


If you are tired of spending every weekend dragging heavy plastic bags of dyed wood chips across your yard, only to watch them fade to a dull, depressing gray by July, you are not alone. I used to do the exact same thing. I would dump tons of that pitch-black corporate mulch around my tomatoes and shrubs, thinking I was doing them a massive favor. Instead, I was baked-earth baking my soil, fighting off weird fungus outbreaks, and watching my plants struggle for air.
The turning point for me was the great squash rebellion of 2016, when my yellow crooknecks literally climbed out of their heavily mulched beds to root in the walking paths instead. That was the summer I realized my expensive, store-bought landscaping habits were actually suffocating my garden.
Switching your garden beds over to organic materials isn’t just a trend; it is the single best thing you can do to save your back, your budget, and your plants this season. When you stop treating your dirt like a stage prop and start treating it like a living ecosystem, everything changes.
Let us break down exactly why those bags of dyed wood chips are sabotaging your backyard, what you should use instead, and how to make the switch without destroying your back or your wallet.
Best Natural Mulch for Vegetable Gardens and Flower Beds
When you start looking for alternatives to the standard commercial options, the sheer volume of choices can feel overwhelming. I have tried just about everything you can drop onto dirt, including a disastrous experiment with un-composted chicken bedding that smelled so bad my neighbors stopped talking to me for a month. Through a lot of trial and error, I have narrowed the playing field down to a few MVP materials that actually deliver on their promises.
Straw and Clean Hay
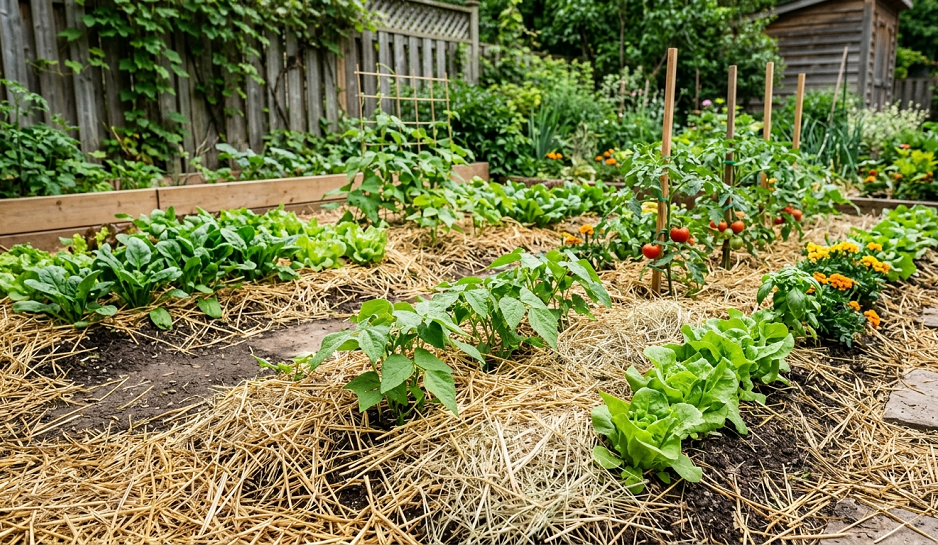
Shredded straw is the absolute gold standard if you are growing food. It reflects light, keeps the soil incredibly cool during hot July afternoons, and breaks down into a beautiful, fluffy humus by the time winter rolls around.
You do need to ensure you are buying straw, not hay. Hay contains seed heads, and if you spread it over your garden, you are essentially planting a dense lawn of pasture grass right in your carrot rows. I made that mistake once, and I spent three months hand-pulling stubborn grass clumps out of my garlic bed.
Look for tight, golden bales at local feed stores rather than the shrink-wrapped versions at big-box centers. It should smell clean and dry. Spread it about three to four inches deep around your peppers, eggplants, and tomatoes, leaving a little breathing room right around the main stems so you don’t invite rot.
Arborist Wood Chips
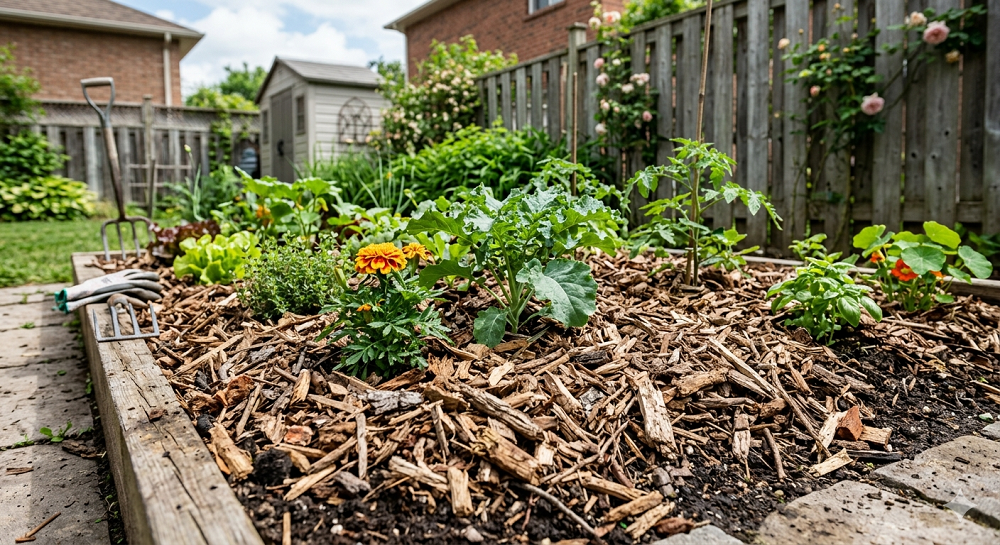
If you have large landscape beds, perennial borders, or fruit tree orchards, you need to find a local tree trimming service and beg them for their wood chips. These aren’t the uniform, sterile chips you buy at the store. This is a chaotic mix of bark, twigs, leaves, and sapwood shredded up together.
This specific combination mimics the natural floor of a healthy forest. The green leaves provide a quick burst of nitrogen as they rot, while the heavy wood chunks break down slowly over several years.
The best part? Most tree crews will dump a massive mountain of this stuff in your driveway completely for free because it saves them a trip to the commercial dump. Just be ready for the sheer volume—the first time a truck dropped a load at my place, my kids used it as a climbing wall for two solid weeks before I managed to shovel it all into the backyard.
Shredded Fall Leaves
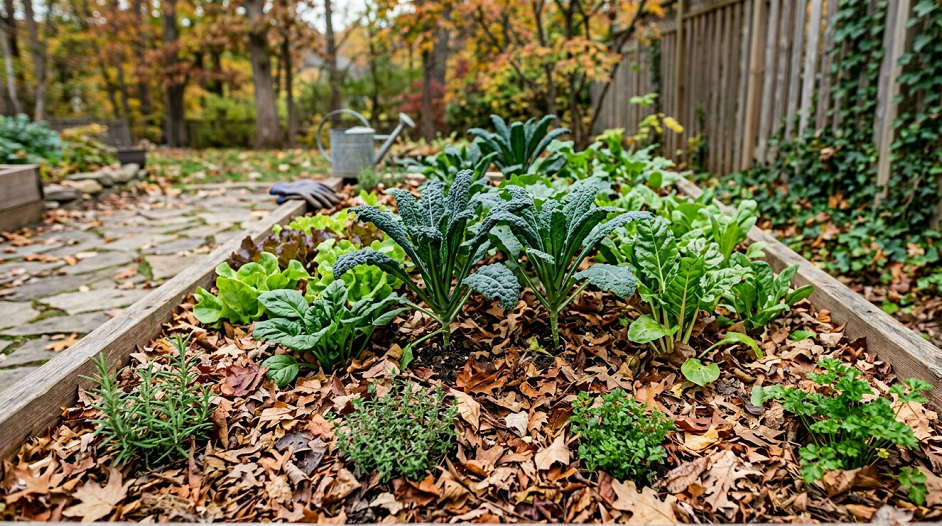
Every autumn, your neighborhood trees drop pure gold right onto your lawn, and most people rake it up, stuff it into plastic bags, and leave it on the curb. I drive around my neighborhood like a scavenger every October collecting those bags from my neighbors’ yards.
Leaves are packed with deep-cycle minerals that tree roots pull up from far below the surface. If you drop them whole onto your garden beds, they will mat down like a wet tarp and suffocate your soil.
You have to shred them first. Run over them with a lawnmower a couple of times until they are broken into nickel-sized pieces, then pile them on. They are incredible for suppressing weeds around berry bushes and long-term perennial structures, and earthworms love them more than almost anything else.
Why Dyed Wood Chips are Ruining Your Garden Soil
The stuff you see piled high in parking lots—the bright red, deep black, and dark brown bags—is often made from shredded industrial waste, old pallets, and construction debris rather than fresh timber. Because this wood is completely dead and bone-dry, it absorbs massive amounts of moisture out of the air and the ground, acting like a giant sponge that prevents water from ever reaching your plants’ root systems.
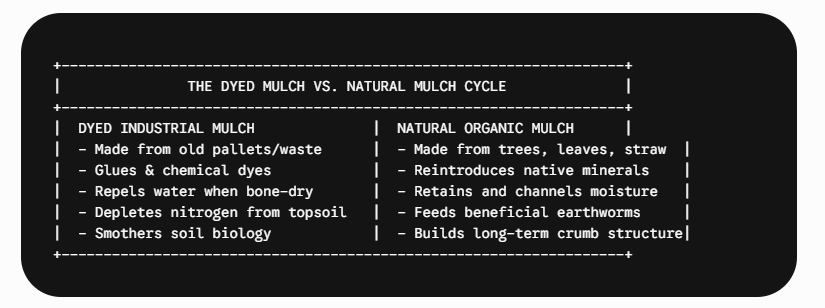
Furthermore, the dyes used to color these products require chemical fixatives to keep them from washing away during the first heavy rainstorm. While many manufacturers swear these colorants are completely safe, I have noticed a distinct lack of earthworm activity under areas treated with dyed black chips compared to areas covered with raw leaves or straw.
When you smother your ground with a thick layer of chemically treated, slow-to-rot wood, you create an anaerobic barrier that cuts off oxygen to the beneficial microbes living in your topsoil. Over a few seasons, your soil becomes hard, compacted, and completely lifeless.
The carbon-to-nitrogen ratio in those commercial bags is also completely out of whack. Because the wood is entirely carbon, the bacteria trying to break it down have to steal nitrogen from the surrounding topsoil just to do their job. This causes a temporary localized nitrogen deficiency right where your young vegetable starts and annual flowers are trying to establish their roots, leading to yellowing leaves and stunted, sluggish growth.
How to Suppress Weeds Naturally with Sheet Mulching
If your garden paths and beds are currently a thriving jungle of dandelion, thistle, and crabgrass, do not reach for the chemical spray bottle. Sheet mulching, which is often called lasagna gardening, is a simple method that smothers existing weeds using simple materials while building premium topsoil right in place.
Step 1: Prep the Area
Do not waste your energy digging out every single weed by hand. Just use a weed whacker or a lawnmower on the lowest possible setting to scalp the target area right down to the soil surface. Leave all the chopped-up plant matter sitting right where it falls—it will decompose and serve as a quick initial meal for your local earthworms.
Step 2: Lay Down the Barrier
Collect a massive stack of plain, unprinted corrugated cardboard boxes or thick sections of black-and-white newspaper. Remove all plastic packing tape, shipping labels, and heavy staples from the cardboard.
Lay the pieces flat over your scalped weeds, ensuring every single edge overlaps by at least six inches. If you leave even a tiny gap between the pieces, a stubborn weed like dahlia or bermuda grass will find the light and shoot straight through your new bed within a matter of days.
Step 3: Soak It Completely
Thoroughly wet down the entire layer of cardboard with a garden hose until it is completely saturated, soft, and forms directly to the contours of the ground below it. This heavy, wet barrier completely cuts off sunlight from the weeds below, halting photosynthesis and forcing them to rot down into the soil.
Step 4: Layer the Organic Matter
Top the wet cardboard with a two-inch layer of nitrogen-rich material, such as fresh grass clippings or well-rotted manure, then finish the whole thing off with a three-to-four-inch layer of your chosen natural mulch. By the time the next spring rolls around, the cardboard will have completely dissolved, the weeds will be gone, and you will be left with rich, loose soil that you can dig into with your bare hands.
Summer Garden Maintenance to Keep Soil Cool and Retain Water
Applying your ground cover is only half the battle; managing it through the intense heat of July and August requires a bit of strategy. The main goal during the dog days of summer is water conservation and protecting delicate root systems from getting baked by high temperatures.
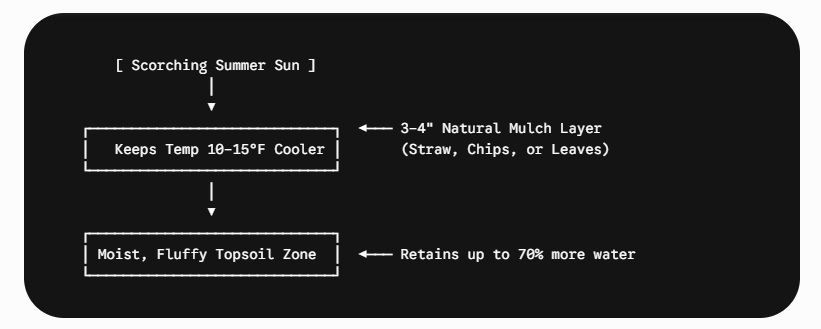
A common mistake I see people make is watering their gardens with short, daily sprinkles that barely wet the top half-inch of their ground cover. This causes water to evaporate before it ever touches the soil, forcing plants to grow weak, shallow roots that shrivel the second the afternoon sun hits them.
Instead, pull back your ground cover once or twice a week and run a slow, deep soaking system right at the base of your plants, then push the material back into place to lock that moisture deep down where it belongs.
Keep an eye out for a strange, bright orange or yellow growth that looks exactly like scrambled eggs expanding across your wood chips. This is a completely harmless organism called slime mold, or more colloquially, “dog vomit fungus.”
When I first found a giant patch of it next to my perennial herbs, I panicked and tried to kill it with a solution of baking soda and vinegar. Don’t bother doing that. It is just a sign that your ground cover is actively decomposing and doing its job—simply scrape it off with a shovel and toss it into your compost pile if you can’t stand looking at it.
Real Talk: Gardening Pitfalls and Waste-of-Money Products
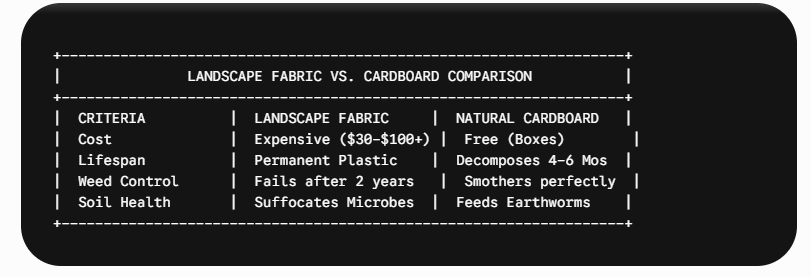
Let us get real for a minute about some of the absolute garbage products being pushed on everyday backyard growers. Landscape fabric is the biggest scam in the entire home improvement industry, and I will stand by that statement until the day I die.
It looks great on home renovation television shows when they roll it out over pristine dirt, but in the real world, it is a complete nightmare. Within two seasons, dust, dirt, and decaying organic matter blow right on top of the fabric, creating a perfect seedbed for weeds.
The roots of those weeds grow straight down through the woven plastic cloth, making them nearly impossible to pull out without tearing up the entire system. Meanwhile, the fabric below completely blocks earthworms from surfacing, traps gasses in the soil, and creates a dead zone underneath. Save your hard-earned money and use free cardboard instead.
Another massive waste of time is buying individual small bags of clean-washed cocoa bean hulls. Yes, they smell amazing for the first week, almost like your backyard has been converted into a high-end chocolate factory, but they have major drawbacks.
They are incredibly light, meaning a single thunderstorm will wash them right out of your beds and down the driveway. More importantly, they contain theobromine, the exact same chemical that makes chocolate toxic to dogs, so if you or your neighbors have curious pets, you are introducing a major safety hazard to your yard.
You also need to watch out for the depth of your application. Piling wood chips up against the base of your trees in a giant cone shape—frequently called “volcano mulching”—is a guaranteed way to slowly kill your trees.
Bark needs access to air to protect the trunk. When you trap constant moisture against the base of a tree, the bark rots, pests move in, and you create an open invitation for fungal infections that can destabilize the entire root system. Keep the base of your plants clear, creating a small doughnut-shaped ring rather than a mountain.
Parting Wisdom for a Thriving Summer Landscape
If you make the switch to raw, natural materials this season, your garden will thank you for it almost immediately. Stop trying to make your backyard look like a sterile, synthetic corporate office park. Embrace the natural texture of leaves, straw, and raw chips, and let the soil biology do the heavy lifting for you while you sit back with a cold drink and enjoy your summer.
What kind of materials are you currently using to protect your beds this season? Have you ever had a major garden disaster with store-bought bags like I did? Let us talk about it in the comment section below—I read every single one and would love to help you troubleshoot your yard!