12 Fun and Junky Planters for Your Yard

Fun and Junky Planters for Your Yard

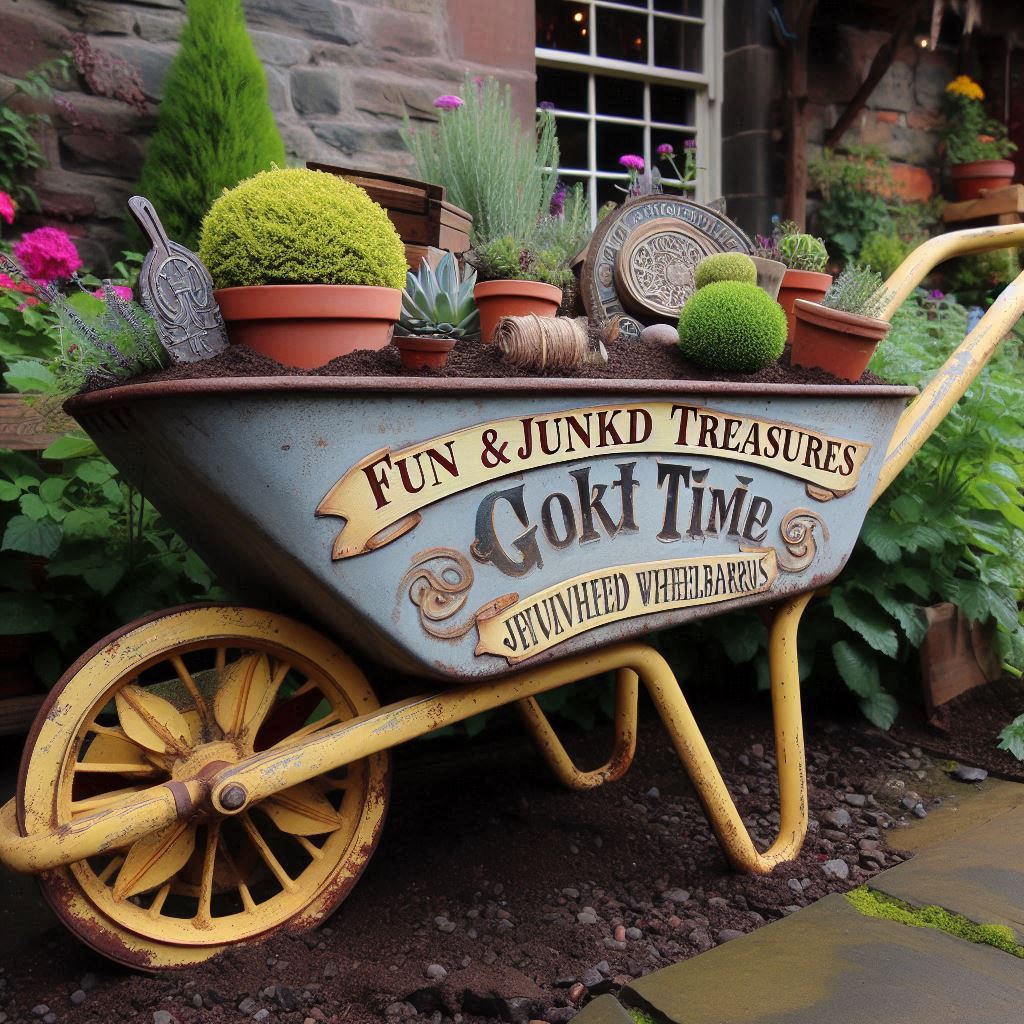
Plants have the incredible power to transform any outdoor space. They add pops of color, soften harsh lines, and create a sense of life and vibrancy.  But have you ever considered using something other than the standard clay pot to house your leafy friends?  The world of planters is expanding, and the trend of using unexpected and upcycled items is taking root! Gone are the days of boring, mass-produced planters. Today, it’s all about embracing the unique and unconventional.  “Junky” planters, as they’re affectionately called, are all about using everyday objects, vintage finds, or even cast-offs to create quirky and conversation-starting homes for your plants. Benefits Of Junky Planters So, why choose junky planters? Here are just a few reasons: Unleashing Your Inner Upcycler: The Magic of Junky Planters “Junky” doesn’t mean ugly!  These planters are all about embracing imperfections and finding beauty in the unexpected. They add a touch of whimsy and character to your yard, turning everyday objects into functional works of art. The possibilities are truly endless! From mismatched boots overflowing with colorful blooms to a vintage bathtub transformed into a miniature herb garden, junky planters are a great way to add personality and a touch of surprise to your outdoor space. Here’s the best part: upcycling is easier than you think! With a little creativity and some basic DIY skills, you can transform almost anything into a charming planter. 12 Fun and Junky Planter Ideas to Get You Started Ready to ditch the boring clay pots and get creative with your planters? Here are 12 inspiring ideas to get you started: 1. Reimagined Treasures: A Second Life for Old Boots Have a pair of old rain boots gathering dust in the back of the closet? Don’t toss them out! With a little TLC, they can be transformed into charming and unexpected planters. 2. Wheelie Good Time: Revamped Wheelbarrows Looking for a statement piece for your yard? Look no further than an old, rusty wheelbarrow! 3. Tubby Time: Bathtubs as Statement Planters Who says bathtubs are only for bathing? With a little imagination, a reclaimed bathtub can become the centerpiece of your garden. 4. Let’s Get Cooking: Teapots for Tiny Blooms Don’t let those chipped or mismatched teapots languish in the back of the cupboard! They can be transformed into charming miniature planters for your porch or patio. 5. Shoe Biz in the Garden: Repurposed Shoes Don’t throw away those old sneakers or mismatched high heels! With a little TLC, they can be transformed into quirky and conversation-starting planters. 6. Swinging Success: Upcycled Tire Swings Calling all nostalgic gardeners! Take a trip down memory lane by transforming an old tire swing into a hanging planter. 7. Birdbath Bonanza: A Refreshing Oasis for Plants Too Give your feathered friends a break and repurpose an old birdbath into a charming planter. 8. Mailbox Magic: Reimagining Delivery Destinations Give your retired mailbox a new purpose as a charming planter. 9. Tin Can Treasures: Upcycled Containers of Creativity Don’t toss those empty food cans! With a little TLC, they can be transformed into a collection of mini planters. 10. Crafty Crates: Repurposed Containers for Climbing Companions Give old wooden crates a second life as rustic planters for climbing plants. 11. Guttering Greenery: Repurposed Rainwater Pathways Turn old gutters into a unique and functional planter system. 12. Lantern Light Upcycled: A Glowing Oasis for Plants Give an old lantern a new purpose as a home for shade-loving plants. Conclusion Junky planters are a fun, creative, and budget-friendly way to add personality and charm to your outdoor space. They’re a conversation starter guaranteed to spark curiosity and admiration from visitors. But beyond the aesthetics, upcycling everyday objects into planters is a sustainable choice that reduces waste and gives new life to unwanted items. So next time you’re cleaning out your garage or browsing a thrift store, keep your eyes peeled for potential planter candidates! With a little imagination and some basic DIY skills, you can transform almost anything into a unique and functional home for your plants. Here are some additional tips to ensure your junky planters thrive: Share Your Junky Planter Creations! We’d love to see your junky planter creations! Share photos of your upcycled planters and inspire others on the comment section below using the hashtag #JunkyPlanterLove.

17 Best Rustic Vintage Porch Décor Ideas To Create A Cozy Mood

Rustic Vintage Porch Décor Ideas

There’s just something magical about a rustic vintage porch — the way it instantly feels like home. Every time I step onto one, I’m reminded of simpler days, where chipped paint told stories and weathered wood held years of laughter and family gatherings. Creating that kind of cozy, nostalgic vibe on your own porch doesn’t have to be complicated or expensive. It’s all about layering textures, mixing old with new, and adding those thoughtful little details that make the space feel warm and lived-in. In this post, I’m sharing 17 of my favorite rustic vintage porch décor ideas that can completely transform your outdoor space into a cozy retreat. Whether you love the farmhouse charm of galvanized planters, the romance of string lights, or the inviting touch of a vintage rocking chair, there’s something here that will spark your creativity. And if you’re not much of a DIYer or simply don’t have the time, I’ve included some ready-made products you can grab on Amazon to help you achieve that perfect rustic look without the extra work. The Enchantment of Rustic Vintage Porch Decor But what exactly is rustic vintage, and why is it so captivating? Imagine stepping onto a porch with a weathered wooden door adorned with a vintage welcome sign. A repurposed metal bucket overflowing with colorful flowers flanks the entrance, while a vintage rug, repurposed as a doormat, adds a touch of warmth. This is the essence of rustic vintage – a blend of natural textures, muted colors, and vintage finds that whisper stories of the past. But the allure goes beyond mere aesthetics. Rustic vintage decor evokes a sense of coziness, a feeling of stepping back into a simpler time. It’s about creating a space that feels inviting and familiar, a place where you can relax and unwind amidst the beauty of the outdoors. Vintage pieces, especially, hold a special place in our hearts. They carry the weight of history and tell stories of their past lives. Owning a vintage item allows us to connect with the past, to feel a sense of continuity with generations gone by. 17 Breathtaking Rustic Vintage Porch Decor Ideas Now that you’ve been introduced to the magic of rustic vintage decor, let’s get down to the fun part – creating your own cozy haven! Here are 17 breathtaking ideas to inspire you: 1. Welcoming Entrance with Upcycled Charm The entrance to your porch is the first impression, so make it count! Start with a weathered wooden door that exudes rustic charm. Above it, hang a vintage welcome sign – it can be anything from a hand-painted wooden board to a metal sign with aged lettering. On either side of the door, place repurposed metal bucket planters overflowing with colorful flowers. To add a touch of whimsy, consider using an old watering can transformed into a hanging planter. Finally, lay down a vintage rug, repurposed as a doormat, to add a pop of color and texture. Upcycled Touches: Don’t have a metal bucket planter? No problem! Repurpose an old paint can by cleaning it thoroughly and drilling drainage holes. Paint it a cheerful color and plant your favorite flowers. Instead of buying a new doormat, breathe new life into an old throw rug. Choose one with a muted color palette and interesting patterns that complement your rustic vintage theme. Tips: 2. Rustic Seating Nook for Relaxation Your porch should be a place where you can unwind and soak in the fresh air. Create a cozy seating nook with a pair of vintage rocking chairs or a weathered wooden bench. Add a splash of color and comfort with throw pillows featuring vintage patterns. A small side table beside the seating provides a convenient spot for drinks and books. Upcycled Touches: Don’t have rocking chairs or a bench? Get creative! An old ladder can be repurposed into a charming plant stand, and a stack of vintage suitcases can be transformed into a unique side table. Give old throw pillows a new lease on life by recovering them with vintage fabric scraps. This is a great way to add a touch of personality and upcycle unwanted textiles. Tips: 3. A Touch of Whimsy with Upcycled Birdhouses Birdhouses add a touch of whimsy and charm to any porch. Hang a collection of vintage birdhouses in different shapes and sizes from the porch ceiling or display them on a table. Don’t be afraid to mix and match styles and colors for a playful look. Upcycled Touches: Unleash your inner DIY spirit! Transform old tin cans into miniature birdhouses. Clean them thoroughly, paint them in cheerful colors, and add a small perch for feathered friends. Decorate your birdhouses with natural elements. Glue twigs and moss onto the exteriors for a rustic touch, or create tiny nesting materials using shredded fabric scraps. Tips: 4. Rustic Garland for a Storybook Entrance A handcrafted or store-bought garland adds a touch of whimsy and welcomes guests to your porch. Look for garlands made with natural materials like burlap, twine, and dried flowers for a rustic feel. Upcycled Touches: Give your garland a personal touch! String vintage buttons or keys onto the twine for a unique look. Upcycle fabric scraps from old clothes to create colorful fabric flowers and add them to the garland for a touch of texture and personality. Tips: 5. Rustic Lantern Light for Evening Ambiance As the sun sets, transform your porch into a magical haven with the warm glow of rustic lanterns. Vintage lanterns, with their aged metal and flickering candlelight (or fairy lights for a safer option) add a touch of timeless charm. Upcycled Touches: Don’t have a vintage lantern? No worries! Repurpose an old metal bucket or even a large glass jar into a lantern. Drill small holes for ventilation if using candles and decorate them with lace or twine for a rustic touch. Tips: 6. Vintage Signage for a Personalized Touch Vintage signs are a fantastic way to add a touch of personality to … Read more

21 Spring-Inspired Tiered Tray Styling Ideas

Spring-Inspired Tiered Tray Styling Ideas

Spring whispers promises of renewal, bursting forth with vibrant colors, gentle breezes, and the sweet fragrance of blooming flowers. As the season awakens, our homes often crave a similar refresh.  Tiered trays have become a popular decorating trend, offering a charming platform to showcase seasonal vignettes.  This spring, ditch the store-bought décor and embrace creativity!  By upcycling everyday items and incorporating thrifted treasures, you can craft unique and budget-friendly tiered tray displays that celebrate the essence of spring. The Art of Tiered Tray Styling Before we begin on the specific ideas, let’s explore some general tips for creating visually appealing tiered tray displays.  Think of your tiered tray as a miniature stage where you’ll tell a spring story.  Here are a few foundational concepts: 21 Breathtaking Spring-Themed Tiered Tray Ideas Now, let’s get creative with some upcycled and thrifted spring-inspired tiered tray ideas! 1. Rustic Springtime: Theme: Capture the essence of a natural springtime scene with earthy textures and pops of color. Tier 1: Moss Marvels: For the bottom tier, create a bed of springtime growth using moss balls or preserved sheet moss. You can find moss balls at craft stores or online retailers. Tier 2: Mini Birdhouse Bonanza: Thrifted stores are treasure troves for miniature birdhouses. Look for houses in various styles and colors to add a touch of whimsy. Tier 3: Galvanized Metal Magic: Repurpose a small galvanized metal bucket as a planter. Fill it with colorful spring bulbs like tulips, daffodils, or hyacinths for a burst of color. Upcycled Touches: 2. Pastel Paradise: Theme: Create a soft and sweet spring atmosphere with pastel colors and delicate florals. Tier 1: Stacked and Sweet: Use a set of vintage plates or mismatched pastel-colored plates in varying sizes. Stack them on the bottom tier for a touch of elegance. Tier 2: Pastel Floral Flair: Spring is synonymous with blooming flowers. Create a miniature floral arrangement using artificial flowers in soft pastel shades like lavender, baby pink, and mint green. Opt for small blooms in a bud vase or teacup for a delicate touch. Tier 3: Bunny Bonanza: No springtime scene is complete without a touch of Easter cheer. Look for a charming bunny figurine at a thrift store and add a miniature carrot sign for a playful touch. Thrifted Treasures: 3. Butterfly Bonanza: Theme: Celebrate the beauty and symbolism of butterflies in springtime with a whimsical and colorful display. Tier 1: Pebble Path: Scatter decorative pebbles in various colors on the bottom tier. You can find these at craft stores or garden centers. Cut out butterfly shapes from colorful construction paper or felt and add them to the pebbles for a touch of whimsy. Tier 2: Mini Watering Can Charm: Look for a miniature watering can made of metal or ceramic at a thrift store. This practical garden tool adds a touch of springtime functionality to your display. Tier 3: Paper Butterflies in Flight: Fill a small glass jar with colorful paper butterflies. You can create your own butterflies using origami techniques or purchase pre-made paper butterflies from craft stores. Upcycled Touches: Instead of buying decorative pebbles, consider using leftover buttons in various colors and sizes. Arrange them on the bottom tier to create a whimsical pathway for your paper butterflies. If you have any old glass jars lying around, give them a new lease on life! Clean them thoroughly and remove any labels. You can even paint the jar a light pastel color for a more customized look. 4. Farmhouse Fresh: Theme: Embrace the rustic charm of a farmhouse aesthetic for spring with natural textures and pops of color. Tier 1: Galvanized Metal Magic: Repurpose another galvanized metal tray as the base for this tier. Arrange a collection of mason jar lids in different sizes for a touch of vintage farmhouse charm. Tier 2: Stacked and Stacked Again: Find a couple of vintage books with worn leather covers at a thrift store. Stack them on the second tier and tuck a sprig of fresh or artificial spring greenery (like eucalyptus or rosemary) between the books for a touch of life. Tier 3: Enamel Pitcher Perfection: Look for an enamel pitcher in a classic white or pastel color at a thrift store. Fill it with artificial Easter eggs in various patterns and colors. You can even mix in some natural elements like colorful quail eggs for a more rustic touch. Thrifted Treasures: Keep an eye out for old wooden crates or small boxes at thrift stores. These can be used as a base for your tiered tray, adding a rustic touch and extra display space. Vintage milk jugs or watering cans can be a charming alternative to the enamel pitcher in Tier 3. 5. Tea Time in the Garden: Theme: Create a whimsical scene reminiscent of an afternoon tea party in a blooming garden. Tier 1: Mismatched Floral Symphony: Embrace the vintage charm of mismatched floral saucers. Look for saucers in a variety of colors and floral patterns at thrift stores. Tier 2: Miniature Teacup Delights: Find a collection of miniature teacups at a thrift store. Fill each teacup with a single, delicate spring flower like a small rosebud or a sprig of violets. Tier 3: Decorative Birdcage Beauty: A decorative birdcage can be the perfect centerpiece for this whimsical display. Look for a birdcage with interesting details or a light, pastel color. You can even place a small bird figurine inside the cage for an extra touch of charm. Upcycled Touches: If you have any old teacups or saucers that are chipped or cracked, don’t toss them! You can use them as part of your tiered tray display. Line the bottom tier with a piece of lace or a doily you no longer use for a touch of vintage elegance. 6. Citrus Sunshine: Theme: Capture the bright and cheerful energy of spring with a citrus theme that bursts with color and vibrancy. Tier 1: Decorative Citrus Delight: Arrange artificial lemons and limes on the bottom tier for a … Read more

17 Sustainable Home Décor DIY Ideas Using Recycled and Thrifted Finds

Over the years, I’ve fallen in love with the idea that beautiful home décor doesn’t have to come at the expense of the planet—or my wallet. Some of the most charming, conversation-starting pieces in my home are actually made from recycled materials or thrifted finds I’ve reimagined with a little creativity. There’s something deeply satisfying about giving new life to something that might have otherwise been discarded. It’s not just about saving money; it’s about creating a home that tells a story—one that’s full of character, intention, and heart. When I first started experimenting with sustainable décor, I was surprised at how simple it could be. A coat of paint here, a repurposed fabric there, and suddenly, that old vase or forgotten chair becomes something entirely new. The beauty of DIY upcycling is that it’s accessible to everyone—you don’t need fancy tools or professional skills, just a bit of imagination and a willingness to see potential in the overlooked. In this post, I’ll share some of my favorite sustainable home décor DIY ideas using recycled and thrifted finds—projects that not only reduce waste but also fill your space with creativity and purpose. 1. Upcycled Spring Wreaths Wreaths are a timeless way to add a touch of spring charm to your door or walls. Let’s create a beautiful wreath using everyday items you might already have or can find at a thrift store. Materials: Instructions: Variations: 2. Thrifted Picture Frame Makeover Thrift stores are treasure troves of old picture frames that can be easily transformed into beautiful spring decor pieces. Materials: Instructions: Variation: Decoupage Delight: Instead of paint, use spring-themed scrapbook paper to decoupage the frame. Cut out floral patterns or Easter egg designs from the paper and use Mod Podge to adhere them to the frame. 3. Upcycled Tin Can Vases Don’t toss those empty tin cans! With a little creativity, they can be transformed into charming and functional spring vases. Materials: Instructions: Finishing Touches: Variation: Tiered Treasure: Create a stunning centerpiece by grouping painted tin cans of different sizes. Glue them together in a tiered formation using a hot glue gun or craft glue. 4. Lightbulb Garland Give those burned-out lightbulbs a new lease on life by transforming them into a whimsical lightbulb garland! Materials: Instructions: Variation: Egg-cellent Garland: Turn your lightbulb garland into an Easter-themed decoration! Paint the lightbulbs to resemble Easter eggs with fun patterns and designs. You can even add small ribbons or twine bows to the tops for a festive touch. 5. Teacup Candle Holders Embrace the charm of vintage teacups and saucers found at thrift stores and turn them into unique and elegant candle holders. Materials: Instructions: Variation: Nature’s Touch: For an extra touch of spring, fill the teacup with decorative moss or Easter grass before placing the candle inside. This adds a natural element and complements the spring theme. 6. DIY Fabric Easter Baskets Skip the store-bought Easter baskets and create your own unique and reusable fabric ones! Materials: Instructions: Variation: Egg-cellent Basket:  Create a vibrant and fun Easter basket by using fabric scraps with Easter egg patterns or brightly colored polka dots. 7. Spring Mason Jar Luminaries Mason jars are another versatile item that can be easily transformed into beautiful spring decorations. Materials: Instructions: Variations: 8. Upcycled Tin Can Wind Chimes Give those leftover tin cans a musical makeover! Materials: Instructions: 9. Repurposed Chair Spring Planters Turn those old, discarded chair springs into unique hanging planters! Materials: Instructions: Variation: Spring Bouquet: For a more elaborate display, group several hanging chair spring planters together, creating a vibrant and cascading spring bouquet. 10. Vintage Suitcase Flower Box Give a new lease on life to a vintage suitcase and transform it into a charming flower box! Materials: Instructions: 11. Upcycled Book Page Wreath Repurpose old books into a beautiful and literary spring wreath! Materials: Instructions: 12. Tin Can Mailbox Bird Feeder Transform a recycled tin can into a charming bird feeder for your spring garden! Materials: Instructions: Variation: Mailbox Magic: Lean into the “mailbox” theme by adding a small cutout paper flag to the front of the can. 13. Repurposed Ladder Plant Stand Give a new purpose to a vintage ladder and create a unique plant stand for your spring garden. Materials: Instructions: Variation: Multi-Level Magic: If your ladder is large enough, create a multi-level plant stand by placing smaller potted plants on a sturdy shelf secured across a few rungs. 14. Mismatched Teacup Bird Bath Turn a mismatched teacup and saucer into a charming bird bath for your feathered friends! Materials: Instructions: 15. Vintage Suitcase Seed Packet Holder Repurpose a vintage suitcase into a charming and practical seed packet organizer for your spring garden! Materials: Instructions: 16. Upcycled Glass Jar Terrariums Transform old glass jars into miniature spring gardens with these beautiful terrariums! Materials: Instructions: Variation: Fairy Tale Forest: For a more whimsical touch, create a miniature fairy tale forest scene inside your terrarium. Use small twigs, moss, and miniature figurines of fairies or woodland creatures. 17. Repurposed Window Frame Herb Garden Give a new purpose to an old window frame and create a charming vertical herb garden for your spring kitchen! Materials: Instructions: Wrap Up At the end of the day, sustainable home décor is about more than just crafting pretty things—it’s about shifting the way we think about consumption and creativity. Every thrifted frame, repurposed jar, or upcycled piece of furniture becomes a reminder that style and sustainability can beautifully coexist. What I love most about these projects is how personal they feel. Each piece carries a bit of history and a lot of heart, making your home truly one of a kind. As I look around my space now, I see so many pieces that started as “junk” and ended up becoming part of my story. That’s the real joy of decorating sustainably—you’re not just designing a home, you’re curating meaning. So, the next time you’re tempted to toss something out or scroll for new décor, take a second look … Read more

16 Easy Tips for Decorating with Houseplants!

Decorating with Houseplants

Houseplants have exploded in popularity in recent years, and for good reason. Not only do they add a touch of life and beauty to any space, but they also offer a surprising number of benefits. Studies have shown that houseplants can improve air quality by filtering out toxins, reduce stress levels, and even boost creativity.  Whether you’re a seasoned plant parent or a curious beginner, incorporating greenery into your home decor is a rewarding and accessible way to enhance your living environment.  This blog will equip you with 16 easy tips to transform your space into a thriving urban jungle, fostering a connection with nature and creating a more vibrant and life-giving atmosphere. 1. Choose the Right Plant for the Right Light: Just like us, plants have specific needs to thrive. One of the most crucial factors for a houseplant’s health is light. Understanding a plant’s light requirements is essential for choosing the right specimen for your space. Here’s a breakdown of common houseplant categories based on their light needs: Pro Tip: Not sure how much light a particular spot in your home receives? Invest in a light meter, a handy tool that measures light intensity. This can help you determine the perfect location for your light-sensitive plant friends. 2. Elevate Your Indoor Jungle: Choosing the Perfect Plant Stand Plants add life and beauty to any space, but the right stand can truly elevate your indoor jungle. You need to find the perfect match for your greenery based on the following factors: 3. Consider Plant Size and Scale: Just like furniture placement, the size and scale of your houseplants play a crucial role in creating a visually pleasing arrangement.  Imagine a towering monstera deliciosa dwarfing a delicate maidenhair fern – not the most harmonious pairing! Here’s a basic guide to choosing the right size plant for the space: 4. Hang in There: Selecting the Perfect Planter Hanging Hooks Hanging planters are a fantastic way to add a touch of vertical greenery and free up precious floor space. But before your plants become airborne, choosing the right hanging hooks is crucial! When choosing your planter hooks, ensure both style and safety for your leafy friends. Here’s what you need to consider: 5. Group Plants for Impact: A single houseplant can add a touch of nature, but a well-curated grouping creates a lush and inviting atmosphere. Grouping plants with varying heights, textures, and foliage colors adds visual interest and depth to your decor. Here are some tips for creating a successful plant grouping: 6. Think Beyond the Pot: Explore Ceramic and Terracotta Planters The humble pot plays a significant role in the overall aesthetic of your plant display.  Choosing stylish planters that complement your existing decor can elevate your houseplants from functional objects to design statements. Here are some planter material options to consider: 7. Let There Be Light (Literally): Explore Full-Spectrum Grow Lights Not all homes are blessed with abundant natural light. If your space leans towards the dim side, fear not!  Supplemental lighting can be a game-changer for low-light-loving plants. Here are a few options to consider: Pro Tip: When using supplemental lighting, position the light source close to the plant (around 12-18 inches) and ensure it receives the recommended amount of daily light exposure (typically 8-12 hours). 8. Embrace the Vertical Space: Don’t limit your plant life to tabletops and shelves! Utilize vertical space with hanging plants to create a cascading effect and add another dimension to your decor. Here are some hanging plant options to explore: 9. Don’t Be Afraid to Experiment (and Repot!): Finding the perfect spot for your plant companions can sometimes be a process of trial and error. Don’t be afraid to experiment and move your plants around until you discover their ideal location.  Here are some additional tips: Pro Tip: When repotting, choose a pot that is only 1-2 inches larger in diameter than the current pot.  Overpotting can lead to root rot, so err on the side of a slightly smaller container. 10.  Craft a Terrarium Tableau: Curate Miniature Worlds: Terrariums offer a captivating way to showcase miniature ecosystems within a glass container.  Layer pebbles for drainage, add a charcoal filter, and use a variety of small plants with contrasting textures and colors. Include mosses, ferns, and tiny succulents to create a miniature jungle or a desert landscape. Terrariums are perfect for adding a touch of life to desks, coffee tables, or even mounted on walls. 11.  Embrace Biophilic Shelves: Design Living Walls: Shelving units don’t have to be solely for books and knick-knacks.  Transform them into living walls by incorporating a variety of small to medium-sized plants. Use a mix of wall-mounted planters, floating shelves, or tiered plant stands to create a vertical garden. Opt for trailing plants like pothos or string of pearls that cascade over the edges, adding a touch of whimsy and lushness. 12.  Repurpose with Purpose: Upcycled Plant Displays: Get creative and breathe new life into old objects by turning them into unique plant holders.  An old teapot with drainage holes drilled in the bottom becomes a charming planter for a flowering violet.  Repurpose vintage suitcases as plant stands for larger plants, or use a rustic wooden ladder to create a vertical display for climbing vines. 13.  Embrace the Unexpected: Plants as Art Installations: Think beyond the traditional pot.  Air plants, with their unique shapes and textures, can be displayed in artistic ways.  Attach them to driftwood branches or arrange them in glass orbs suspended from the ceiling.  Climbing vines can be trained to grow on wire structures, creating living sculptures. 14.  Light Up the Night: Plants with Illuminated Accents: Combine the beauty of houseplants with the ambiance of soft lighting. Strategically place LED strip lights around the base of your plants to create an ethereal glow.  For a touch of whimsy, use fairy lights woven through the foliage of trailing plants. Opt for warm white or colored lights to create a specific mood or atmosphere. 15.  … Read more

17 Easy Ways to Transition Home Décor from Winter to Early Spring

Easy Ways to Transition Home Décor from Winter to Early Spring

Stop staring at that dusty evergreen garland. I get it—it’s February, the sky is the color of a wet sidewalk, and you’re currently huddled under three weighted blankets. But keeping your house in “winter mode” until May is a recipe for seasonal blues. Trust me, I once left my heavy velvet curtains up until July, and I’m pretty sure I grew actual moss on my shins. Transitioning your home for spring isn’t about a total gut renovation. It’s about tricking your brain into thinking the sun is actually out. Here are 17 ways to kick winter to the curb without breaking your back or your bank account. 1. Swap Heavy Textiles for Breathable Fabrics If your living room feels like a grizzly bear’s den, it’s time to strip. I’m talking about those wool throws and faux-fur pillows that seemed like a great idea in December. By mid-February, they just trap cat hair and sadness. I once tried to keep a chunky knit throw on the sofa year-round, and by April, it felt like I was being hugged by a hot radiator. Pull out the linen, cotton, and lightweight blends. These fabrics let the air move, which is exactly what you need when the heater is still kicking on but the afternoon sun starts hitting the windows. It’s a psychological shift—seeing a light, breezy fabric makes the whole room feel five pounds lighter. Don’t feel like you need to buy all new inserts, either. Just grab some cheap linen covers. I’ve found that high-end silk covers are a total waste of money for a high-traffic living room; they snag the second a fingernail or a dog paw touches them. Stick to durable cotton or flax linen that you can actually throw in the wash. 2. Refresh Your Entryway with a Spring Doormat Your front door is the first thing you see when you trudge home from work, and if there’s a salt-stained “Let it Snow” mat greeting you, you’re going to stay in a winter headspace. I learned this the hard way when I slipped on a frozen slush-pile right onto a “Merry Christmas” mat in late March. It was embarrassing and entirely preventable. Look for a natural coir mat with a simple floral or geometric pattern. Better yet, layer it. Put a slightly larger, washable outdoor rug underneath it for that “I have my life together” look. It adds a pop of color and keeps the mud from your boots from migrating into the hallway. Make sure you actually scrub the threshold while you’re at it. A winter’s worth of road salt and grime builds up in the cracks. A quick sweep and a fresh mat tell your brain that the seasons are changing, even if there’s still a stubborn pile of snow in the corner of the yard. 3. Brighten Up Walls with Removable Wallpaper If your walls feel like they’re closing in after three months of darkness, give them a “fake” makeover. I’m a huge fan of peel-and-stick wallpaper for accent walls. It’s the ultimate low-commitment relationship. Back in my early DIY days, I painted a room “Sunset Orange” thinking it would feel like spring—it actually just looked like the inside of a Cheeto bag. Using a light, botanical print or a soft pastel stripe on a single wall can completely change the luminosity of a room. It reflects the returning natural light instead of soaking it up like a sponge. And the best part? If you hate it by the time summer rolls around, you just peel it off. No sanding, no priming, no tears. When you’re searching for patterns, avoid anything too “busy” or dark. You want something that feels airy. I’ve found that “watercolor” styles work best for early spring because they mimic the soft, hazy light we get during the transition. It makes the room feel expansive rather than cluttered. 4. Introduce Live Greenery and Potted Bulbs Artificial plants are fine for high shelves where you can’t reach, but for early spring, you need the real deal. There is nothing like the smell of actual dirt to remind you that life exists. I once tried to pass off a plastic ivy plant as “spring decor,” but my cat chewed a leaf off and looked at me with such betrayal that I went straight to the nursery. Grab some potted tulips, hyacinths, or daffodils from the grocery store. You don’t even have to plant them outside yet. Just stick the plastic pots inside some pretty ceramic crocks. They bring immediate color and a scent that screams “winter is over” much louder than any candle ever could. Once the blooms fade, don’t toss them! Keep the bulbs, let the leaves die back naturally, and toss them in the garden later. It’s the gift that keeps on giving. If you’re a “black thumb” like I used to be, start with a snake plant or a pothos. They are basically impossible to kill, even if you forget they exist for two weeks. 5. Transition Your Scent Profile If I walk into a house in March and it still smells like “Cinnamon Spiced Cider” or “Fraser Fir,” I feel like I’m stuck in a time loop. Your sense of smell is the fastest way to change your mood. I used to hoard “Midnight Forest” candles until I realized they were making my house feel dark and heavy during the day. Switch to citrus, eucalyptus, or light floral scents. Think lemon, grapefruit, or fresh linen. You want scents that feel “clean” rather than “cozy.” It’s like opening a window without actually letting the 40-degree air inside. I’m also a big proponent of essential oil diffusers for this time of year. A mix of lemon and peppermint is like a shot of espresso for your house. It wakes the space up. Avoid those super-sugary “Cupcake” or “Cookie” scents; they’re too heavy for the transitional period. You want crisp, not cloying. 6. Audit Your Bookshelf Decor Bookshelves tend to become “clutter … Read more

Spring Fireplace Décor: 15 Fresh & Fabulous Ideas You Can Use!

Spring Fireplace Decor

Spring has sprung! The days are getting longer, the birds are singing, and there’s a vibrant energy in the air. It’s time to shed the cozy vibes of winter and refresh your home decor to reflect the new season. And what better place to start than your fireplace mantel? The fireplace mantel is a focal point of most living rooms, and it’s the perfect canvas to showcase your seasonal style. Whether you crave a burst of color, a touch of whimsy, or a minimalist aesthetic, there’s a spring fireplace decor idea out there waiting to be brought to life. 15 Spring Fireplace Decor Ideas to Embrace the Season Let’s now explore 15 fresh and fabulous ideas to transform your fireplace mantel into a stunning springtime masterpiece. We’ll cover a variety of styles and budgets, so get ready to find inspiration that perfectly suits your taste! 1. Floral Fantasia: Let the Blooms Take Center Stage Spring is synonymous with blooming flowers, and there’s no better way to embrace the season than by incorporating them into your fireplace decor. Here are a few ways to bring the floral magic to your mantel: Pro Tip: Don’t forget to care for your fresh flowers and plants! Regular watering and proper sunlight will ensure they stay vibrant and beautiful throughout the spring season. 2. Light & Airy Appeal: Embrace the Longer Days As the days become longer and the sun shines brighter, create a light and airy feel on your fireplace mantel that reflects the changing season. Here’s how: Pro Tip: Play with the arrangement of your lanterns and vases. Group them together in a cluster for a cozy feel, or arrange them at different heights for a more dynamic display. 3. A Touch of Whimsy: Infuse Your Mantel with Playful Charm Spring is a time for joy and renewal. Capture that playful spirit by adding a touch of whimsy to your fireplace mantel. Here are some ideas to get you started: Pro Tip: When using figurines or vintage pieces, curate them carefully to avoid cluttering the space. Choose a few key pieces that complement your overall theme and arrange them with intention. 4. Embrace the Colors of Spring: A Vibrant Celebration Spring is a season bursting with color, and your fireplace mantel can be a canvas to showcase this vibrant palette. Here are some ways to add a pop of color to your spring decor: Pro Tip: If you’re hesitant to commit to a bold color on your mantel itself, using colorful accents is a great way to add pops of spring without overwhelming the space. 5. Rustic Elegance: Warm & Inviting with Natural Elements For those who love a warm and inviting atmosphere, consider a rustic elegance approach to your spring fireplace decor. Here’s how to achieve this look: Pro Tip: When using natural elements, ensure they are clean and well-maintained. You can also add a touch of color with painted accents on the wooden pieces or incorporate colorful ribbons or twine into your arrangement. 6. Minimalist Marvel: Less is More with a Statement Piece Spring decor doesn’t have to be elaborate. If you prefer a clean and minimalist aesthetic, you can still achieve a beautiful spring look with a focus on a single statement piece. Here are some ideas: Pro Tip: When using a minimalist approach, ensure the quality and visual weight of your chosen pieces are strong enough to hold their own as the focal point of your mantel decor. 7. Mix & Match Magic: Embrace Your Unique Style Don’t be afraid to experiment and combine elements from different styles to create a spring fireplace decor that truly reflects your unique personality! Here are some ideas to get your creative juices flowing: Pro Tip: When mixing and matching styles, ensure there’s a unifying element that ties everything together. This could be a color palette, a recurring theme (like nature or vintage), or even a similar texture used throughout the display. 8. Rustic Charm with a Burlap Banner & Mason Jars: Channel the essence of a relaxed farmhouse aesthetic with a DIY burlap banner and a collection of mason jars. Here’s how to bring this look to life: 9. A Serene Spring Tablescape: Transform your mantel into a serene spring tablescape, perfect for showcasing treasured decorative items. Here’s how to achieve this look: 10. A Touch of Whimsy with a Springtime Mobile: Embrace the playful spirit of spring with a DIY or store-bought springtime mobile hanging above your mantel. Here are some ideas: 11. Mirror Magic for Light & Airiness: Incorporate a mirror on your mantel to create a sense of light and airiness, perfect for smaller spaces. Here’s how to use a mirror effectively: 12. A Botanical Bonanza with Succulent Arrangements: Embrace the low-maintenance beauty of succulents by creating a stunning spring display on your mantel. Here’s how to get started: 13. Rustic Elegance with Repurposed Wood Elements: Infuse your mantel with rustic charm by incorporating repurposed wood elements. Here’s how to create a unique and sustainable spring display: 14. A Birdwatcher’s Paradise with a Birdhouse Centerpiece: Celebrate the return of spring songbirds by creating a birdwatcher’s paradise on your mantel. Here’s how to make it a reality: 15. A Touch of Modernity with Geometric Shapes & Metallics: For those who love a modern aesthetic, embrace clean lines, geometric shapes, and metallic accents for your spring decor. Here are some ideas: Extra Touches to Complete Your Spring Mantel Masterpiece Now that you have a plethora of ideas for decorating your fireplace mantel for spring, here are some extra touches to elevate your creation: Most Importantly, Have Fun! Decorating your home should be an enjoyable experience. Don’t be afraid to experiment, try new things, and let your creativity flow. The most important thing is to create a spring fireplace decor that reflects your personality and brings you joy! Wrapping Up Spring is a time for renewal and a celebration of new beginnings. By incorporating these inspiring ideas, you can easily transform … Read more

11 Beautiful Spring Wreaths and Door Hangers to Welcome Spring in Style!

Beautiful Spring Wreaths and Door Hangers

Spring has sprung! The days are getting longer, the birds are singing, and there’s a vibrant energy in the air. It’s time to trash out the heavy winter decor and embrace the season’s beauty by transforming your entryway. After all, your front door is the first impression your home makes, and a beautiful spring wreath or door hanger sets the tone for a warm and welcoming atmosphere. This blog post is your guide to creating stunning spring wreaths and door hangers that will add a touch of seasonal cheer to your home. We’ll explore 11 unique and easy-to-make ideas suitable for every style and budget, from classic floral arrangements to whimsical DIY projects. So, get ready to unleash your creativity and transform your entryway into a spring masterpiece! 11 Spring Wreath & Door Hanger Ideas to Celebrate the Season Let’s go straight to the top spring wreath and door hanger ideas: 1. Blooming Beauty: A Classic Floral Wreath Nothing quite says spring like a vibrant floral wreath bursting with color. This timeless option is perfect for those who love a touch of elegance and the sweet fragrance of fresh flowers. Here’s what you’ll need: Let’s get crafting: Pro Tip: If using fresh flowers, water your wreath regularly to keep them looking their best. Consider using a floral spray to extend their lifespan. 2. Rustic Charm: A Twig Wreath with Burlap Accents Embrace the natural beauty of spring with a rustic twig wreath adorned with burlap accents. This simple yet charming option is perfect for farmhouse-inspired homes or those who love a touch of natural texture. Here’s what you’ll need: Let’s get crafting: Pro Tip: You can spray paint the twigs in a soft pastel color for a unique look. Additionally, consider adding a touch of fragrance by weaving in dried lavender sprigs or potpourri amongst the twigs. 3. A Touch of Whimsy: A DIY Fabric Bunny Wreath If you love playful and creative decor, a DIY fabric bunny wreath is sure to add a touch of whimsy to your door. This project is perfect for those who enjoy crafting and allows you to personalize it with your favorite colors and patterns. Here’s what you’ll need: Let’s get crafting: Pro Tip:  Get the whole family involved in this fun project! Let the kids choose the fabrics and help decorate the bunny face for a personalized touch. 4. Modern Elegance: A Wreath with Geometric Shapes For those who love a sleek and modern aesthetic, a wreath adorned with geometric shapes is a perfect choice. This contemporary design adds a touch of sophistication to your entryway and complements minimalist decor beautifully. Here’s what you’ll need: Let’s get crafting: Pro Tip: Play with the scale and dimension of the geometric shapes. Using a mix of larger and smaller shapes adds visual interest to your wreath. 5. Fresh & Fragrant: A Herb Wreath for Your Door Looking for a unique and practical option? A fragrant herb wreath is a perfect choice! Not only does it add a touch of spring beauty to your entryway, but the fresh herbs also release a delightful aroma that welcomes guests. Here’s what you’ll need: Let’s get crafting: Pro Tip: To prolong the life of your herb wreath, mist it lightly with water every few days. You can also replace the herbs as needed to maintain their fragrance. 6. Welcome the Birds: A Wreath with a Birdhouse Centerpiece If you’re a bird lover, a charming wreath featuring a miniature birdhouse is a delightful way to welcome feathered friends to your doorstep. Here’s what you’ll need: Let’s get crafting: Pro Tip: Consider placing a small bowl of birdseed near your entryway to attract feathered friends to your welcoming birdhouse wreath. 7. A Rainbow of Ribbon: A Cheerful Fabric Scrap Wreath Embrace the spirit of spring with a burst of color using recycled fabric scraps! Here’s what you’ll need: Let’s get crafting: Pro Tip: To add a touch of dimension, consider curling some of the fabric strips before attaching them to the wreath base. This creates a more textured and visually appealing look. 8. Under the Sea: A Seashell & Netting Door Hanger Bring a touch of coastal charm to your entryway with a nautical-inspired door hanger. Here’s what you’ll need: Let’s get crafting: Pro Tip: To add a touch of color, consider spray painting some of the seashells in soft pastel shades that complement the spring season. 9. A Literary Spring: A Book Page Wreath with Floral Accents For bookworms and literature lovers, a book page wreath adorned with spring flowers is a unique and creative option. Here’s what you’ll need: Let’s get crafting: Pro Tip: Consider using vintage book pages with aged paper for a more rustic and charming look. 10. Butterfly Bliss: A Vibrant Butterfly Wreath Welcome spring with a flutter of colorful butterflies! Here’s what you’ll need: Let’s get crafting: Pro Tip: To add a touch of whimsy, consider incorporating some butterflies with glitter accents or iridescent wings that shimmer in the sunlight. 11. Macrame Magic: A Spring Boho Wreath with Yarn Accents Embrace the bohemian trend with a macrame wreath adorned with colorful yarn and natural elements. Here’s what you’ll need: Let’s get crafting (Macrame option): Let’s get crafting (Non-macrame option): Pro Tip: If you’re new to macrame, there are many beginner-friendly patterns available online. Don’t be afraid to experiment with different knotting techniques to create a unique and personalized macrame wreath. Bonus Tips for Wreath-Making Success Final Thoughts With these 11 inspiring spring wreath and door hanger ideas, you’re sure to find the perfect option to welcome the season and add a touch of personality to your entryway. Remember, there are no hard and fast rules! Embrace your creativity, experiment with different materials, and have fun crafting a spring masterpiece that reflects your unique style.

17 Gorgeous Spring Crafts for the Home: Bring the Beauty of the Season Indoors

Spring Crafts for the Home

Spring has sprung!  The days are longer, the air is warmer, and everything outside feels fresh and alive. As the world outside bursts with color and the scent of blooming flowers, it’s natural to want to bring that vibrant energy indoors.  Spring crafts are a delightful way to personalize your home decor and celebrate the season with handmade creations. Not only is crafting a fun and rewarding activity, but it also allows you to create unique decorations that perfectly reflect your style and taste.  So, grab your crafting supplies, unleash your creativity, and get ready to transform your home into a spring haven with these 17 gorgeous DIY projects: 1. Blooming Beauties: Paper Flower Wall Hanging Who needs a real flower garden when you can create a stunning floral display with colorful paper? This paper flower wall hanging is a show-stopping piece that will add a touch of whimsical charm to any room. Materials: Instructions: 2. A Breath of Fresh Air: DIY Spring Wreath Greet spring at your door with a unique and welcoming wreath handcrafted by you.  This DIY spring wreath is a fantastic way to add a touch of personality to your entryway and set the tone for your spring home decor. Materials: Instructions: 3. A Pop of Color with Painted Flower Pots Tired of plain terracotta pots? Breathe new life into them with a splash of color and transform them into vibrant planters for your spring blooms. This project allows you to personalize your pots and create a cohesive look for your spring plants. Materials: Instructions: 4. A Touch of Whimsy with Butterfly Mobiles Bring the delicate beauty of butterflies indoors and add a touch of whimsy to your space with these charming DIY butterfly mobiles. They’re perfect for hanging in a child’s room, a nursery, or any space that needs a dose of spring cheer. Materials: Instructions: 5. Springtime Scents with DIY Potpourri Fill your home with the delightful fragrances of spring by creating your own potpourri. This project allows you to personalize the scent to your liking and create a beautiful and decorative element for your home. Materials: Instructions: 6. A Tabletop Welcome with a Spring Centerpiece Create a charming centerpiece to add a touch of spring to your dining table or any other surface that needs a seasonal refresh. This project allows you to use your creativity and personalize it to match your existing decor. Materials: Instructions: 7. Spring Greetings with a Hand-Painted Doormat Welcome guests and celebrate the arrival of spring with a personalized and vibrant doormat. This project allows you to showcase your creativity and create a unique first impression for your home. Materials: Instructions: 8. Wind Chimes with a Natural Touch Bring the soothing sounds of spring breezes indoors with handcrafted wind chimes. This project allows you to personalize the sound and visual elements for a unique and delightful addition to your porch or patio. Materials: Instructions: 9. Textured Spring Wreath with Fabric Scraps Move beyond the traditional floral wreath and create a textural masterpiece with fabric scraps. This project allows you to upcycle leftover materials and create a unique and stylish spring decoration. Materials: Instructions: 10. A Springtime Tablescape with Hand-Dyed Napkins Elevate your spring dinner parties with a touch of handmade elegance.  These hand-dyed napkins add a personal touch to your table setting and create a delightful spring tablescape. Materials: Instructions: Prepare the napkins:  Wash and iron the plain white cotton napkins to remove any wrinkles or residue that might prevent the dye from adhering evenly. 11. A Whimsical Spring Garland with Paper Flowers and Pinwheels Add a touch of playful charm to your mantelpiece or windowsill with a whimsical spring garland featuring paper flowers and pinwheels. This project is perfect for a craft night with friends or family and allows for endless creativity. Materials: Instructions: 12. A Springtime Sensory Basket for Little Ones Engage the senses of your little ones with a delightful springtime sensory basket. This project is perfect for toddlers and preschoolers, offering them a fun and stimulating way to explore the season. Materials: Instructions: 13. A Springtime Herb Garden in Upcycled Containers Embrace the fresh flavors of spring by creating your own herb garden using upcycled containers. This project is a sustainable and practical way to add a touch of green to your kitchen windowsill or patio. Materials: Instructions: 14. A Delectable Springtime Wreath Made with Candy Who says wreaths are just for decoration?  Create a delightful and whimsical spring wreath made with colorful candy that will be a sweet treat for the whole family. Materials: Instructions: 15. A Springtime Chandelier Made with Recycled Plastic Bottles Transform everyday recyclables into a dazzling spring chandelier. This project is a creative and eco-friendly way to add a touch of whimsy and sparkle to your home. Materials: Instructions: 16. A Springtime Centerpiece with a Nest and Colorful Eggs Create a charming and natural centerpiece for your spring table with a nest filled with colorful eggs. This project allows for customization and can be a collaborative effort with young children for a fun and creative activity. Materials: Instructions: 17. A Fragrant Springtime Sachet with Dried Flowers and Herbs Fill your home with the delightful scents of spring by creating your own fragrant sachets. These little bundles of potpourri are perfect for placing in drawers, closets, or anywhere you want a touch of springtime fragrance. Materials: Instructions: Conclusion Spring is a time for renewal and creativity. With these 17 gorgeous spring crafts for the home, you can transform your living space into a vibrant and welcoming haven that celebrates the beauty of the season.  Embrace the opportunity to personalize these projects, experiment with different colors and techniques, and let your creativity bloom! So, gather your supplies, unleash your inner artist, and get ready to enjoy the satisfaction of creating beautiful handmade decorations that bring the spirit of spring into your home. Happy crafting!

15 Super Cute Spring DIY Projects to Welcome the Blooming Season

Spring DIY Projects

Spring has sprung! With the days growing longer, the sun shining brighter, and flowers bursting into bloom, it’s the perfect time to bring the vibrant energy of the season indoors and outdoors. DIY projects are a fantastic way to personalize your space and celebrate the fresh start that spring embodies. So, grab your crafting supplies and get ready to unleash your creativity with these 15 super cute Spring DIY projects! Project 1: Blooming Beauties: Painted Clay Pot Spring Planters There’s nothing quite like the sight of colorful blooms adorning your windowsill or patio. Elevate your plant game this spring with hand-painted clay pot planters! What you’ll need: Let’s get started! Top tip: Don’t be afraid to experiment with different color combinations and patterns. You can even paint a message or quote on your pots for a personalized touch. Feeling less adventurous? Pre-painted pots or plastic pots (lighter option) can be a great starting point. Project 2: Fluttery Friends: Button Butterfly Wall Art Bring a touch of whimsy to your walls with this adorable button butterfly wall art project! It’s a perfect DIY for a kid’s room, a spring-themed kitchen, or anywhere you want to add a burst of color and cheer. Gather your materials: Let’s create! Top tip: Using a butterfly image as a reference can be helpful when placing your buttons, especially if you’re aiming for a realistic look. Feeling adventurous? Explore beyond buttons! Felt scraps, fabric pieces, or even bottle caps can be used to create unique and colorful butterfly wings. Project 3: Blooming Banner: No-Sew Fabric Flower Bunting Add a touch of springtime cheer to your porch, mantelpiece, or anywhere you want a festive touch with this easy no-sew fabric flower bunting! Here’s what you’ll need: Let’s get crafting! Top tip: Using pinking shears to cut your fabric squares will add a decorative scalloped edge to your flowers and eliminate the need to fray the edges. Don’t have a sewing machine? No worries! This project is entirely achievable without one. However, if you’re comfortable with sewing, you can stitch the center of your fabric layers instead of tying them for a more polished look. Project 4: Melodies of Spring: Upcycled Tin Can Wind Chimes Embrace the sounds of spring with these charming upcycled tin can wind chimes! This project is a fantastic way to give new life to used tin cans and add a touch of musical magic to your patio or balcony. Gather your supplies: Let’s upcycle and create! Project 5: Lucky Ladybug Charm: Easy Painted Rock Ladybugs Welcome a touch of luck and whimsy to your garden or windowsill with these adorable painted rock ladybugs! This is a quick and easy project perfect for kids and adults alike. What you’ll need: Let’s paint some lucky bugs! Top tip:  For a more polished look, you can lightly sketch the ladybug design on the rock with a pencil before painting. Feeling creative? Use buttons or wooden beads instead of rocks for a unique twist on this classic craft. Project 6: Springtime Wreath Magic: Fabric Scrap Wreath Welcome spring with a vibrant and colorful fabric scrap wreath! This project is a fantastic way to use up leftover fabric pieces and create a unique statement piece for your door or wall. What you’ll need: Let’s get crafting! Top tip: Don’t have a wire wreath frame? No worries! You can use a cardboard cut-out as a base for your fabric wreath. Simply cut a donut shape out of sturdy cardboard and use it as the foundation for gluing your fabric strips. Project 7: Hoppy Decorations: DIY Sock Bunnies Celebrate the season with these adorable and easy-to-make sock bunnies! This project is perfect for using up old socks and creating charming Easter decorations or springtime home accents. Gather your supplies: Let’s get hopping! Top tip: Feeling adventurous? Use different colored socks or add other embellishments like ribbons or yarn for a unique look! Project 8: A Touch of Whimsy: Springtime Fairy House Create a magical haven for fairies in your garden with this enchanting springtime fairy house project! This activity is perfect for kids and adults alike, encouraging creativity and imagination. What you’ll need: Let’s build a fairy haven! Top tip: Encourage your local fairies to move in by leaving out a small bowl of water or a sprinkle of sugar near the fairy house. Project 9: A Symphony of Spring: DIY Windsock Embrace the spring breezes with a vibrant and musical DIY windsock! This project is a fun activity for kids and a delightful addition to your porch or balcony. What you’ll need: Let’s create a springtime symphony! Top tip:  For a more decorative touch, you can add streamers or ribbons of different lengths to the bottom of the windsock. These will flutter in the wind and add to the visual appeal. Project 10: A Splash of Color: Painted Flower Pots with Fingerprint Art Transform plain clay pots into blooming works of art with this fun and easy fingerprint art project! This activity is perfect for creating unique and personalized planters for your spring flowers. What you’ll need: Let’s get creative with fingerprints! Top tip:  For a more coordinated look, use a limited color palette for the fingerprint flowers. You can also create a border around the rim of the pot using a paintbrush and a contrasting color. Project 11: A Feathery Welcome: Springtime Wreath with Bird’s Nest Welcome spring and feathered friends with this charming wreath adorned with a bird’s nest! This project is perfect for your front door or a cozy corner inside your home. Gather your supplies: Let’s create a welcoming haven! Top tip: Consider adding a small decorative sign or a handmade “Welcome Spring” banner to the wreath for a more personalized touch. Project 12: A Glimmering Display: Upcycled Glass Jar Terrarium Transform old glass jars into captivating miniature gardens with this upcycled glass jar terrarium project! This is a great way to bring a touch of nature indoors and enjoy a low-maintenance display of … Read more