

Over the years, I’ve fallen in love with the idea that beautiful home décor doesn’t have to come at the expense of the planet—or my wallet. Some of the most charming, conversation-starting pieces in my home are actually made from recycled materials or thrifted finds I’ve reimagined with a little creativity. There’s something deeply satisfying about giving new life to something that might have otherwise been discarded. It’s not just about saving money; it’s about creating a home that tells a story—one that’s full of character, intention, and heart.
When I first started experimenting with sustainable décor, I was surprised at how simple it could be. A coat of paint here, a repurposed fabric there, and suddenly, that old vase or forgotten chair becomes something entirely new. The beauty of DIY upcycling is that it’s accessible to everyone—you don’t need fancy tools or professional skills, just a bit of imagination and a willingness to see potential in the overlooked. In this post, I’ll share some of my favorite sustainable home décor DIY ideas using recycled and thrifted finds—projects that not only reduce waste but also fill your space with creativity and purpose.
1. Upcycled Spring Wreaths

Wreaths are a timeless way to add a touch of spring charm to your door or walls. Let’s create a beautiful wreath using everyday items you might already have or can find at a thrift store.
Materials:
- Wire wreath frame (any size)
- Fabric scraps in various spring colors and patterns (ribbons, lace, or yarn can also be used)
- Hot glue gun
- Scissors
- Optional embellishments: artificial flowers, buttons, twine, Easter eggs (plastic or wooden)
Instructions:
- Create the Base: Begin by securing your fabric scraps or ribbons to the wire wreath frame. You can use a hot glue gun for this step. If using fabric, cut long strips and wrap them around the frame, overlapping slightly for a full coverage. You can also use a combination of fabrics and ribbons for a more textured look.
- Add Spring Flair: Now comes the fun part – decorating! Here are some ideas to inspire you:
- Floral Fantasy: Hot glue artificial flowers in various spring colors like pinks, yellows, and purples onto the wreath base.
- Button Bonanza: Use colorful buttons in different sizes and textures to create a unique and playful design. Arrange them in clusters or scatter them around the wreath.
- Yarn Wonder: Wrap the wreath frame with colorful yarn, creating a whimsical and textured look. You can even use different yarn weights and textures for added interest.
Variations:
- Burlap Beauty: For a rustic touch, use a burlap wreath frame as your base. Paint wooden Easter eggs or cut out bunny shapes from felt and glue them onto the burlap.
- Twiggy Delight: Create a natural spring look with a twig wreath frame. Spray paint the twigs in pastel colors and add fabric flowers or small bird nests for a touch of whimsy.
2. Thrifted Picture Frame Makeover

Thrift stores are treasure troves of old picture frames that can be easily transformed into beautiful spring decor pieces.
Materials:
- Old picture frame (any size or style)
- Paint in spring colors (pastel shades, floral patterns)
- Washi tape in spring designs
- Buttons in various sizes and colors
- Twine
- Hot glue gun (optional)
Instructions:
- Give it a Fresh Coat: Start by giving the picture frame a fresh coat of paint in a spring color that complements your decor. Pastel shades like lavender, mint green, or light yellow work well. If the frame has an interesting design, you can choose to leave some of the original wood exposed for a vintage touch.
- Embellish with Flair: Now, let’s personalize your frame! Here are a few ways to add some spring flair:
- Washi Tape Magic: Washi tape comes in a vast array of spring-themed designs, from floral patterns to butterfly prints. Use it to create stripes, borders, or even geometric patterns on the frame.
- Button Bonanza: Glue buttons in various sizes and colors onto the frame for a playful and textured look. You can arrange them in a specific pattern or create a random scattering for a more whimsical feel.
- Twine Touch: Wrap twine around the frame in a spiral pattern or create a simple bow on the corner for a rustic touch. Secure the twine with hot glue if needed.
Variation:
Decoupage Delight: Instead of paint, use spring-themed scrapbook paper to decoupage the frame. Cut out floral patterns or Easter egg designs from the paper and use Mod Podge to adhere them to the frame.
3. Upcycled Tin Can Vases

Don’t toss those empty tin cans! With a little creativity, they can be transformed into charming and functional spring vases.
Materials:
- Clean tin cans in various sizes (soup cans, vegetable cans)
- Paint in spring colors (acrylic or spray paint)
- Stencils (optional)
- Paintbrushes
- Ribbon or twine (optional)
- Fresh spring flowers or faux blooms
Instructions:
- Clean Up Crew: First things first, remove any labels or stickers from the tin cans. Wash them thoroughly with soap and water and let them dry completely.
- Paint Power: Now comes the fun part – painting! Choose spring colors that complement your decor. You can go for a solid color palette or create patterns using stencils. Here are some ideas to inspire you:
- Polka-Dot Party: Use a polka dot stencil and a contrasting paint color to create a playful design.
- Striped Sensation: Stencil stripes in different widths and colors for a bold and graphic look.
- Ombre Delight: Create a beautiful ombre effect by blending two or three shades of the same color from top to bottom of the can.
Finishing Touches:
- Ribbon Flair: Add a touch of elegance by wrapping a ribbon or twine around the rim of the can. Secure it with a knot or a hot glue gun.
- Flower Power: Fill your upcycled tin can vases with fresh spring flowers like tulips, daffodils, or hyacinths. You can also use faux blooms for a vibrant and long-lasting display.
Variation:
Tiered Treasure: Create a stunning centerpiece by grouping painted tin cans of different sizes. Glue them together in a tiered formation using a hot glue gun or craft glue.
4. Lightbulb Garland

Give those burned-out lightbulbs a new lease on life by transforming them into a whimsical lightbulb garland!
Materials:
- Burned-out lightbulbs (various shapes and sizes)
- Paint in bright spring colors or pastel shades
- Acrylic paint pens (optional)
- Twine
- Hot glue gun
Instructions:
- Painting Party: Clean the lightbulbs with a damp cloth to remove any dust or dirt. Once dry, paint them in bright spring colors or pastel shades. You can even paint them with polka dots, stripes, or floral patterns using acrylic paint pens for added creativity.
- String it Up: Once the paint is dry, it’s time to create your garland. Cut a long piece of twine and hot glue the end to the top of a lightbulb, creating a hanging loop. Repeat this process for all the lightbulbs.
- Assemble the Garland: Arrange the painted lightbulbs on the twine in a desired pattern. You can space them evenly or cluster them together for a more whimsical look. Secure them with additional hot glue if needed.
Variation:
Egg-cellent Garland: Turn your lightbulb garland into an Easter-themed decoration! Paint the lightbulbs to resemble Easter eggs with fun patterns and designs. You can even add small ribbons or twine bows to the tops for a festive touch.
5. Teacup Candle Holders

Embrace the charm of vintage teacups and saucers found at thrift stores and turn them into unique and elegant candle holders.
Materials:
- Mismatched teacups and saucers (various sizes and patterns)
- Candles (sizes that fit comfortably inside the teacups)
- Spray paint (optional)
- Decorative moss or Easter grass (optional)
Instructions:
- Mix and Match: The beauty of this project lies in using mismatched teacups and saucers. Choose a variety of sizes, patterns, and colors to create a whimsical and eclectic look.
- Painting (Optional): If your teacups and saucers have a look you’d like to update, spray paint them in a cohesive color scheme. Pastel shades or metallic finishes work well for spring decor. However, don’t be afraid to leave them in their original state for a vintage charm.
- Light it Up: Place a candle on the saucer and then carefully place the teacup on top, creating a charming and unique candle holder.
Variation:
Nature’s Touch: For an extra touch of spring, fill the teacup with decorative moss or Easter grass before placing the candle inside. This adds a natural element and complements the spring theme.
6. DIY Fabric Easter Baskets

Skip the store-bought Easter baskets and create your own unique and reusable fabric ones!
Materials:
- Fabric scraps in various spring colors and patterns
- Sewing materials (needle, thread, scissors)
- Fabric basket template (optional)
- Iron (optional)
- Ribbon or twine (optional)
- Decorative embellishments (buttons, lace trim, felt cutouts) (optional)
Instructions:
- Template Time: There are two ways to approach this project. You can either find a free Easter basket template online or freehand your own design. If using a template, print it out and cut it out of paper.
- Fabric Fun: Choose a variety of spring-colored fabric scraps for your basket. You can use a single fabric for a simpler look or combine different patterns for a more playful design. Cut out two pieces of fabric based on your template or freehand design.
- Sew it Up: Place the two fabric pieces right sides together and pin them in place. Sew along the edges using a straight stitch, leaving a small opening at the bottom for turning. Clip the curves at the corners for easier turning.
- Finishing Touches: Turn the basket right side out and iron the seams flat (optional). Hand-stitch the opening closed. Now comes the fun part – decorating! Here are some ideas:
- Ribbon Flair: Tie a colorful ribbon around the top rim of the basket for a simple yet elegant touch.
- Button Bonanza: Sew on buttons in various sizes and colors for a playful and textured look.
- Lace Delight: Add a touch of vintage charm by sewing lace trim around the top rim of the basket.
- Felt Fun: Cut out Easter egg shapes or bunny silhouettes from felt and glue them onto the basket for a festive touch.
Variation:
Egg-cellent Basket: Create a vibrant and fun Easter basket by using fabric scraps with Easter egg patterns or brightly colored polka dots.
7. Spring Mason Jar Luminaries

Mason jars are another versatile item that can be easily transformed into beautiful spring decorations.
Materials:
- Mason jars (various sizes)
- Acrylic paint in spring colors
- Paintbrushes
- Mod Podge (optional)
- Tissue paper in spring colors (optional)
- Stencils (optional)
- Floral wire (optional)
- Tealights or battery-operated fairy lights
Instructions:
- Clean Canvas: Begin by washing the mason jars thoroughly with soap and water and drying them completely.
- Painting Power: Unleash your creativity! Here are some ideas to inspire you:
- Solid Color Chic: Paint the mason jars in solid spring colors like lavender, mint green, or pale yellow.
- Pattern Play: Use stencils to create polka dots, stripes, or floral patterns on the jars.
- Tissue Paper Magic: Cut tissue paper in spring colors into squares and decoupage them onto the mason jars using Mod Podge for a stained-glass effect.
- Light it Up: Once the paint or decoupage is dry, place a tealight candle or battery-operated fairy lights inside the jar.
Variations:
- Hanging Beauties: Attach floral wire to the rim of the jar to create hanging luminaries for your porch or patio.
- Spring Centerpiece: Group mason jar luminaries of different sizes on a tray filled with decorative moss or Easter eggs for a charming spring centerpiece.
8. Upcycled Tin Can Wind Chimes
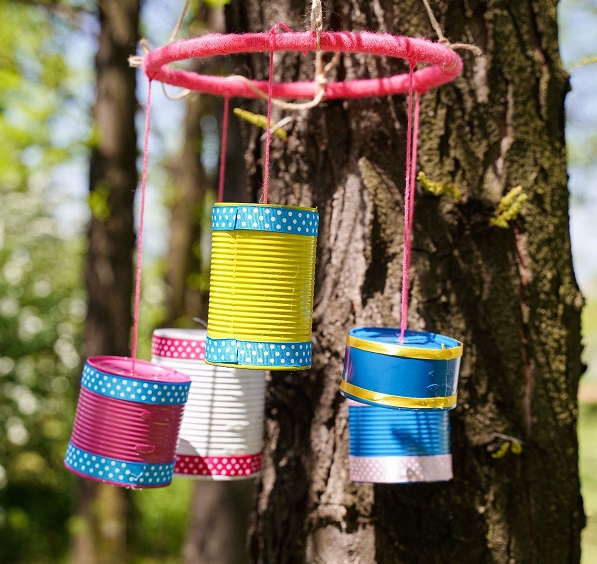
Give those leftover tin cans a musical makeover!
Materials:
- Clean tin cans in various sizes (different pitches create a richer sound)
- Hammer and nail
- Fishing line or twine
- Wind chimes suspension rod (optional, can be a branch)
- Bells (optional)
- Acrylic paint (optional)
- Paintbrushes (optional)
Instructions:
- Can-Do Creativity: Wash and dry the tin cans. If desired, paint them in spring colors or create patterns using stencils.
- Poke a Tune: Using the hammer and nail, carefully poke a hole near the rim of each can. Make sure the holes are all aligned for hanging.
- String it Up: Cut pieces of fishing line or twine of varying lengths. Tie one end of each string to a can’s pre-made hole.
- Assemble the Chimes: Secure the other ends of the strings to a wind chimes suspension rod or a sturdy branch. You can also tie bells to the strings for added sound effects.
- Hang it High: Find a breezy spot on your porch or patio and hang your upcycled wind chimes. Enjoy the calming sounds and vibrant spring colors!
9. Repurposed Chair Spring Planters

Turn those old, discarded chair springs into unique hanging planters!
Materials:
- Discarded chair springs (various sizes)
- Coco liners (sized to fit the springs)
- Potting soil
- Spring flowers or herbs
Instructions:
- Spring Cleaning: Clean any dirt or rust from the chair springs.
- Liner Up: Place a coco liner inside each spring, ensuring it fits snugly. Secure it with twine or floral wire if needed.
- Planting Power: Fill the coco liners with potting soil and plant your favorite spring flowers or herbs.
- Hanging Delight: Attach a sturdy hook to the top coil of the spring. Hang your repurposed planters in a sunny spot on your porch or patio.
Variation:
Spring Bouquet: For a more elaborate display, group several hanging chair spring planters together, creating a vibrant and cascading spring bouquet.
10. Vintage Suitcase Flower Box

Give a new lease on life to a vintage suitcase and transform it into a charming flower box!
Materials:
- Vintage suitcase (any size)
- Paint (optional)
- Paintbrushes (optional)
- Plastic liner (optional)
- Potting soil
- Spring flowers
Instructions:
- Suitcase Spruce-Up: Clean the suitcase and remove any unwanted stickers or labels. If desired, paint it in a fresh spring color to match your decor.
- Liner Option: To prevent leaks, consider lining the inside of the suitcase with a plastic liner.
- Planting Paradise: Fill the suitcase with potting soil and plant your favorite spring flowers.
- Display Delight: Place your vintage suitcase flower box on your porch or patio for a unique and conversation-starting spring decoration.
11. Upcycled Book Page Wreath

Repurpose old books into a beautiful and literary spring wreath!
Materials:
- Old book with interesting pages (avoid valuable books)
- Scissors or craft knife
- Hot glue gun
- Wire wreath frame (any size)
- Optional embellishments: artificial flowers, twine, buttons
Instructions:
- Page Power: Cut out individual pages from the old book. Aim for a variety of shapes and sizes, including circles, squares, and triangles.
- Curl Up: Gently curl the edges of the book page cutouts using your fingers or a pencil to create a 3D effect.
- Wreath it Up: Begin hot gluing the curled book pages onto the wire wreath frame, layering them slightly for a full and textured look.
- Finishing Touches: Once the wreath is covered, add any optional embellishments like artificial flowers, twine bows, or buttons for a personalized touch.
12. Tin Can Mailbox Bird Feeder

Transform a recycled tin can into a charming bird feeder for your spring garden!
Materials:
- Clean tin can with lid
- Hammer and nail
- Wood dowel rod (cut to desired feeder length)
- Birdseed
- Paint (optional)
- Paintbrushes (optional)
- Twine or ribbon
- Hot glue gun (optional)
Instructions:
- Can-Do Prep: Wash and dry the tin can thoroughly. If desired, paint the can in a cheerful spring color or create a bird-themed design.
- Birdseed Access: Using the hammer and nail, carefully poke several small holes near the bottom of the can to allow birdseed to dispense.
- Perch Perfect: Create a perch for the birds by drilling a hole on either side of the can near the top. Thread the wood dowel rod through these holes, ensuring it extends out from both sides. Secure the dowel with hot glue if needed.
- Lid Lift: On the top of the lid, create a small hanging loop by punching a hole with the hammer and nail.
- Fill ‘er Up: Open the lid and fill the can with birdseed.
- Hang it High: Thread a piece of twine or ribbon through the loop on the lid and hang your tin can mailbox bird feeder in a sturdy location in your garden, preferably near trees or bushes.
Variation:
Mailbox Magic: Lean into the “mailbox” theme by adding a small cutout paper flag to the front of the can.
13. Repurposed Ladder Plant Stand
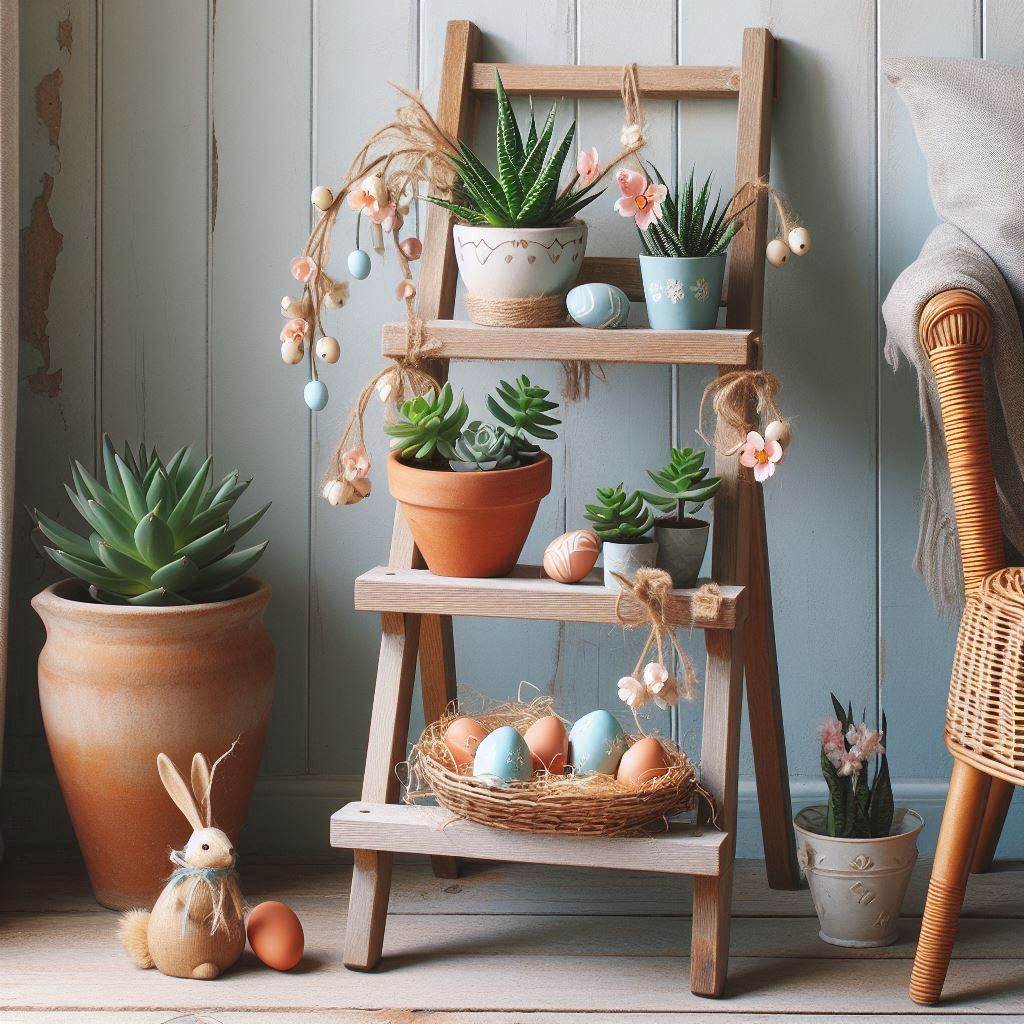
Give a new purpose to a vintage ladder and create a unique plant stand for your spring garden.
Materials:
- Old wooden ladder (ensure it’s sturdy)
- Sandpaper (optional)
- Paint (optional)
- Paintbrushes (optional)
- Plant pots (various sizes)
- Hooks (optional)
Instructions:
- Ladder Love: Clean the ladder and remove any dirt or debris. Sand down any rough edges for a smoother finish (optional).
- Painting Power: If desired, paint the ladder in a fresh spring color to match your garden decor (optional).
- Stand Up Straight: Lean the ladder against a wall or fence in your garden, ensuring it’s secure and won’t tip over.
- Plant Paradise: Arrange your plant pots on the ladder rungs. You can place them directly on the rungs or use S-hooks to hang them for a more layered look.
Variation:
Multi-Level Magic: If your ladder is large enough, create a multi-level plant stand by placing smaller potted plants on a sturdy shelf secured across a few rungs.
14. Mismatched Teacup Bird Bath

Turn a mismatched teacup and saucer into a charming bird bath for your feathered friends!
Materials:
- Mismatched teacup (preferably a wider, shallower cup)
- Mismatched saucer (larger than the teacup)
- Marble pebbles or gravel
- Waterproof sealant (optional)
Instructions:
- Teacup Transformation: Clean the teacup and saucer thoroughly. If desired, apply a coat of waterproof sealant to the teacup to prevent cracks from water exposure.
- Shallow Waters: Fill the teacup with a shallow layer of marble pebbles or gravel. This will help birds grip the surface while bathing.
- Assembled Delight: Place the teacup on the saucer, creating a shallow bird bath.
- Placement Paradise: Find a shady spot in your garden and place your mismatched teacup bird bath on a sturdy base or pedestal.
15. Vintage Suitcase Seed Packet Holder

Repurpose a vintage suitcase into a charming and practical seed packet organizer for your spring garden!
Materials:
- Vintage suitcase (small to medium size)
- Paint (optional)
- Paintbrushes (optional)
- Decorative knobs (optional)
- Screws or hot glue gun
- Small metal baskets or tins (enough to fit inside the suitcase)
- Seed packets
Instructions:
- Suitcase Spruce-Up: Clean the suitcase and remove any unwanted stickers or labels. If desired, paint it in a cheerful spring color to match your garden decor.
- Knob Appeal (Optional): Attach decorative knobs to the front of the suitcase for a more polished look. Use screws for a permanent fixture or hot glue for a simpler option.
- Basket Bonanza: Find small metal baskets or tins that fit comfortably inside the suitcase. You can also use repurposed tin cans or paint coffee cans for a uniform look.
- Seed Sorting: Arrange the baskets or tins inside the suitcase, creating compartments for different types of seeds. Label each compartment with the type of seed using chalkboard labels, paint, or stickers.
- Seed Stash: Organize your seed packets inside the labeled compartments.
- Display Delight: Place your vintage suitcase seed packet holder on a shelf in your garden shed or potting area for easy access and a touch of vintage charm.
16. Upcycled Glass Jar Terrariums

Transform old glass jars into miniature spring gardens with these beautiful terrariums!
Materials:
- Glass jars (various sizes and shapes)
- Pebbles or gravel
- Activated charcoal (optional)
- Potting soil
- Spring-themed plants (miniature ferns, mosses, succulents)
- Decorative elements (small figurines, shells, colorful stones) (optional)
- Spray bottle with water
Instructions:
- Jar Joust: Clean the glass jars thoroughly and remove any labels. Choose jars of different sizes to create a collection of terrariums.
- Drainage Layer: Add a layer of pebbles or gravel to the bottom of each jar for proper drainage.
- Charcoal Cleanse (Optional): For larger terrariums, consider adding a thin layer of activated charcoal on top of the gravel to help remove impurities and odors.
- Soil Power: Fill the jars halfway with a well-draining potting mix suitable for terrarium plants.
- Planting Paradise: Carefully choose and plant your spring-themed miniature plants. Mosses, ferns, and small succulents are perfect for terrariums due to their low light and moisture requirements.
- Decorative Delight (Optional): Add a touch of whimsy to your terrariums with decorative elements like small figurines, colorful stones, or seashells.
- Mist and Maintain: Lightly mist the inside of the jar with water to create a humid environment. Terrariums don’t need frequent watering, so mist only when the soil feels dry to the touch.
Variation:
Fairy Tale Forest: For a more whimsical touch, create a miniature fairy tale forest scene inside your terrarium. Use small twigs, moss, and miniature figurines of fairies or woodland creatures.
17. Repurposed Window Frame Herb Garden
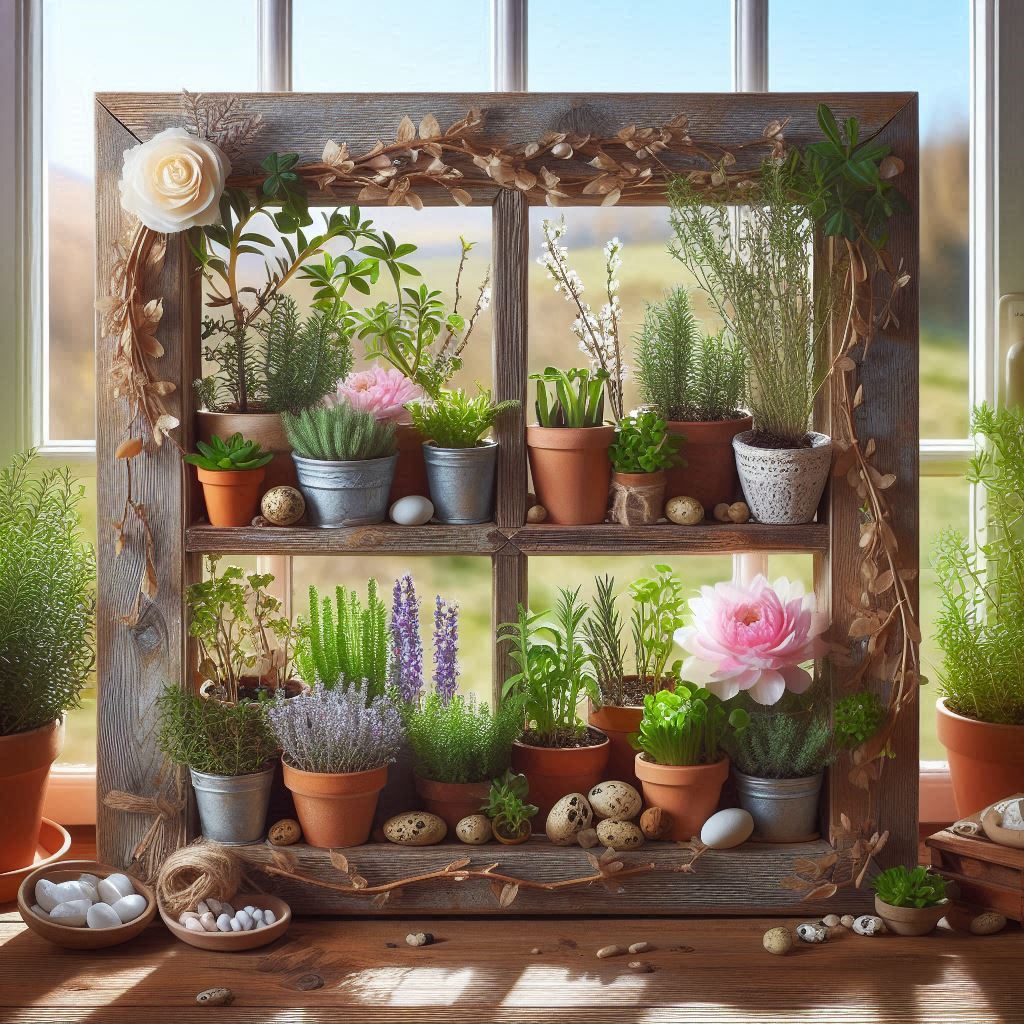
Give a new purpose to an old window frame and create a charming vertical herb garden for your spring kitchen!
Materials:
- Old window frame with removable glass panes
- Chicken wire or mesh
- Staple gun
- Scissors
- Potting soil
- Herb plants (basil, rosemary, thyme, mint)
- Hooks (optional)
Instructions:
- Window Wonderland: Clean the window frame and remove any remaining glass shards.
- Mesh Magic: Cut a piece of chicken wire or mesh to fit the size of the window frame opening. Secure the mesh to the back of the frame using a staple gun.
- Planting Pockets: Create planting pockets by folding the mesh inwards at regular intervals. This will form small pockets to hold the potting soil and herb plants.
- Herb Haven: Fill each pocket with potting soil and plant your chosen herbs.
- Hanging Delight (Optional): Attach sturdy hooks to the top of the window frame for hanging.
- Kitchen Comfort: Hang your repurposed window frame herb garden in a sunny spot in your kitchen for easy access to fresh herbs while cooking.
Wrap Up
At the end of the day, sustainable home décor is about more than just crafting pretty things—it’s about shifting the way we think about consumption and creativity. Every thrifted frame, repurposed jar, or upcycled piece of furniture becomes a reminder that style and sustainability can beautifully coexist. What I love most about these projects is how personal they feel. Each piece carries a bit of history and a lot of heart, making your home truly one of a kind.
As I look around my space now, I see so many pieces that started as “junk” and ended up becoming part of my story. That’s the real joy of decorating sustainably—you’re not just designing a home, you’re curating meaning. So, the next time you’re tempted to toss something out or scroll for new décor, take a second look at what’s already around you. You might just discover your next favorite DIY waiting to be transformed.