
It is not acceptable to place a P-trap lower than the drain pipe. If a new bathroom vanity or new sink was installed and the P-trap appears to be lower than the drain pipe, you either have to lower the rough-in or raise the trap to allow it to drain more effectively.
To achieve this, you’ve to:
- Find out the appropriate P trap height.
- Disconnect the tailpiece from your sink.
- If you have already determined the required height for the trap, you can cut the tailpiece of the P-trap and install it at the height that you determined in step 1.
- Reinstall the tailpiece that you removed earlier.
- Install the P-trap in your sink or bathroom.
Why Is It Not Ideal To Install A P-Trap Lower Than Drain Pipe?
When you install a P-trap at the bottom of a drain, you’ll have an arm angled toward the drain to trap sediment. Having a P-trap installed toward the wall drain pipe can help you prevent backflows by allowing water to flow horizontally from the pump to the ground, as well as allowing gravity to pull debris down the drain pipe. You’ll need higher pressure to drive the debris down the drain, which means the waste pipe will likely become clogged. P-traps can be placed higher than a drain pipe, so long as the arm angle is not more than 1/4″ per linear foot.
A steeper slope may make water flow at a higher speed, possibly establishing a siphoning impact that may end up sucking water seals out from the p-trap. You must always avoid installing a p-trap at a position above the drain pipe if the two seem close to each other. In such a scenario, you risk converting your P-trap to an S-trap, which is not allowed by the plumbing code.
How Can You Raise Your P-Trap If It’s Lower Than Your Drain Pipe?
The easiest way to fix a P-trap lower than a drain pipe is to raise it. The good thing is that this process is a walk in the park, even for beginners.
Here is what you need:
- Marker
- Tape measure
- Plumber’s putty
- Sandpaper
- P-trap
- Brand new tailpiece (however, this is optional)
- Pliers
- Hacksaw
Steps to Raise Your P-Trap If It’s Lower than Drain Pipe
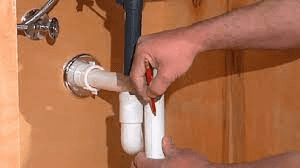
Step 1: Measure the Height of your P-trap
If you want to raise your P-trap, you ought to reduce the length of the tailpiece that extends from the back of your sink. The extended part from your sink that connects to the P-trap is what we refer to as the tailpiece. ( look at that long side of the J)
Before you begin, cut it and determine the length of the pipe that you need to remove.
Install the arm that extends from the bottom of the P-trap to your wall stub, and allow your assistant to hold it so that it extends along a slight slope from your wall stub to your sink drain. This slope should be approximately 1/4″ per foot from your wall drain to the tailpiece.
Mark where the connector for the P-trap and the drain pipe connect. You’ll cut the tailpiece at that location.
Don’t worry if you’ve to take out a large section from your tailpipe. The pipe must be long enough to pass down the drain to the wall. However, the standard code limits the length of a tailpiece not to exceed 24″.
Step 2: Take Out the Tailpiece
If you’ve already installed the P-trap and drain pipe, you will have to take out the tailpiece and cut out the required length or put back a shorter one of the needed height.
To achieve that, unscrew the bolt that holds your P-trap. Turn it counterclockwise.
Use a pair of pliers or a movable wrench to unscrew your tailpiece and pull it out gently.
Step 3: Replace or Cut the Tail Piece
Here, you’ve got two options:
One is to replace the tailpiece, and the second is to cut it to the required height.
If you choose to replace your tailpiece, ensure to get the one with the appropriate size.
But if it’s not of the required height, cut the extra part using a hacksaw. Make sure to use sandpaper to take out the burrs. Next, replace your sink drain and seal its joints using a plumber’s putty.
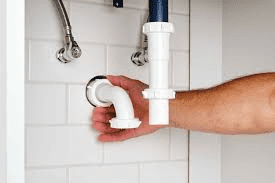
Step 4: Reinstall the P-Trap
Since your tailpiece is now of the required size, it allows for the perfect installation of your P-trap.
First, insert the P-trap to test whether it excellently aligns with your wall drain. If you notice that it has a more extended arm, you’ll need to cut it short to fit well.
Fit a washer and a connection nut on the P-trap (check whether the nut thread is facing your wall stub) and then fit a washer and nut to your tailpiece.
Push the P-Trap arm toward the drain opening in your wall stub, then fix its vertical end to the tailpiece. Tighten the nuts gently on both ends to protect the P-trap in its ideal place.
Step 5: You Must Test Your Fittings
Now turn on your water supply to the sink and allow it to run for several minutes. If water is leaking, remove the nut and check for leaks. Check the joints in the sink to confirm if any water is leaking from them. You can check for leaks by putting a dry towel over the joints of the sink.
If water leaks from any of the joints, gently tighten the nut using a pair of pliers. Stop tightening when the leak halt. However, be very cautious when tightening the nut since it may crack, especially if it’s made from PVC.
Pro Tip: While this tutorial shows you how to raise a drain or sink, it applies to all other plumbing fixtures and appliances. For example, if you want to install a drain to allow water from your washing machine to drain out of your sink, check that it is set correctly. You should also ensure you use the ideal trap size.
3 Alternative Ways to Fix a Misaligned P-trap
The above method is the easiest solution for fixing a P-trap lower than a drain pipe. However, we’ll give you three alternatives to fix it.
1. The Reversible P-Trap
A P-trap is designed so that its longer bent side fits into the tailpiece, whereas its arm fits on a shorter bent side. This allows the P-Trap to be constantly filled up with water to prevent sewer gasses from flowing back to your toilet.
Reversing the basic P-Trap isn’t an excellent idea since your drain pipe will frequently clog. Moreover, a reversed P-Trap holds up to 4″ of water, and that’s against the plumbing code.
Nevertheless, you can buy reversible P-Traps in home-improved stores near you. These P-Traps look J-shaped –similar to the standard P-Trap. However, the longer side of its bend appears shorter enough to provide a tight seal and prevent leakages when you install it the opposite way (the horizontal arm is fitted to the longer side of the P-Trap and the tailpiece is fitted to the shorter side). Reversible P-Traps may solve the predicament if your sink drain is slightly below the waste pipe.
2. Lower your Rough-in
The drain and water pipes that run in the walls, including that drain line you look forward to fitting your P-Trap to, are what we call the plumbing rough-in. You may have to lower the drain if you do not want to cut the tailpiece. All you need to do is to tear off the wall and cut the primary drain line. This is a solution if you wish to do a major remodeling of your bathroom or kitchen and don’t bother to install another wall panel.
3. Installing the HepvO Valve
Another alternative solution is installing a HepvO valve in your sink. A HepvO valve does the same work as a P-Trap, i.e., preventing sewer gases from flowing back to your toilet. HepvO valves are meant for use in RVs and small homes. But why not try this out in your home?
The only thing you need to do is to confirm whether your residence building codes permit the use of the HepvO valve.
FAQs
What is a P-trap?
P-traps are drains designed to trap water in a specially designed section of pipe buried under the sink or the bathroom sink to provide an airtight seal. This prevents toxic and potentially lethal sewage fumes from flowing back into the house.
Must you install the P-Trap below your sink?
P-traps are connected to the bottom of the sink through a horizontal section of pipe connected to a wall drain. It is common for sinks to have two separate drains or for kitchen sinks and dishwashers to share a drain.
Conclusion
With these tips, you can easily attach your P-trap directly to your drain and move it slightly to fit into a favorable position. It is not a good idea to install the p-trap below the exit drain since water will flow outwards.