

My neighbor thought I’d lost my mind when I started digging a foundation in my backyard in October. “It’s nearly winter,” she called over the fence. “Exactly,” I said. By January, I was sitting in 185°F of cedar-scented bliss while snowflakes melted on the little window. That outdoor sauna changed my life — and my neighbor now wants one too.
If you’ve been dreaming about an outdoor sauna but feel stuck staring at vague Pinterest boards and $40,000 price tags, this article is for you. I’m going to break down seven real, buildable outdoor sauna ideas — from budget barrel builds to full Nordic cabin retreats — so you can figure out which one actually fits your yard, your lifestyle, and your budget.
Why an Outdoor Sauna Is Worth Every Single Penny (And Some Are Surprisingly Affordable)
Before I get into the ideas, let me just say: I was skeptical too. I thought outdoor saunas were for people with lake houses in Finland or influencers with suspiciously perfect backyards. Then I priced out a decent hot tub — $8,000 to $15,000, plus chemicals, maintenance, and the water bill — and suddenly a wood-fired barrel sauna at $3,500 looked like the deal of the century.
An outdoor sauna adds real value to your property. More importantly, it adds real value to your life. My sleep improved within two weeks of regular use. My lower back pain — fifteen years of it — dialed down noticeably. There’s solid research behind this, but honestly, I knew it was working when I stopped dreading winter.
The key is picking the right outdoor sauna style for your specific situation. A 200-square-foot backyard in a suburb calls for a different solution than a half-acre rural lot. So let’s get into it.
1. The Classic Barrel Sauna — Best Outdoor Sauna for Small Backyards
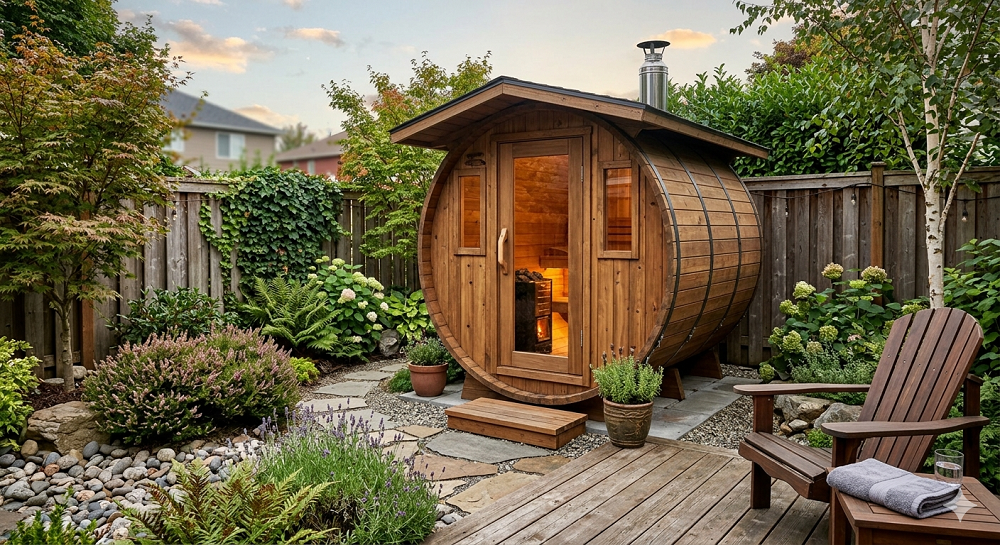
If you’re new to outdoor saunas and want the most bang-for-your-buck starting point, the barrel sauna is it. The cylindrical design isn’t just beautiful — it’s genuinely functional. The curved interior means heat circulates in a continuous loop, which heats up faster and more evenly than a box-shaped room. My first sauna was a barrel, and I still think it’s the smartest design out there for most homeowners.
What makes it work: A good barrel sauna kit comes pre-cut and numbered, so assembly is basically like adult LEGO — if LEGO occasionally gave you a splinter. Most DIYers finish the installation in a weekend. Mine took me and my brother-in-law about 11 hours, including the two hours we spent arguing about whether to level it front-to-back or side-to-side. (Level it on all axes. Both of us were wrong.)
Size and placement tips: Barrel saunas typically range from 6 to 8 feet in diameter and 6 to 8 feet long. That fits comfortably on a 10×10 gravel pad, which makes them ideal for smaller city lots. Cedar is the gold-standard wood — it resists moisture, smells incredible, and doesn’t splinter under bare skin the way cheaper woods do. Avoid anything labeled “thermally modified pine” if your budget allows. It looks nice in photos and degrades faster than cedar in outdoor conditions.
Heating options: You can go wood-fired or electric. I’m a wood-fired evangelist — there’s a ritual quality to it that you just can’t replicate with a dial. That said, if you want push-button convenience, a quality electric heater from a Finnish brand works beautifully. Budget $600 to $1,200 for a reliable electric unit. Don’t cheap out here; the heater is not where you save money.
Budget range: $3,000–$7,000 for a kit; $8,000–$14,000 professionally installed.
2. The Nordic Cabin Sauna — When You Want the Full Scandinavian Sauna Experience
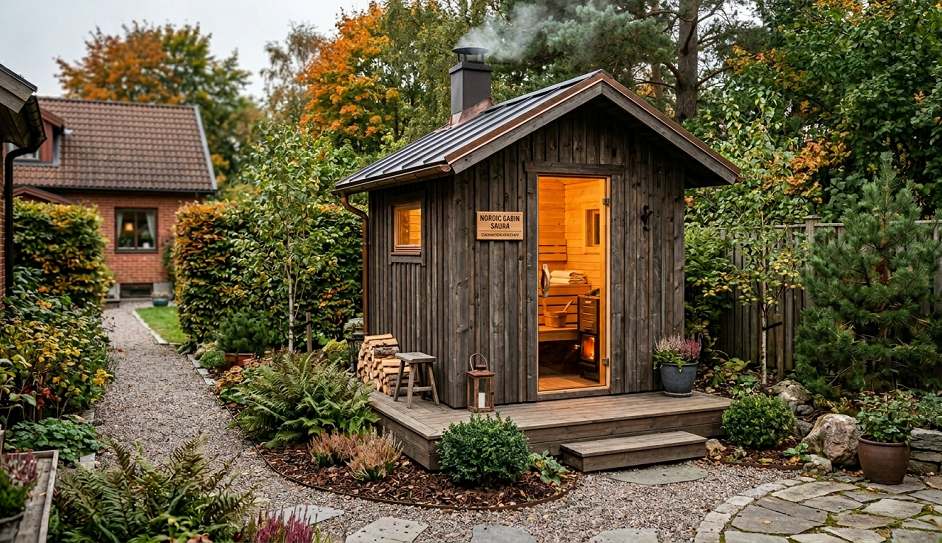
This is the one that makes guests do a double-take when they walk into your backyard. A Nordic cabin sauna — sometimes called a Finnish sauna cabin or garden sauna house — looks like a miniature log cabin or timber-frame outbuilding. It’s a standalone structure with changing room, benches, a proper sauna heater, and sometimes a small porch for cooling down between rounds.
I built one of these for my sister’s property two summers ago. It’s roughly 8×12 feet, with about a 4×6 sauna room and a small changing area. She has a wood-fired Harvia heater in there, and let me tell you, sitting on those upper benches while sleet hits the metal roof outside is as close to a Finnish forest as you can get without a plane ticket.
Structural considerations: You’re building a real structure here, which means you likely need a building permit. This is not optional, and yes, I’ve seen people skip this step and regret it deeply when they try to sell their home. Check with your local zoning office first. The process is usually straightforward for accessory structures under a certain square footage — often 120 to 200 square feet depending on your municipality.
Materials matter: Nordic spruce, Western red cedar, and thermally modified aspen are the top choices for interior walls and benches. The exterior can be clad in cedar shingles, board-and-batten, or even corrugated metal for a more contemporary Nordic look. The corrugated metal is having a real moment right now, and I genuinely love how it weathers — it develops a texture that looks like it’s been there for decades within a couple of years.
The changing room is non-negotiable: I’ve seen builds that skip the changing room to save space, and the owners regret it every single winter. You need somewhere to go between sauna rounds that isn’t outside in the wind. Even a 4-foot-deep anteroom makes a massive difference in usability and your overall sauna experience.
Budget range: $12,000–$35,000 depending on size, materials, and whether you DIY or hire out.
3. The Wood-Fired Outdoor Sauna with a Cold Plunge — The Ultimate Recovery Setup
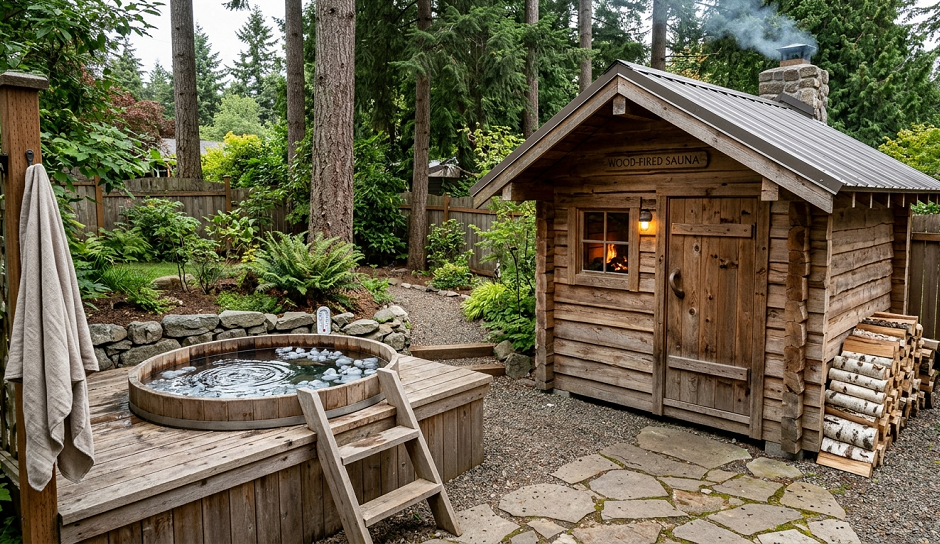
Here’s where things get serious. If you’re into biohacking, athletic recovery, or just want the most intense sauna experience possible, pairing a wood-fired sauna with a cold plunge is the setup. Hot. Cold. Hot. Cold. Repeat. Your nervous system will thank you in ways that are genuinely hard to describe until you’ve done it.
My cold plunge is an insulated stock tank — the galvanized kind farmers use for livestock — that I put on a small platform next to my barrel sauna. Ice goes in before the sauna session starts. A dedicated cold plunge tub looks fancier, but an 8-foot stock tank does the exact same physiological job for about $400, versus $5,000 to $15,000 for a dedicated cold plunge unit. I’ve found the stock tank is a total Pinterest myth-buster in the best way.
The logistics of heat and cold: Position the sauna and cold plunge within 10 to 15 steps of each other. You want to be able to move between them quickly without losing the thermal benefit — and without crossing your neighbor’s sight line, unless they’re the type who won’t mind seeing you sprint barefoot in January. Privacy screening, whether that’s a fence, lattice, or mature plantings, is something I’d plan into this setup from day one.
Wood-fired sauna heating tips: A wood-fired sauna heater (usually called a kiuas in Finnish) with a large rock bed is what you want for this kind of use. The rocks store heat and release it when you throw water on them, creating the steam burst — called löyly — that defines traditional sauna. You want 20 to 50 kilograms of special sauna stones. Don’t use river rocks; they can crack and explode under the thermal stress. Buy stones specifically sold for sauna use.
Water drainage planning: Cold plunges need to drain somewhere. Plan this before you pour any concrete. I didn’t, and I spent an unpleasant afternoon with a shovel and a lot of regret.
Budget range: $5,000–$20,000 for the full setup, depending on how elaborate you go.
4. The Modern Glass-Wall Sauna — Best Outdoor Sauna for Contemporary Home Design
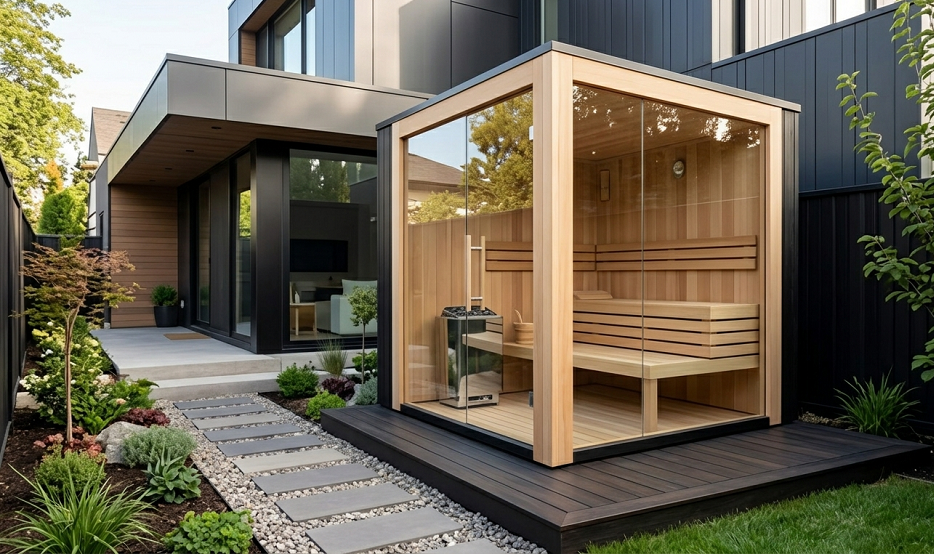
Not every backyard is a rustic cedar escape, and not every homeowner wants one. If your home is modern, minimalist, or has clean architectural lines, a sauna with a full glass front wall or panoramic windows might be the right fit. The visual drama of sitting inside a warm cedar room while looking out at a snowy garden or a nighttime sky is genuinely stunning.
The glass-front sauna design has gotten popular in Scandinavia over the last decade and has been slowly making its way to North American backyards. The frame is usually cedar or heat-resistant hardwood, and the front panel is tempered sauna glass — a specific product designed to handle the dramatic temperature swings. Please don’t use regular insulated glass units from a window company; they’ll fog, fail, or both.
Privacy and placement: This one requires thoughtful siting. A glass-front sauna facing your neighbor’s kitchen window is not a great outcome for anyone. Orient the glass face toward a private garden view, a fence backdrop, or a planted screen. Japanese maples, ornamental grasses, and bamboo (in a root barrier, always) all create a beautiful living screen that looks intentional rather than defensive.
Interior design for the modern sauna: Go minimal inside. Smooth aspen benches, a matte black electric heater, and a single ambient light source. Resist the urge to accessorize — the view is the feature. LED strip lighting under the bench is a nice touch that doesn’t overwhelm the space.
The honest trade-off: Glass-front saunas are harder to maintain in hot, humid outdoor climates. If you’re in the American South or anywhere with heavy humidity, the condensation management is real work. In drier or cooler climates, it’s a non-issue. In Atlanta or Houston, I’d think carefully about the maintenance commitment before going this route.
Budget range: $15,000–$45,000 professionally installed; less if you’re a skilled builder and source the glass panel directly.
5. The Lakeside or Poolside Sauna — Perfect for Properties with Water Access
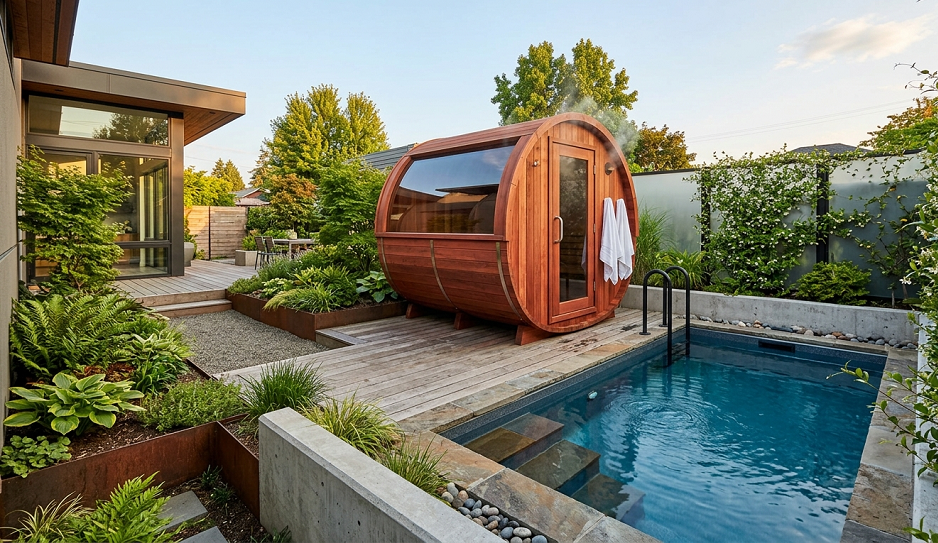
If you have a pool, a pond, a lake, or even a large decorative water feature, building your outdoor sauna as close to the water as possible is not just about aesthetics — it’s about creating the full Nordic bathing ritual. Sauna, plunge, rest, repeat. When the plunge is actual open water, the experience moves from “nice backyard amenity” to something that feels genuinely ancient and restorative.
For poolside saunas, I recommend a structure that complements the pool surround — composite decking, concrete, or natural stone. Cedar siding weathers beautifully against any of these materials. Keep the footprint small and elevated if possible; a sauna on a raised platform with two or three steps down to the pool surround looks intentional and keeps the base wood dry.
Water proximity and electrical considerations: If you’re installing an electric heater within a certain distance of a pool or body of water, you’ll have specific electrical code requirements to meet. This is not a DIY-the-permit situation. Get a licensed electrician who knows pool and spa electrical codes. The requirements vary by state and locality, but GFCI protection, conduit depth, and breaker specifications are all going to come into play.
The lakeside dream setup: A small dock-mounted sauna — essentially a sauna cabin on a floating platform or built at the edge of a lake — is the ultimate outdoor sauna idea for rural lake properties. I’ve seen these done beautifully in Northern Wisconsin and Minnesota, and they tend to become the most-used structure on the entire property. Build it with a simple porch, a ladder into the water, and a wood-fired heater, and you’ve essentially replicated what Finnish families have been doing for a thousand years.
Budget range: $10,000–$50,000+ depending on proximity to water, site access, and whether marine-grade materials are needed.
6. The Sauna Shed Conversion — Best Budget Outdoor Sauna Idea
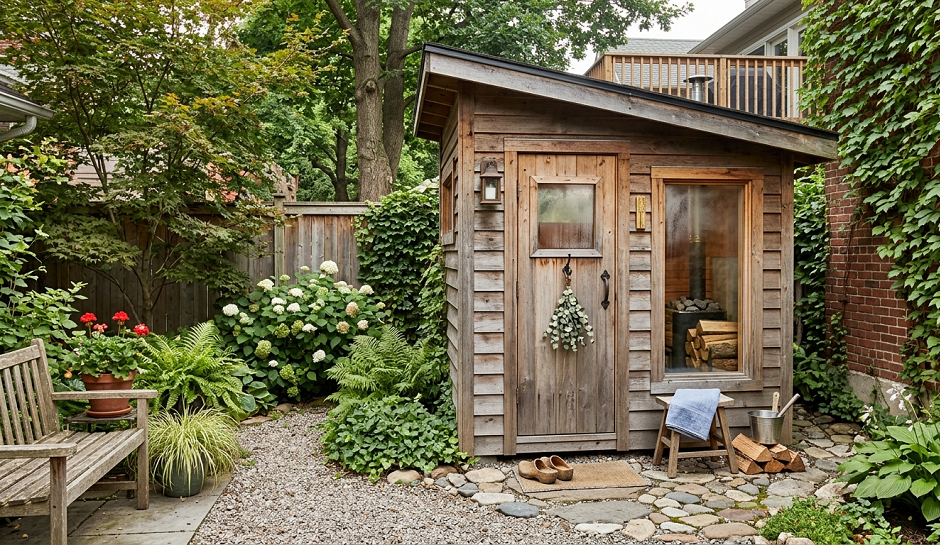
This is the most underrated outdoor sauna idea on this list, and it’s the first thing I recommend to people who are nervous about budget or commitment. Take an existing shed — or buy a new one from a big-box store — and convert it into a sauna. Done right, it looks intentional, performs beautifully, and costs a fraction of a purpose-built structure.
The key to making a shed conversion look and feel like a real sauna — and not just a shed with a hot box in it — is the interior build-out. You need to add a vapor barrier, insulation, sauna-grade paneling on the interior walls and ceiling, proper benches, and a quality heater. The exterior is already done. You’re just finishing the inside properly.
What to look for in a conversion-candidate shed: You want a shed that’s at least 8×10 feet to have a comfortable sauna room. Wood-framed construction is ideal. Avoid metal sheds — they’re not suitable for insulation installation and the thermal performance is terrible. Check that the floor is level and the roof doesn’t leak. Address any moisture issues before you insulate; sealing moisture inside a wall cavity is a bad day waiting to happen.
The interior build sequence:
- Remove existing interior finishes (if any).
- Install a vapor barrier on all walls and ceiling — 6-mil poly sheeting works fine.
- Add insulation between studs (rock wool or rigid foam).
- Install cedar tongue-and-groove paneling over the vapor barrier.
- Build two-tier benches along the back and side walls.
- Install your heater and wire it to a dedicated circuit.
- Add a sauna-specific thermometer/hygrometer combo to track conditions.
The whole interior conversion for a standard 8×10 shed runs $1,500 to $3,500 in materials, depending on heater choice. That’s hard to beat.
Budget range: $3,500–$8,000 total including shed purchase (or less if you’re converting an existing one).
7. The Sunken or Garden-Integrated Sauna — For Those Who Want Something Truly Unique
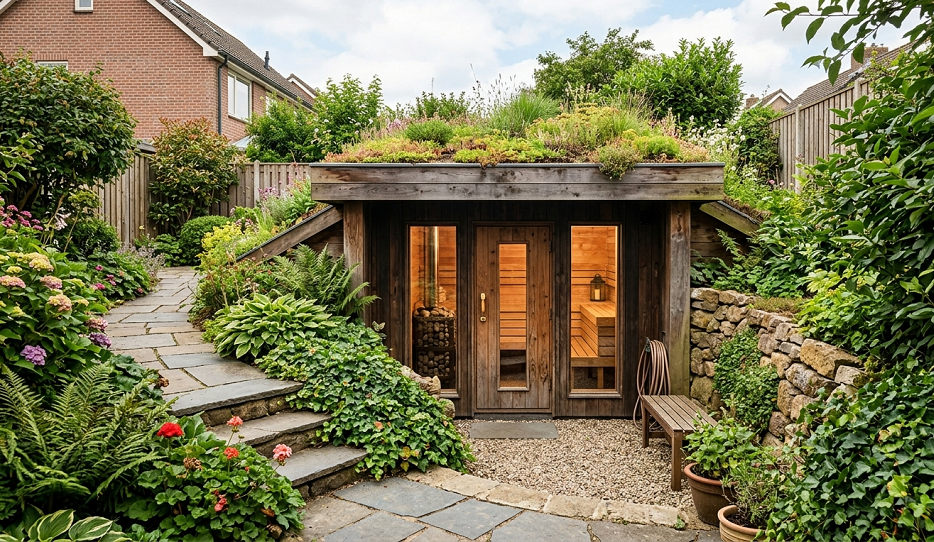
Here’s the one that takes more planning but earns every compliment you’ll ever receive. A sunken sauna — partially recessed into a hillside or garden slope — or a sauna that’s designed to look fully integrated into the landscape, is the most architecturally compelling option on this list. Instead of a structure in your garden, it becomes a structure of your garden.
I’ve seen a sunken sauna in a Vermont backyard that you’d walk right past unless you knew it was there. The roof was a planted sedum mat. The entrance was framed by two mature birch trees. The inside was immaculate cedar with a Harvia wood-fired heater and a view through a small window into a fern garden. It was, without any exaggeration, one of the most beautiful small spaces I’ve ever been in.
Site requirements: You need a natural or created slope of at least 3 to 4 feet to make a sunken or hillside sauna work without major excavation expense. The hillside acts as natural insulation, which actually improves thermal efficiency. Drainage must be planned carefully — a sunken structure that collects water is going to rot quickly, no matter how good your wood is.
Roof options for an integrated sauna: Sedum/living roof, metal standing seam, or cedar shingles all work. A living roof requires a proper waterproof membrane, drainage layer, growing medium, and appropriate plantings — it’s more involved than it looks, but the result is unmatched for landscape integration.
The planning investment: This type of build benefits enormously from working with a landscape architect or designer, even just for an hour-long consultation. Getting the site analysis right at the beginning saves you from expensive drainage and structural corrections later.
Budget range: $20,000–$60,000+ depending on excavation, structure size, and finish level.
Real Talk: What Can Go Wrong (And What’s Not Worth the Effort)
Alright. I’ve been enthusiastic for seven sections, so let me balance that out with the stuff nobody tells you in the glossy buying guides.
Ventilation is where most DIY saunas fail silently. Proper sauna ventilation — a low intake vent near the heater and a high exhaust vent on the opposite wall — is not optional. Without it, you get stale, oxygen-depleted air, uneven heating, and long-term moisture damage to the structure. I see this skipped constantly in online build threads, and it drives me crazy. Do it right.
Cheap heaters are a false economy. I’ve seen three sauna builds ruined by no-name electric heaters sourced from marketplace sites. Control failures, uneven heating, premature element burnout. Stick with brands like Harvia, Tylö, Helo, or EOS. Yes, they cost more. They also last 20 years.
Pre-fab kit quality is wildly variable. Not all barrel sauna kits are created equal. The cheap ones use thin-walled staves that warp in the first summer, hardware that rusts in two seasons, and doors that won’t seal properly. Research the specific brand, not just the price point. If a kit seems suspiciously cheap, it is.
Electric sauna saunas — specifically the infrared type — are, in my opinion, a waste of money for an outdoor build. I know infrared saunas have a devoted following, and they have some wellness benefits. But they don’t produce real löyly, can’t tolerate humidity the way a traditional sauna can, and feel like a glorified heating lamp compared to the full Finnish experience. For the price of a quality outdoor infrared unit, you can build a proper traditional sauna. I’ve said what I’ve said.
Don’t undersize the electrical circuit. Most quality sauna heaters need a 240V dedicated circuit at 30 to 60 amps. Plan this into your budget and timeline early; running a new circuit from your main panel can add $500 to $2,000 to the project depending on distance and accessibility.
Parting Wisdom
An outdoor sauna is one of the few home improvement projects where the “return on investment” question almost answers itself. Yes, it adds property value. But more than that, it becomes the thing you use every single week, the thing guests ask about every single visit, and the reason you actually go outside in February instead of collapsing on the couch.
Start simpler than you think you need to. A well-built barrel sauna will bring you more genuine pleasure than an over-complicated dream build that took three years and broke your budget. Get in the habit of using it, understand what you love and what you wish you’d done differently, and expand from there.
My biggest regret? Not building one sooner.
Now I want to hear from you — are you starting from scratch, or working with an existing structure? Do you have a slope, a pool, a tiny city lot? Drop your situation in the comments below and I’ll give you my honest take on which of these ideas makes the most sense for your space. There are no wrong starting points, just wrong assumptions — and I’d rather you make mine than your own.
Have questions about specific heater brands, permit processes, or material sourcing? Ask in the comments. I check regularly and nothing makes me happier than a good outdoor sauna problem to think through.