
Your windowsill is begging for plants, but every time you try to make it work, something either falls off, dries out in three days, or looks like a sad afterthought. I know that feeling. My first attempt at a window ledge garden was a single plastic pot of petunias that blew off my second-floor sill in a light breeze, shattered on the pavement below, and scared my neighbor half to death.
If you’ve got limited outdoor space — a city apartment, a narrow townhouse, a rented flat where you can’t dig up the yard — your window ledges are prime real estate. And most people are leaving that space completely wasted. Let me change that for you.
Why Window Ledge Container Gardening Is Worth Your Time (and Money)
Before we get into specific ideas, here’s something most gardening articles won’t tell you: window ledge gardening is harder than it looks, but once you crack it, it’s one of the most rewarding things you can do with a small outdoor space.
You’re working with extreme conditions — full wind exposure, intense reflected heat from brick or siding, fast-draining containers that dry out overnight in summer. I’ve killed more herbs on a south-facing sill than I care to admit. But I’ve also grown some of my most productive basil plants, the prettiest trailing lobelia I’ve ever had, and even a compact cherry tomato that fed me through July — all from window ledges no wider than a foot.
The key is matching your container choice, your plant selection, and your watering system to the realities of ledge life. Start there, and everything else falls into place.
1. Classic Wooden Window Box Planters for a Timeless Look
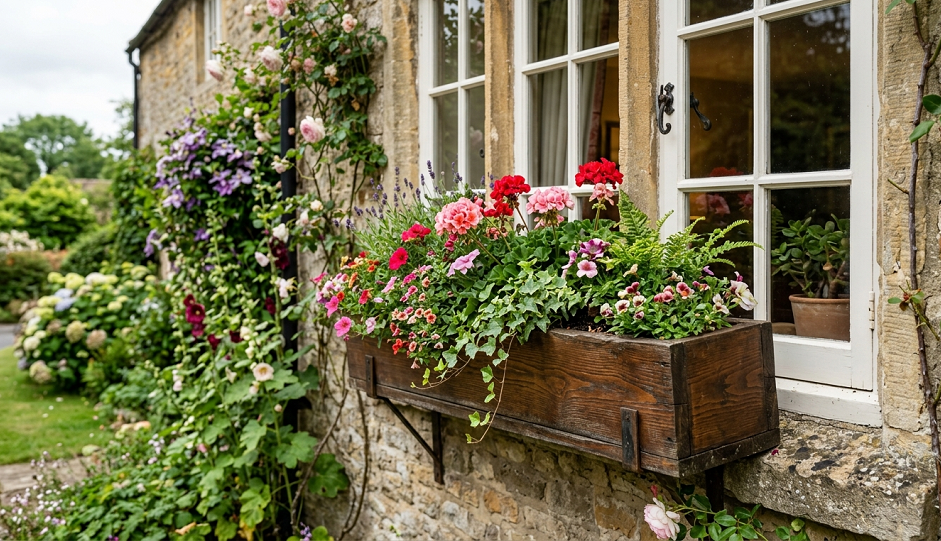
The wooden window box is the original window ledge container, and for good reason. A well-built cedar or redwood box insulates roots from temperature swings, gives you deep soil volume (critical for healthy roots), and looks genuinely beautiful whether you’re going for cottage-garden charm or clean modern lines.
I made mine from untreated cedar about eight years ago and lined them with landscape fabric before filling with soil. They’re still going strong. The common mistake I see people make is buying pine window boxes from a big box store, skipping the sealant, and then wondering why the wood is rotting by year two. Always seal or use naturally rot-resistant wood — cedar, redwood, or teak if you’re feeling fancy.
For drainage, drill at least three holes per foot of box length, minimum half an inch in diameter. I can’t stress this enough. Waterlogged roots are a death sentence in containers. Set your boxes on small rubber feet or wedge a few pennies underneath so water can actually escape.
A 24-inch cedar window box is my personal go-to for window ledge herb gardens. Plant thyme, chives, and compact sage together — they all have similar watering needs and look great as a trio. The sage will eventually try to take over, so cut it back hard every spring.
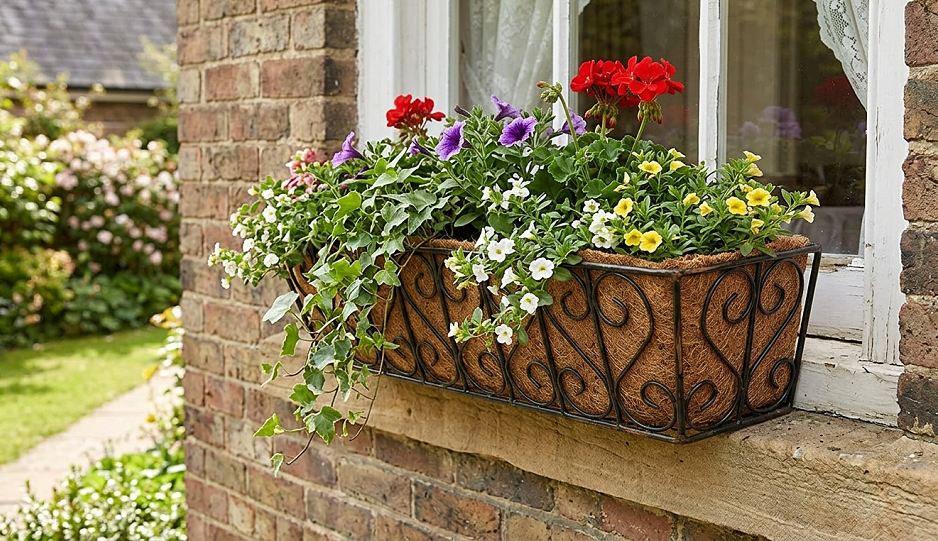
2. Wrought Iron Window Box Brackets and Metal Planters for a French Quarter Vibe

If you want your window ledge to look like something out of New Orleans or a European street café, wrought iron is your material. The bracket-style setup — where a curved iron holder cradles a liner or clay pot — gives you incredible flexibility because you can swap out the inner container seasonally without reinstalling hardware.
Metal containers do heat up fast in direct sun, which will cook roots if you’re not careful. I learned this the hard way with a galvanized steel trough on my west-facing sill — the soil hit near-boiling temperatures on summer afternoons and I lost an entire planting of pansies. The fix is simple: use a coco coir liner inside the metal, or double-pot with a plastic nursery pot as a buffer. The air gap insulates the roots.
For plants, go with sun-loving, heat-tolerant varieties in metal containers: portulaca, vinca, creeping Jenny, or dwarf zinnia. These plants actively enjoy the extra warmth, and they’ll reward you with blooms all summer long.
Wrought iron brackets are permanent installations, so make sure you’re anchoring into something structural — masonry anchors in brick, or into wall studs if you’re on wood framing. A 20-pound planter full of wet soil is no joke if it comes down on someone.
3. Self-Watering Window Box Planters: The Lazy Gardener’s Best Friend
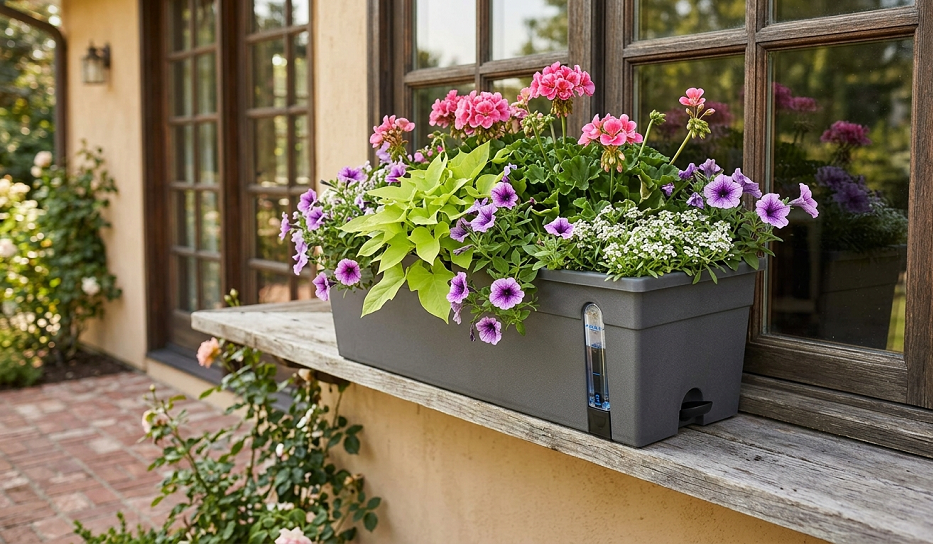
If I could go back and start my window ledge garden from scratch, I’d use self-watering containers from day one and save myself years of coming home to dead basil. Self-watering planters have a reservoir at the bottom separated from the soil by a wicking layer. You fill the reservoir every few days instead of watering daily, and the roots drink what they need.
On a sun-exposed window ledge in summer, regular containers can need water twice a day. That’s not realistic for most people. Self-watering boxes cut that down to every three to five days, and your plants actually grow better because they’re never going through the boom-bust cycle of soaking wet to bone dry.
The brands I’ve personally used and liked are Lechuza (German engineering, worth the price) and the Crescent Garden TrueDrop line. I’ve found the generic cheap versions at garden centers are a total waste of money — the wicking mechanism clogs or breaks within a season, and then you’ve just got a regular planter with a useless reservoir underneath.
Self-watering boxes are especially good for herbs and salad greens on window ledges. Lettuce, spinach, and basil are particularly sensitive to moisture swings, and they’ll thrive in a self-watering setup in a way they simply won’t in a standard box.
4. Coco Coir Liner Window Baskets for Lightweight Flexibility
Wire baskets lined with coco coir are a classic for a reason — they’re lightweight, they look natural and beautiful, and they drain so freely that root rot is almost impossible. The coir holds just enough moisture without staying soggy, and the open sides of the wire basket allow air to reach the roots from all angles.
For window ledge use, the biggest advantage is weight. A coco coir-lined wire basket with damp soil weighs significantly less than an equivalent ceramic or concrete container. That matters when you’re dealing with ledge weight limits, especially on older buildings.
The tradeoff is that coir dries out faster than almost any other container material. In hot weather, I water my coir baskets daily. That’s a real commitment, and if you travel or forget to water, they’ll punish you for it. I once came back from a five-day trip in August to find my coir basket had basically turned into a terracotta brick of dry roots.
Plant selection matters a lot with coir baskets. Trailing plants like bacopa, million bells (calibrachoa), ivy-leaf pelargoniums, and sweet potato vine are spectacular choices. They spill beautifully over the edges, soften the wire structure, and tend to be more drought-forgiving than vegetables or herbs. A single basket with three calibrachoa plants in contrasting colors — purple, yellow, and hot pink — is genuinely one of the prettiest things you can do on a window ledge.
5. Terracotta Pots in Window Ledge Clusters for a Mediterranean Garden Feel

Grouping several terracotta pots of different sizes on a wide window ledge creates an informal, layered look that I find much more interesting than a single long planter. It also lets you customize watering and soil mix per plant, which is a genuine advantage if you’re mixing herbs with flowers or succulents.
Terracotta is my favorite material for succulents and drought-tolerant herbs like rosemary, thyme, and lavender specifically because it breathes. The porous walls wick away excess moisture, which is exactly what those plants need. For moisture-loving plants like impatiens or ferns, terracotta is the wrong call — they’ll dry out before you can blink.
The practical challenge with terracotta clusters is keeping them on the ledge safely. I use non-slip rubber matting underneath (the kind sold for drawer liners works perfectly), and for any pot that’s taller than it is wide, I tie it to a wall hook with a discreet piece of wire. It looks a little paranoid until you’ve had a terracotta pot crash through a screen door. Ask me how I know.
Aged terracotta — the kind with white mineral deposits and a bit of green moss — looks phenomenal. You can artificially age new pots by painting them with a slurry of yogurt and water, then leaving them outside for a week. It sounds ridiculous but it works.
6. Vertical Pocket Planters Mounted on Window Surrounds
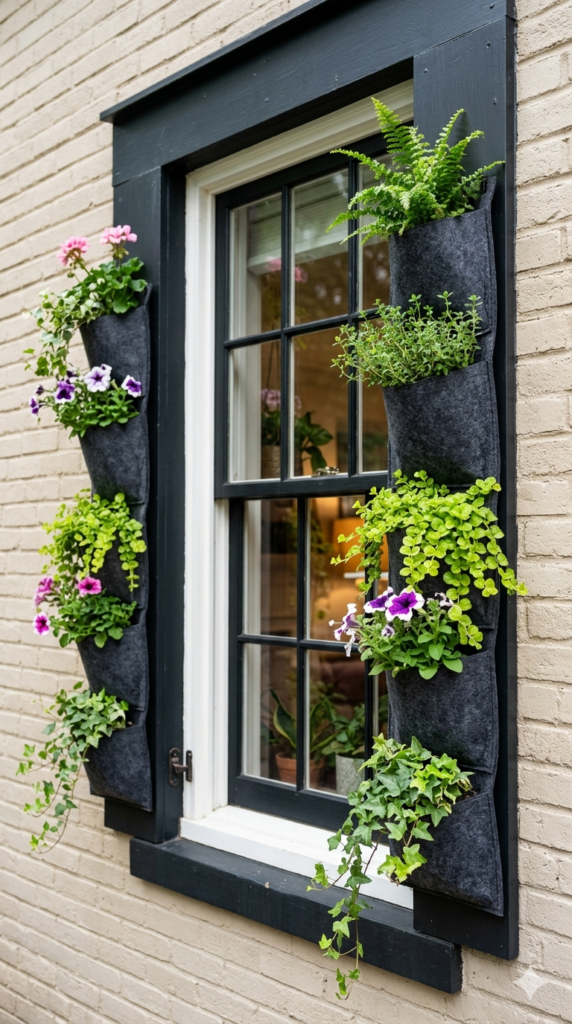
Here’s where things get interesting for people with truly minimal ledge space. If your ledge is only six inches wide or you just don’t have one at all, a fabric pocket planter mounted to the wall beside or below the window gives you vertical growing real estate without eating into the ledge itself.
I mounted a five-pocket felt planter on the exterior wall beneath my kitchen window last summer and grew nothing but herbs — one pocket each for basil, cilantro, flat-leaf parsley, chives, and thyme. It was the most functional garden I’ve ever had. I could grab fresh herbs through the window screen without even going outside.
Felt pocket planters dry out extremely fast — even faster than coir. Daily watering in summer is non-negotiable. I eventually ran a small drip irrigation line through the pockets from a battery-powered timer, and that solved the problem completely. The whole setup cost under forty dollars.
Not everything works in pockets. Deep-rooted plants — tomatoes, peppers, most root vegetables — will struggle. Shallow-rooted herbs, compact lettuce varieties, strawberries, and trailing flowers are your best options.
7. Hypertufa or Lightweight Concrete Troughs for a Dramatic Structural Look
Hypertufa is a DIY mix of Portland cement, peat moss, and perlite that you can mold into containers that look like ancient stone troughs. I made my first batch six years ago, convinced I’d ruin it. The result was three of the most beautiful planters in my entire garden, and they’ve survived winters in zone 6 without cracking.
The texture is genuinely stunning — rough and organic, nothing like the plastic-trying-to-look-like-stone containers that I’ve found to be a total waste of money, even if they look pretty on Pinterest. Hypertufa actually gets better-looking as it ages and develops a patina.
Weight is the main concern for window ledge use. True hypertufa is lighter than concrete but heavier than most other materials. I’d only use it on masonry sills or ledges with clear structural support. For wooden window ledge boxes, stick to the lighter options on this list.
Hypertufa is perfect for alpine plants, sedums, and small ornamental grasses that want lean, well-drained soil and tough conditions. A trough filled with various sedum varieties and a dwarf ornamental allium is low-maintenance, drought-tolerant, and looks spectacular from late spring through fall.
8. Painted Galvanized Steel Buckets for a Farmhouse Aesthetic
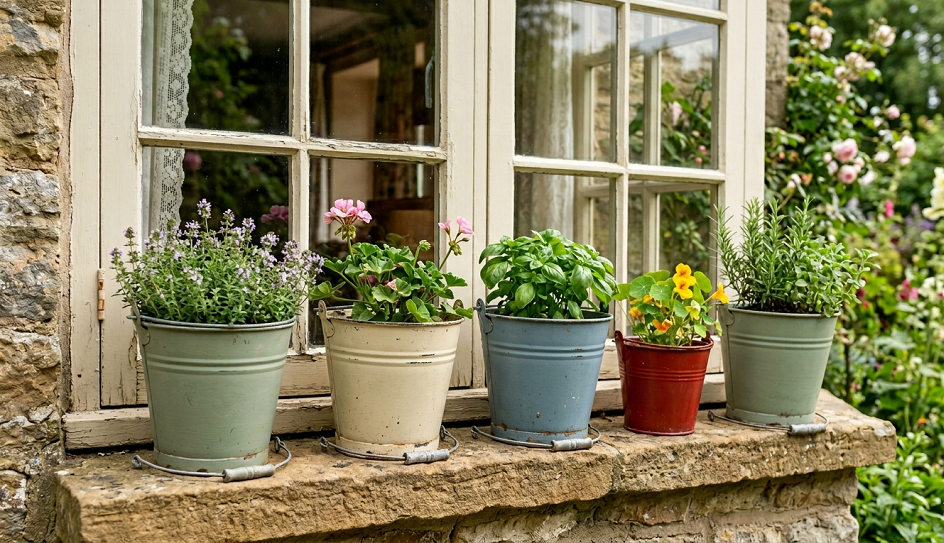
Galvanized steel buckets and troughs from farm supply stores are cheap, durable, and genuinely charming when you group three or four of them in graduating sizes on a window ledge. Drill drainage holes, paint them whatever color matches your trim (I’ve done matte black, sage green, and a warm terracotta orange), and you’ve got custom containers for under ten dollars each.
The heat retention issue I mentioned in tip two applies here — double-pot with plastic liners, especially for sun-baked south or west-facing ledges. On north or east-facing ledges with less direct sun, this is less of a problem.
I’ve had great luck growing compact flowering plants in galvanized buckets on my east-facing sill: nemesia, diascia, sweet alyssum, and compact marigolds all performed well. They don’t get the brutal afternoon heat that would stress the roots through the metal walls.
One practical note: the paint on galvanized steel chips more than on other materials, especially where the pot contacts the ledge. Apply a primer coat specifically designed for metal before your color coat, and touch it up each spring. It takes about twenty minutes and keeps everything looking sharp.
9. Repurposed Colanders and Vintage Kitchen Finds for Quirky Character
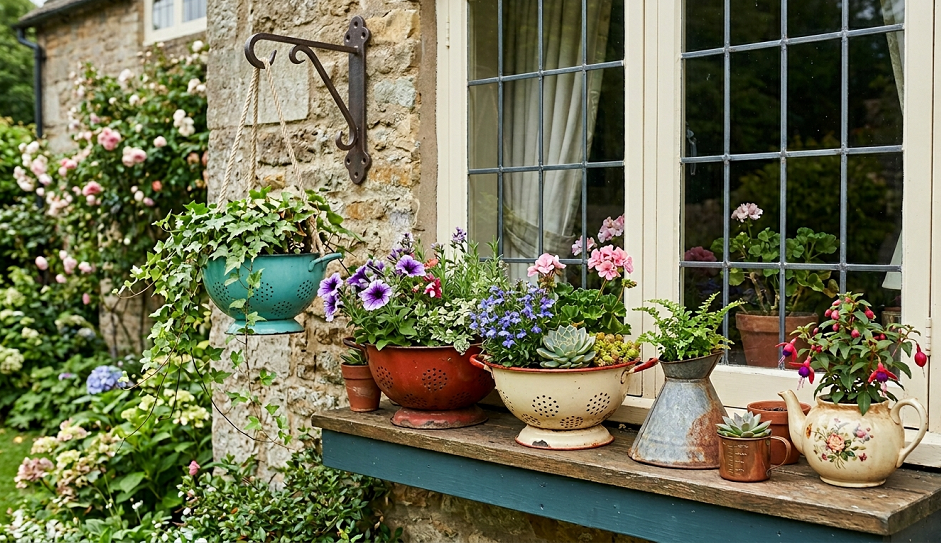
This is my favorite option for anyone who wants their window ledge garden to be a genuine conversation starter. Old enamelware colanders, vintage baking tins, chipped enamel roasting pans — any vessel with natural drainage holes (or that you can drill) becomes a planter with immediate personality.
I picked up a battered blue-and-white enamel colander at an estate sale for two dollars, planted it with trailing variegated ivy and a compact petunia, and it sat on my window ledge for three summers. Every single person who visited asked about it.
The limitation is soil volume. Most vintage kitchen finds are shallow, which works for succulents, herbs, or annuals but rules out anything with deep roots. Pansies, violas, alyssum, compact herbs like thyme and chives, and alpine strawberries all work beautifully in shallow vintage containers.
These containers age beautifully — rust and chipping enamel just adds to the charm rather than looking neglected. They’re also essentially free to acquire at thrift stores, estate sales, or even your own kitchen clear-out.
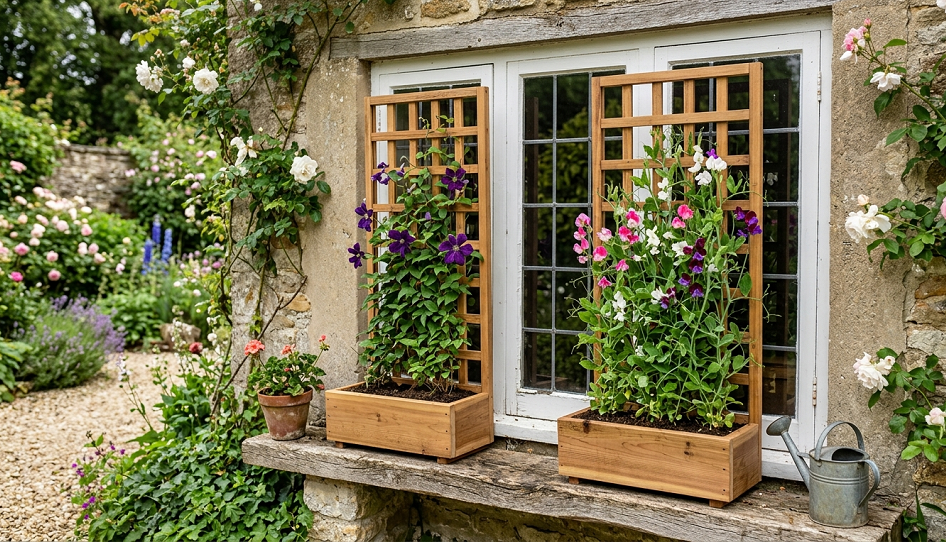
10. Trellised Mini Planter Boxes for Climbing Plants

A standard window box gets a lot more interesting when you attach a small trellis to the back. This is a setup I wish I’d tried years earlier. Even a 12-inch section of bamboo lattice or a bent wire form zip-tied to the wall behind the box gives climbing and trailing plants something to work with, effectively doubling your visual height for the same ledge footprint.
I’ve grown compact morning glories, sweet peas, and even a small-fruited cucamelon vine on a trellised window box. The cucamelon — a tiny watermelon-lookalike that tastes like cucumber with a lime kick — was the most-photographed thing in my garden that summer.
For the box itself, go deeper than standard — at least eight inches of soil depth — because climbing plants push harder roots than typical annuals. Use a mix with extra compost for moisture retention, since taller plants draw more water.
The trellis needs to be anchored to the wall, not just the box. A planter full of established vine growth catches wind like a sail, and you don’t want to test the limits of a window box bracket in a summer storm.
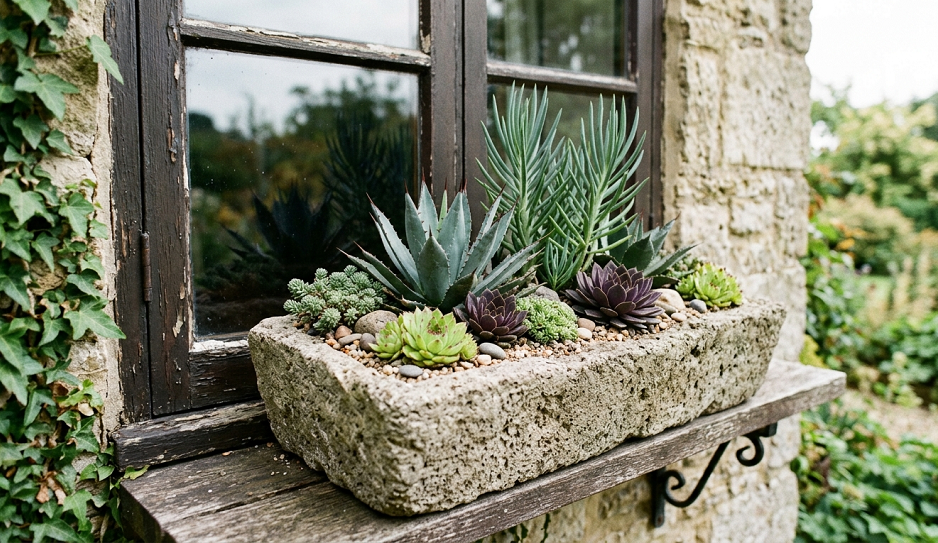
11. Succulent and Drought-Tolerant Ledge Gardens for Low Maintenance Results
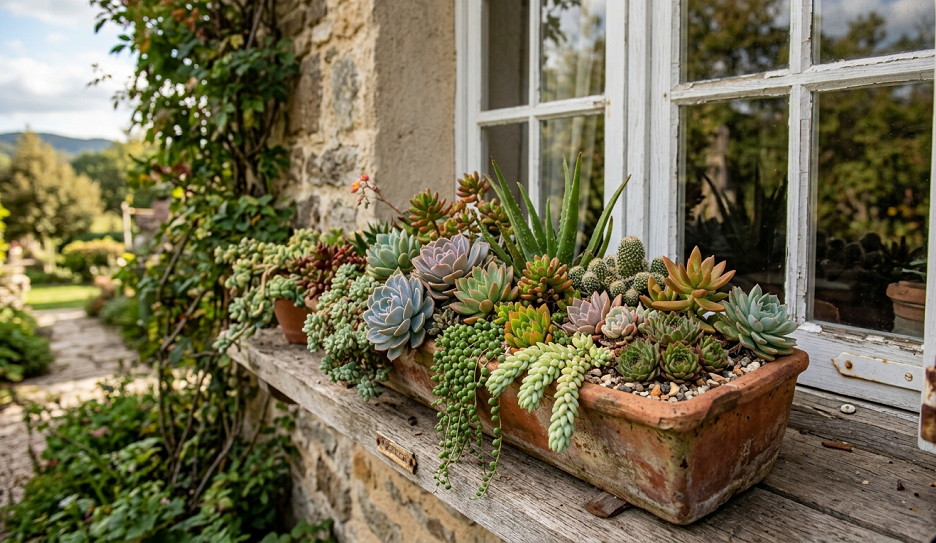
If you are honest with yourself about how often you’ll actually remember to water — and most people are not daily waterers — a succulent window ledge container garden is the answer. A wide, shallow trough or a cluster of terracotta pots filled with echeveria, sedum, sempervivum (hens and chicks), and small aloe varieties will look incredible, need watering maybe once a week in summer, and survive almost anything you throw at them.
I set up a full succulent ledge at my mother’s house two years ago because she was watering everything too infrequently and killing more plants than she was growing. The succulent ledge has required almost zero intervention and somehow looks better than it did when I first planted it.
Use a cactus and succulent potting mix — never regular potting soil, which holds too much moisture. Perlite is your friend: mix it into whatever soil you use at about a 50/50 ratio for the best drainage. Succulents in the wrong soil will rot at the crown and die slowly in a way that’s frustrating to diagnose.
Hardy sempervivum varieties are genuinely frost-tolerant and can overwinter on the ledge in most temperate climates, which means you’re not starting from scratch every spring. For year-round visual interest, mix in a few ornamental grasses or dwarf sedge — they add movement and texture that succulents alone can’t provide.
Quick Side Note on Anchoring: Please Don’t Skip This
Every single container on a window ledge needs to be secured. I’m not being dramatic. A two-gallon pot of wet soil weighs close to fifteen pounds. A window box might weigh forty pounds soaked. A strong gust of wind, a child reaching out a window, a building vibration — that’s all it takes. Use purpose-built window box brackets, non-slip matting, and safety cables or wire for anything taller than it is wide. Two minutes of setup prevents a very bad day.
Real Talk: What Goes Wrong with Window Ledge Container Gardens
I’m not going to pretend this is all charm and cascading petunias. Here’s where most people struggle — and where I’ve personally failed.
Overwatering kills more ledge plants than underwatering. People see their plants wilting in the heat and reach for the watering can four times a day. But wilting in afternoon heat is often just the plant conserving moisture — it doesn’t mean the soil is dry. Always stick a finger two inches into the soil before you water. If it’s still damp, walk away.
Choosing the wrong container size. Tiny pots look adorable in photos and die in real life. On a hot ledge in direct sun, a four-inch pot can go from well-watered to bone dry in four hours. Go bigger than you think you need — a minimum of eight inches deep and twelve inches long for most planting combinations.
Ignoring weight limits. This is especially true in older buildings, apartments, and any ledge that’s decorative rather than structural. Talk to your building manager or a contractor before loading up a ledge you’re not sure about. Losing a window box to a snapped bracket isn’t just about the plants.
Planting shade lovers in full sun (and vice versa). The ledge environment is more extreme than your average garden bed. Full sun means full sun — reflected off glass, brick, and pavement. Shade means genuine shade — possibly with cold air channeled off a north-facing wall. Read plant tags seriously, and when in doubt, start with one or two plants to test the conditions before committing a full planting.
Wrapping Up: Start Small, Build What Works
My best piece of advice after years of window ledge gardening is this: start with one box, one planting, and one season before you go all-in. Get to know your specific ledge — how fast it dries out, how much direct sun it actually gets at different times of day, whether it’s a wind tunnel or a sheltered pocket. That knowledge is worth more than any container or plant combination I can recommend.
Your window ledge can be genuinely beautiful. It can grow food, attract pollinators, smell like a herb garden every time you open the window, and transform the look of your home’s exterior with almost no ground space required. All it takes is the right setup and a little patience with yourself when things don’t work out the first time.
I’ve killed plants on every ledge I’ve ever had. I’ve also grown things that made strangers stop on the sidewalk to take photos. Both are part of the process.
What’s your window ledge situation — are you working with a wide masonry sill, a narrow wood ledge, or somewhere in between? Drop your setup in the comments below and I’ll tell you exactly what I’d plant there. And if you’ve got a window ledge win (or disaster) of your own, I genuinely want to hear it.