
Standing water on your walkway after every rainstorm is more than annoying. It’s a sign your yard is fighting you, and every puddle is a little reminder that water has to go somewhere. If it’s not soaking into the ground, it’s pooling by your foundation, drowning your flower beds, or turning your favorite path into a mud pit.
My neighbor Carla used to joke that her backyard path was really a seasonal creek. Every spring she’d lose a garden clog to the mud near her back steps. That’s the exact problem permeable gravel pathways solve, and they solve it without a contractor’s price tag.
A solid gravel path lets rainwater filter straight down into the soil instead of running off into a soggy mess. No standing water, no erosion carving trails through your lawn, and no slippery moss taking over your walkway. Better yet, most of these projects are weekend jobs. Grab some gloves, and let’s get your yard drinking water the way it’s supposed to.
Why Permeable Gravel Pathways Beat Solid Pavers for Drainage
Before I get into the ideas themselves, here’s the quick “why” behind all of this. Solid surfaces like poured concrete or tightly fitted pavers act like a raincoat for your yard. Water hits them and runs off fast, usually straight toward your house or a low spot that turns into a swamp.
Gravel is different. The gaps between each stone let water pass through gradually, almost like a filter. That slows the flow down and lets your soil absorb it the way nature intended. This is exactly why permeable paving is showing up more in stormwater management guides and why a lot of cities now offer rebates for reducing hard, impermeable surfaces on residential lots.
I’ve built gravel paths that handled a Kansas thunderstorm without a single puddle showing up the next morning. Meanwhile, my old concrete patio turned into a wading pool every single time. Once you switch to permeable gravel, you’ll wonder why you waited so long.
1. The Classic Crushed Gravel and Paver Combo Path
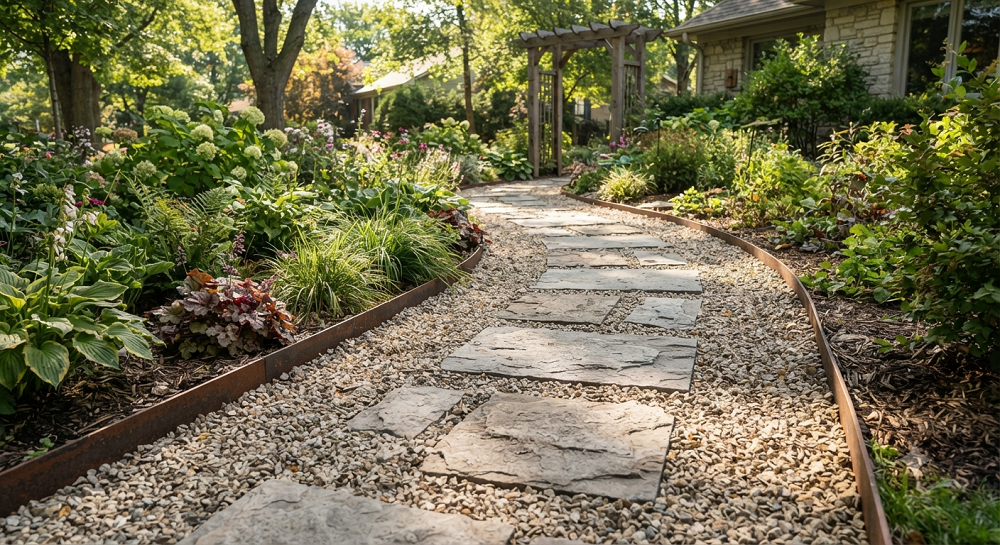
This is the path I recommend to almost every first-timer because it’s forgiving and looks polished without much fuss.
You lay a row of flat pavers or stepping stones down the center or along the edges, then fill the surrounding space with crushed gravel. The pavers give you a firm, stable spot to walk on, and the gravel handles the drainage work around them.
Start by digging out your path area about 4 to 6 inches deep. Add a compacted base layer of crushed rock, set your pavers where you want them, then pour in your gravel fill around each one. I like using 3/8-inch pea gravel or crushed granite because it compacts nicely and doesn’t shift too much underfoot.
The real trick here is spacing. Leave at least an inch or two of gravel buffer around each paver so water has somewhere to escape instead of pooling on top of the stone. My first attempt at this had the pavers packed too tight, and I basically built tiny bathtubs into my own path. Lesson learned the hard way, so you don’t have to.
Cost-wise, this is one of the cheapest options on the list if you shop secondhand for pavers. I’ve picked up matching stepping stones from neighbors doing yard renovations for practically nothing. Just make sure whatever pavers you use are at least 2 inches thick. Thinner decorative stones crack under regular foot traffic within a season, and then you’re back to square one with a broken path and a Saturday you’ll never get back.
2. Permeable Gravel and Grass Checkerboard Walkway

If you want a path that still feels like part of your lawn instead of a hard structural feature, this design is a favorite. It alternates squares of gravel with squares of grass, creating a checkerboard look that softens the whole space.
To build it, use pressure-treated lumber, brick, or steel edging to create a grid of square or rectangular sections. Fill every other section with gravel and leave the rest open for grass or low-growing groundcover like creeping thyme.
This layout works especially well for side yards or garden paths where you want something a little more decorative than a straight gravel strip. It also breaks up large gravel areas visually, which matters if you’ve got a smaller yard where too much stone can start feeling like a driveway instead of a garden.
One thing I always tell people: pick grass or groundcover that can handle some foot traffic. Regular lawn grass gets beat up fast in a checkerboard path. Creeping thyme, dwarf mondo grass, or Irish moss hold up much better and smell fantastic when you brush past them.
Sizing your squares matters more than people expect going in. Anything smaller than about 12 by 12 inches starts to feel choppy underfoot, almost like you’re playing hopscotch just to walk to your mailbox. I usually go with 16 to 18 inch squares for a natural stride length, and I always run a quick walk-through with stakes and string before committing to any digging. It’s a lot easier to move a stake than to redo a filled section of gravel.
3. Gravel-Filled Gabion Edge Path for Slopes
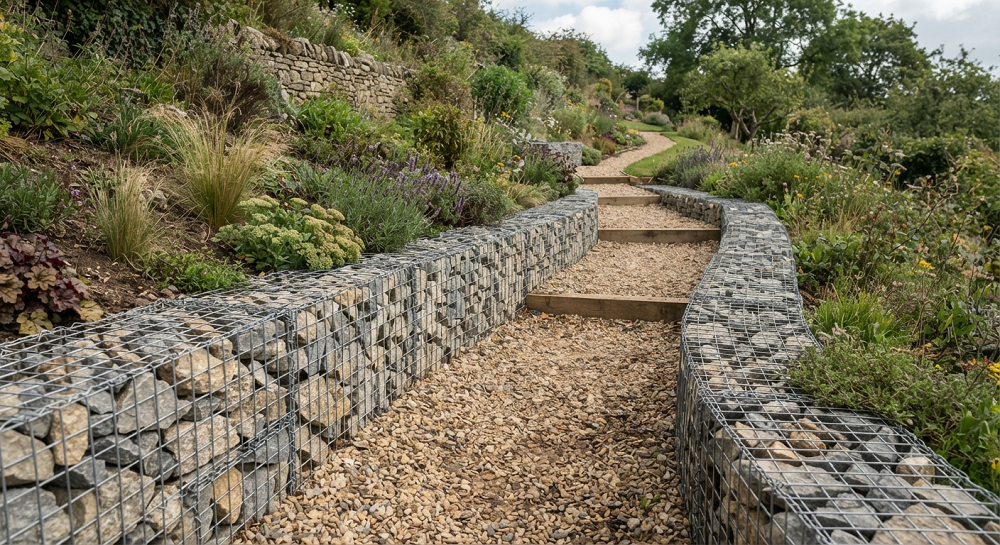
Sloped yards are where drainage problems get serious fast, and this is the setup I reach for when a client’s yard has any real grade to it.
Gabions are wire cages filled with stone, and when you line the edges of a sloped gravel path with them, they do double duty. They hold your gravel fill in place so it doesn’t wash downhill during heavy rain, and they create a defined, sturdy border that looks intentional rather than like loose rock scattered around.
Build your cages first using galvanized wire mesh, then anchor them into the slope with rebar stakes before filling them with larger stones, around 3 to 5 inches across. Once your gabion walls are in place, fill the pathway itself with smaller permeable gravel so water still filters through properly instead of sheeting off the surface.
This is a bigger project than most on this list, and I won’t sugarcoat it. It takes real muscle to fill those cages. But if you’ve got a sloped backyard that turns into a mudslide every spring, this is one of the few DIY options sturdy enough to actually hold.
Give yourself a full weekend for this one, maybe two if your slope is steep or long. Renting a small trailer to haul the stone in bulk saves a lot of trips compared to buying bagged gravel from the garden center. I made that mistake on my first gabion project and spent an entire Saturday just driving back and forth. Buy more stone than you think you need too. Gabion cages eat up material faster than a flat path because you’re filling a three-dimensional cage, not just a shallow trench.
4. Herringbone Gravel and Brick Border Path
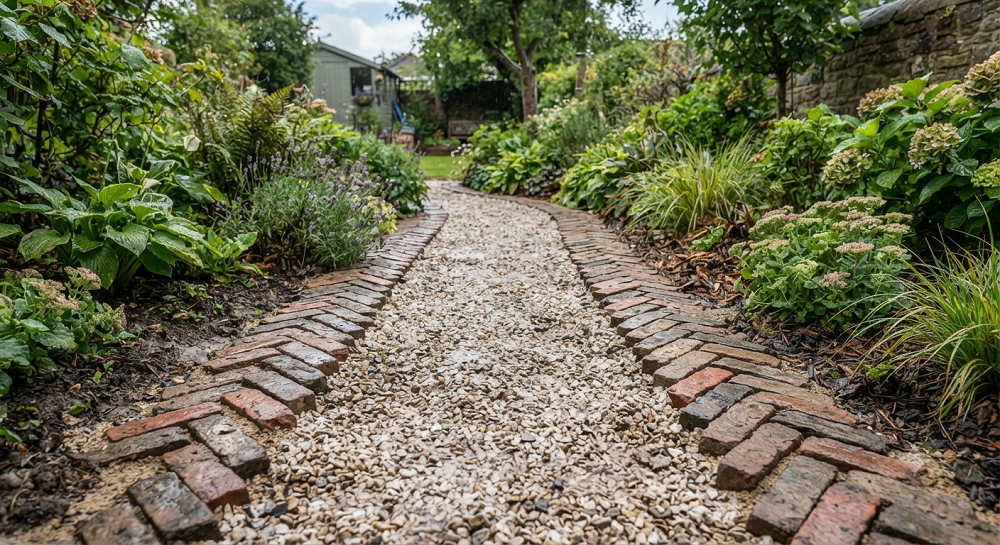
There’s something about a herringbone pattern that makes a path look expensive even when it cost you almost nothing. This design uses reclaimed brick set in a herringbone pattern along the edges, with loose gravel filling the walking surface in between.
Set your brick border first, angling each piece at 45 degrees to create that zigzag look. You don’t need mortar for a garden path like this. A firm base of compacted sand and gravel underneath holds everything in place just fine, and it keeps the whole system permeable instead of sealing it off with concrete.
Once your brick edging is set, fill the center with your gravel of choice. I’m partial to a warm-toned pea gravel here because it plays nicely against the reddish brick, but crushed limestone gives a cleaner, more modern contrast if that’s more your style.
This path takes a bit more patience because of the brick placement, but it’s one of the most compliment-worthy paths I’ve ever put in. My aunt used reclaimed bricks from an old chimney teardown for hers, and now half the neighborhood thinks she hired a professional landscaper.
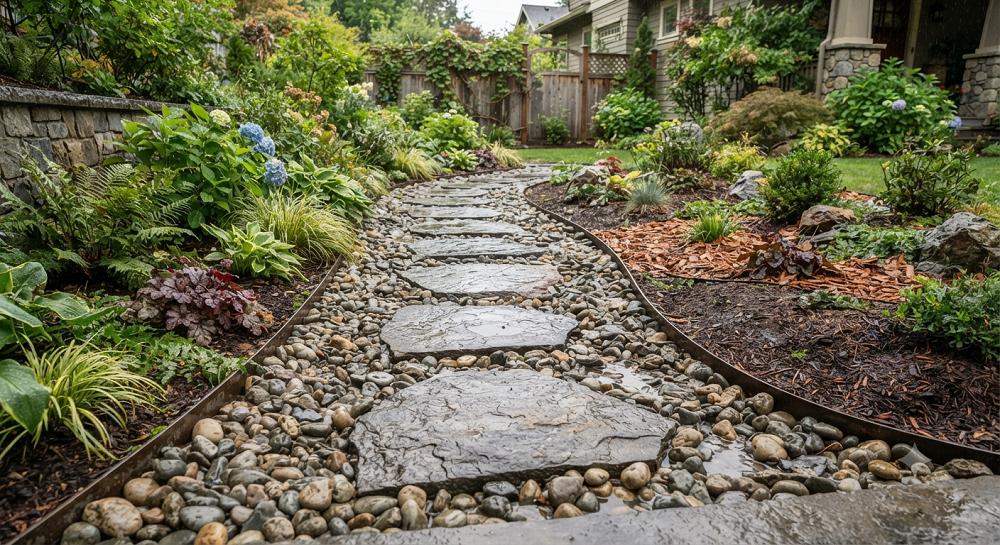
5. Stepping Stone and River Rock Drainage Trail

This one mimics a dry creek bed, and it’s perfect if you already have a low, wet spot in your yard where water naturally collects.
Instead of fighting the water’s natural path, you work with it. Dig a shallow channel following where water already tends to flow, line it with landscape fabric, then fill it with river rock in mixed sizes. Set flat stepping stones through the middle so you’ve got a real walking surface instead of just a rock-filled ditch.
The mix of stone sizes matters here. Larger rocks, around 4 to 8 inches, go at the edges and in spots where water moves fastest, since bigger stones resist getting swept away. Smaller river rock fills in between for that natural streambed texture, and it helps slow the water enough to let it soak in properly.
This is genuinely one of my favorite garden features because it solves a drainage headache while looking like it belongs there. I built one along the side of my own house where gutter runoff used to carve a trench through the lawn every single year. Now that water has somewhere productive to go, and the path looks like a designed feature instead of an accident.
6. Permeable Gravel Path With Buried French Drain
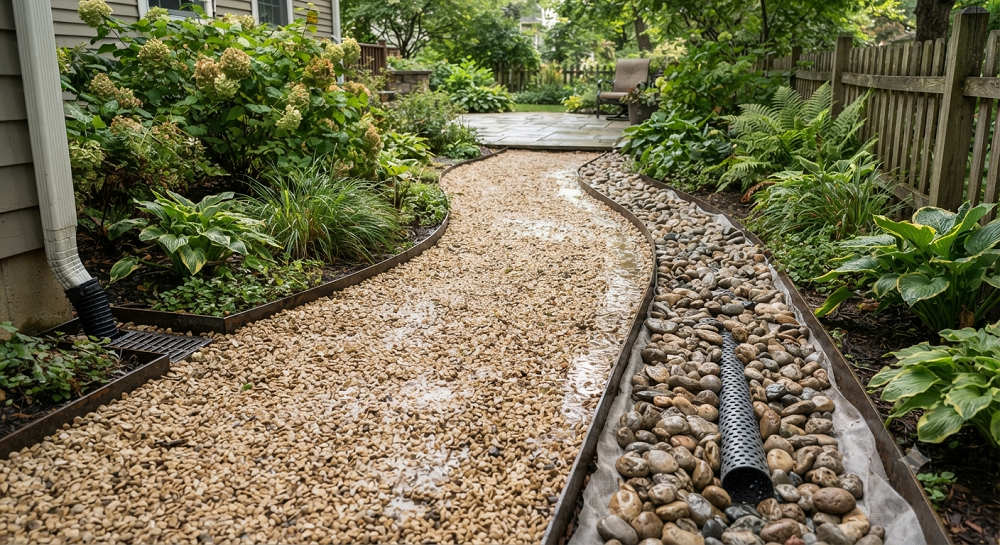
For yards with genuinely stubborn drainage problems, sometimes surface-level gravel isn’t quite enough on its own. This design pairs a gravel path with a buried French drain running underneath or alongside it, giving water an extra escape route below ground.
Dig your path trench a bit deeper than usual, around 10 to 12 inches. Lay perforated drain pipe wrapped in landscape fabric along the bottom, sloping it slightly toward a drainage outlet or dry well. Cover the pipe with a few inches of gravel, then build your walking surface on top the same way you would for a standard gravel path.
This setup handles serious volumes of water, which makes it ideal for spots near downspouts, low corners of the yard, or areas close to your foundation where standing water is more than a cosmetic problem. It’s more digging and more planning than the other ideas here, but it’s also the most effective option if you’re dealing with a genuine flooding issue rather than just a puddle that annoys you.
I’ll be honest, this is the one project on this list where I’d recommend calling a landscaper if your yard’s grading is complicated. A French drain installed at the wrong slope does basically nothing, and re-digging a 12-inch trench twice is not a fun weekend.
7. Mulch and Gravel Hybrid Woodland Path
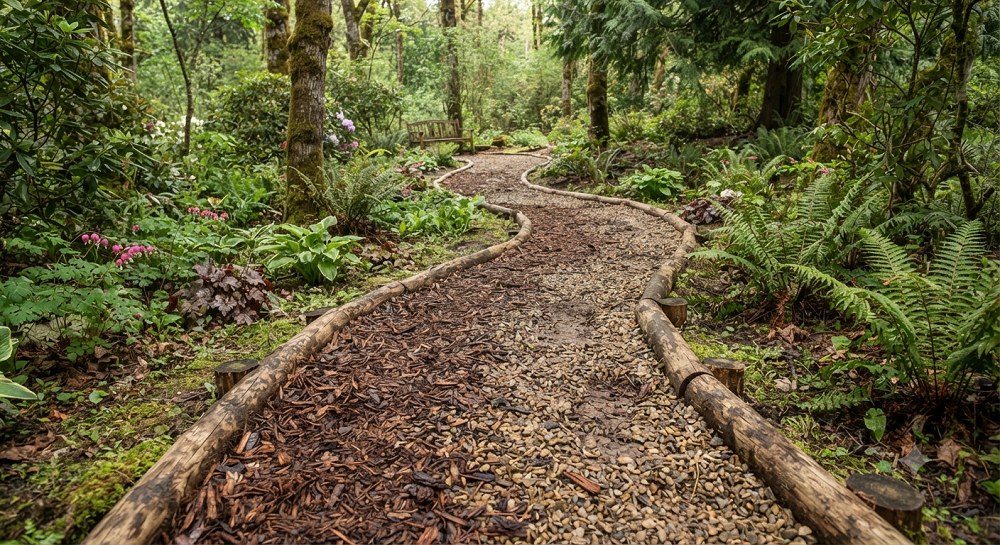
Not every path needs to look formal, and if your style leans more toward a shaded woodland garden, this hybrid design blends organic mulch sections with permeable gravel strips for both texture and drainage.
Alternate sections of gravel with sections of shredded bark mulch along the length of your path. The gravel sections handle the heavy water flow in low or wet spots, while the mulch sections keep things soft underfoot and blend naturally into a garden setting with ferns, hostas, or shade-loving perennials.
Use edging between each section so the mulch and gravel don’t migrate into each other over time, because trust me, they will if you skip this step. Metal or bender board edging works best since it holds a curve, which most woodland paths naturally have.
This design won’t handle heavy rainfall quite as efficiently as straight gravel, since mulch does slow water absorption somewhat compared to open stone. But for a shaded backyard path where looks and comfort matter as much as drainage, it’s a nice middle ground. My own side path uses this hybrid style, and it’s genuinely the most pleasant one to walk barefoot on a summer evening.
Quick side note: whichever style you choose, always lay landscape fabric or weed barrier underneath your gravel before you fill it in. Skip this step and you’ll be pulling weeds out of your beautiful new path within a month. I learned that one the expensive way, twice.
Real Talk: What Can Go Wrong With DIY Gravel Pathways
Here’s where I get honest about the parts nobody puts in the pretty Pinterest photos.
Gravel migrates. No matter how carefully you edge your path, gravel walks. It gets kicked onto the lawn, tracked into the house, and slowly disappears into the soil underneath over a few seasons. Plan on topping off your gravel every year or two. It’s not a one-and-done project.
Weeds happen anyway. Even with landscape fabric, seeds blow in and root right on top of the gravel itself. It’s less weeding than a bare dirt path, but it’s not zero. Budget fifteen minutes a month for a quick pull-through during growing season.
The wrong gravel size ruins the whole thing. I’ve seen people use gravel that’s too fine, and it compacts down into something close to concrete, which defeats the entire purpose of a permeable path. Too large, and it’s uncomfortable to walk on and awful for anyone using a cane or walker. Stick to 3/8-inch to 3/4-inch stone for most walking paths.
Slopes need real planning, not guessing. If your yard has any real grade to it, gravel without proper edging or a gabion border will slide downhill after enough heavy rain. I’ve re-shoveled more than one client’s “finished” gravel path back into place after a bad storm because we skipped a proper border. Don’t skip the border.
It’s not actually maintenance-free. A lot of gravel path tutorials make it sound like you install it once and never think about it again. That’s not true. Between refilling low spots, pulling occasional weeds, and raking it back into shape after heavy use, plan on a little seasonal upkeep. It’s still way less work than a lawn, but it’s not zero.
Snow and ice complicate things. If you live somewhere with real winters, gravel paths get tricky once the snow flies. You can’t run a snowblower over loose stone without launching gravel across your yard, and shoveling tends to drag stone along with it. A flat-bladed shovel used carefully helps, but honestly, gravel paths work best in climates without heavy snow, or in spots you’re willing to hand-clear.
Final Thoughts on Building Your Own Drainage-Friendly Path
A good gravel path does more than look nice. It quietly solves a problem your yard has probably been fighting for years, one rainstorm at a time. Pick the style that fits your space, get your base layer right, and don’t skip the edging or the landscape fabric. Those two shortcuts cause 90% of the regrets I hear about.
Start small if you’re not sure. A short test section near a problem spot will teach you more about your soil and drainage needs than any article, including this one.
Which of these designs fits your yard best, and what’s your biggest drainage headache right now? Drop it in the comments below. I read every one, and I’d love to help you figure out the right fix.