
Your front porch is the first impression your home makes. It’s a warm welcome for guests and a cozy spot to relax with a cup of coffee and enjoy the fresh air. But creating a beautiful and inviting porch space doesn’t have to break the bank. With a little creativity and some DIY magic, you can transform your porch into a charming haven that reflects your unique style.
The best part? DIY porch decor allows you to personalize your space and add a touch of your personality. Plus, it’s a fun and rewarding way to spend a weekend afternoon. So, grab your toolbox and get inspired by these 17 incredible DIY porch decorating ideas!
1. Upcycled Planter Makeover: Breathe New Life into Old Pots
Upcycling is all about giving new life to old items, and it’s a fantastic approach for eco-conscious porch decor. Take a look at those dusty paint cans and forgotten mismatched planters in your garage – they’re about to get a fabulous makeover!
Materials:
- Old paint cans (in various sizes and shapes)
- Sandpaper
- Primer (optional)
- Outdoor paint in your desired colors
- Stencils (optional)
- Paintbrushes
- Sealant (optional)
Instructions:
- Prep the Planters: Begin by giving your planters a thorough cleaning with soap and water. Remove any dirt, debris, or old paint that may be flaking off. Sand down any rough surfaces to ensure a smooth finish for the new paint.
- Prime Time (Optional): For a more vibrant and long-lasting paint job, apply a coat of outdoor primer. This is especially helpful if your planters are made of plastic or have significant scratches. Let the primer dry completely according to the manufacturer’s instructions.
- Painting Party: Now comes the fun part! Choose outdoor paint colors that complement your home’s exterior and your overall porch design. You can go bold with contrasting colors or create a cohesive look with a monochromatic palette.
- Stenciling for Extra Flair (Optional): Stencils are a fantastic way to add intricate designs or lettering to your planters. Secure the stencil firmly onto the planter surface and use a brush to apply paint carefully, ensuring you don’t go under the stencil.
- Seal the Deal (Optional): To protect your beautiful paint job from the elements, consider applying a coat of outdoor sealant. This will extend the life of your planters and keep them looking fresh for seasons to come.
Tips:
- Don’t be afraid to mix and match patterns and colors. Experiment with polka dots, stripes, or geometric designs for a playful touch.
- Group planters of different sizes and heights together for a visually appealing arrangement.
- For a rustic charm, consider leaving some areas of the original paint exposed for a distressed look.
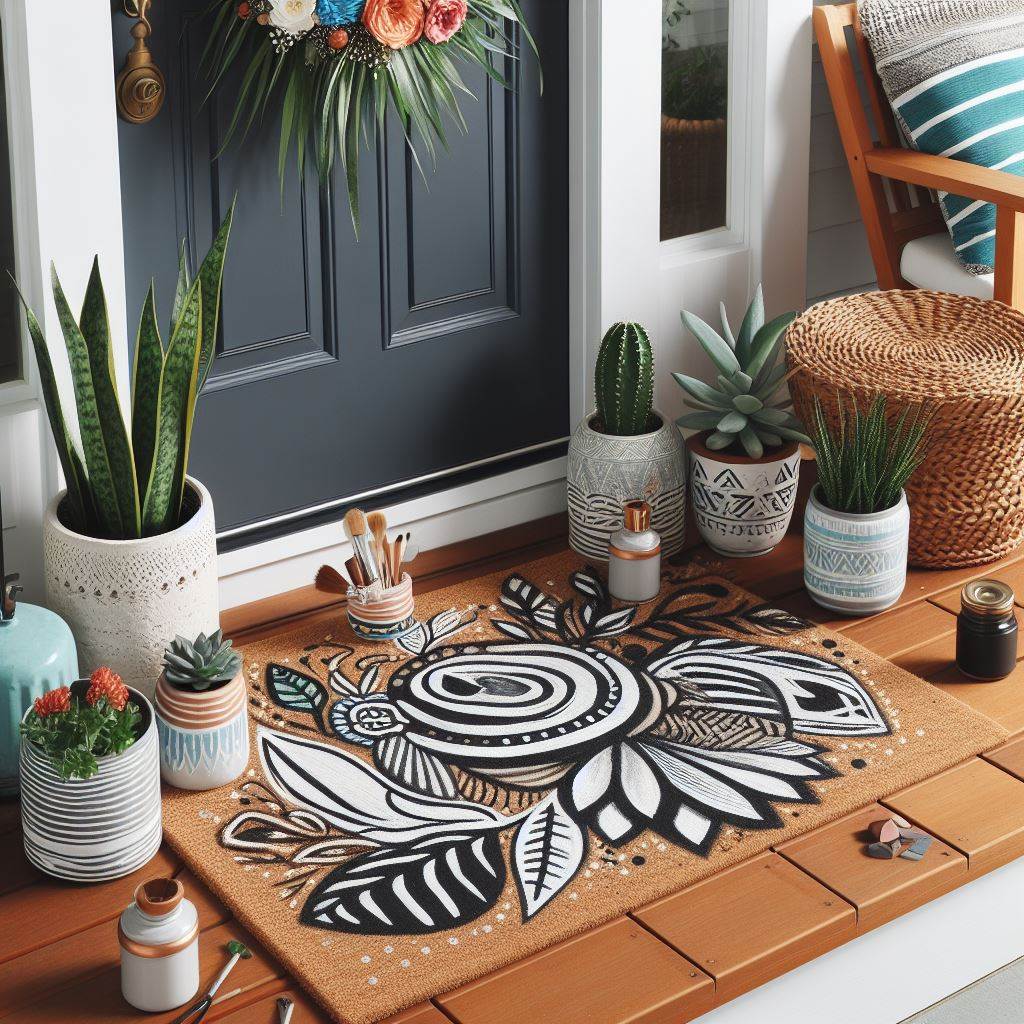
2. DIY Welcome Mat: Make a Statement at Your Doorstep
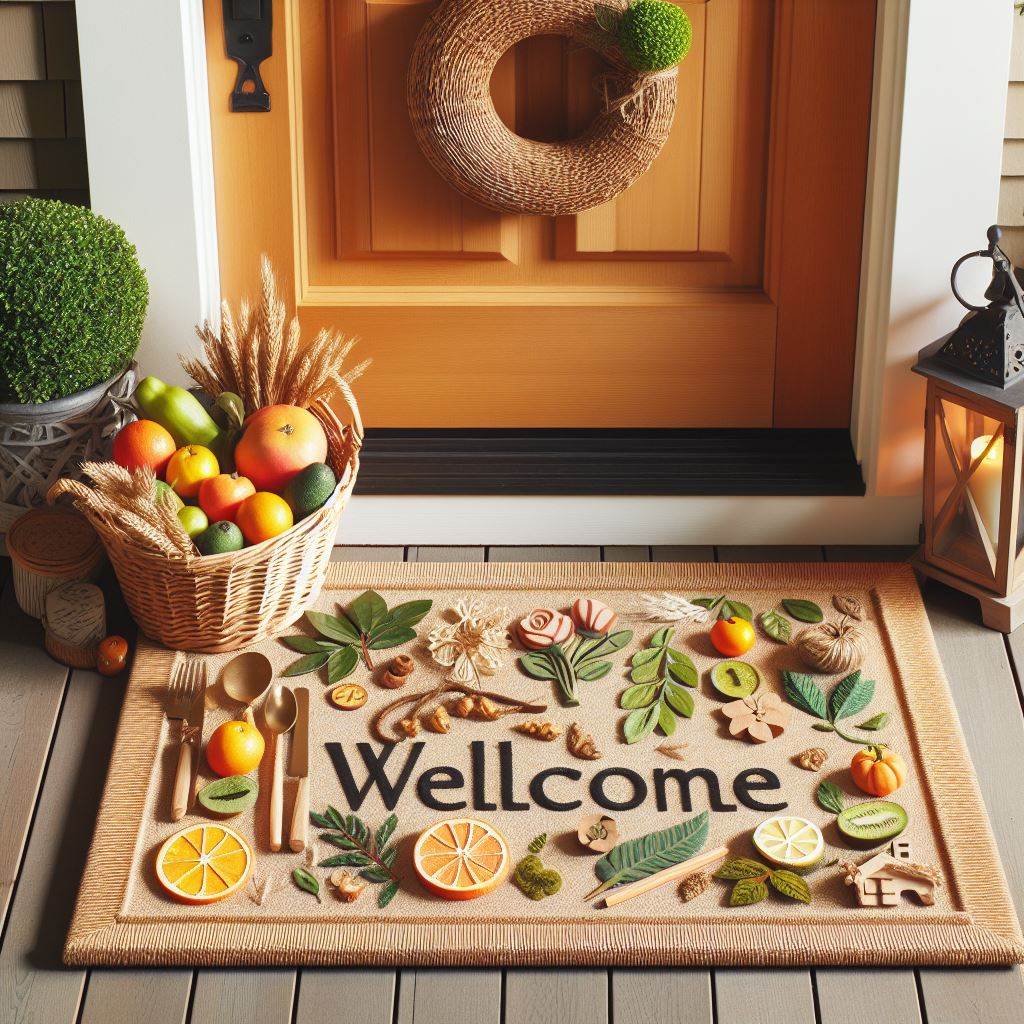
A welcome mat is not just a functional piece – it’s the first chance to express your personality to visitors. Here’s how to create a unique and welcoming DIY doormat.
Materials:
- Blank outdoor rug (coir or rubber are popular choices)
- Stencils or fabric paint markers (depending on your design)
- Drop cloths (to protect your work surface)
- Paintbrushes (if using fabric paint)
- Masking tape (optional)
Instructions:
- Plan Your Design: Decide on the message or image you want to showcase on your welcome mat. Consider including a warm greeting like “Welcome” or “Hello,” your family name, or a seasonal message.
- Protect Your Workspace: Lay down drop cloths to avoid paint splatter on your work area.
- Stencil Magic (Optional): If you’re using stencils, secure them to the rug using masking tape to ensure clean lines. Apply fabric paint carefully within the stencil using a brush.
- Freehand Fun: For a more artistic approach, you can freehand your design directly onto the rug using fabric paint markers.
- Let it Dry: Allow the paint to dry completely according to the manufacturer’s instructions.
Design Ideas:
- Use seasonal stencils with pumpkins for fall, snowflakes for winter, or flowers for spring/summer.
- Stencil your family name in a cute font for a personalized touch.
- Write a witty message like “Welcome! Shoes Off Please” or “Caution: Dog Owner on Duty.”
3. String Light Mason Jar Lanterns: Create a Magical Ambiance
String lights and mason jars are a classic combination that evokes a warm and inviting atmosphere. Here’s how to create these charming lanterns to illuminate your porch in style.
Materials:
- Mason jars in various sizes (cleaned and dried)
- Fairy lights (battery-operated or solar-powered are ideal)
- Hooks or cup hooks (for hanging)
- Drill (with a drill bit size appropriate for the wire of your fairy lights)
- Wire cutters (optional)
- Twine or string (for a rustic touch, optional)
Instructions:
- Drilling for Light Access: Here comes the slightly technical part. Decide where you want the light to enter the jar. For a hanging lantern, drill a hole near the top center of the lid. If you plan to place the jar on a surface, drill a hole on the side of the jar towards the top.
- Fairy Light Maneuvers: Carefully thread the string of fairy lights through the drilled hole. You may need to use wire cutters to snip off the end bulb of the string if it’s too bulky to fit.
- Light it Up: Once the string is inside the jar, gently push most of the fairy lights inside. Leaving a few lights trailing outside will create a beautiful cascading effect. Secure the lid back on the jar tightly.
- Hanging Options: There are two ways to hang your lanterns. If you drilled a hole in the lid, simply attach a hook or cup hook and hang it from a nail or shepherd’s hook on your porch. For side-drilled jars, use twine or string to create a loop around the neck of the jar for hanging.
Tips:
- Use a variety of sized mason jars for a more visually interesting display.
- Opt for warm white fairy lights for a cozy ambiance or cool white for a more modern look.
- Solar-powered fairy lights are a great option for eco-conscious decorating and eliminate the need to change batteries.
- For an extra touch, decorate the outside of the jar with lace, twine, or ribbons.
4. Painted Doormat: A Bold Statement for Your Entryway
A painted doormat is a simple yet impactful way to add a pop of color and personality to your porch.
Materials:
- Outdoor doormat (choose a material suitable for painting, such as coir or rubber)
- Outdoor paint in your desired color(s)
- Paintbrushes
- Drop cloths (to protect your work surface)
- Painter’s tape (optional)
Instructions:
- Clean Up Crew: Begin by giving your doormat a thorough cleaning. Remove any dirt, debris, or loose fibers. Allow it to dry completely before painting.
- Protect Your Surroundings: Lay down drop cloths to avoid paint splatter on your porch floor or surrounding areas.
- Taping for Precision (Optional): If you’re creating a design with clean lines, use painter’s tape to mask off the areas you don’t want painted.
- Painting Power: Apply outdoor paint in even strokes using a paintbrush. Depending on the desired opacity, you may need two or three coats. Allow each coat to dry completely before applying the next.
- Peeling Back the Design (Optional): Once the final coat of paint is dry, carefully remove the painter’s tape to reveal your crisp design.
Stencil Ideas:
- Geometric shapes like stripes, polka dots, or chevrons for a modern look.
- Stenciled flowers or leaves for a charming and natural feel.
- Words or phrases like “Welcome” or “Hello” in a fun and colorful font.
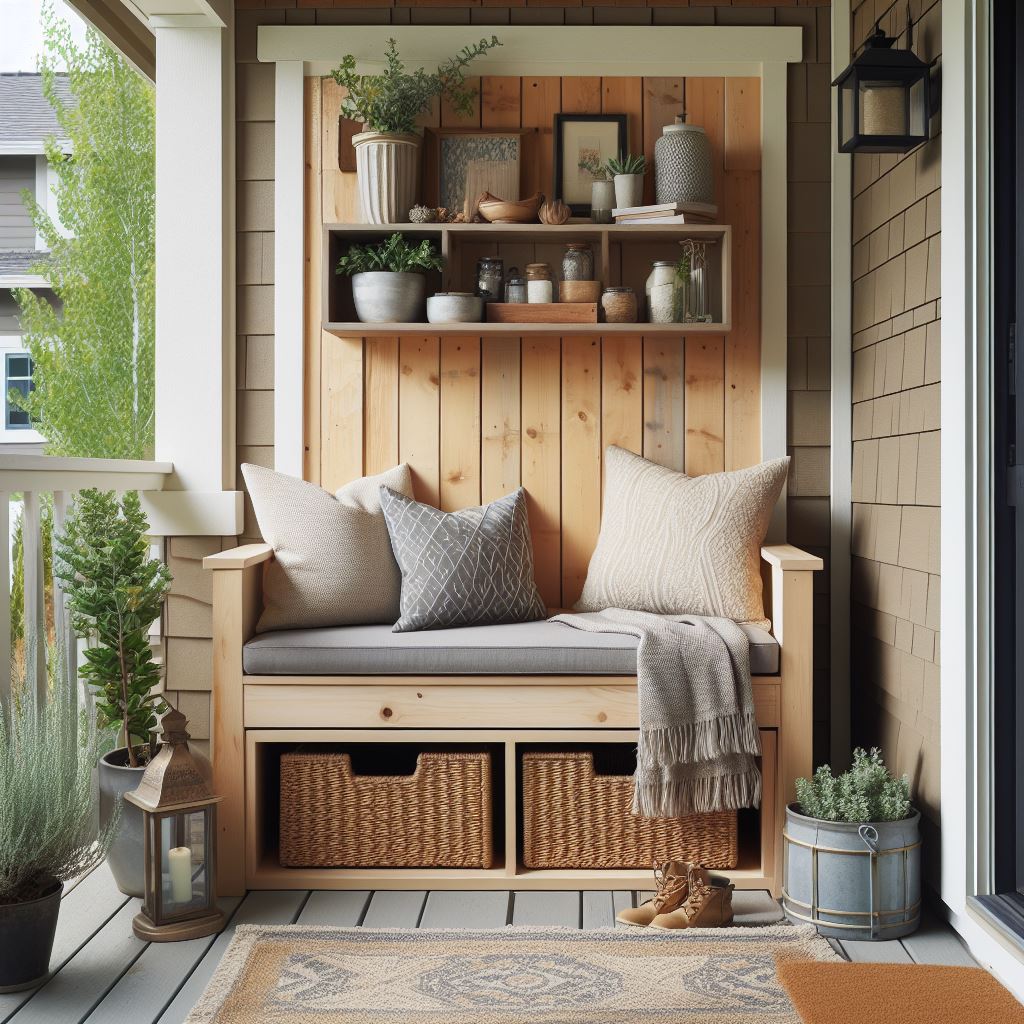
5. DIY Bench with Storage: Function Meets Style
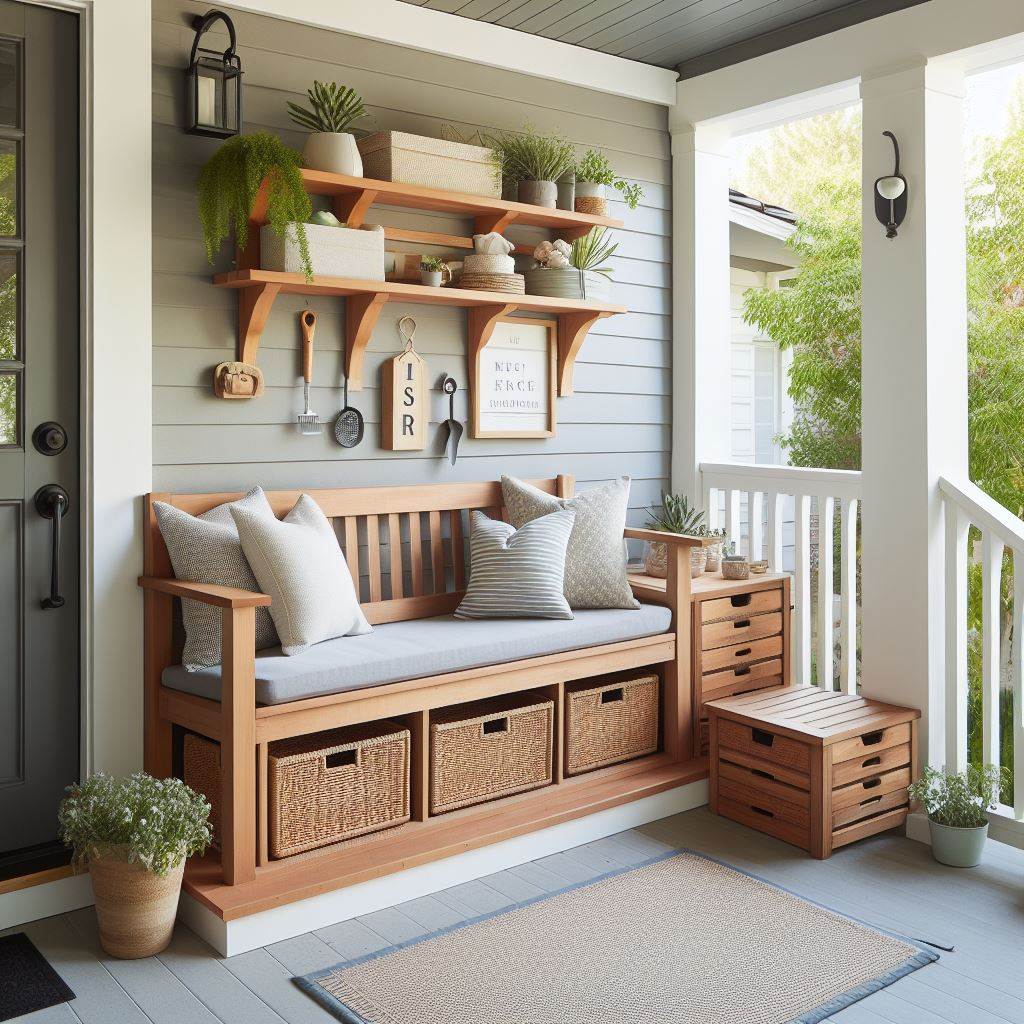
A DIY bench with storage is a perfect addition to your porch, offering a comfortable spot to relax while providing valuable storage space for shoes, gardening tools, or outdoor cushions.
Materials:
- Wood planks (treated for outdoor use) – The amount will depend on the desired size of your bench.
- Saw
- Drill
- Screws
- Kreg Jig (optional, for pocket hole joinery)
- Hinges
- Outdoor paint or stain
- Hardware for storage compartment (lid support, handles, etc., optional)
Instructions:
Note: This project requires some basic carpentry skills. If you’re a beginner, consider using pre-built ottomans or chests and adding a comfortable cushion on top for a simpler approach.
For the more adventurous DIYer:
- Plan Your Build: Sketch a design for your bench, including dimensions and the size of the storage compartment. Determine how you’ll access the storage (hinged lid, removable top, etc.).
- Cutting the Lumber: Use a saw to cut your wood planks according to your design. Ensure all cuts are straight and even.
- Assembly Time: Here’s where your carpentry skills come in. You can use standard butt joints and screws for a basic build. For a stronger and more aesthetically pleasing option, consider using pocket hole joinery with a Kreg Jig.
- Assemble the sides and back of the bench first.
- Attach the base of the bench, creating a box-like structure.
- If you’re opting for a hinged lid for the storage compartment, attach the hinges to the lid and the top of the bench frame.
- Smoothing It Out: Sand down any rough edges on the wood to ensure a smooth finish.
- Painting or Staining: Apply outdoor paint or stain to your desired color. Allow for proper drying time between coats.
- Adding Storage Functionality (Optional): Install lid support hardware (like gas struts) for a smoother opening and closing experience. Add handles to the front of the storage compartment for easy access.
Tips:
- Choose comfortable outdoor cushion materials that can withstand the elements.
- Line the bottom of the storage compartment with a waterproof liner to protect your belongings from moisture.
- Consider adding decorative touches like casters on the legs for easy mobility or installing a small shelf inside the storage compartment for additional organization.
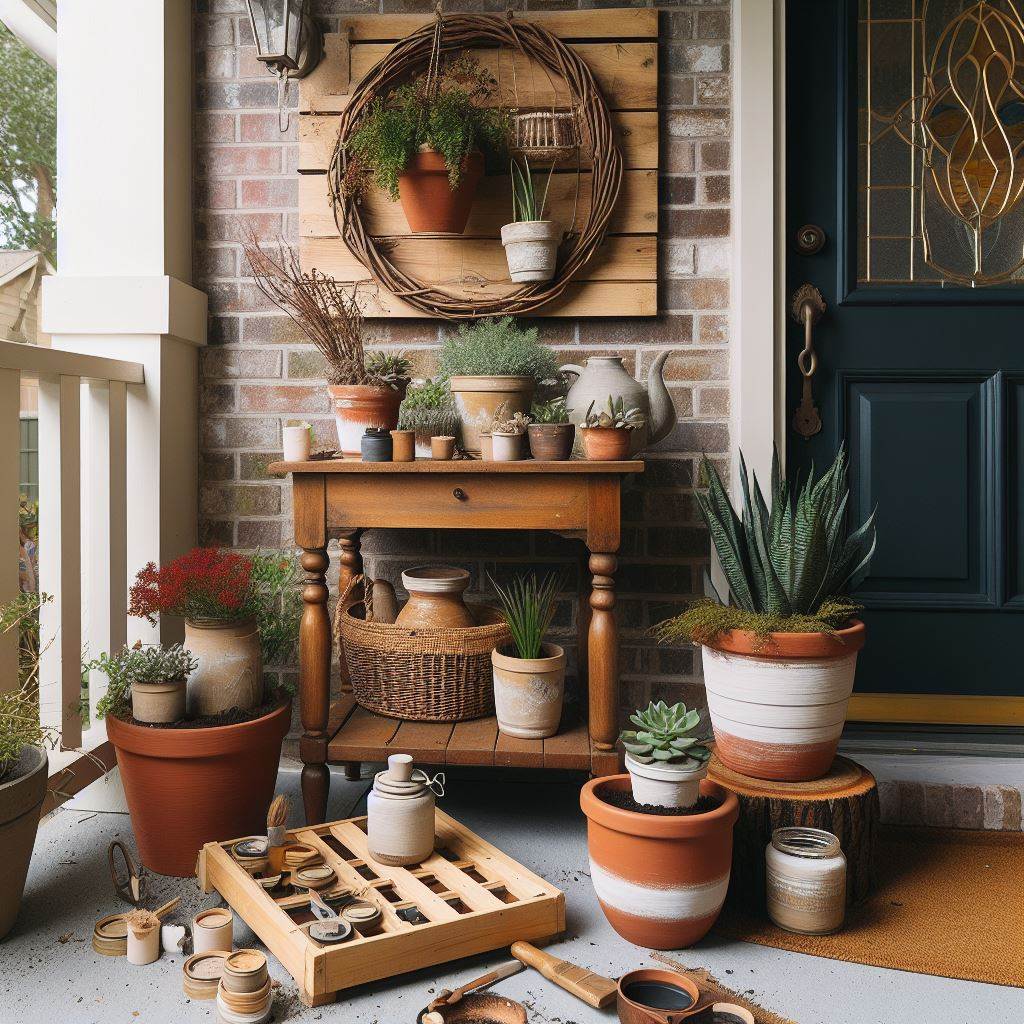
6. Tiered Plant Stand: Maximize Vertical Space with Greenery
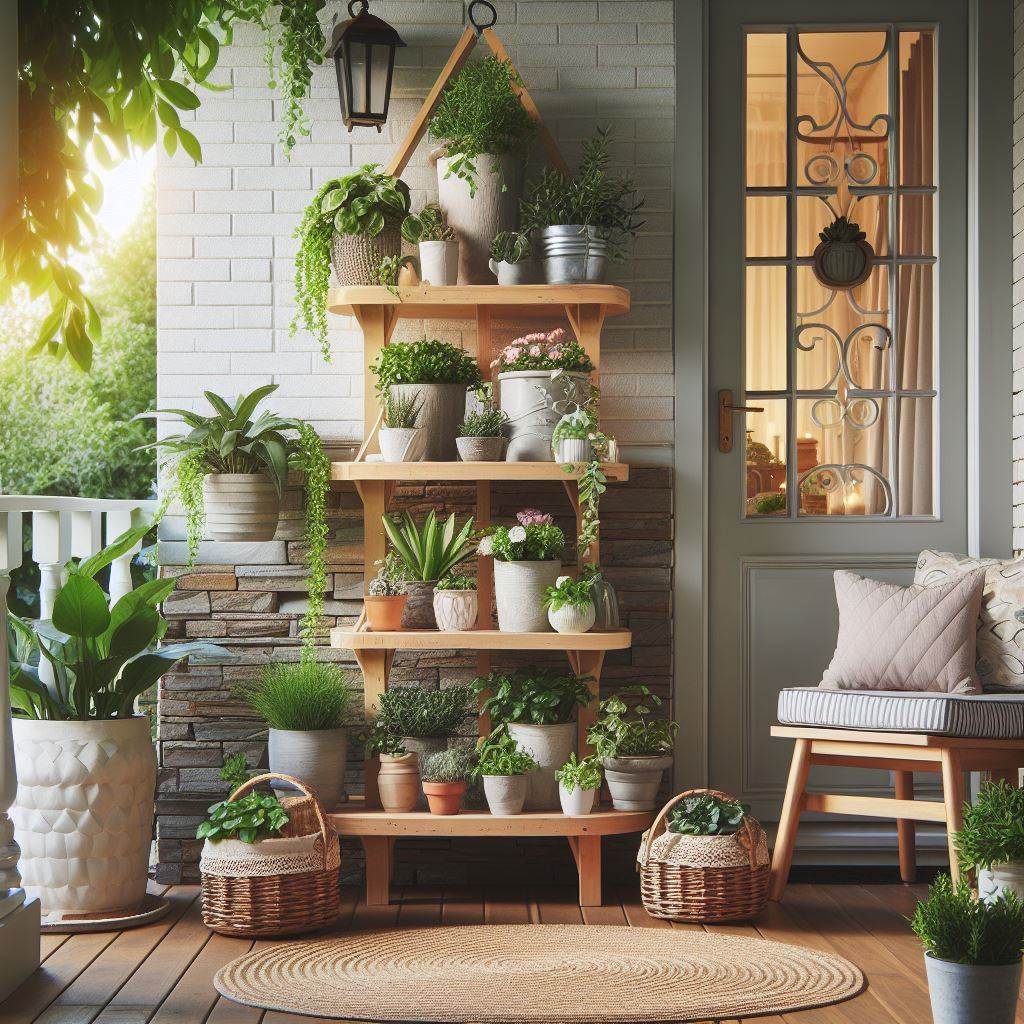
Tiered plant stands are a fantastic way to showcase your favorite plants on your porch, especially if space is limited. Here’s how to create your own using readily available materials.
Materials (Option 1: Terracotta Pots):
- Terracotta pots in various sizes (at least 3)
- Metal plant stand (with multiple tiers)
- Drill (with a drill bit size appropriate for the drainage holes)
- Saucers for each pot (optional)
Materials (Option 2: PVC Pipes):
- PVC pipes (cut to desired lengths for tiers)
- PVC elbows and connectors
- Spray paint (optional)
- Wire mesh or plant shelves (to create plant holders on each tier)
- Zip ties
Instructions (Terracotta Pots):
- Drainage is Key: If your terracotta pots don’t have drainage holes, drill a hole in the bottom of each pot to prevent waterlogging.
- Pot Placement: Arrange the terracotta pots on the metal stand according to size, with the largest pot at the bottom for stability.
Instructions (PVC Pipes):
- Assemble the Frame: Use PVC elbows and connectors to build the frame of your plant stand according to your desired height and number of tiers. You can create a simple 2-tier stand or a more elaborate multi-tiered structure.
- Painting Fun (Optional): Spray paint your PVC frame in a color that complements your porch decor.
- Plant Holder Creation: There are two main options. You can cut pieces of wire mesh to create individual plant holders for each tier, securing them to the PVC frame with zip ties. Alternatively, you can purchase pre-made plant shelves designed for PVC pipe applications and simply attach them to the frame.
Tips:
- Choose plants that thrive in similar light conditions for each tier of your stand.
- Use colorful pots or decorative saucers to add a pop of color to your plant display.
- Consider hanging lightweight plants from the bottom tier of the stand for a cascading effect.
7. Decorative Door Hanger: A Seasonal Welcome
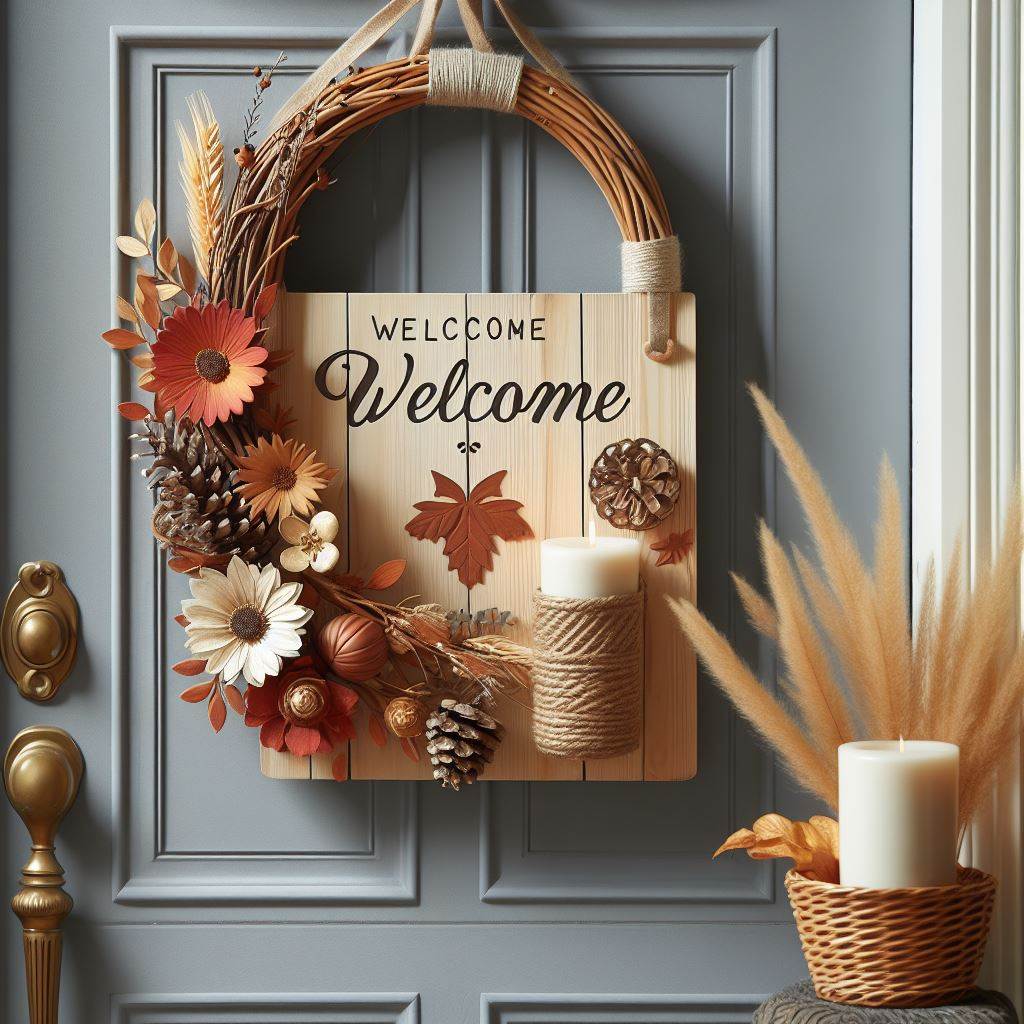
A door hanger is a charming way to personalize your porch and showcase your creativity. You can design a door hanger to reflect the current season, a particular holiday, or simply express your unique style.
Materials:
- Wood cutout (in a desired shape, like a wreath, circle, or animal)
- Sandpaper
- Outdoor paint or stain
- Stencils or craft paint (optional)
- Embellishments (ribbons, buttons, artificial flowers, etc., optional)
- Twine or string for hanging
Instructions:
- Sanding Smoothness: Begin by sanding the wood cutout to remove any rough edges and ensure a smooth painting surface.
- Painting Power: Apply outdoor paint or stain in your desired color. Allow for proper drying time between coats.
- Stencil Magic or Freehand Flair (Optional): If you want to add lettering, designs, or patterns, you have two options. Use stencils to create clean lines or unleash your inner artist and freehand your design using craft paint.
- Embellishment Extravaganza (Optional): This is where you can truly personalize your door hanger. Use hot glue to attach ribbons, buttons, artificial flowers, or any other embellishments that reflect your taste and the theme of your door hanger.
- Hanging Hardware: Create a loop at the top of your door hanger using twine or string. You can simply tie a knot or secure it with a hot glue gun for added strength.
Design Ideas:
- Seasonal Door Hangers:
- Fall: Paint a wooden circle orange and decorate with stencils of leaves or a burlap bow.
- Winter: Create a snowflake cutout from wood, paint it white, and add sparkly glitter for a wintry touch.
- Spring: Use a wreath-shaped cutout, paint it green, and embellish with colorful artificial flowers.
- Summer: Opt for a seashell shape, paint it light blue, and add a starfish or twine wrapped around the center.
- Holiday Door Hangers: Design a ghost or pumpkin cutout for Halloween, a snowman or Santa cutout for Christmas, or a bunny or egg cutout for Easter.
- Welcome Signs: Paint a wooden rectangle and stencil a warm welcome message or your family name in a cute font.
Bonus Tip: For added durability, consider applying a coat of outdoor sealant on your finished door hanger to protect it from the elements and extend its lifespan.
8. Cozy Up with Outdoor Throw Pillows and Blankets:
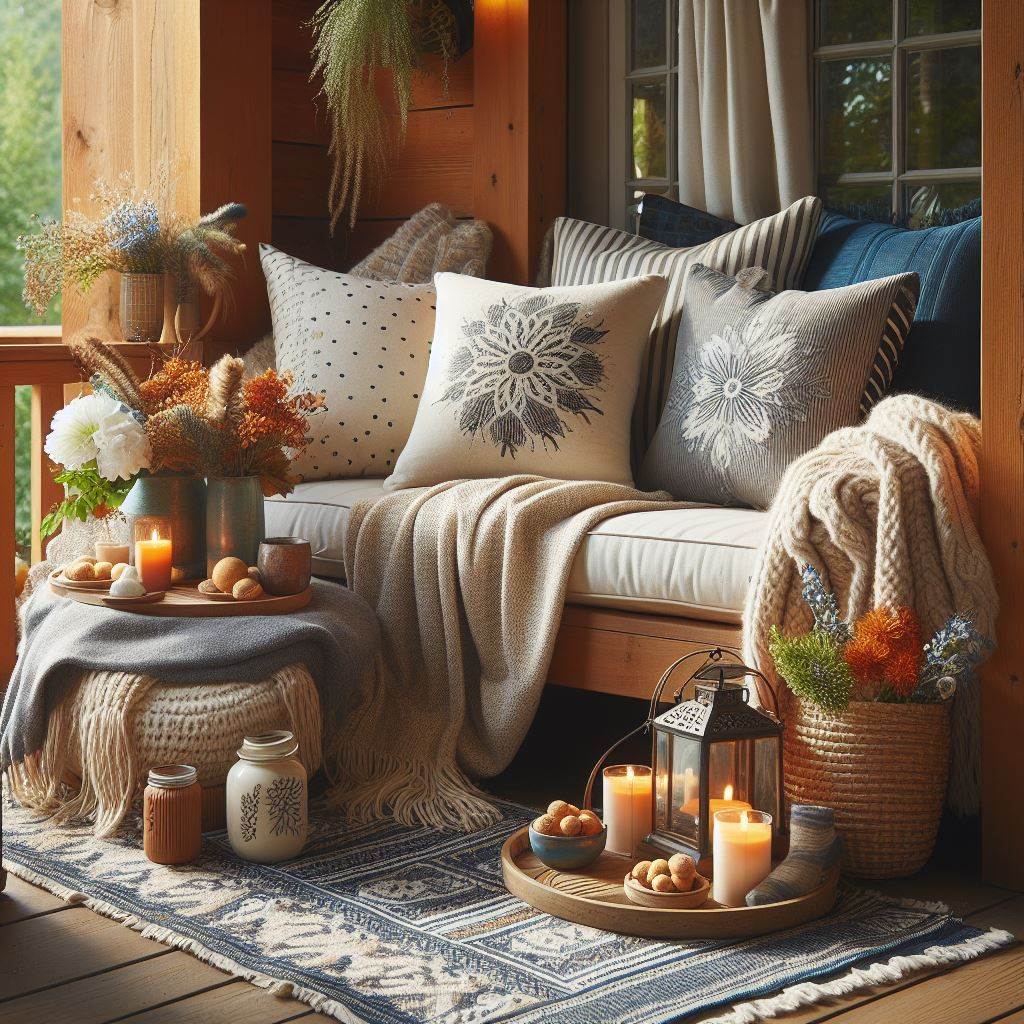
Pillows and blankets instantly add comfort and a touch of homeyness to your porch seating. Choose weather-resistant outdoor fabrics in colors and patterns that complement your overall porch decor. Plush throw pillows and a soft blanket draped over a rocking chair create an inviting spot to curl up with a good book or enjoy a cup of coffee on a chilly morning.
Materials:
- Outdoor throw pillows (various sizes and colors)
- Outdoor blanket (waterproof and mildew-resistant)
Tips:
- Opt for neutral-colored pillows as a base and add pops of color with patterned accent pillows.
- Store pillows and blankets inside when not in use to extend their lifespan.
- Consider adding a decorative storage bin on your porch to keep throws and pillows organized.
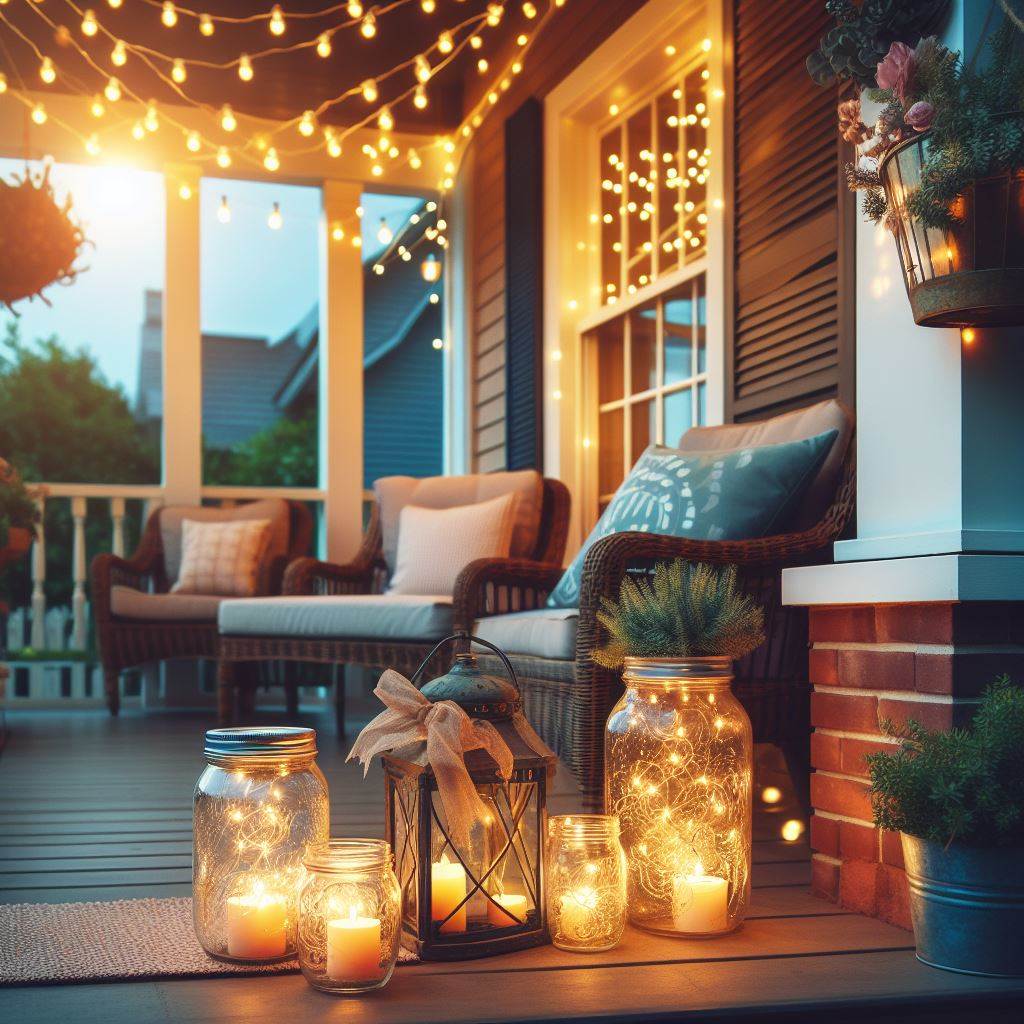
9. Light Up the Night with DIY Solar Lanterns:
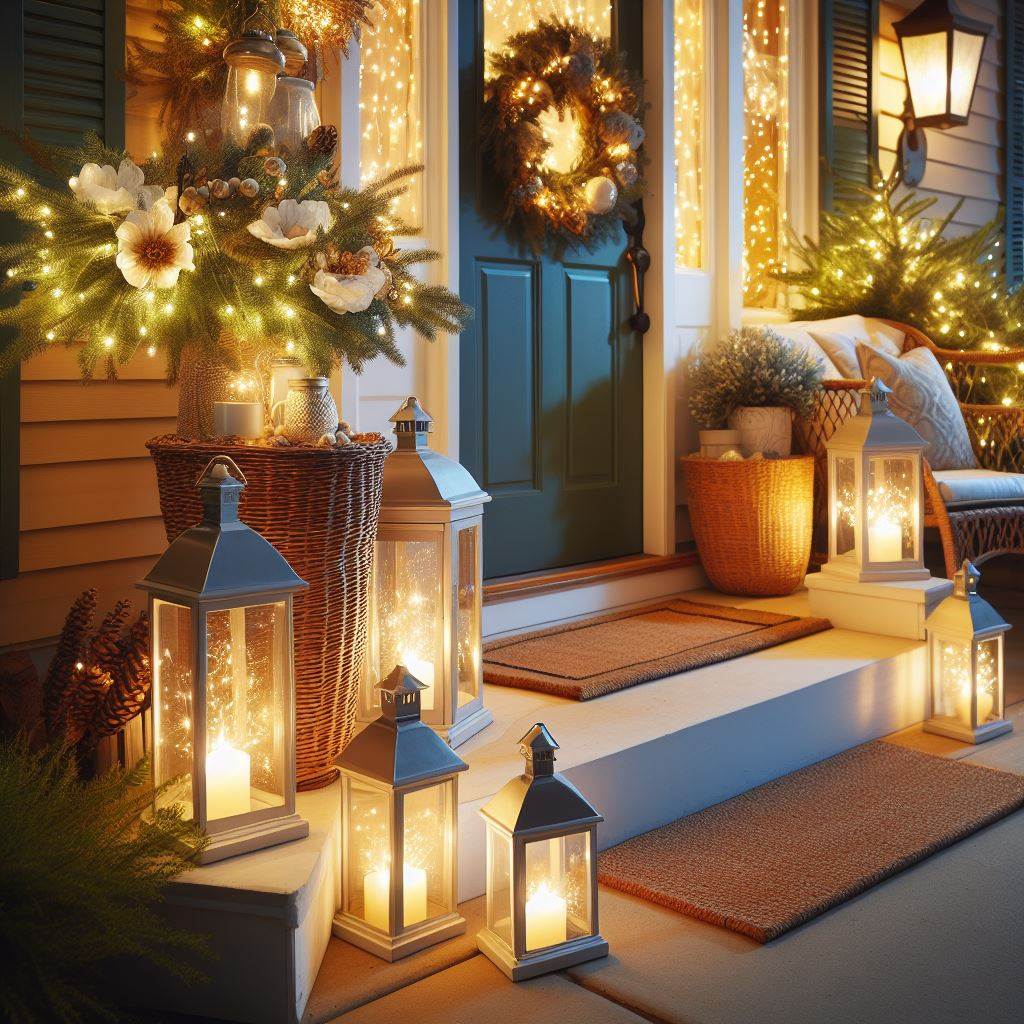
Solar lanterns offer a beautiful and eco-friendly way to illuminate your porch after sunset. You can create your own unique lanterns using recycled glass jars and fairy lights.
Materials:
- Recycled glass jars (various sizes)
- Solar fairy lights (string or individual lights)
- Decorative stones or marbles (optional)
- Twine or string (optional)
- Hot glue gun (optional)
Instructions:
- Clean the glass jars thoroughly and remove any labels or residue.
- Carefully push a string of solar fairy lights into the jar, leaving the solar panel on top.
- (Optional) Add decorative stones or marbles to the bottom of the jar for weight and a touch of style.
- (Optional) Secure the lid on the jar with hot glue for a more permanent closure (ensure proper ventilation for the solar panel).
- Hang your lanterns from the porch ceiling, railings, or shepherd’s hooks using twine or string.
Tips:
- Choose solar fairy lights with warm white or colored lights to create a desired ambiance.
- Group lanterns of different sizes together for a visually appealing display.
- Consider placing solar lanterns on your porch steps to create a well-lit pathway.
10. Welcome the Birds with a DIY Bird Feeder:
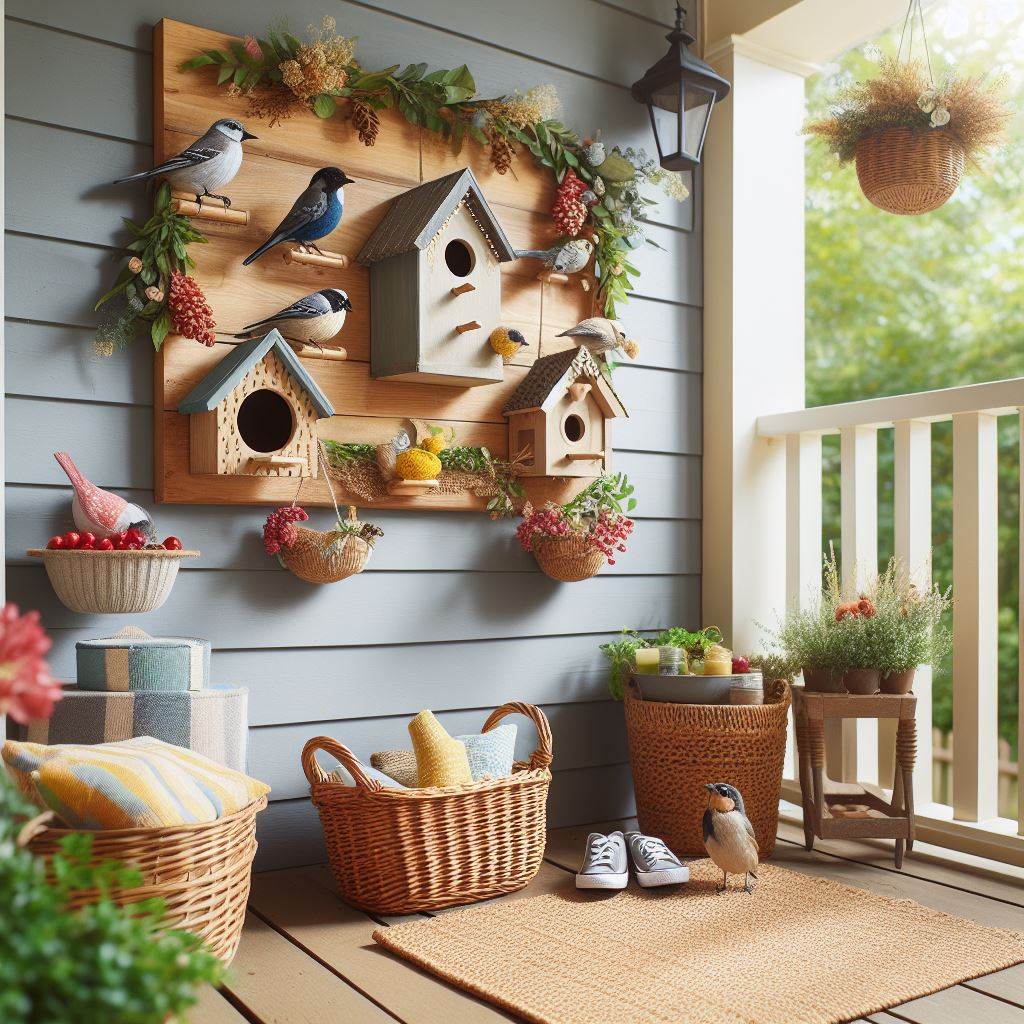
Bird feeders not only attract beautiful feathered friends to your porch but also add a touch of life and movement. Here’s how to create a simple yet functional bird feeder from a recycled plastic bottle.
Materials:
- Clean, empty plastic bottle (2-liter size)
- Craft knife or box cutter
- Wooden spoon
- Twine or string
- Birdseed
Instructions:
- Use a craft knife or box cutter to carefully cut a feeding hole near the bottom of the bottle. Make sure the hole is large enough for birds to comfortably access the seeds.
- Cut a larger opening on the side of the bottle to allow birds to easily enter and exit.
- Thread a long piece of twine or string through the neck of the bottle to create a hanger.
- Tie a knot at the end of the string to secure the hanger and prevent the bottle from slipping.
- Fill the bottle with birdseed and hang it from a sturdy branch or hook on your porch.
Tips:
- Choose a location for your bird feeder that is sheltered from harsh weather and away from direct sunlight.
- Opt for a variety of birdseed mixes to attract different species of birds.
- Clean your bird feeder regularly to prevent the spread of diseases.
11. Create a Welcoming Entrance with a DIY Doormat Wreath:
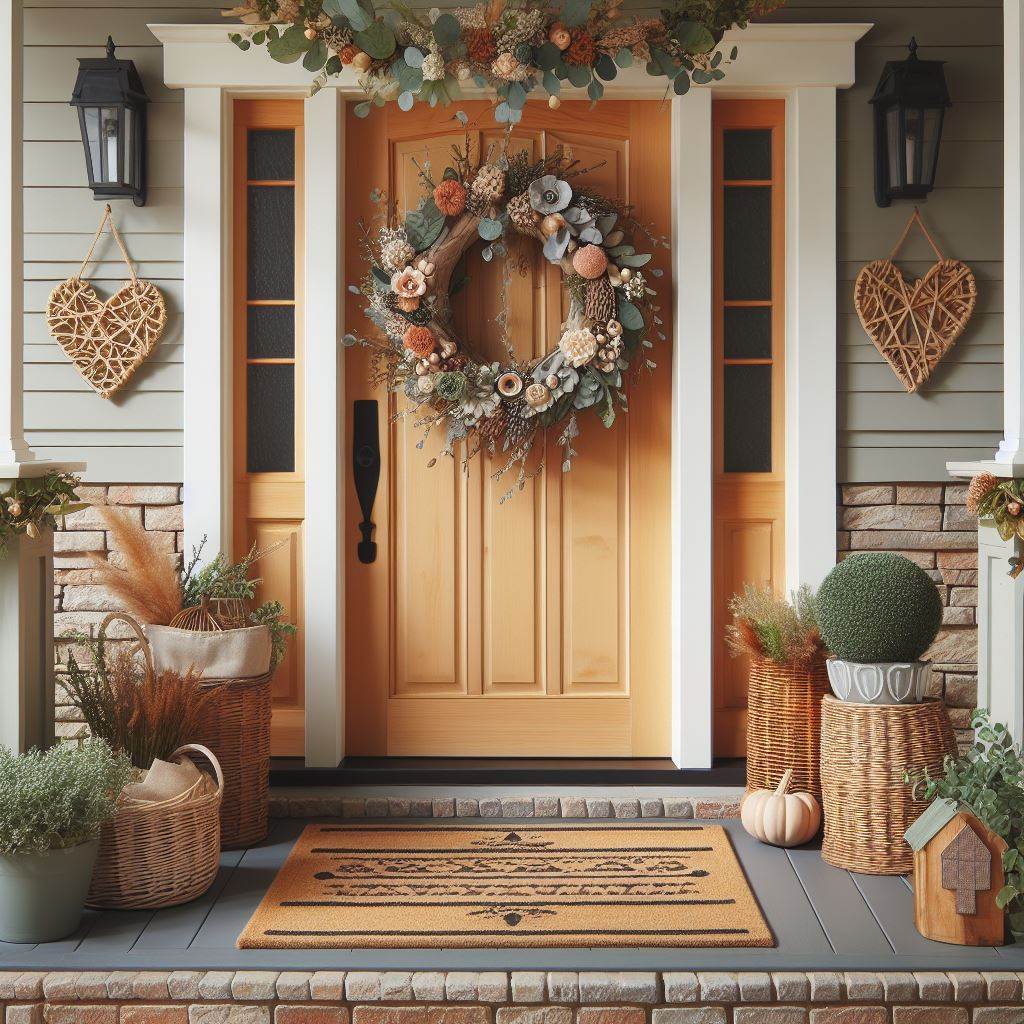
Wreaths are a classic way to decorate your front door, but you can create a unique and functional version using a simple doormat.
Materials:
- Coir doormat (round or rectangular)
- Artificial flowers, greenery, or ribbons (in your desired colors)
- Hot glue gun
- Twine or string (for hanging)
Instructions:
- Lay the doormat flat on a work surface.
- Arrange your chosen decorative elements (flowers, greenery, ribbons) on the doormat in a circular or wreath-like design.
- Secure each element to the doormat using hot glue, ensuring a firm and lasting hold.
- Once all elements are secured, tie a piece of twine or string to the back of the doormat to create a hanger.
Tips:
- Choose artificial flowers and greenery designed for outdoor use to withstand the elements.
- Consider using seasonal flowers or colors to keep your doormat wreath fresh and
- Consider using seasonal flowers or colors to keep your doormat wreath fresh and reflect the current season.
- For a more rustic look, use burlap ribbon or twine to create the wreath base instead of artificial greenery.
12. Add a Touch of Whimsy with DIY Wind Chimes:
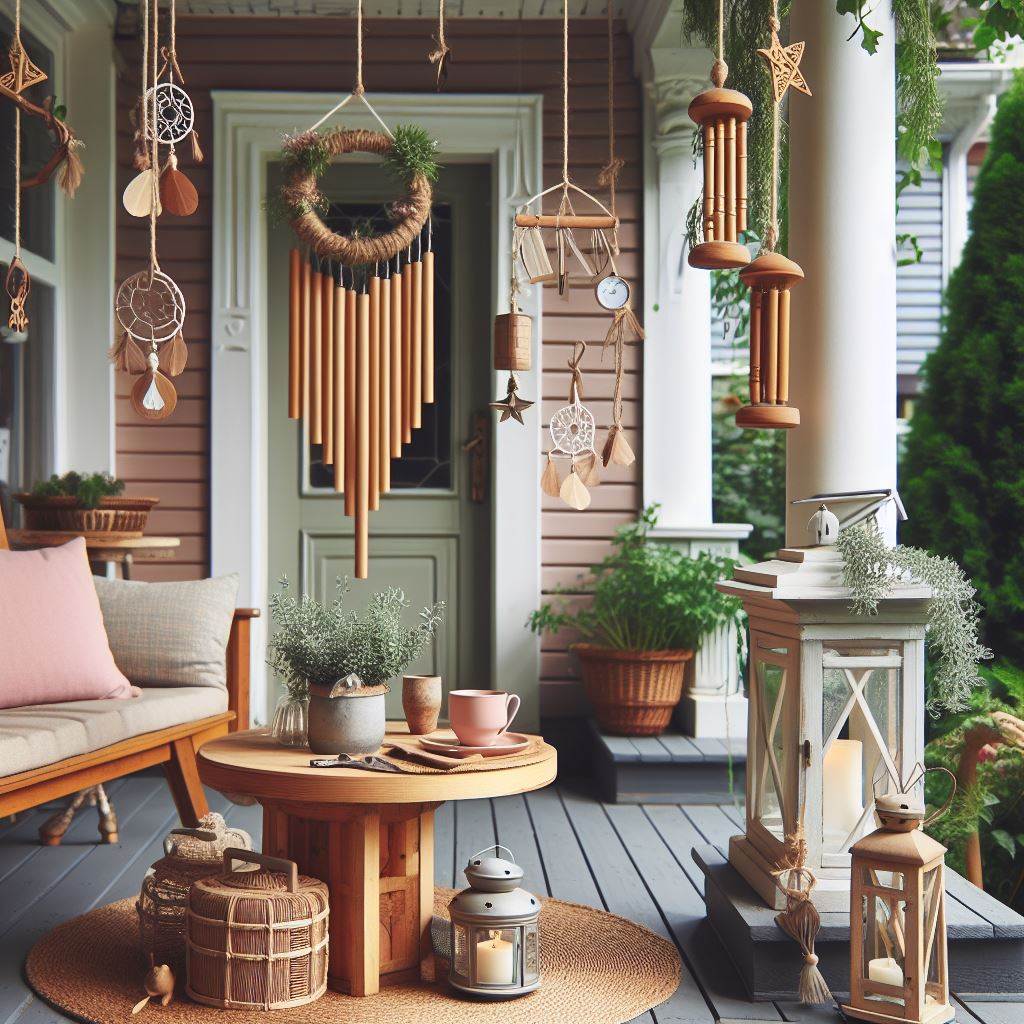
Wind chimes add a touch of melody and visual interest to your porch. Here’s how to create a set of wind chimes using recycled materials.
Materials:
- Tin cans (various sizes)
- Fishing line or nylon thread
- Seashells, beads, or small wind chimes (for decoration)
- Wooden dowel or branch
- Drill
Instructions:
- Wash and dry the tin cans thoroughly. Remove any labels or residue.
- Use a drill to create small holes near the top rim of each tin can.
- Cut pieces of fishing line or nylon thread of varying lengths.
- Thread a seashell, bead, or small wind chime onto each piece of thread and tie a knot at the top to secure it.
- Attach the threaded elements to the holes in the tin cans. You can use multiple threads per can for a fuller sound.
- Tie the free ends of the threads to a wooden dowel or branch, ensuring each thread has a different length for a varied chime.
- Hang your DIY wind chimes from your porch ceiling or a sturdy hook.
Tips:
- Choose tin cans in different sizes to create a range of tones in your wind chimes.
- Experiment with different materials for the hanging elements to achieve different sounds.
- Hang your wind chimes in an area with good air circulation for them to chime pleasantly.
13. String Up Memories with a DIY Photo Display:
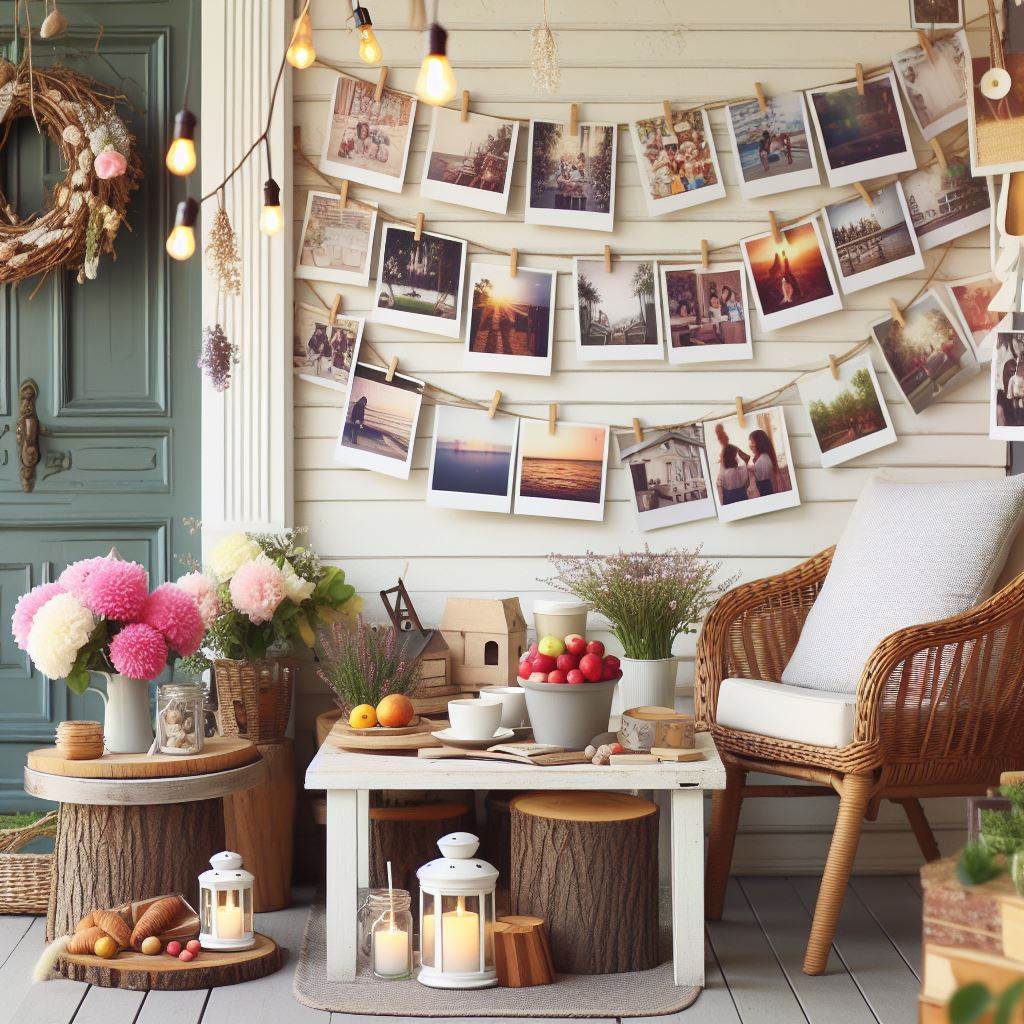
Personalize your porch with a charming photo display showcasing cherished memories. Here’s a simple way to create a weatherproof display using readily available materials.
Materials:
- Clear picture frame (large size)
- Chicken wire or mesh
- Hot glue gun
- Twine or string
- Clothespins (optional)
- Photos printed on waterproof paper
Instructions:
- Remove the glass and backing from the picture frame.
- Cut a piece of chicken wire or mesh to fit the size of the frame opening.
- Secure the chicken wire to the back of the picture frame using hot glue.
- Attach a long piece of twine or string to the top corners of the frame for hanging.
- Print your photos on waterproof paper and attach them to the chicken wire using clothespins or by clipping the corners of the photos directly onto the wire.
- Hang your DIY photo display on your porch wall or a sturdy hook.
Tips:
- Choose a picture frame with a weatherproof material like plastic or metal.
- Opt for clothespins made of wood or stainless steel to withstand outdoor elements.
- Consider using fairy lights strung behind the chicken wire to illuminate your photo display at night.
14. Craft a Colorful Welcome with a DIY Painted Address Sign:
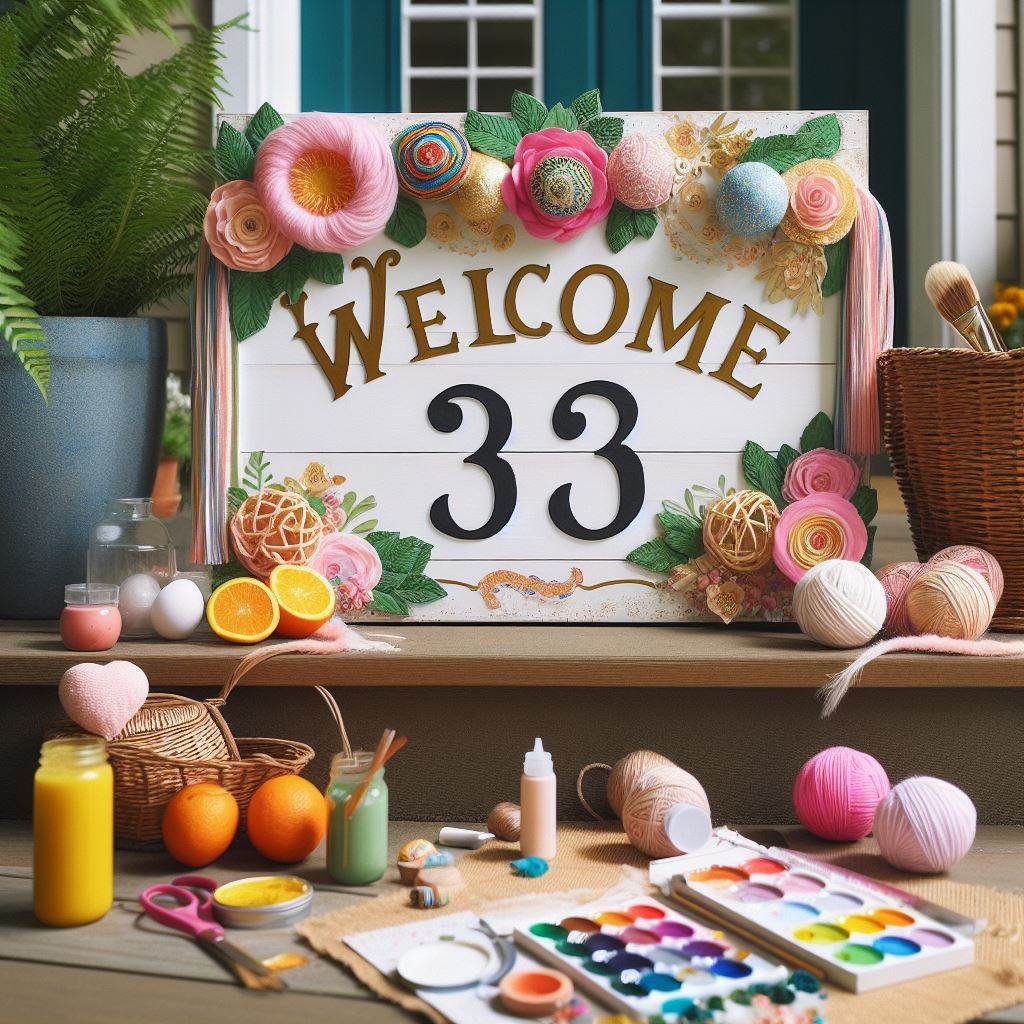
A painted address sign adds a decorative touch to your porch while ensuring your home is easily identifiable.
Materials:
- Wooden plaque or cutout (in a desired shape)
- Sandpaper
- Outdoor paint in contrasting colors
- Stencils or paint markers (optional)
- Drill (with a screw eye attachment, optional)
- Twine or string (optional)
Instructions:
- Sand the wooden plaque to ensure a smooth painting surface.
- Paint the plaque in your desired base color. Allow for proper drying time.
- Add your address numbers using stencils or paint markers. You can also use contrasting paint colors for the numbers to make them stand out.
- (Optional) Drill a hole at the top of the plaque and screw in a screw eye to create a hanging point. Alternatively, you can hot glue twine or string to the back of the plaque for hanging.
- Hang your painted address sign on your porch wall or near your front door.
Tips:
- Choose a paint color for the plaque that complements your overall porch decor.
- Select a font style for your address numbers that is easy to read from the street.
- Apply a coat of outdoor sealant to your finished sign for added protection against the elements.
15. Embrace Rustic Charm with a DIY Wooden Pallet Planter:
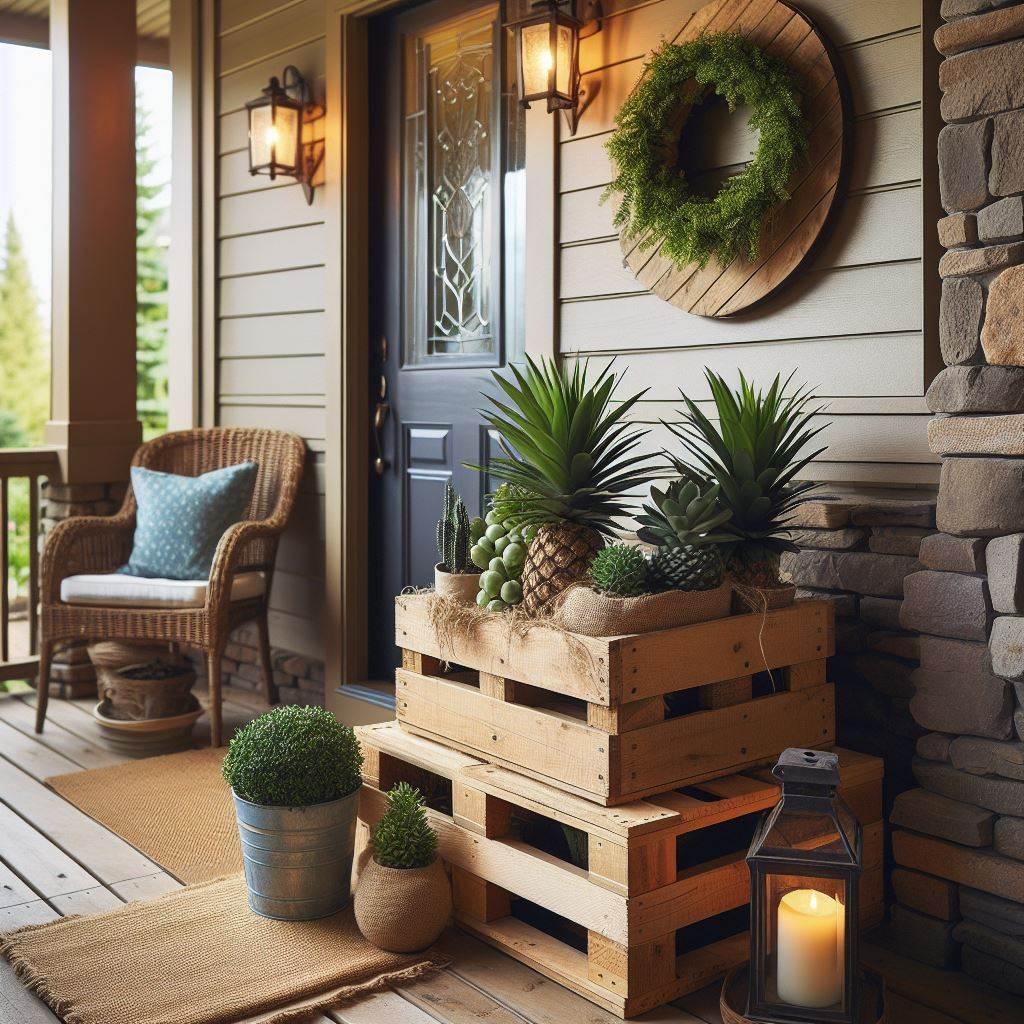
Wooden pallets offer a fantastic material for creating a rustic and functional planter for your porch.
Materials:
- Wooden pallet (disassembled if necessary)
- Hammer and nails
- Saw (optional)
- Sandpaper
- Weed barrier fabric (optional)
- Potting soil
- Plants suitable for outdoor containers
Instructions:
- Disassemble the wooden pallet carefully, removing any loose nails or damaged boards. You can use a pry bar or hammer to help separate the boards.
- Decide on the size and design of your planter. You can use the entire pallet for a large planter or cut it down to create smaller ones. A saw might be necessary to cut the boards to your desired lengths.
- Sand down any rough edges on the pallet boards to ensure a smooth finish and prevent splinters.
- Reassemble the pallet boards into a planter box-like structure. Use nails and a hammer to secure the boards together. You can create a simple rectangular planter or get creative with a more complex design.
- (Optional) Line the bottom of the planter with weed barrier fabric to help with drainage and prevent weeds from growing through.
- Fill the planter with potting soil suitable for your chosen plants.
- Plant your favorite flowers, herbs, or vegetables in the planter box.
- Place your DIY wooden pallet planter on your porch in a location with adequate sunlight and water according to your plants’ needs.
Tips:
- Consider staining or painting your pallet planter for a more polished look. Opt for outdoor paint or stain to ensure weather resistance.
- Add drainage holes to the bottom of the planter to prevent waterlogging. You can drill holes or create gaps between the boards at the bottom for drainage.
- Group multiple pallet planters together in different sizes for a visually appealing display on your porch.
16. Light Up Your Steps with DIY Solar Step Lights:

Solar step lights are a practical and energy-efficient way to illuminate your porch steps at night, improving safety and adding a touch of elegance. Here’s how to create your own decorative solar step lights using recycled materials.
Materials:
- Tin cans (clean and dry, various sizes)
- Hammer and nail
- Glow sticks (multiple colors, optional)
- Sandpaper (optional)
- Spray paint (optional)
- Solar tea lights (or small solar path lights)
- Hot glue gun
Instructions:
- (Optional) If you want a painted look, use sandpaper to remove any labels or residue from the tin cans and then spray paint them in your desired color. Allow for proper drying time.
- Use a hammer and nail to carefully poke a hole near the top rim of each tin can. This hole will be used to attach the solar tea light later.
- (Optional) If using glow sticks, crack and activate them according to the instructions. Place the activated glow sticks inside the tin cans for a temporary lighting solution.
- Secure the solar tea light (or small solar path light) to the top of the tin can using hot glue. Make sure the solar panel on the light faces upwards to collect sunlight during the day.
Tips:
- Choose tin cans in different sizes to create a unique and layered look for your step lights.
- Opt for solar tea lights with warm white or colored lights to create a desired ambiance.
- Attach your DIY solar step lights to the risers (vertical parts) of your porch steps using double-sided tape or strong adhesive for easy installation.
17. Hang Up a Cozy Hammock for Relaxation:
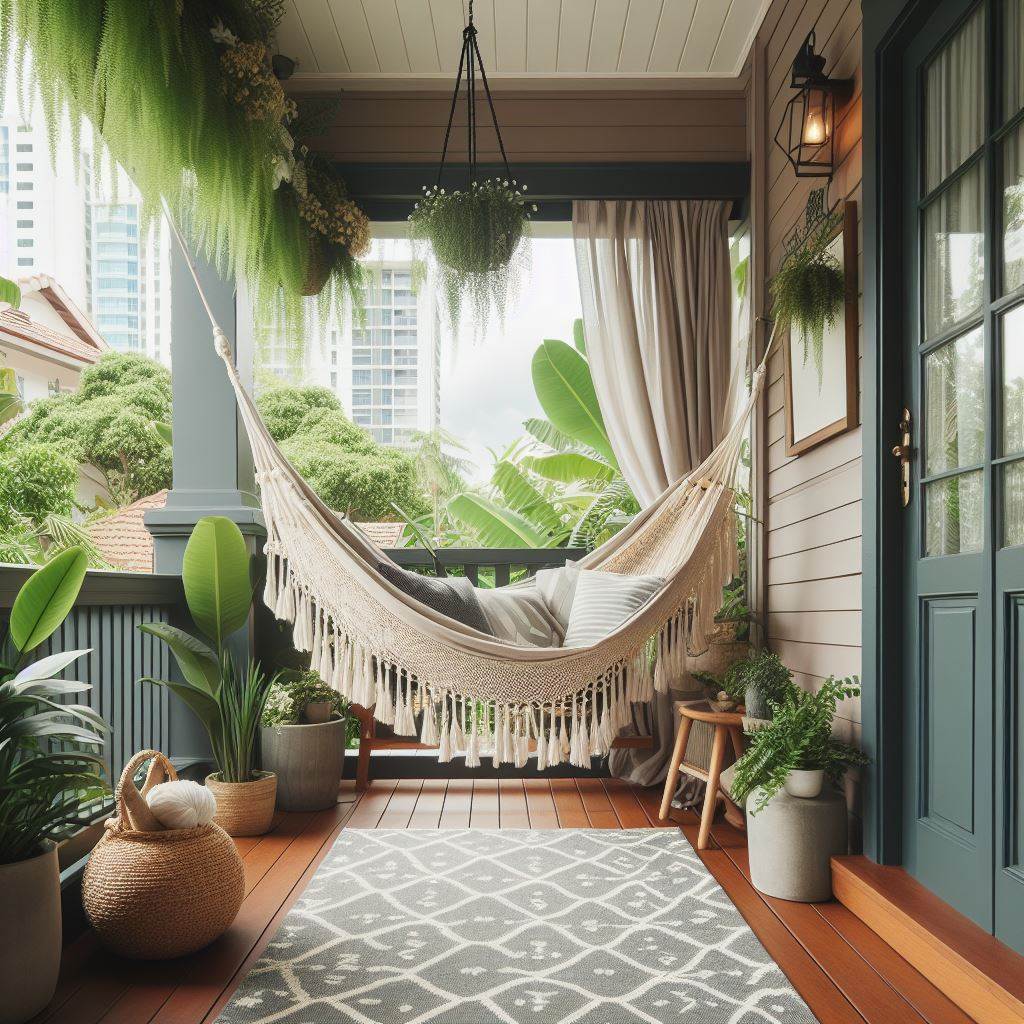
A hammock instantly transforms your porch into a relaxing haven. Here’s how to create a comfortable spot to unwind and enjoy the outdoors.
Materials:
- Sturdy hammock (suitable for outdoor use)
- Hanging hardware (appropriate for your porch structure)
- Drill (with appropriate drill bits for your chosen hanging hardware)
- Tape measure
- Level
Instructions:
- Safety First: Ensure your porch structure can support the weight of a hammock and occupants. Consult a professional if necessary for proper installation, especially if drilling into your porch ceiling.
- Choosing Your Spot: Select a location on your porch that offers enough clearance for swinging comfortably. Measure the distance between the two hanging points for your hammock.
- Marking Your Spots: Use a tape measure and level to mark the exact locations for drilling the holes for your hanging hardware on both sides of your porch (ceiling, beams, or posts).
- Drilling Time: Drill the holes according to the instructions and specifications of your chosen hanging hardware.
- Hanging the Hammock: Secure the hammock’s hanging straps or ropes to the installed hardware on each side of your porch. Double-check all connections for safety before climbing into your hammock.
Tips:
- Choose a hammock made from weather-resistant materials like cotton or nylon for outdoor use.
- Opt for a hammock with a stand if drilling into your porch structure isn’t feasible.
- Add comfy cushions and throws to your hammock for an extra touch of relaxation.
Wrapping Up: Bringing Your Porch Decor Vision to Life
These 17 DIY porch decorating ideas offer a fantastic starting point to unleash your creativity and transform your porch into a welcoming and personalized haven. Remember, there are no hard and fast rules – the most important aspect is to have fun and enjoy the process! Here are some additional tips to bring your porch decor vision to life:
- Consider Your Style: Do you gravitate towards a modern, rustic, traditional, or bohemian aesthetic? Choose elements that reflect your taste and create a cohesive look.
- Think About Functionality: Incorporate elements that serve a purpose beyond aesthetics. Ottomans with storage, hanging planters, and solar step lights all add functionality to your outdoor space.
- Embrace Color: Don’t be afraid to add pops of color with paint, throw pillows, or flowers. Color can instantly elevate your porch decor and create a cheerful and inviting atmosphere.
- Shop Smart: Look for deals at thrift stores or flea markets to find unique pieces you can repurpose into charming porch decor.
- Comfort Matters: Include comfortable seating options like chairs, rocking chairs, or a hammock to encourage relaxation and enjoyment of your outdoor space.
- Seasonal Touches: Switch up your porch decor with seasonal accents. Add pumpkins and fall foliage in autumn, brighten things up with summer blooms, and create a cozy winter wonderland with evergreen branches and fairy lights.
- Maintain Your Decor: Regularly clean and maintain your DIY projects to ensure they last for years to come. Apply fresh paint or stain as needed, and store fabric elements like pillows and throws indoors when not in use.
By following these tips and letting your creativity flow, you can create a beautiful and inviting porch that reflects your unique personality and becomes a cherished outdoor haven for you, your family, and your guests. Happy decorating!