

Every spring, the same scene plays out in gardens across the country. You step out your back door, glance down at that eroded bank or crumbling old step, and think, “Someone really should fix that.” That someone is you. And you don’t want to spend a thousand dollars on a landscaper to do what is, honestly, a weekend project with the right guidance.
I’ve built outdoor stairs five times now. Timber-frame garden steps along a slope. Concrete block treads going down to my veg patch. A set of gravel-filled sleeper stairs that my neighbor copied and then texted me to complain about, because her dog kept digging them up. (She filled the gravel with too small a stone. I told her. She didn’t listen.) The point is, I’ve made every possible mistake, and I’m here to save you the weekend of frustration.
Cheap DIY outdoor stairs are absolutely achievable. You can build a solid, safe, attractive set of garden steps for somewhere between £50 and £200 depending on your materials, your slope, and how many steps you actually need. Here’s everything you need to know.
Before You Touch a Single Tool: Planning Your Outdoor Garden Steps
The most expensive mistake you can make with DIY outdoor steps is skipping the planning stage. I know this because the first set of garden stairs I ever built had to be completely dismantled after three weeks because I hadn’t accounted for drainage. Water pooled behind the bottom riser every time it rained, undermined the soil, and the whole thing listed sideways like a sinking ship.
Start by measuring your slope. You need two numbers: the total rise (how many inches or centimetres from the bottom of the slope to the top) and the total run (the horizontal distance from front to back). Divide the rise by a comfortable step height — somewhere between 15 cm and 18 cm (6 to 7 inches) is the sweet spot for garden stairs — and that tells you how many steps you need.
Then figure out your tread depth. A comfortable outdoor tread is at least 30 cm (12 inches) deep. Multiply your number of steps by 30 cm and check that against your total run. If it doesn’t fit neatly, you either adjust your riser height slightly or you extend the stairway path. Neither is a crisis — it just needs to be sorted on paper before you buy anything.
Pro Tip
The golden rule for comfortable outdoor steps is this: 2× riser height + tread depth = 65 cm. So a 15 cm riser needs a 35 cm tread. A 17 cm riser needs a 31 cm tread. Nail this formula and your steps will feel natural to climb every single time.
Also think about drainage from the start. Every tread should slope forward ever so slightly — about 1 cm of fall across a 30 cm tread is plenty. That tiny angle sends water off the front of each step instead of pooling on the surface. It sounds minor. It is not minor. It is the difference between steps that last a decade and steps that turn into a moss-covered ice rink by November.
The Best Cheap Materials for DIY Outdoor Stairs (And What I Actually Recommend)
Here’s where I’ll save you the most money. There are about a dozen materials people use for outdoor garden steps, and roughly half of them are either overkill, too fiddly, or genuinely a waste of money for the average garden. I’ll be direct about which is which.
Timber Railway Sleepers: My Top Pick for Most Gardeners
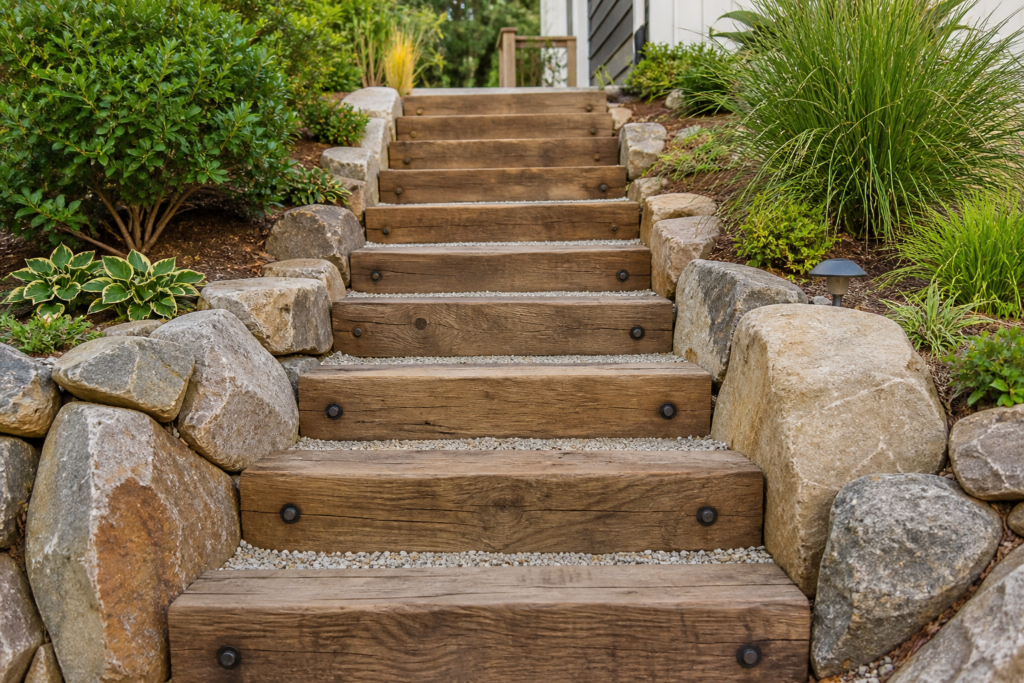
If I had to choose one material for cheap DIY outdoor steps, it would be reclaimed or new railway sleepers every single time. They’re chunky, they look great, they’re easy to cut with a hand saw or circular saw, and you can source second-hand ones from reclamation yards for as little as £10 to £20 each. A single sleeper laid flat makes a tread that is 25 cm wide and 13 cm tall — almost perfectly proportioned for a riser-and-tread combination right out of the box.
For most residential garden slopes, you stack two sleepers per step: one laid flat as the riser, one on top as the tread. Dig the step into the bank, compact the soil or add a gravel base, and pin the sleepers together with timber screws or rebar stakes driven through pre-drilled holes. I’ve had a sleeper staircase hold up for eight years now with zero maintenance beyond an annual brush to clear leaf litter.
New hardwood sleepers will run you £25–£45 each from a timber merchant. Reclaimed softwood ones are cheaper but need a coat of preservative. Skip the ones that smell heavily of tar — that’s old creosote, which you don’t want near a vegetable garden.
Concrete Blocks and Pavers: Inexpensive and Practically Permanent
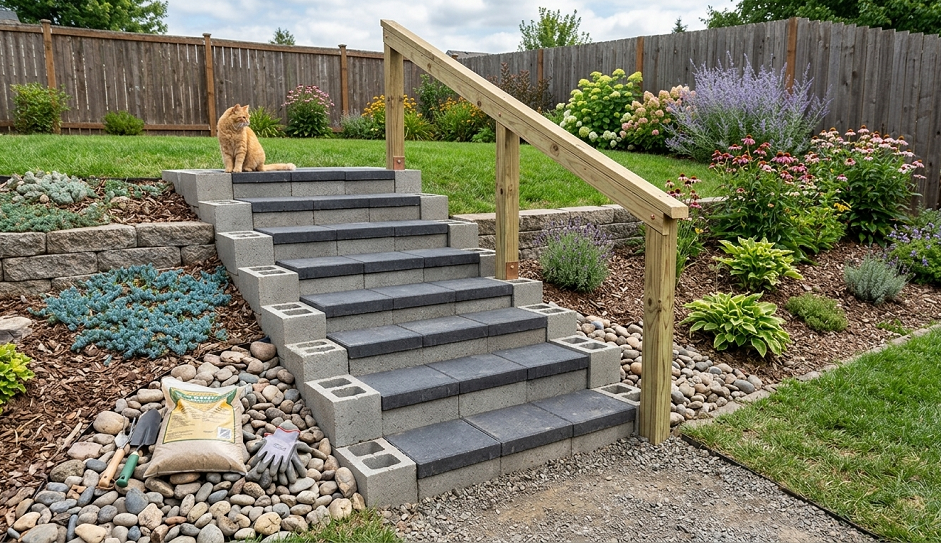
Concrete blocks are the cheapest material per step if you’re buying new, and they’ll outlive both of us. You’re looking at £3–£8 per paving slab or concrete block from a builders’ merchant or DIY shed. The tradeoff is that concrete looks brutally utilitarian unless you take care with the finishing, and cutting them requires a diamond blade on an angle grinder, which not everyone has kicking around.
For a basic budget build, I use a double layer of standard concrete blocks as risers with large paving slabs as treads. Set them on a compacted hardcore base, backfill behind each riser with soil or gravel, and the steps essentially become part of the landscape. I planted creeping thyme in the gaps on one set I built for my veg garden path, and within a year it looked like something from a glossy magazine spread — despite costing me about £40 in materials.
- Railway Sleepers£10–£45 each – Best all-round choice. Easy to work with, long-lasting, looks natural.
- Concrete Paving Slabs£3–£8 each – Cheapest option. Durable but heavy to work with.
- Natural Stone£15–£40 per slab – Beautiful but pricey. Best reserved as treads over concrete risers.
- Gravel + Timber Edging£30–£80 total – Works on gentle slopes. Needs bigger gravel (20mm+) to stay put.
Natural Stone: Worth It as a Tread, Overkill as a Full Build

I’ll be honest: I love the look of natural stone garden steps. Sandstone, limestone, York stone — they age beautifully and feel substantial underfoot. But using natural stone for an entire set of cheap outdoor stairs is, in my opinion, false economy. You’ll spend £200–£400 on stone alone, it’s back-breakingly heavy to move and set correctly, and a badly-set stone tread becomes a trip hazard the moment one corner sinks.
My compromise: use concrete blocks as risers and infill, and splurge on natural stone only for the treads. You get the look without the back pain or the budget blowout.
Step-by-Step: How to Build DIY Timber Sleeper Garden Steps
This is the method I recommend to everyone starting out. It works on slopes between about 20 and 45 degrees, it requires no specialist tools beyond a circular saw and a drill, and it produces a staircase that genuinely looks designed rather than improvised. Here’s exactly how I do it.
- Mark out your stair layout. Using pegs and string, mark the front edge of each step on the slope. Space them according to your tread depth calculation. Check that your string lines are level side-to-side — a spirit level is your best friend here.
- Excavate each step. Starting from the bottom, dig out the first step shape. You want a flat shelf that’s slightly deeper than your sleeper width, and angled 1–2 degrees back into the slope. This “key” angle stops the sleeper from creeping forward over time.
- Lay a gravel base. Add a 5–7 cm layer of compacted gravel or hardcore to each shelf before placing any sleepers. This is the drainage layer I mentioned earlier. Do not skip it. This is what I skipped the first time. My steps moved. Don’t be me circa 2014.
- Set the bottom riser first. Place your first sleeper across the base of the staircase and check it’s level side-to-side. Drive two 60 cm lengths of rebar through pre-drilled holes into the ground to pin it in place. Hammer the rebar flush with the sleeper top.
- Build up each step in sequence. Working from bottom to top, place the tread sleeper behind the riser, backfill with compacted soil or gravel behind it, then set the next riser on top of the fill. Each riser should overlap the back of the tread below it by at least 5 cm — this interlock is what gives the staircase its structural integrity.
- Fasten the layers together. Use 150 mm structural screws to join each riser to the tread behind it. Two screws per end, pre-drilled to avoid splitting. This stops any lateral movement even under heavy foot traffic.
- Backfill and compact around the sides. Once all steps are in, fill in the sides with soil and firm it down well. Plant the banks with ground-cover plants to lock the soil in place long-term. I use creeping jenny, ajuga, or low sedums — all tough, spreading, and practically maintenance-free.
- Apply a wood preservative. If you’re using softwood sleepers, give the whole staircase a coat of exterior timber preservative once everything is set. This step alone can double the life of your stairs. Don’t use a decorative stain — use a proper preservative that soaks into the grain.
Watch Out
Never set a sleeper directly on bare clay. Clay heaves when it freezes and shrinks when it dries. Without a gravel sub-base, your beautiful new staircase will shift, rock, and crack its joints within a single winter. The gravel layer is not optional — it’s structural.
Cheap DIY Outdoor Stair Railings and Handrails: Do You Actually Need One?
Garden steps fewer than four risers high don’t legally require a handrail in most UK residential settings, but that doesn’t mean you shouldn’t consider one. If your steps are used by elderly relatives, small children, or anyone carrying a heavy load of vegetables from the bottom garden, a simple post-and-rail adds real safety value.
The cheapest option that doesn’t look terrible is a single metal handrail post set in a concrete-filled hole at either side, with a simple wooden or metal top rail. You can buy galvanised steel post spikes from any builders’ merchant for around £8–£12 each — drive the spike into the ground at either side of the staircase, insert a 75×75mm fence post, and run a length of timber or metal conduit between them. Total cost: under £40, and it genuinely increases safety.
What I would not recommend is those ornate wrought-iron railing kits you see on home-decor websites for £150 a set. They look fine in photos. In a garden, they corrode at every joint, wobble after the first winter, and the ornate top rails trap leaf debris like a sieve. Practical wins over pretty every time outdoors.
“The best cheap outdoor stairs aren’t the ones that look expensive — they’re the ones you never have to think about again.”
How to Build DIY Gravel-Filled Outdoor Steps (A Gentler Slope Method)
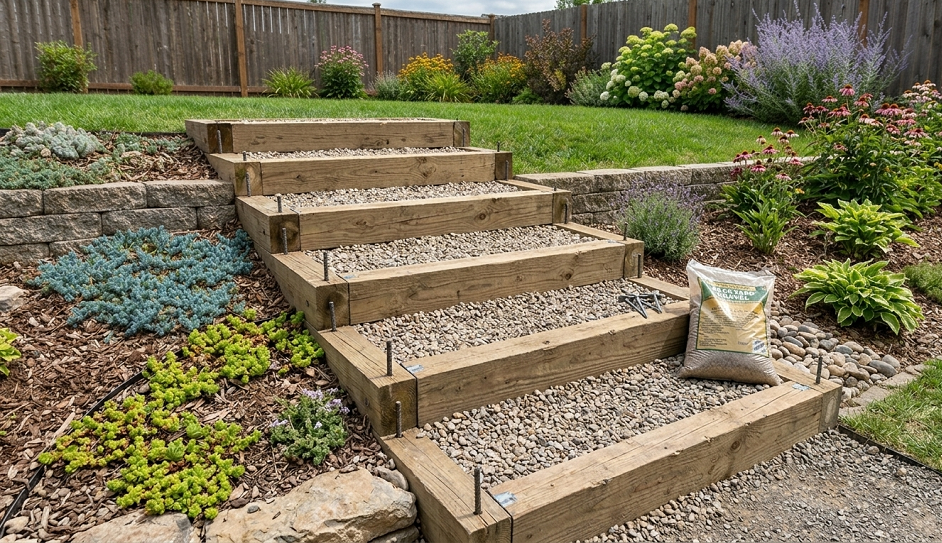
If your slope is relatively gentle — less than 20 degrees — or you want an even more budget-friendly option, gravel-and-timber steps are worth considering. The method is simple: you create a series of shallow timber frames using pressure-treated 100×50mm timber as retainers, pin them to the slope with rebar or heavy-gauge timber pegs, and fill each frame with 20mm pea gravel or decorative angular chippings.
The critical word there is 20mm. This is where my neighbour went wrong. She used 10mm gravel. It looked prettier. It also scattered everywhere the first time anyone walked up the steps at pace, spread across her lawn, and jammed in her mower. Angular 20mm gravel locks together under foot pressure and stays where you put it. Smaller, rounder stone just doesn’t.
This style of step is also fantastic for gentle, curving paths through a kitchen garden or orchard area — you’re not locked into a straight run, and because the gravel surface is self-levelling, minor settling over time is easy to top up. A 25-kg bag of 20mm granite chippings runs about £5–£7 at a builders’ merchant, and you’ll typically need two to three bags per step.
The Real Talk: What Can Go Wrong With Cheap DIY Outdoor Stairs
Things That Will Actually Ruin Your Stairs
I promised you an honest guide, so here’s the section where I stop being encouraging and start being useful in a different way.
Skipping drainage will wreck everything. I’ve said this twice already and I’m saying it again because it is the single most common reason DIY outdoor stairs fail. Water trapped behind or under a riser has nowhere to go. It saturates the soil, freezes in winter, expands, and slowly pushes your beautiful staircase apart. A basic gravel sub-base costs you an extra hour and about £8 in materials. It is never not worth doing.
Untreated softwood is a money-losing false economy. I’ve seen people build gorgeous-looking sleeper steps with untreated pine and watch them go spongy and splitting within three years in a damp climate. Spend £15 on a tin of preservative. Apply it before the timber goes in the ground. Done.
Those landscape fabric membrane “kits” are largely a waste of money. The ones sold specifically for “garden step construction” online are often just standard woven geotextile at a 300% markup. If you want to use membrane under your gravel base (reasonable idea, genuinely), buy a roll of standard weed-suppression fabric from a garden centre for £12 instead of a branded “step kit” for £45.
Trying to build into a very steep slope (over 50 degrees) without engineering help is genuinely risky. Cheap DIY steps are absolutely appropriate for normal garden gradients. But if you’re cutting into a steep bank to create steps and you’re not sure about the stability of that bank, get a professional assessment first. Soil collapse is not a problem that a YouTube tutorial can help you fix.
Decorative cobblestones as treads are a slip hazard. They look great on Pinterest. They’re treacherous when wet. Every time. If you want a textured tread surface, use brushed concrete, rough-sawn timber, or riven stone — surfaces with actual grip, not rounded decorative ones. I found this out the hard way carrying a full trug of courgettes down a cobblestone tread in October. The courgettes did not survive.
Estimated Cost Breakdown: Budget Outdoor Stairs for a Typical Garden
Here’s a realistic cost breakdown for a set of six sleeper steps — which is about what you’d need for a slope with a 90 cm rise, a very common scenario in UK gardens.
- 12 reclaimed railway sleepers (2 per step) at £15 each: £180
- 3 bags of 20mm gravel for sub-bases: £18
- Rebar (2 lengths per step, 12 total): £20
- Structural screws (box of 50): £9
- Timber preservative (1 litre): £12
- Total: approximately £239
Use new budget softwood sleepers instead of reclaimed ones and you can get that down to around £180. Use concrete blocks as risers with reclaimed slabs as treads and you could feasibly do six steps for £80–£100. The range is real, and it scales with how much time you have versus how much money you want to spend.
Save Money Here
Check Facebook Marketplace and local reclamation yards before buying anything new. I’ve sourced beautiful York stone treads and barely-used hardwood sleepers for free or near-free when people were clearing gardens before moving house. The quality is often better than new, and the carbon footprint is lower too.
Bonus Tip
If you’re building steps on a slope that also needs to double as a path for a wheelbarrow or garden cart, make your treads a minimum of 40 cm deep and widen the staircase to at least 90 cm across. A narrow staircase is fine for foot traffic but will drive you absolutely mad when you’re trying to wheel a loaded barrow down to the compost heap. Wider is better. Build it right once.
Parting Wisdom: Build It Once, Build It Right
The thing I wish someone had told me before I built my first set of outdoor stairs is this: the cheapest build over a ten-year horizon is not the one with the lowest materials cost. It’s the one you don’t have to rebuild. The gravel base, the wood preservative, the proper rebar pinning — none of these are glamorous, and none of them are expensive. But every one of them is load-bearing in a very practical sense.
Spend the extra hour on the sub-base. Measure your rise and run twice before you buy anything. And if you’re working on a slope that makes you even slightly nervous about stability, shore up the bank before you build into it. Garden steps done right will still be there decades from now, looking like they’ve always been part of the landscape.
That’s the goal: build something that eventually just looks like it grew there.
Have you built outdoor garden steps before? What material did you use — and would you use it again? Or do you have a question about a specific slope or situation I haven’t covered? Drop it in the comments below. I read every one, and no question is too basic. Someone out there has the same question and is too shy to ask.