

It’s that sinking feeling in your gut when the local weather person mentions a “light dusting of frost” while your tender seedlings are finally starting to show off. I’ve been there, standing in my pajamas at 10:00 PM with a flashlight, trying to find enough spare bedsheets to save my peppers. One year, I thought I was being clever and used thin plastic painter’s plastic; I woke up to a garden of “veggie popsicles” because the plastic touched the leaves and sucked the heat right out of them.
Frost doesn’t have to be the end of your gardening season, but you can’t just wing it. If you want to keep your plants alive when the mercury dips, you need a plan that actually works, not just something that looks “aesthetic” for a photo. I’ve spent over a decade losing plants and winning them back, and these are the tricks that have actually saved my harvest when the air turns crisp.
1. Using Burlap and Stakes for Vertical Protection
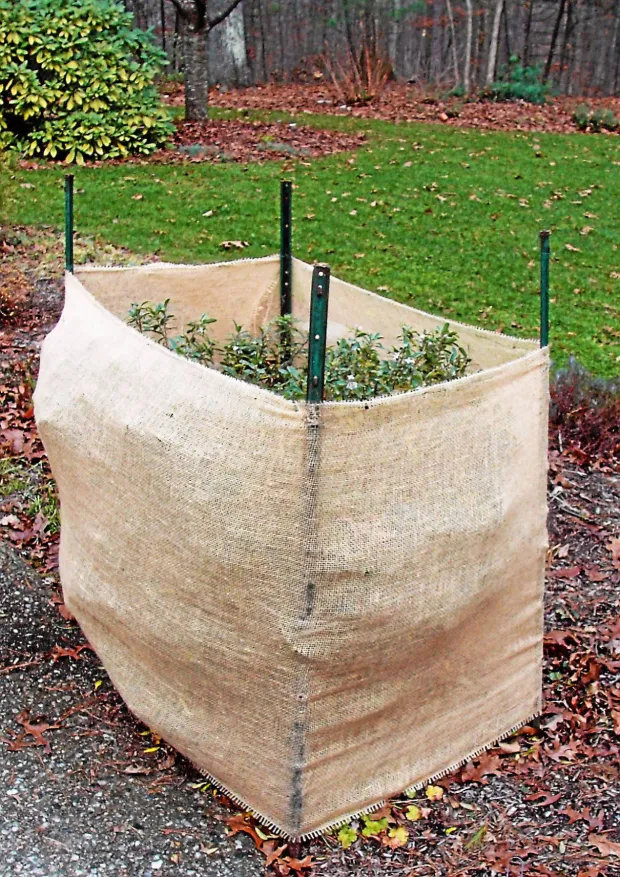
When you’re dealing with young shrubs or those “fussy” perennials that aren’t quite established, burlap is your best friend. I’ve found that heavy-duty burlap is worth every penny compared to the cheap, thin stuff that tears if you look at it wrong. The secret isn’t just wrapping the plant like a mummy; it’s creating a microclimate. If you wrap the burlap directly against the foliage, the moisture trapped against the leaves can freeze and cause more damage than if you’d done nothing at all.
I always drive four wooden stakes into the ground around the plant first. This creates a “cage” so the fabric never actually touches the leaves. One October, I got lazy with a new hydrangea and just threw the burlap over it. A week later, the top buds were mush. Now, I make sure there’s at least three inches of breathing room between the branch tips and the fabric. It’s a bit more work, but it’s the difference between a blooming spring and a brown stick.
You want to secure the burlap to the stakes using heavy staples or even clothespins if you’re in a pinch. Start from the ground and go up. I like to leave the top slightly open during the day if the sun comes out, then cinch it shut like a drawstring bag before the sun goes down. This traps the heat the soil gathered during the afternoon.
If you are wondering where to buy burlap, don’t go to the fancy garden centers first. I usually hit up the local hardware store or even look for used coffee bean sacks from local roasters. Just make sure they haven’t been treated with anything weird. It’s a cheap, breathable solution that lasts for years if you dry it out properly before storing it in the garage.
2. The Old-Fashioned Milk Jug Cloche Method
If you have a row of small starts or herbs, don’t go out and buy expensive glass cloches. They’re heavy, they break, and they cost a fortune. I’ve been using “trash” for years with better results. Empty one-gallon milk jugs or water bottles are the gold standard for DIY frost protection. I learned this the hard way after a surprise late-April freeze wiped out my entire first round of zucchini. I was heartbroken, but my neighbor showed me her “jug graveyard,” and I haven’t looked back since.
To make these work, you just cut the bottom off the jug. On a cold night, you slide the jug over the plant and push it about an inch into the dirt so the wind doesn’t blow it into the next county. The best part is the cap. Keep the cap off during the day so the plant doesn’t bake—I’ve literally steamed a tomato plant to death by leaving the cap on during a sunny 50-degree day—and then screw it back on tight about an hour before sunset.
I prefer the translucent jugs over the solid white ones because they let in more light if I get stuck at work and can’t get home to uncover them right away. If you’re worried about them flying away, you can thread a thin bamboo stake through the handle and deep into the ground. It’s not the prettiest look for a front-yard garden, but my plants are alive and my neighbors’ are usually shivering, so I’ll take the “recycled” look any day.
One quick side note: if your plants are getting too big for a milk jug, try those five-gallon buckets from the home improvement store. Just remember to take them off as soon as the sun hits them, or you’ll create a mini-sauna that’s way too hot for most greens.
3. High-Quality Frost Blankets and Row Covers
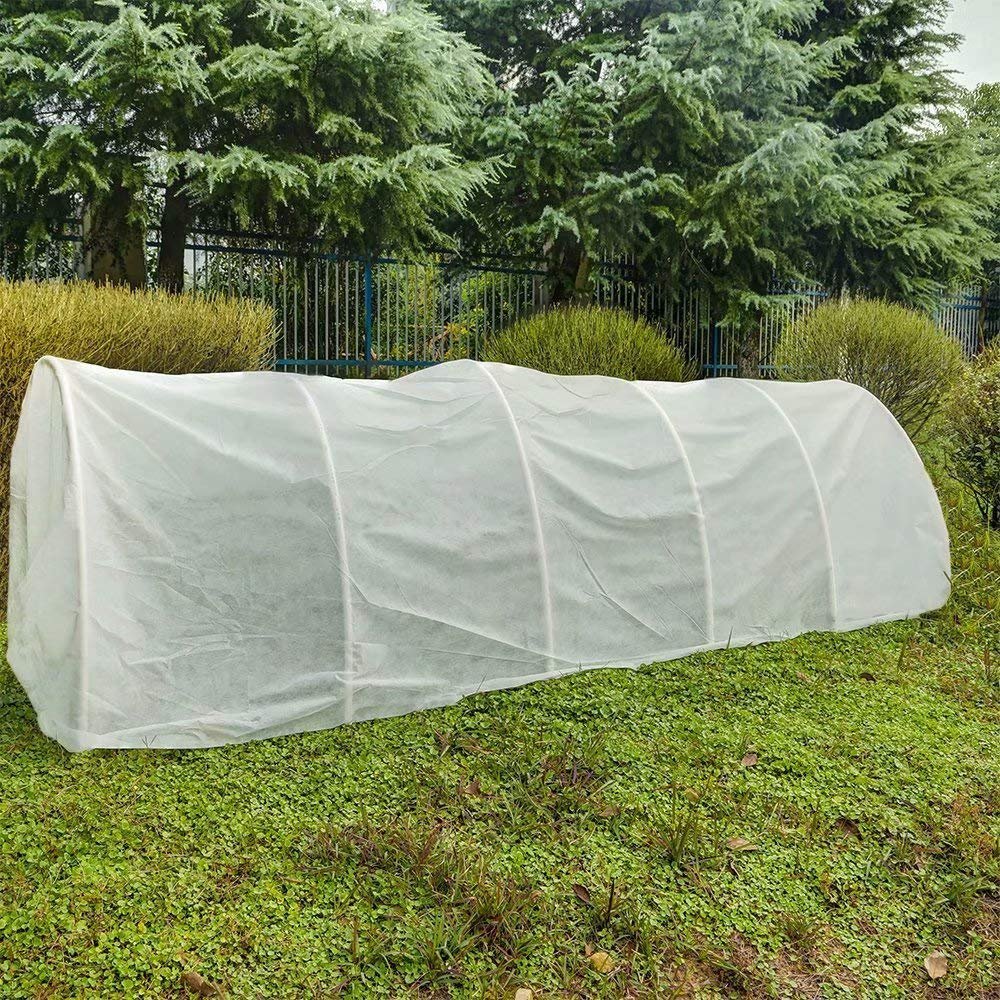
If you have a large raised bed, individual jugs are a nightmare. That’s when you need to invest in professional-grade frost blankets. I used to think a regular bedsheet was just as good, but I was wrong. Bedsheets get heavy when they get wet from dew, and then they sag and crush your plants. A dedicated “frost cloth” or “Agribon” is lightweight enough to float right on top of the plants, though I still prefer using hoops.
I use PVC pipes bent into arches over my beds to support the fabric. It looks like a little Conestoga wagon when I’m done. This keeps the material off the leaves and creates a massive pocket of warm air. I’ve seen this setup keep plants safe even when it drops five or six degrees below freezing. I’ve found that the “heavy-weight” fabric is better for deep winter, while the “lightweight” stuff is perfect for those pesky spring frosts where you just need a little insurance.
When you’re setting these up, the most important part is the seal at the ground. If you leave gaps at the bottom, the cold air will crawl right in there like a draft under a door. I use old bricks or smooth rocks to weigh down the edges every two feet. Don’t use landscape staples unless you want to rip holes in your fabric every time you pull it back to check on things.
Last year, I tried using some leftover bubble wrap I found in the attic for a row cover. Absolute disaster. It doesn’t breathe, and it creates “hot spots” that scorched my kale. Stick to the fabric. It lets a little moisture and air through so the plants don’t suffocate, but it holds that precious ground heat where it belongs.
4. Deep Mulching for Root Insulation
Most people think about the leaves, but the roots are the “engine room” of the plant. If the ground freezes solid, the plant can’t take up water, and it dies of thirst while surrounded by ice. I’m a huge believer in “mulching for your life” right before a freeze. I’m talking about a thick, 4-to-6-inch layer of clean straw, shredded leaves, or wood chips.
I once had a beautiful rosemary bush that I was sure wouldn’t survive a zone-pushing winter. I piled straw so high around it that you couldn’t even see the plant. By spring, the top few inches of the branches had died back, but the root ball was cozy and warm. It grew back twice as fast as the one I “protected” with just a plastic bag. Straw is my favorite because it’s easy to move around and doesn’t mat down like wet leaves can.
You want to apply the mulch while the ground is still a bit warm. If you wait until the ground is already frozen, you’re just “insulating the cold” in, which is the opposite of what we want. Think of it like putting a coat on a person; the coat doesn’t make heat, it just traps the heat that’s already there.
When the threat of frost passes, don’t forget to pull that mulch back a few inches from the stems of your plants. If you leave it piled up against the trunk or main stem, you’re just inviting voles and rot to move in. I’ve lost more than one fruit tree to “collar rot” because I was too lazy to clear the mulch in the spring.
5. Using Water Barrels as Thermal Heaters
This is one of those “science-y” tricks that actually feels like magic. Water is a heat sink. It takes a long time to heat up and a long time to cool down. In my greenhouse—and even out in the open garden—I keep large containers of water right next to my most prized plants. During the day, the sun beats down and warms that water up. At night, as the air temperature drops, the water slowly releases that heat back into the environment.
I’ve used everything from 55-gallon blue drums to simple one-gallon jugs painted black. The black paint is key; it absorbs much more solar energy than a clear jug. I’ll cluster four or five black jugs around the base of a young citrus tree. It usually keeps the immediate area about 2 or 3 degrees warmer than the rest of the yard. That might not sound like much, but in the gardening world, 3 degrees is the difference between life and death.
One “fake” personal anecdote for you: I once tried to do this with an old kiddie pool I filled with water near my tomatoes. I thought the surface area would be great. Instead, I just created a giant skating rink for the neighborhood cats, and it didn’t do squat for the plants because the water was too spread out. Stick to deep, concentrated containers.
If you’re in a real pinch and a hard freeze is coming, you can actually fill those jugs with hot tap water right before dark. It’s like giving your plants a literal heating pad. Just don’t pour the hot water on the plants—I assume I don’t need to tell you that, but hey, we’ve all done silly things when we’re panicked at 11:00 PM.
6. The Low-Tech Cardboard Box Shelter
Cardboard is an underrated hero in the frost-fighting world. It’s a fantastic insulator because of the corrugated layer—all those little air pockets acting like double-paned windows. Whenever I see a frost warning, I raid my recycling bin. For medium-sized plants like peppers or small shrubs, a sturdy cardboard box is often better than a sheet because it doesn’t collapse.
The trick is to weigh them down. I can’t tell you how many times I’ve woken up to see my “plant protectors” tumbling down the street like tumbleweeds because a light breeze picked up. I keep a pile of heavy rocks or bricks nearby just for this. Simply flip the box over the plant and put a weight on top.
I’ve found that cardboard works best for “radiational” frost—those clear, still nights where the heat just floats away into space. However, if it’s a “windy” freeze, the cardboard can be a bit tricky. If the wind gets under the edge, it’ll rip the box right off. I usually mound a little dirt around the bottom edge of the box to create a windproof seal.
Don’t leave cardboard on for more than a day or two, though. It blocks 100% of the light, and if it rains, your “shield” becomes a soggy, heavy mess that will crush your plant. If it gets wet, toss it in the compost and get a fresh one. It’s free, it’s effective, and it’s one of the few times my Amazon addiction actually helps my garden.
7. Grouping Containers for Shared Warmth
If you have a lot of potted plants, don’t leave them sitting out on their own like lonely soldiers. Pots are incredibly vulnerable because the cold can attack from all sides, including through the walls of the container. I always huddle my pots together in a tight group against the warmest wall of my house—usually the south-facing side.
By grouping them, you’re reducing the surface area exposed to the cold. It’s the “penguin huddle” strategy. I put the tallest, hardiest plants on the outside and tuck the delicate ones in the middle. Then, I throw a big blanket or a piece of frost cloth over the whole “huddle.” The combined thermal mass of all that soil and water helps keep the temperature stable.
One year, I left a terracotta pot sitting on a concrete step all by itself. Not only did the plant die, but the pot itself cracked right in half because the damp soil expanded when it froze. Now, I always make sure my pots are “feet up” off the cold ground using pot feet or even just some scraps of wood. This prevents the cold from leaching directly out of the frozen pavement and into the roots.
If you have really big pots that you can’t move, you can wrap the pot itself in bubble wrap or old towels. It looks ridiculous, like your plants are wearing leg warmers, but it works. Protecting the pot is just as important as protecting the foliage.
8. Utilizing Incandescent Christmas Lights
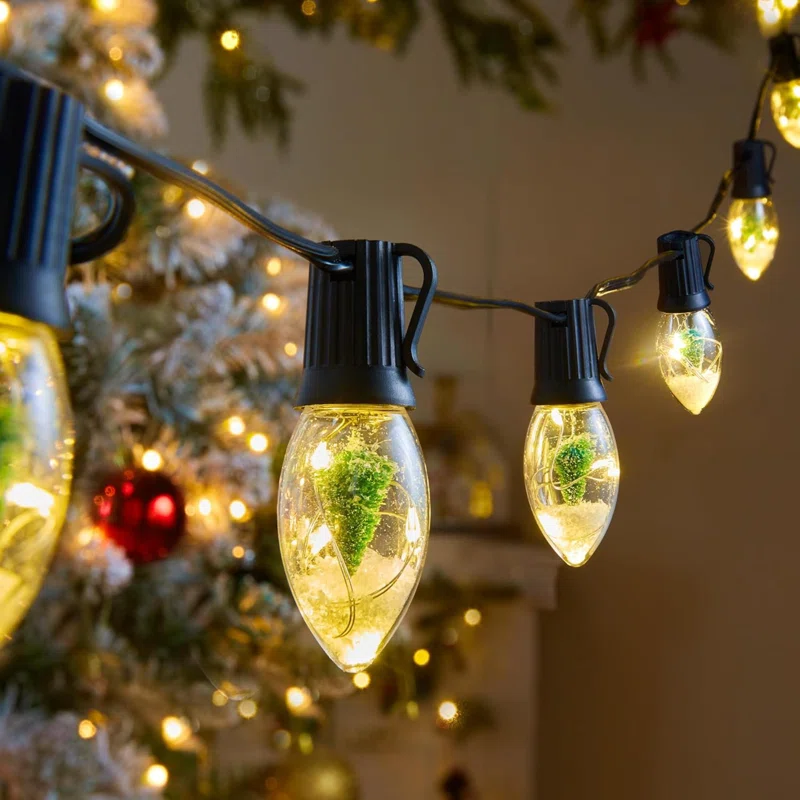
This is my favorite “secret weapon.” Note that I said incandescent—the old-school ones that get warm to the touch. Modern LED lights are great for the power bill, but they produce zero heat. For frost protection, you want those energy-wasting bulbs from ten years ago. I string them through my citrus trees or over my delicate perennials before covering them with a cloth.
The lights provide just enough ambient heat to keep the air inside the cover above the freezing mark. I once saved a lemon tree during a record-breaking cold snap by wrapping it in C9 outdoor bulbs and then draping it in a heavy tarp. When I peeked inside the next morning, it was practically toasty in there. It felt like a little tropical disco.
Be careful not to let the bulbs touch the plant directly, especially if you’re using a plastic cover, as they can occasionally get hot enough to singe a leaf. And for the love of all things green, make sure you’re using outdoor-rated extension cords and a GFCI outlet. We want to save the plants, not burn the house down.
I’ve found that even a single string of “mini-lights” can make a difference in a small space. It’s a bit of a localized “greenhouse effect.” Just remember to turn them off during the day so you don’t confuse the plant or waste electricity once the sun is doing the work for you.
9. Watering Before the Freeze
It sounds counter-intuitive to put water on the ground right before it freezes, but moist soil actually stays warmer than dry soil. Damp soil radiates more heat upward and has more “thermal mass.” I always give my garden a deep soak the morning before a predicted frost.
I learned this after a dry winter where I thought, “Well, the plants are dormant, they don’t need water.” Wrong. The ones I didn’t water were decimated, while the ones near my leaky hose bib—which kept the ground muddy—survived just fine. The water in the soil acts like an insulator for the roots.
Don’t get the leaves wet, though! You want the water in the ground, not on the foliage. Wet leaves are much more likely to suffer from ice damage. Use a soaker hose or just point the nozzle at the base of the plant.
This is especially important for evergreens. They’re still “breathing” (transpiring) even in winter, and if they can’t pull water from the frozen ground, they’ll get “winter burn.” Think of a good watering as a warm meal for your plants before they have to go out into the cold. It gives them the strength to stand up to the chill.
10. Creating a Temporary Greenhouse with Cold Frames
If you’re serious about extending your season, you need a cold frame. You don’t have to build something fancy with glass and cedar. I’ve made them out of old straw bales and a discarded window sash I found in a neighbor’s bulk trash pile. You just arrange the straw bales in a rectangle and lay the window on top.
The straw provides incredible insulation (R-value, for the nerds out there), and the glass lets the sun in. It’s a perfect little bunker for lettuce, spinach, and radishes. On a 30-degree night, the inside of a well-built cold frame can stay in the 40s or even 50s.
One “Real Talk” warning: you MUST vent these. I can’t tell you how many times I’ve forgotten to prop the lid open on a sunny morning and come home to find my salad greens literally cooked. I now keep a small wooden block nearby to prop the lid open about two inches whenever the sun is out.
If you don’t have straw, you can use bricks or even just mounds of dirt to create the “walls” of your frame. The key is just having a clear top that can be tilted toward the sun. It’s a game-changer for getting a head start on the spring or keeping the kale going until Christmas.
11. Bonus: The Emergency “Sheet Pile” Method
Look, sometimes life happens. You get home late, the temperature is dropping fast, and you don’t have time for stakes, jugs, or water barrels. In a total emergency, just start piling. Grab every old towel, blanket, and sheet you own. Layer them up.
The more layers, the better the insulation. I’ve used a heavy wool blanket topped with a plastic tarp (to keep the dew off the wool) and saved plants that had no business surviving. It’s not elegant, and it might squish a few branches, but a bent branch is better than a dead plant. Just get the fabric out there and weigh the corners down with whatever is handy—shoes, flower pots, or those “garden gnomes” you secretly hate.
Real Talk: What’s Not Worth Your Time
I’m going to be honest with you: some things just aren’t worth the effort. Those “plant spray” insulators that claim to coat your leaves in a protective wax? In my experience, they’re a total waste of money. I’ve tried them side-by-side with untreated plants, and the results were identical. Save your cash for more burlap.
Also, don’t bother trying to save “true” tropicals if you live in a place that gets hard, multi-day freezes. You can wrap a banana tree until it looks like a giant marshmallow, but if the ground freezes two feet deep for a week, it’s a goner. Know when to cut your losses and just bring the pots inside or accept that some things are annuals in your climate.
And finally, stop using thin “trash bags” as your only layer of protection. Plastic is a terrible insulator. It’s a moisture barrier, sure, but it has zero R-value. If the plastic touches the leaf, that leaf is dead. If you must use plastic, it has to be the outer layer over a cloth or a frame.
Parting Wisdom
At the end of the day, gardening is a giant experiment. You’re going to lose some plants—I still do, even after ten years. The trick is to learn why they died. Was it the wind? Was it the moisture? Or did you just get unlucky with a “black frost”? Don’t let a bad night discourage you from trying again next year.
What’s the weirdest thing you’ve ever used to save a plant from the cold? I once used a set of old velvet curtains I found at a thrift store! Drop your stories or any questions about your specific setup in the comment box below—I’d love to hear how you’re keeping your green friends cozy this winter.