

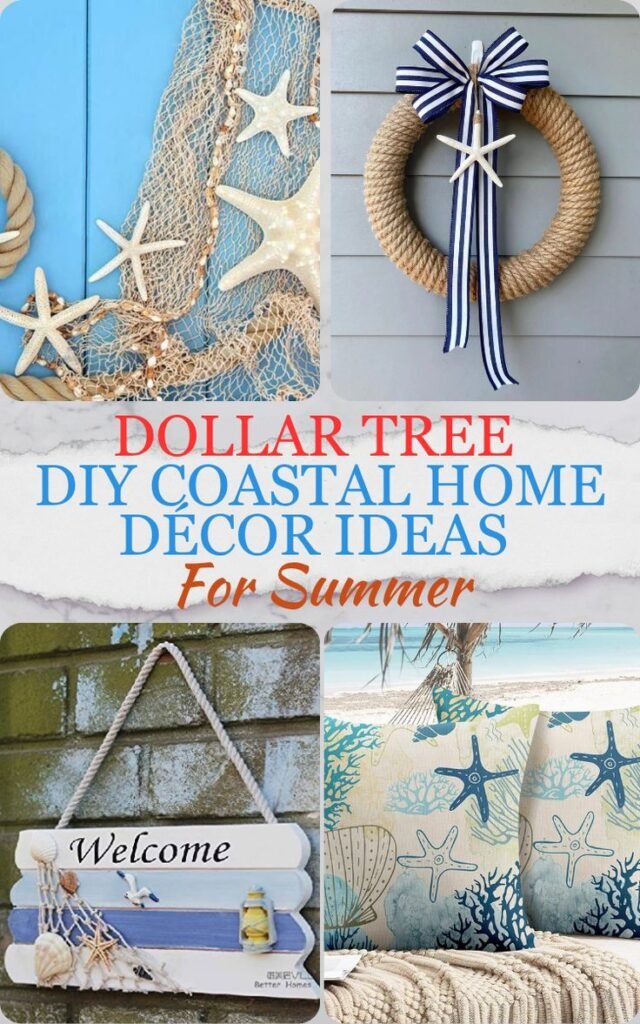
As the sun warms our skin and the scent of salty air fills the breeze, there’s nothing quite like bringing the feeling of the coast into your home. Creating a coastal vibe doesn’t have to involve expensive trips to fancy home decor stores. With a little creativity and a trip to your local Dollar Tree, you can transform your space into a breezy summer oasis. Get ready to unleash your inner interior designer with these 21 budget-friendly DIY coastal decor ideas!
1. Seashell Shadow Box
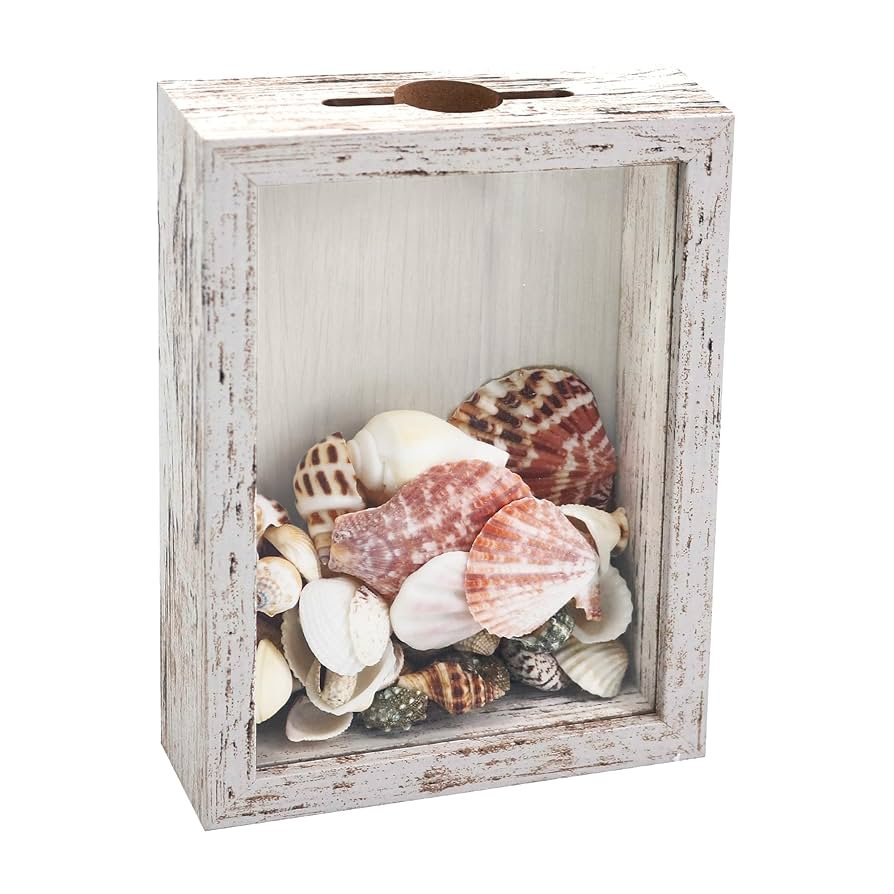
- Materials:
- Shadow box frame (Dollar Tree)
- Hot glue gun and glue sticks
- Sand (Dollar Tree, optional)
- Decorative seahorses, starfish, or shells (Dollar Tree)
- Spray paint (optional, if you want to paint the frame)
- Twine or ribbon (optional, for hanging)
- Instructions:
- (Optional) If you want to change the color of the shadow box frame, lay down some newspaper and spray paint it in your desired shade. Let it dry completely.
- Use hot glue to secure your chosen sea creatures or shells to the backboard of the shadow box. Arrange them in a way that pleases your eye, creating a visually interesting composition. You can use a variety of sizes and textures for added depth.
- (Optional) If you want to create a sandy beach effect, sprinkle a thin layer of sand on the bottom of the shadow box before gluing down your sea life.
- Once you’re happy with the arrangement, carefully close the shadow box and secure the back.
- (Optional) Attach a loop of twine or ribbon to the top of the frame for hanging.
Tips & Variations:
- You can use different colored sand or add small pebbles for a more realistic beach scene.
- If you don’t have any decorative shells or sea creatures, you can use Dollar Tree’s selection of small picture frames and cut out ocean-themed images to glue inside the shadow box.
- Consider using a larger shadow box and creating a 3D effect by building sand dunes with the sand and hot gluing small wooden dowels or popsicle sticks into the sand to create structures like piers or lighthouses.
2. Rustic Driftwood Candle Holder
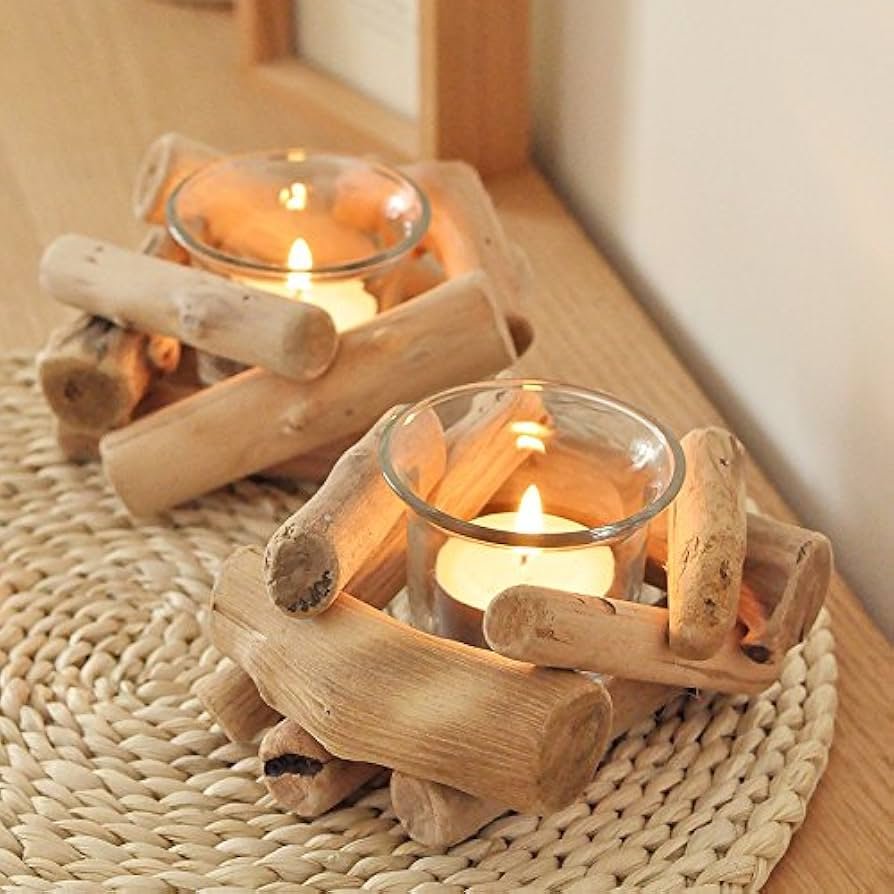
- Materials:
- Glass jar or vase (Dollar Tree)
- Hot glue gun and glue sticks
- Various sized pieces of driftwood (collected from nature or purchased at a craft store, optional)
- Battery-operated tea lights (Dollar Tree)
- Spray paint (optional, if you want to paint the driftwood or jar)
- Twine or rope (optional, for decoration)
- Instructions:
- (Optional) If you’re using natural driftwood, clean it thoroughly with soap and water and let it dry completely. You can also spray paint the driftwood for a more uniform look.
- (Optional) Spray paint the glass jar if desired.
- Begin arranging the driftwood pieces around the glass jar. Use a combination of sizes to create a visually appealing structure. Secure the pieces together with hot glue as needed for stability.
- Once you’re happy with the arrangement, hot glue the driftwood structure to the base of the glass jar.
- Place a battery-operated tea light inside the jar and enjoy the warm glow of your rustic coastal candle holder.
- (Optional) Wrap some twine or rope around the base of the jar for an extra touch of nautical charm.
Tips & Variations:
- If you don’t have access to driftwood, you can substitute with Dollar Tree’s selection of wooden dowels or craft sticks. Bundle them together and stain them for a similar rustic look.
- Instead of a jar, use a hurricane glass or a small fishbowl for a different effect.
- You can add decorative elements like seashells, small starfish, or twine wrapped around the base of the driftwood for extra coastal vibes.
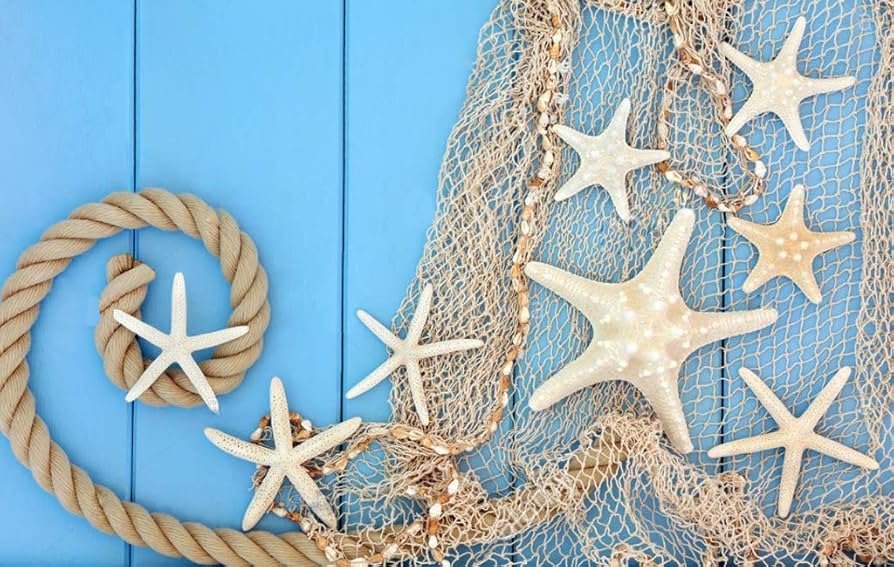
3. Nautical Rope Wreath for the Entrance
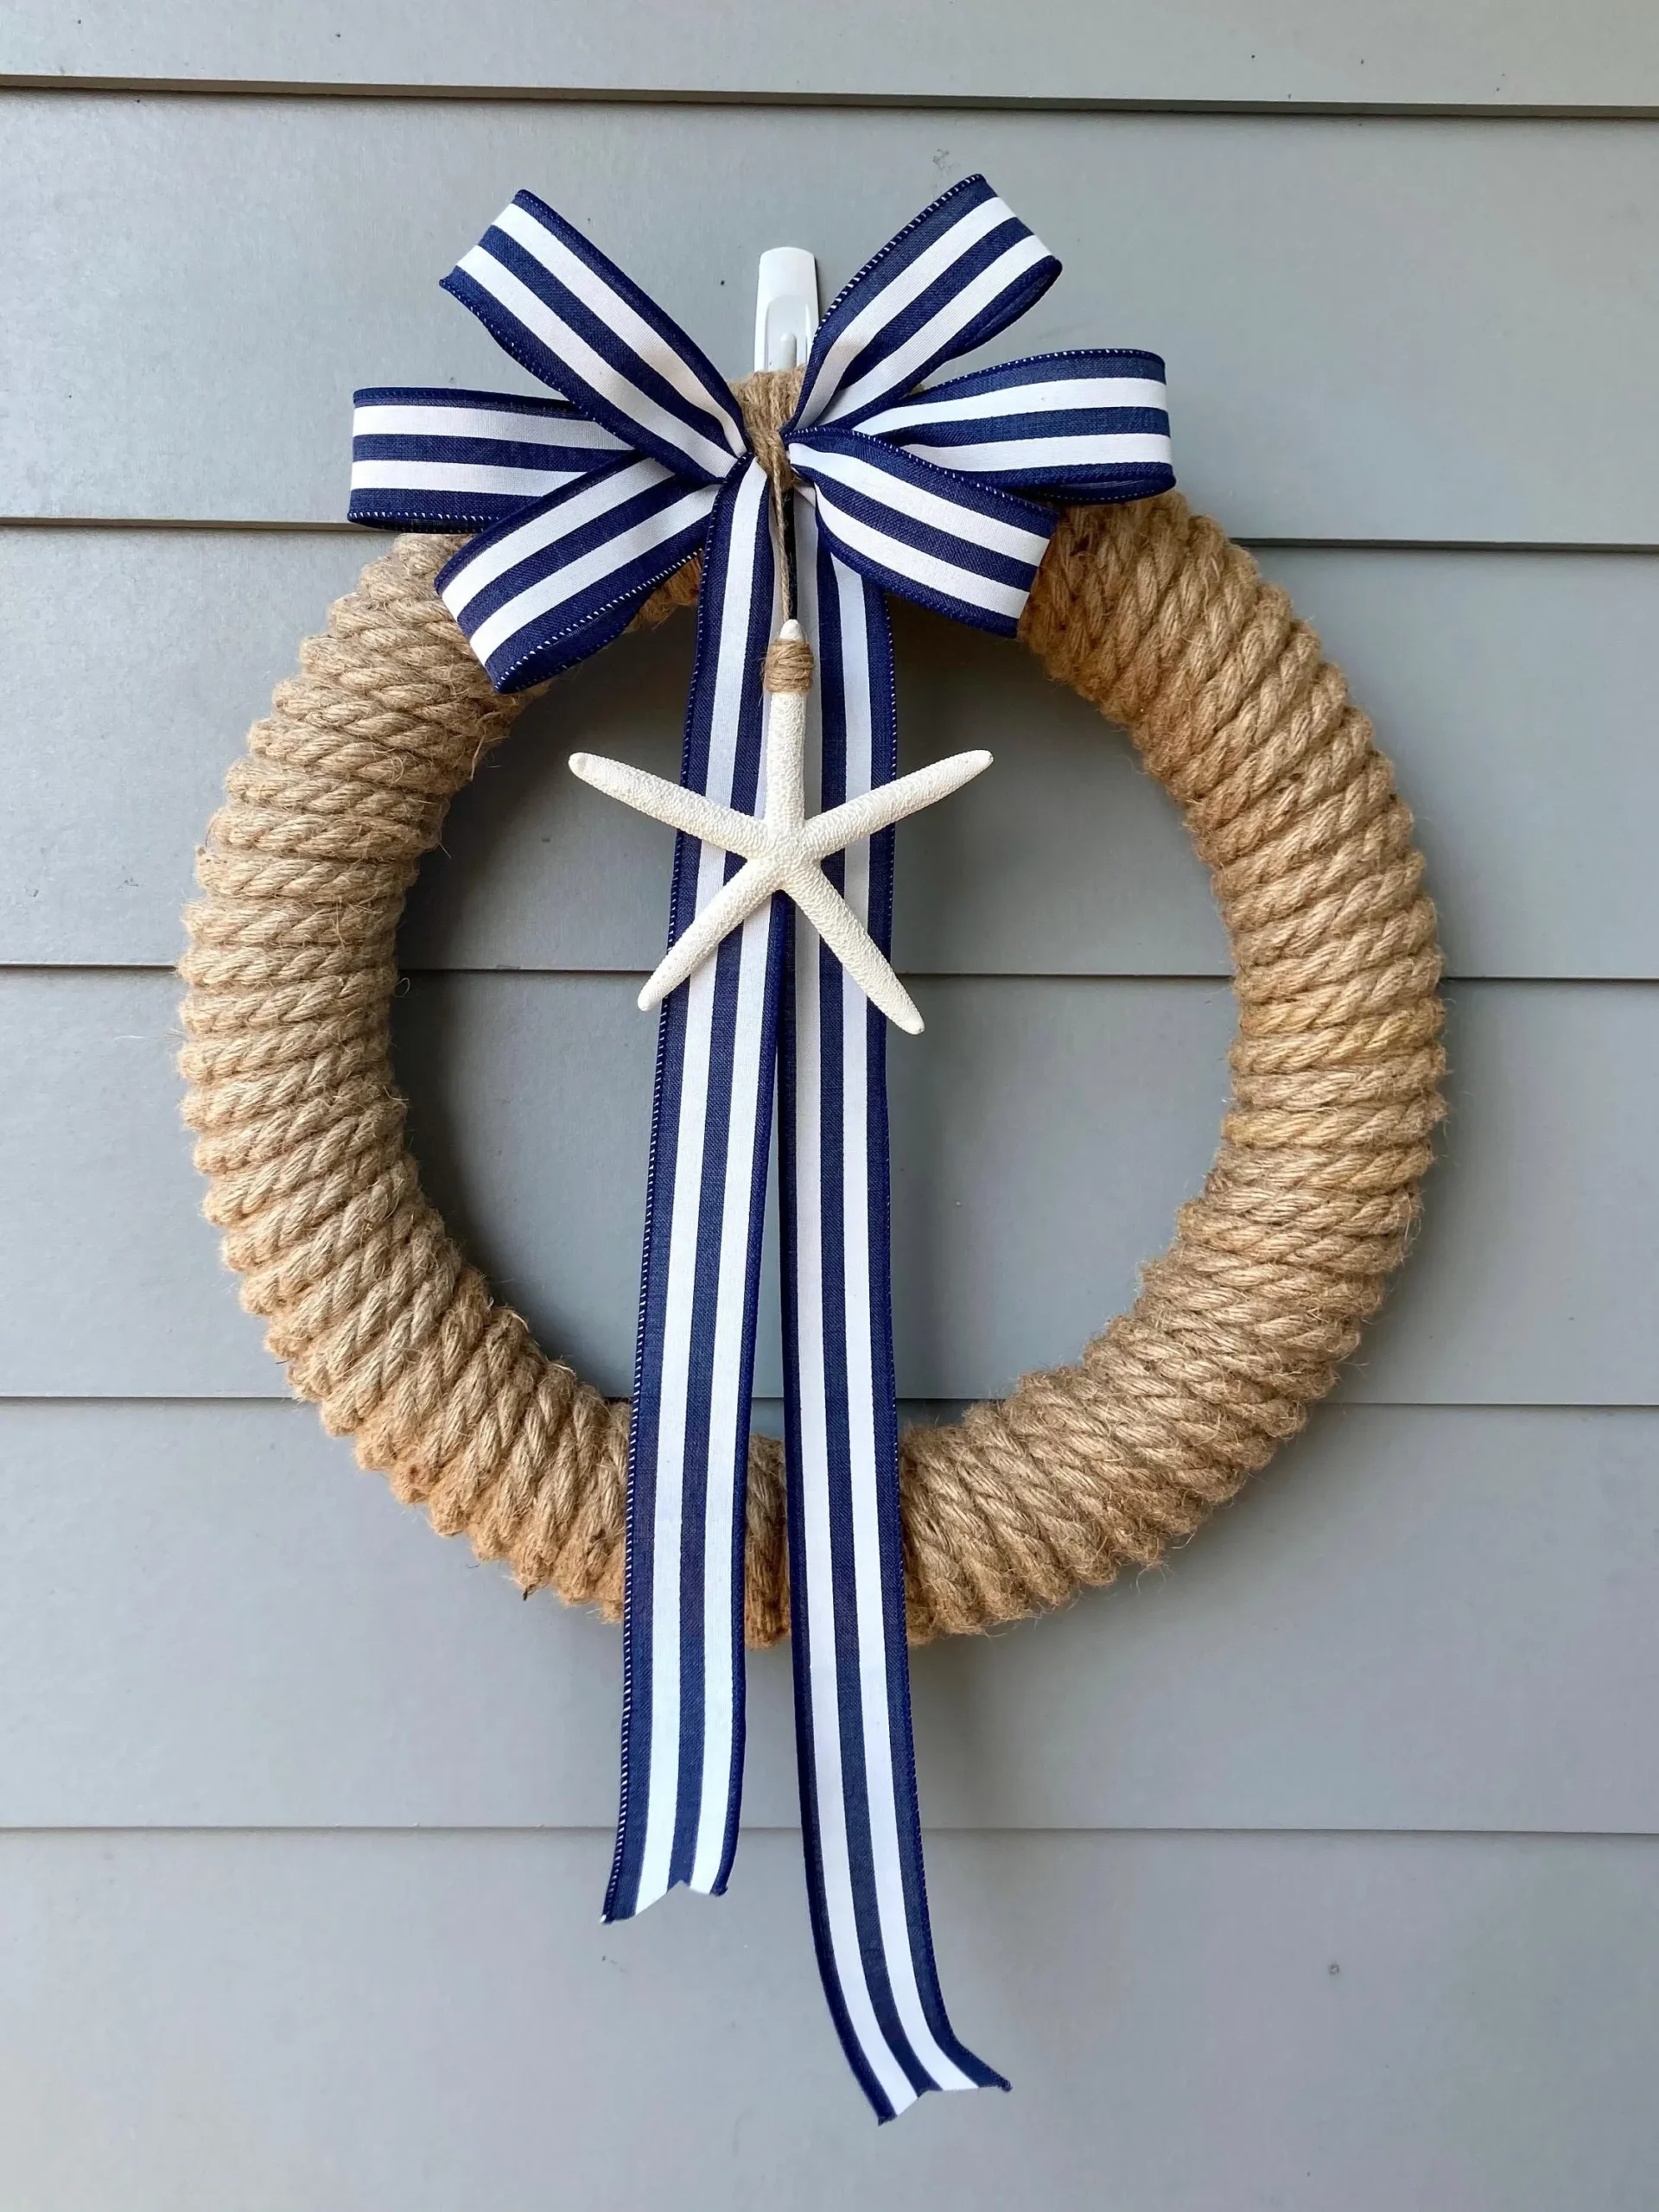
- Materials:
- Wire wreath frame (Dollar Tree)
- Hot glue gun and glue sticks
- Thick nautical rope (Dollar Tree)
- Seashells, starfish, or other nautical decorations (Dollar Tree)
- Spray paint (optional, if you want to paint the frame or rope)
- Instructions:
- (Optional) Spray paint the wreath frame and rope if desired. Let everything dry completely.
- Begin wrapping the rope around the wire wreath frame, securing it with hot glue as you go. Wrap the rope closely together, covering the entire frame. You can either wrap in a spiral pattern or create a more random, woven effect.
- Once the frame is completely covered, use hot glue to secure various seashells, starfish, or other nautical decorations onto the rope wreath. Arrange them in a way that feels balanced and visually interesting.
- You can add additional elements like small painted anchors, twine wrapped around the base of the shells, or even small battery-operated fairy lights woven into the rope for a magical touch.
Tips & Variations:
- Use different colored or textured ropes for a more unique look.
- If you don’t have nautical decorations, you can use hot glue to secure small painted wooden circles with ocean-themed words or pictures onto the wreath.
- Consider incorporating small painted buoys or miniature lighthouses for a more specific nautical theme.
4. Rustic Burlap and Starfish Wall Hanging
- Materials:
- Square or rectangular burlap fabric (Dollar Tree)
- Hot glue gun and glue sticks
- Decorative starfish (Dollar Tree)
- Rope or twine (Dollar Tree)
- Fabric scissors (optional, if you need to cut the burlap)
- Spray paint (optional, if you want to paint the starfish)
- Instructions:
- (Optional) If you want to change the color of the starfish, spray paint them in a desired shade and let them dry completely.
- (Optional) Cut the burlap fabric to your desired size. A square or rectangle works well, but you can also get creative with triangular or rounded shapes.
- Lay the burlap flat and arrange the starfish on it in a way that you find pleasing. You can use a variety of sizes and stack them for added dimension.
- Once you’re happy with the arrangement, use hot glue to secure the starfish firmly onto the burlap fabric.
- Cut two equal lengths of rope or twine and hot glue them to the back of the burlap fabric at the top, creating a loop for hanging.
Tips & Variations:
- You can add other nautical elements like small painted wooden anchors, seashells, or twine wrapped around the base of the starfish.
- Instead of starfish, use other beachy finds like driftwood pieces, sand dollars, or even painted bottle caps with ocean-themed designs.
- Consider staining the burlap for a more rustic look.
5. Coastal Canvas Art

- Materials:
- Canvas panel (Dollar Tree)
- Acrylic paints in various shades of blue, green, white, and brown (Dollar Tree)
- Paint brushes (Dollar Tree)
- Stencils (optional, Dollar Tree has ocean-themed stencils)
- Seashells, sand, or other embellishments (optional)
- Instructions:
- Choose your desired base color for the ocean. A gradient of blues and greens works well, but you can get creative with different shades. Apply the base coat and let it dry completely.
- (Optional) Use stencils to create ocean-themed designs like waves, seashells, or lighthouses.
- Once the base coat is dry, use different shades of blue and green to create a layered effect, painting waves and depth into your ocean scene.
- Add white paint for crashing waves or sea foam. Use brown paint to create a sandy beach at the bottom of the canvas if desired.
- (Optional) Once the paint is dry, you can add embellishments like real seashells glued to the bottom of the canvas, or sprinkle some sand onto the wet paint for a textural beach effect.
Tips & Variations:
- Instead of painting an ocean scene, use fabric from the Dollar Tree. Cut out ocean-themed fabric (like a sailboat or a whale) and glue it onto the canvas.
- You can create a more abstract coastal piece by using fluid acrylic pouring techniques.
- Consider using metallic gold or silver paint to add accents to your artwork, like shimmering sunlight on the water.
6. Frosted Glass Lantern with Seashells
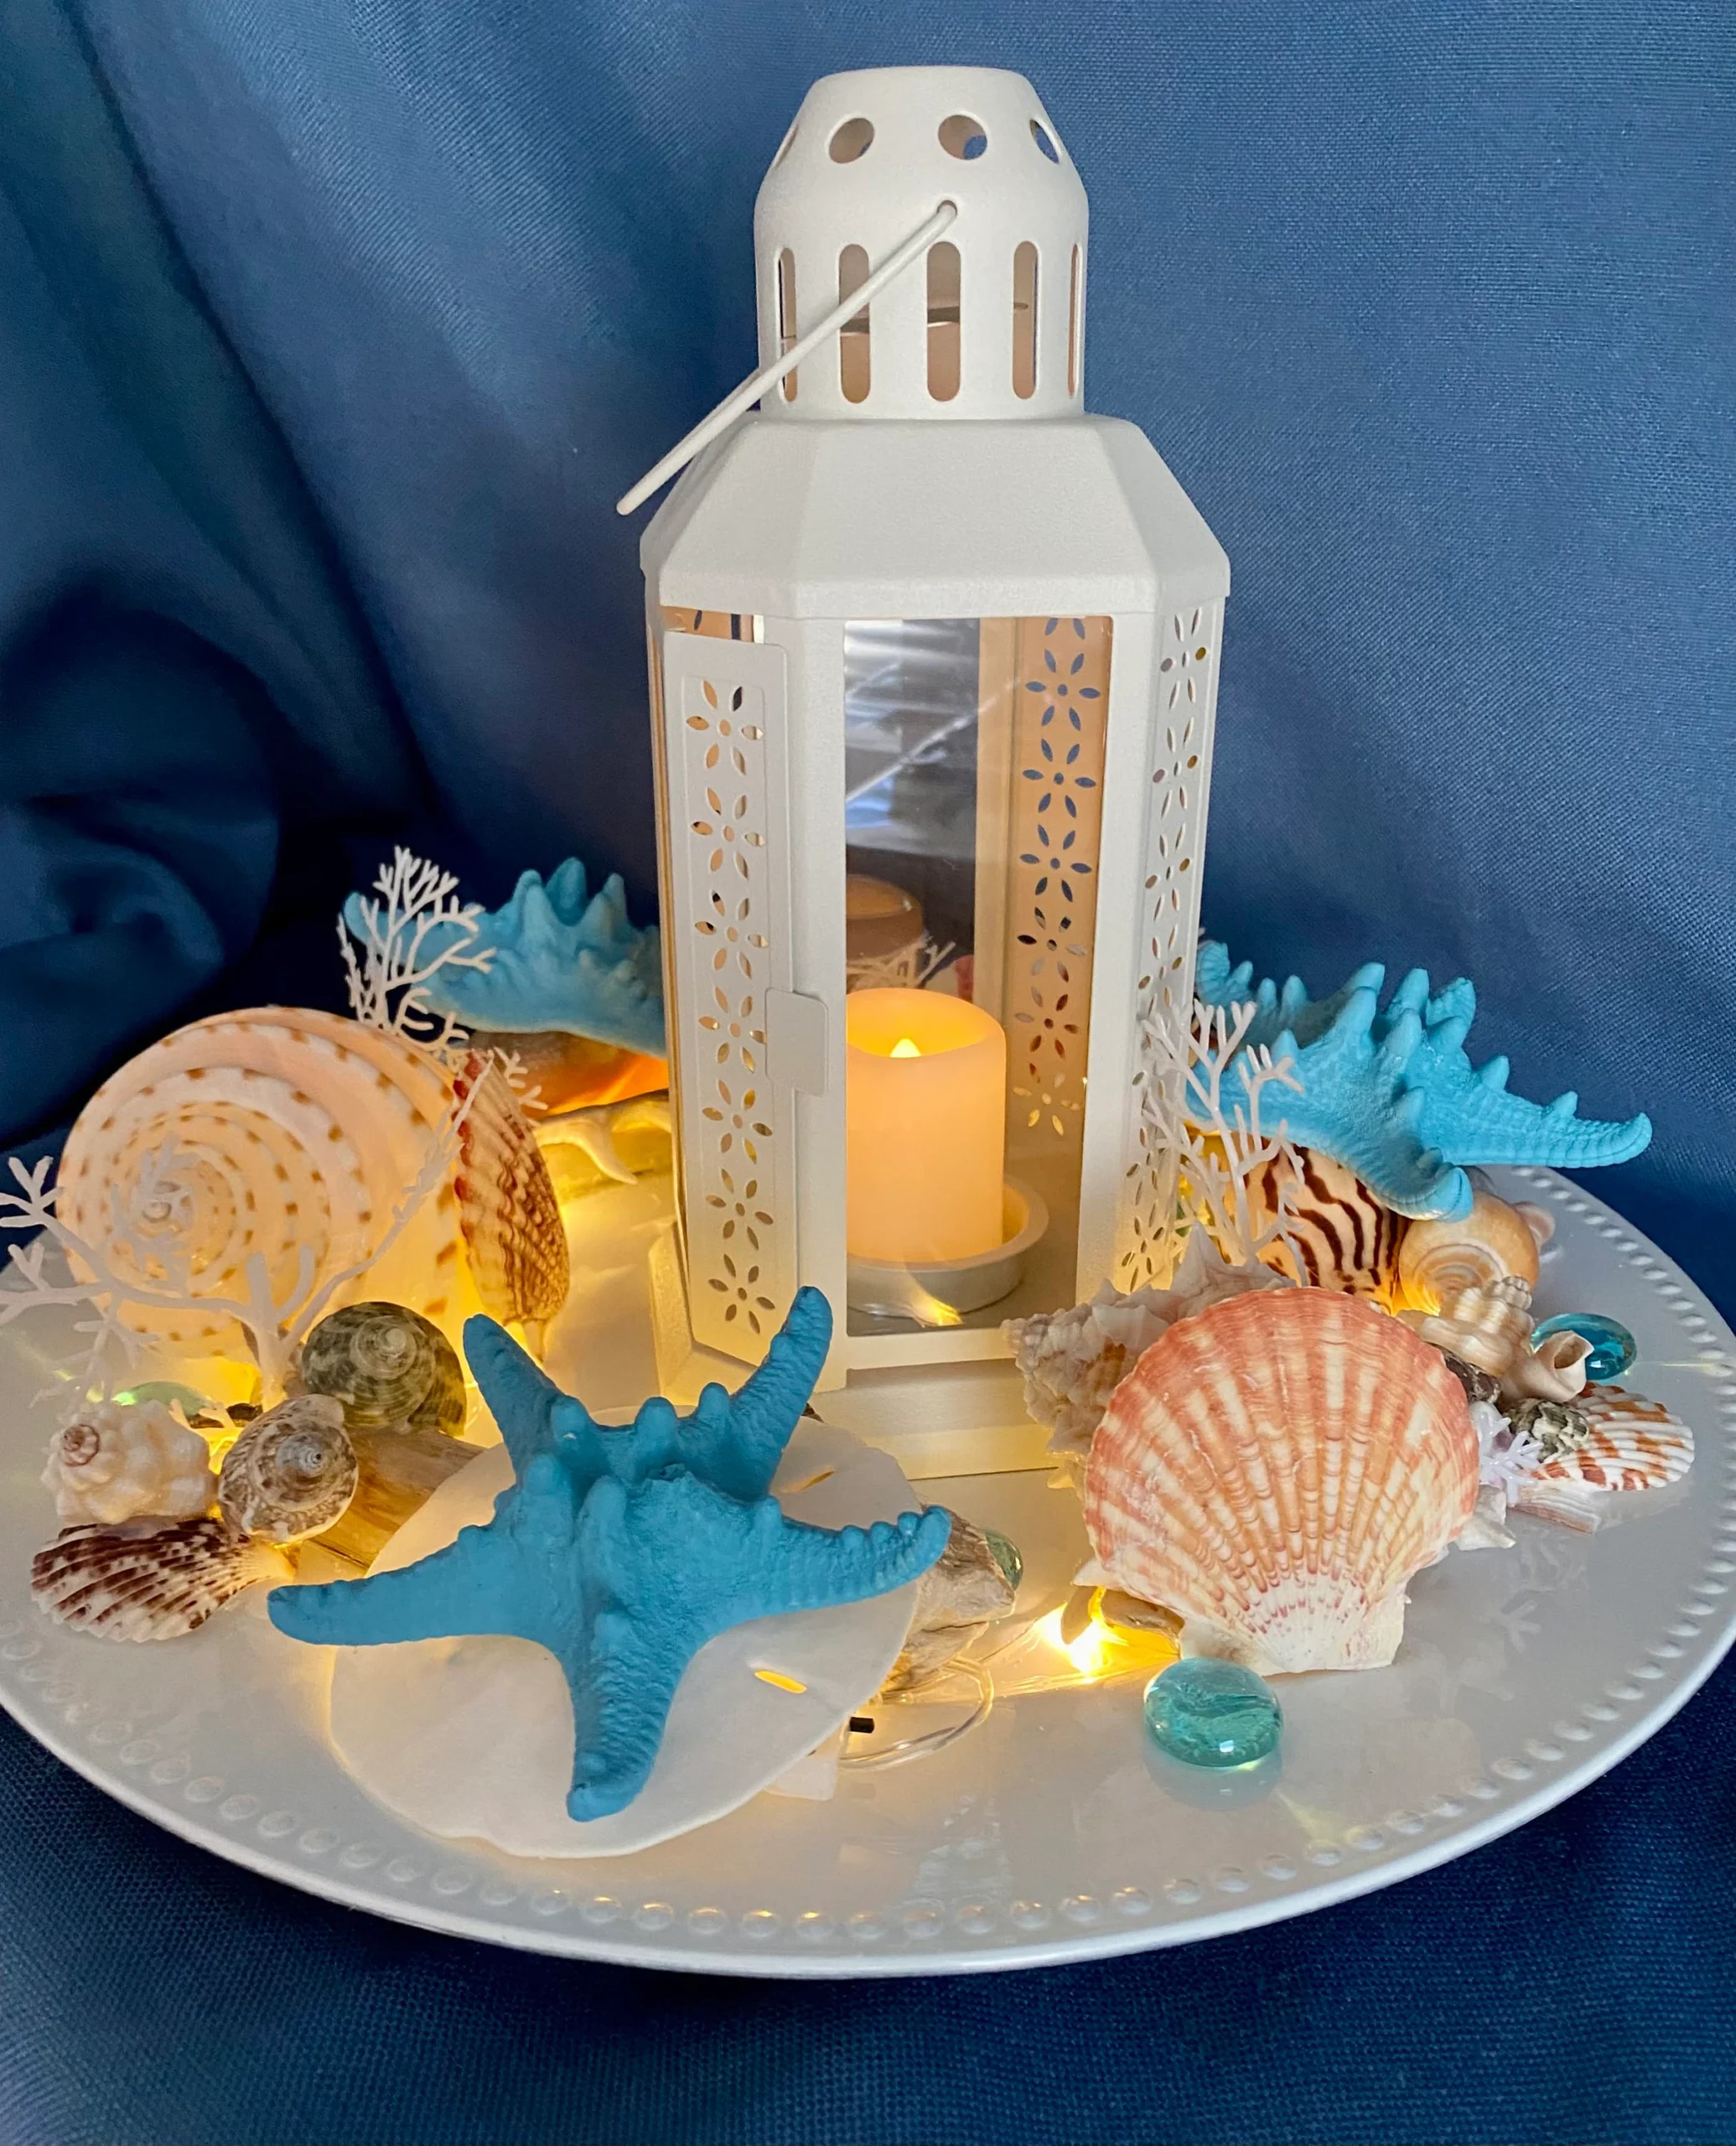
Materials:
- Glass lantern (Dollar Tree)
- Frosted glass spray paint (Dollar Tree)
- Hot glue gun and glue sticks
- Seashells, sand, and other beachy decorations (Dollar Tree)
- Battery-operated flameless candle (Dollar Tree)
Instructions:
- Newspaper or drop cloth (optional, to protect your workspace)
- Lay down newspaper or a drop cloth to protect your work surface.
- (Optional) If the glass lantern has any designs or stickers on it, remove them with a craft knife or scraper.
- Apply several light coats of frosted glass spray paint to the lantern, allowing each coat to dry completely before applying the next. The number of coats will depend on how opaque you want the frosted effect to be.
- Once the paint is dry, use hot glue to secure various seashells, sand dollars, or other beachy decorations to the outside of the lantern. Arrange them in a way that feels balanced and visually interesting.
- Consider adding a thin layer of sand to the bottom of the lantern for a more beachy feel. Secure the sand with a little hot glue around the edges to prevent it from spilling out.
- Place a battery-operated flameless candle inside the lantern and enjoy the soft, glowing coastal ambiance.
Tips & Variations:
- Use different colored sea glass or decorative pebbles instead of sand for a more vibrant look.
- You can paint the seashells or other decorations before gluing them to the lantern for a pop of color.
- Instead of a flameless candle, use a string of battery-operated fairy lights for a magical, twinkling effect.
7. DIY Welcome Beach Sign
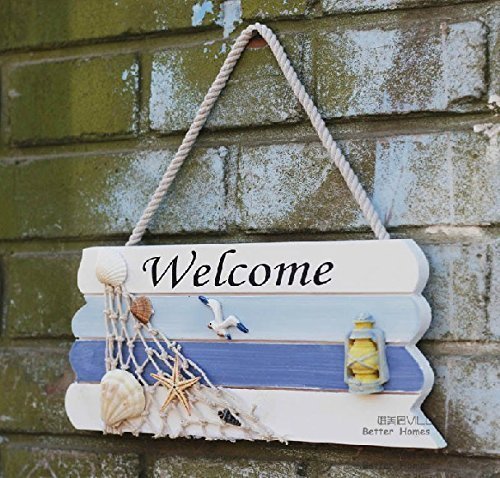
Materials:
- Wooden plaque or canvas (Dollar Tree)
- Acrylic paints in various beachy colors (Dollar Tree)
- Paint brushes (Dollar Tree)
- Stencils (optional, Dollar Tree has beach-themed stencils)
- Seashells, twine, or other embellishments (optional)
- Twine or ribbon (optional, for hanging)
Instructions:
- Choose your base color for the sign. A light blue or sandy beige works well, but you can get creative. Apply the base coat and let it dry completely.
- (Optional) Use stencils to create beach-themed words or images like “Beach Vibes,” a seashell, or a palm tree.
- Once the base coat is dry, use different colors to paint beachy elements like waves, a sandy beach line, or a lighthouse.
- (Optional) You can add embellishments like real seashells glued to the bottom of the sign, or use twine wrapped around the edges for a nautical touch.
- On the back of the sign, hot glue a loop of twine or ribbon for hanging.
Tips & Variations:
- Instead of painting a beach scene, use decorative scrapbook paper with a beach theme and decoupage it onto the wooden plaque.
- You can write your own beachy message directly onto the sign with a paint pen or stencil letters.
- Consider staining the wooden plaque for a more rustic look before painting your design.
8. Seashell Wind Chime
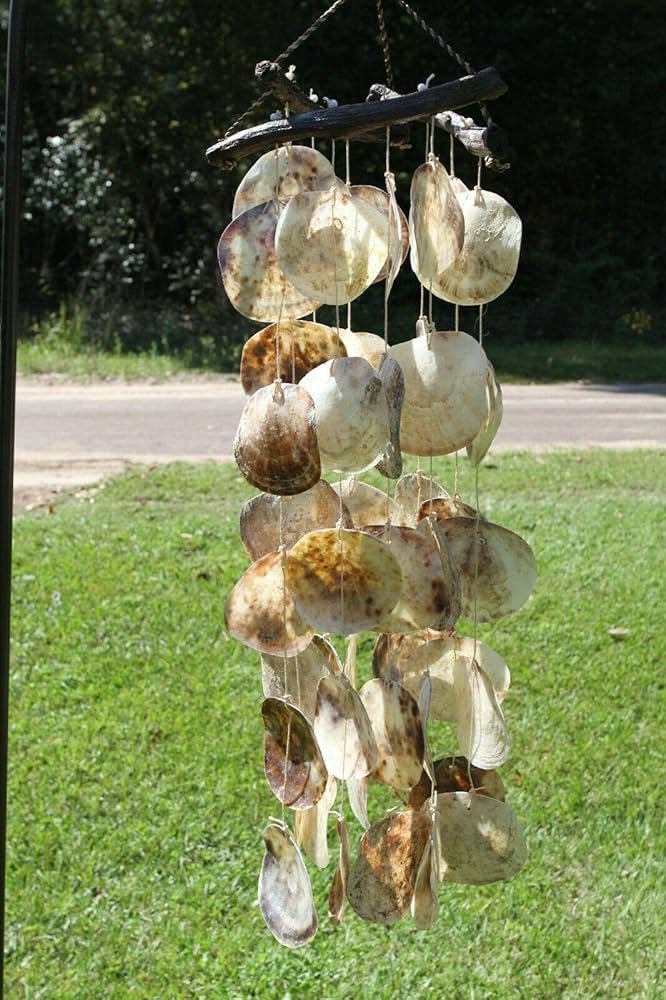
Materials:
- Wooden or bamboo mobile frame (Dollar Tree)
- Fishing line or clear thread (Dollar Tree)
- Seashells in various sizes (Dollar Tree)
- Acrylic paint (optional, Dollar Tree)
- Small bells or decorative beads (optional, Dollar Tree)
Instructions:
- (Optional) Paint the seashells in various colors if desired. Let them dry completely.
- Cut equal lengths of fishing line or thread, depending on your desired chime lengths.
- Tie one end of the thread securely to a seashell. You can use a simple knot or hot glue for extra security.
- Repeat step 3, attaching seashells to each length of thread. Aim for a variety of sizes and colors for visual interest.
- (Optional) Tie small bells or decorative beads between some of the seashells for added sound and visual appeal.
- Tie the other ends of the thread securely to the mobile frame, spacing them out evenly.
- Hang your seashell wind chime outdoors in a breezy location and enjoy the soothing sounds of summer.
Tips & Variations:
- Use different types of seashells for a more diverse look.
- You can incorporate other beachy elements like driftwood pieces or painted wooden cutouts with ocean-themed designs.
- Consider adding a starfish as the central piece at the bottom of the mobile frame.
9. Nautical Throw Pillows

Materials:
- Plain throw pillow covers (Dollar Tree)
- Fabric paint or stencils (Dollar Tree)
- Fabric markers (optional, Dollar Tree)
- Fabric scraps or decorative ribbon (optional, Dollar Tree)
Instructions:
- Choose a base color for your pillow covers, if desired. You can leave them plain or paint them a light blue or sandy beige for a coastal base. Let the paint dry completely.
- (Optional) Use stencils or fabric markers to create nautical designs like anchors, ships’ wheels, or seashells.
- You can also cut out shapes from fabric scraps, like sailboat sails or fish, and glue them onto the pillow covers for a more textured look.
- (Optional) Add decorative ribbon around the edges of the pillow cover for a finished touch.
- Once everything is dry and secure, insert your pillow inserts (not included) into the pillow covers and enjoy cozy coastal comfort on your couch or bed.
Tips & Variations:
- Instead of painting or drawing designs, use fabric cutouts from beach-themed scrapbook paper and decoupage them onto the pillow covers.
- Consider sewing on buttons or small starfish embellishments for added texture and detail.
- You can find pre-stenciled fabric squares at Dollar Tree occasionally, offering a quick and easy way to decorate your pillow covers.
10. DIY Beach Towel Holder

Materials:
- Piece of driftwood (collected from nature or purchased at a craft store)
- Sandpaper (optional, Dollar Tree)
- Twine or rope (Dollar Tree)
- Drill (optional, if using driftwood)
- Screws or eye hooks (optional, if using driftwood)
- Spray paint (optional, Dollar Tree)
Instructions:
- (Optional) If using natural driftwood, clean it thoroughly with soap and water and let it dry completely. Sand the surface for a smoother finish if desired. You can also spray paint the driftwood for a more uniform look.
- Decide on the placement of your beach towel holder. Mark two spots on the driftwood where you want the twine or rope to be attached.
- (Optional) If the driftwood is thick enough, drill two holes at the marked spots.
- Secure the twine or rope to the driftwood using knots or eye hooks (screwed into the pre-drilled holes).
- Mount the driftwood to your desired location on the wall using appropriate wall anchors and screws (not included).
- Hang your beach towels over the twine or rope, adding a touch of coastal charm to your bathroom or poolside area.
Tips & Variations:
- You can use a sturdy piece of branch instead of driftwood if desired.
- If you don’t have driftwood or a branch, consider using a wooden dowel or curtain rod painted white or stained for a beachy look.
- For a more nautical theme, use thick rope instead of twine and tie it in a sailor’s knot around the driftwood before securing it to the wall.
11. Decorative Mason Jar Centerpiece

Materials:
- Mason jar (Dollar Tree)
- Sand (Dollar Tree)
- Decorative seashells, starfish, or pebbles (Dollar Tree)
- Battery-operated fairy lights (Dollar Tree)
- Spanish moss or raffia (optional, Dollar Tree)
- Spray paint (optional, Dollar Tree)
Instructions:
- (Optional) Spray paint the mason jar in a desired color, like a light blue or seafoam green. Let the paint dry completely.
- Pour a layer of sand into the bottom of the mason jar. You can create a layered effect with different colored sand if desired.
- Arrange seashells, starfish, or pebbles on top of the sand, creating a visually pleasing composition.
- (Optional) Add a touch of whimsy with Spanish moss or raffia tucked in around the edges.
- Place a string of battery-operated fairy lights inside the jar and turn them on for a magical, glowing centerpiece.
Tips & Variations:
- You can use different sizes and shapes of mason jars for a more interesting display.
- Instead of sand, use decorative beads or small pieces of colored glass for a more vibrant look.
- Consider gluing a small seashell or starfish to the lid of the mason jar for an extra coastal touch.
12. Upcycled Tin Can Lanterns

Materials:
- Empty tin cans (various sizes, Dollar Tree)
- Hammer and nail (or can opener with a nail opener)
- Acrylic paint in various colors (Dollar Tree)
- Paint brushes (Dollar Tree)
- Stencils (optional, Dollar Tree)
- Battery-operated tea lights (Dollar Tree)
Instructions:
- Wash and dry the empty tin cans thoroughly.
- Carefully make holes in a pattern around the sides of the tin can using a hammer and nail (or a can opener with a nail opener). Aim for a variety of hole sizes for a more interesting light effect.
- (Optional) Paint the tin cans in your desired colors. You can use a solid color or create a beachy scene with stencils or freehand painting. Let the paint dry completely.
- Place a battery-operated tea light inside each tin can and enjoy the warm glow of your upcycled coastal lanterns.
Tips & Variations:
- Use different sized tin cans to create a tiered lantern display.
- Instead of painting the cans, you can wrap them with twine or decorative ribbon for a rustic look.
- Consider lining the bottom of the can with sand for a beachy touch.
13. Driftwood and Seashell Mobile
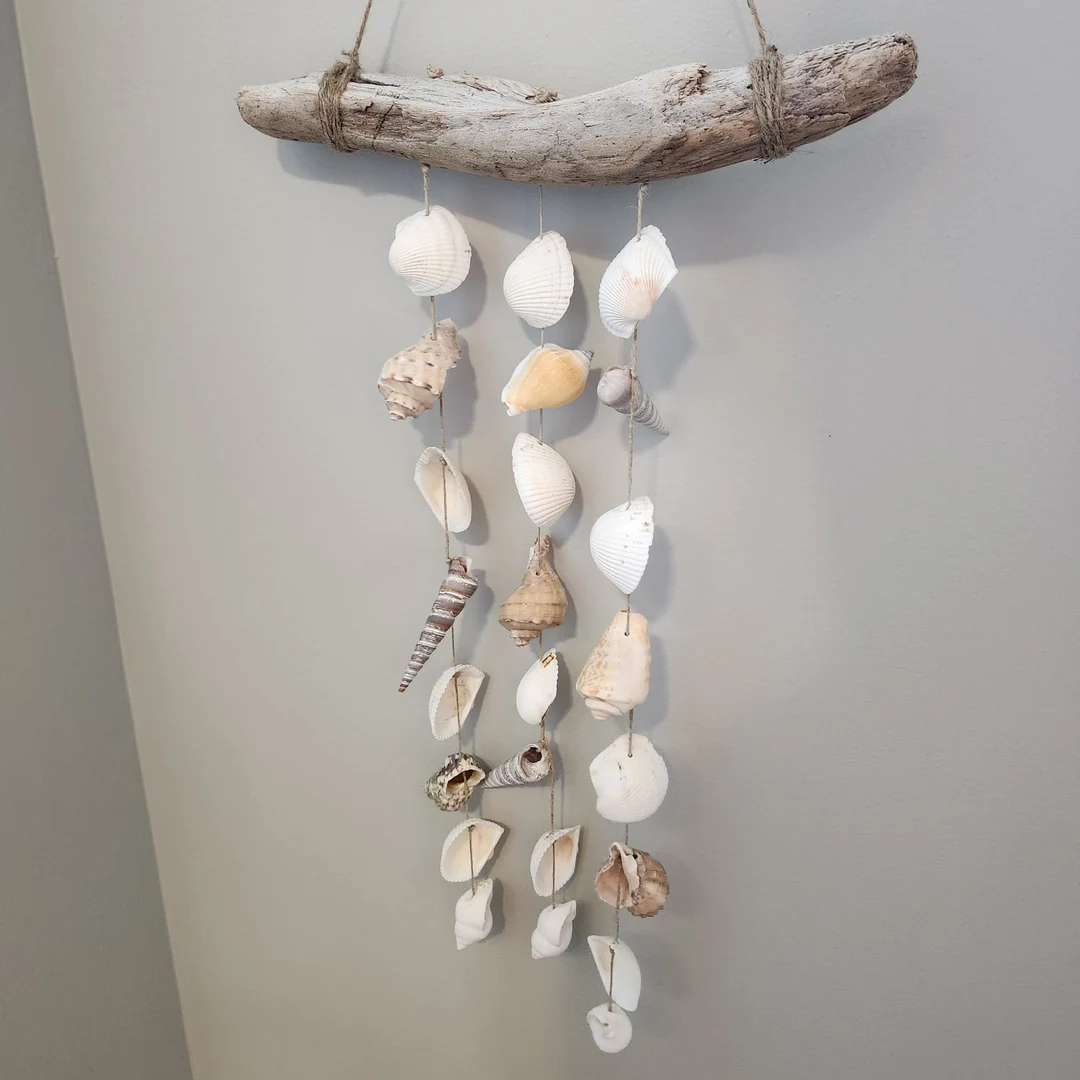
Materials:
- Several pieces of driftwood in various sizes (collected from nature or purchased at a craft store)
- Sandpaper (optional, Dollar Tree)
- Twine or fishing line (Dollar Tree)
- Seashells in various sizes (Dollar Tree)
- Drill (optional, if using large driftwood pieces)
- Hot glue gun and glue sticks
Instructions:
- (Optional) If using natural driftwood, clean it thoroughly with soap and water and let it dry completely. Sand the surface for a smoother finish if desired.
- Decide on the layout of your mobile. You can create a linear mobile with driftwood pieces hanging vertically or a more sprawling design with branches extending in different directions.
- (Optional) If using large driftwood pieces, drill a small hole near the top of each piece for hanging.
- Cut various lengths of twine or fishing line, depending on your desired hanging heights.
- Tie the twine or fishing line to the driftwood pieces, either through the pre-drilled holes or by securely knotting it around the branches.
- Use hot glue to secure seashells of various sizes onto the driftwood pieces.
- Tie the loose ends of the twine or fishing line to a central hanging point, such as a wreath frame or a sturdy branch. Hang your driftwood and seashell mobile indoors or outdoors and enjoy the calming coastal vibes.
Tips & Variations:
- You can paint the driftwood pieces in a light color for a more uniform look.
- If you don’t have seashells, use other beachy finds like small pieces of drift glass or painted wooden cutouts with ocean-themed designs.
14. Coastal Bottle Art
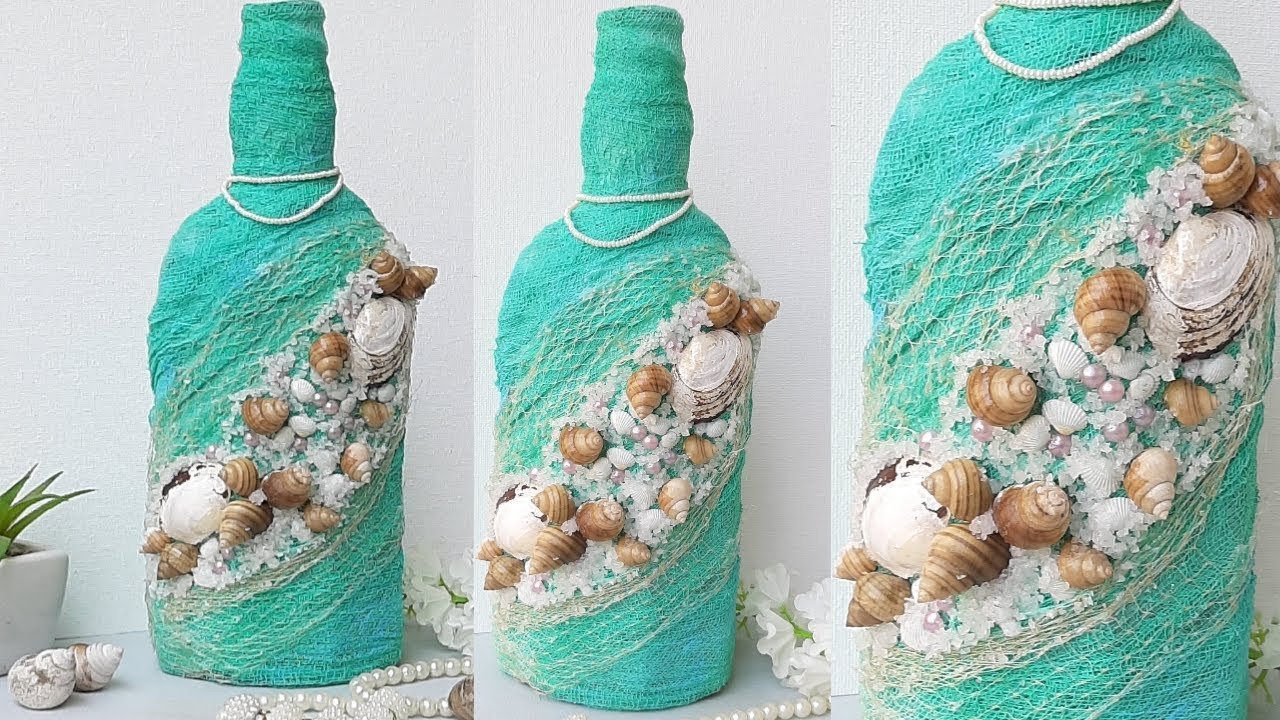
Materials:
- Empty glass bottles (various shapes and sizes, Dollar Tree)
- Acrylic paint in various colors (Dollar Tree)
- Paint brushes (Dollar Tree)
- Sand (Dollar Tree)
- Decorative shells, pebbles, or sea glass (Dollar Tree)
- Hot glue gun and glue sticks
- Twine or ribbon (optional, for hanging)
Instructions:
- Wash and dry the empty glass bottles thoroughly. Remove any labels or residue.
- Paint the glass bottles in your desired colors. You can create a solid color block, a gradient effect, or even paint ocean-themed designs like waves or lighthouses. Let the paint dry completely.
- (Optional) Once the paint is dry, add a layer of sand to the bottom of the bottle for a beachy touch. Secure the sand with a little hot glue around the edges to prevent it from spilling out.
- Use hot glue to secure decorative shells, pebbles, or sea glass to the outside of the painted bottles. Arrange them in a way that feels balanced and visually interesting.
- (Optional) For hanging bottles, tie a loop of twine or ribbon around the neck of the bottle and secure it with hot glue.
Tips & Variations:
- Use different colored sand or create a layered effect with multiple colors for a more vibrant look.
- Instead of painting the entire bottle, you can create a stenciled design or paint stripes for a more modern coastal feel.
- Consider filling the bottle with battery-operated fairy lights for a magical, glowing effect.
15. DIY Coastal Coasters

Materials:
- Square cork tiles (Dollar Tree)
- Fabric squares (beach-themed patterns, Dollar Tree)
- Mod Podge (Dollar Tree)
- Scissors (optional)
- Paint brush (optional)
Instructions:
- Choose fabric squares that complement your coastal theme. You may need to cut them to size to fit the cork tiles if they are slightly larger.
- Apply a thin layer of Mod Podge to the top of the cork tile using a paint brush.
- Carefully lay the fabric square onto the Mod Podge-covered cork tile, smoothing out any wrinkles.
- Apply another thin layer of Mod Podge over the top of the fabric, ensuring it is completely coated and sealed. Let everything dry completely, following the drying instructions on the Mod Podge bottle.
Tips & Variations:
- You can use decorative scrapbook paper with a beach theme instead of fabric squares.
- Consider adding a coat of clear gloss spray paint over the top of the dried Mod Podge for extra protection and shine.
- Personalize your coasters by writing initials or small messages on them with a permanent marker before applying the final layer of Mod Podge.
16. Nautical Rope Basket
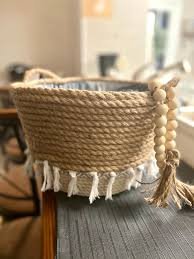
Materials:
- Thick jute rope (Dollar Tree)
- Hot glue gun and glue sticks
- Cardboard or fabric basket (optional, Dollar Tree)
Instructions:
- (Optional) If using a cardboard or fabric basket as a base, ensure it is sturdy enough to hold its shape.
- Begin coiling the jute rope around itself, creating a circular base for your basket. Secure the end of the rope with hot glue to prevent unraveling.
- Continue coiling the rope upwards, adding hot glue as needed to secure each layer to the one below. Aim to create a spiral pattern as you build the sides of the basket.
- You can adjust the height of the basket by adding more layers of coiled rope.
- Once you reach your desired height, tuck the end of the rope underneath the existing coils and secure it with hot glue.
Tips & Variations:
- Use different colored jute rope for a more vibrant look.
- You can add decorative elements like seashells, small starfish, or twine wrapped around the top rim of the basket for a more coastal touch.
- Consider lining the basket with fabric for a softer feel and to hide the cardboard base if you used one.
17. Frosted Glass Vase with Painted Beach Scenes
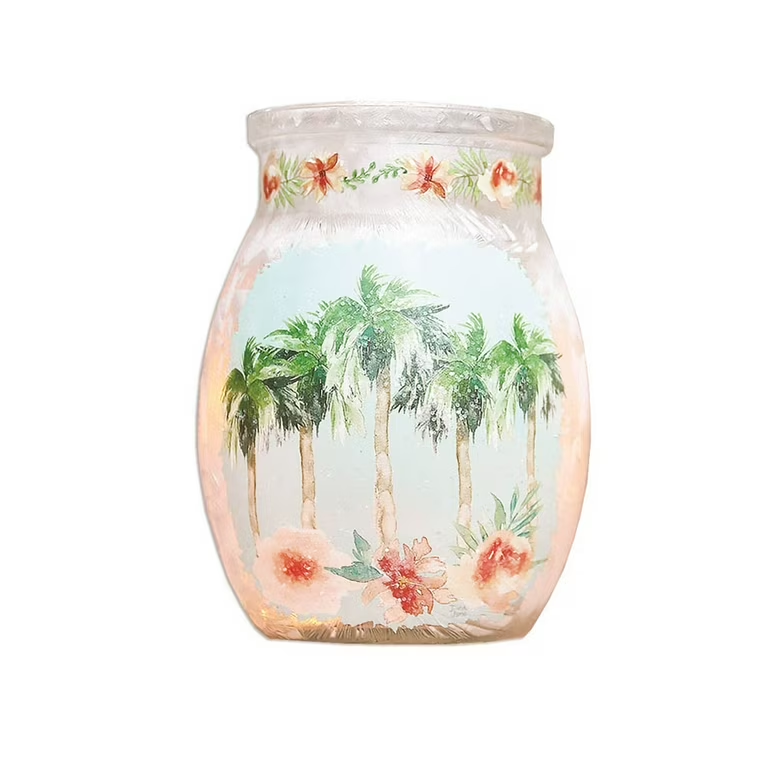
Materials:
- Glass vase (Dollar Tree)
- Frosted glass spray paint (Dollar Tree)
- Acrylic paint in various beachy colors (Dollar Tree)
- Paint brushes (Dollar Tree)
- Stencils (optional, Dollar Tree)
Instructions:
- Newspaper or drop cloth (optional, to protect your workspace)
- Lay down newspaper or a drop cloth to protect your workspace.
- (Optional) If the glass vase has any designs or stickers on it, remove them with a craft knife or scraper.
- Apply several light coats of frosted glass spray paint to the vase, allowing each coat to dry completely before applying the next. The number of coats will depend on how opaque you want the frosted effect to be.
- Once the frosted paint is dry, use stencils (or freehand painting if you’re confident) to create beach scenes on the vase. Popular options include lighthouses, sailboats, seashells, or ocean waves.
- Let the paint dry completely. You can add a final layer of clear gloss spray paint (not included) for extra protection and shine.
Tips & Variations:
- Instead of painting beach scenes, use stencils or markers to create nautical symbols like anchors, ships’ wheels, or compass roses.
- Consider using a variety of paint techniques like stippling or sponging to create a more textured and interesting look on your vase.
- Fill your frosted glass vase with sand, decorative pebbles, or beach-themed artificial flowers for a complete coastal display.
18. DIY Beach Sign with Driftwood

Materials:
- Piece of driftwood (collected from nature or purchased at a craft store)
- Sandpaper (optional, Dollar Tree)
- Stencils (optional, Dollar Tree)
- Acrylic paint in various colors (Dollar Tree)
- Paint brushes (Dollar Tree)
- Twine or ribbon (optional, for hanging)
- Hot glue gun and glue sticks (optional)
Instructions:
- (Optional) If using natural driftwood, clean it thoroughly with soap and water and let it dry completely. Sand the surface for a smoother finish if desired.
- Decide on your design. You can use stencils for lettering or paint a simple beach scene directly onto the driftwood. Popular options include “Beach Vibes,” a seashell, or a palm tree.
- Use acrylic paints to create your chosen design. Let the paint dry completely.
- (Optional) For a more finished look, add a touch of twine or ribbon wrapped around the edges of the driftwood and secure it with hot glue.
- On the back of the driftwood, attach a loop of twine or ribbon for hanging using hot glue or drill a small hole and tie the twine securely.
Tips & Variations:
- Instead of painting a design, decoupage beach-themed scrapbook paper onto the driftwood for a quicker and easier approach.
- Consider using natural elements like small starfish or colorful pebbles glued onto the driftwood for added texture and dimension.
- You can stain the driftwood for a more rustic look before painting your design.
19. Seashell Mirror Makeover

Materials:
- Small round mirror (Dollar Tree)
- Hot glue gun and glue sticks
- Seashells in various sizes (Dollar Tree)
- Spray paint (optional, Dollar Tree)
Instructions:
- (Optional) If you want to change the color of the mirror frame, spray paint it in a desired shade and let it dry completely.
- Arrange the seashells on the mirror frame in a way that feels balanced and visually interesting. You can use a variety of sizes and shapes for a more natural look.
- Once you’re happy with the arrangement, use hot glue to secure the seashells firmly onto the mirror frame.
Tips & Variations:
- Use other beachy finds like small pieces of driftwood or starfish alongside the seashells for a more diverse look.
- Paint some of the seashells in different colors for a pop of vibrancy.
- Consider using a larger mirror for a more dramatic statement piece.
20. Decorative Nautical Rope Bowls
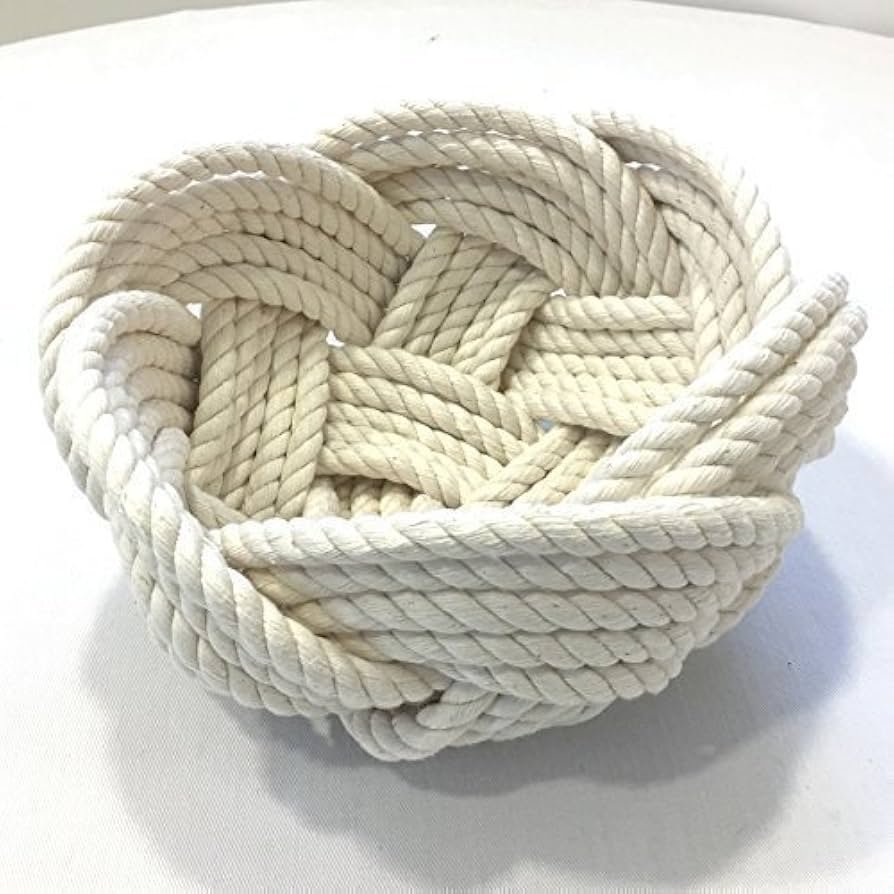
Materials:
- Balloon (various sizes, Dollar Tree)
- Thick yarn or rope (Dollar Tree)
- Petroleum jelly (optional)
- Scissors
- Spray paint (optional, Dollar Tree)
Instructions:
- Inflate a balloon to your desired size for the bowl. The larger the balloon, the bigger the bowl.
- (Optional) Apply a thin layer of petroleum jelly to the balloon to help the yarn or rope adhere more easily and remove cleanly later.
- Begin wrapping the yarn or rope around the inflated balloon, creating a loose web pattern. Leave a small opening at the top. The more layers of yarn or rope you use, the sturdier the bowl will be.
- Once you’re satisfied with the thickness, allow the yarn or rope to dry completely. This may take several hours.
- Once dry, carefully pop the balloon and remove the pieces from the inside of the hardened yarn or rope structure.
- (Optional) Spray paint the finished rope bowl in a desired color for a more polished look.
Tips & Variations:
- Use different colored yarn or rope to create a striped or patterned effect.
- Consider adding decorative elements like seashells or small starfish hot glued to the outside of the bowl for a coastal touch.
- You can create bowls in various sizes using different sized balloons for a multi-tiered display.
21. DIY Beach Towel Ladder for Storage

Materials:
- Two pieces of sturdy dowel rod (cut to desired length, hardware store)
- Sandpaper (optional, hardware store)
- Stain or paint (optional, hardware store)
- Twine or rope (Dollar Tree)
- Saw (optional, hardware store)
- Drill (optional, hardware store)
- Screws or nails (optional, hardware store)
- Hooks (optional, hardware store)
Instructions:
- Prepare the dowel rods: If using new dowel rods, you may want to sand them smooth for a finished look. You can also stain or paint them in a desired color, letting them dry completely.
- Cut the dowel rods (optional): If the dowel rods are too long for your desired size, use a saw to cut them to the appropriate length.
- Attach the dowel rods together (optional): For a more stable ladder, drill a hole near each end of one dowel rod and secure it to the other dowel rod using screws or nails. This creates a fixed ladder structure.
- Create rungs with twine or rope: Cut several equal lengths of twine or rope, depending on the desired spacing between the rungs on your ladder.
- Attach rungs to dowel rods: There are two main options:
- Simple Knot Method: Tie one end of the twine or rope securely around the top dowel rod. Wrap the twine or rope several times around both dowel rods at your desired spacing, then tie another secure knot around the bottom dowel rod. Repeat this process for each rung.
- Drilled Hole Method: (Requires drill) Drill holes at even intervals on both dowel rods. Thread the twine or rope through the holes on one dowel rod, then wrap it around the back of the other dowel rod and thread it back through the corresponding hole. Secure the twine or rope tightly with a knot on the underside of the dowel rod. Repeat this process for each rung.
- Hanging options (optional):
- Wall Hooks: Attach screw-in hooks to the wall at the desired location and hang the ladder from the top rung using the twine or rope.
- D-Rings: Screw D-rings into the back of the top dowel rod and hang the ladder from picture hanging hardware mounted on the wall.
Tips & Variations:
- Consider adding decorative elements like seashells or painted wooden cutouts with ocean-themed designs hot glued to the rungs for a more coastal touch.
- You can use a thicker dowel rod for the top rung to create a shelf-like surface for displaying decorative items.
- If you don’t have dowel rods, you can use sturdy branches for a more rustic look, following the same assembly steps.
Final Thoughts
There you have it! 21 amazing DIY coastal decor ideas that will transform your space into a summer oasis without breaking the bank. With a little creativity and a trip to your local Dollar Tree, you can bring the calming vibes of the coast right into your home. Don’t be afraid to experiment and personalize these projects to reflect your own unique style. For even more inspiration, check out video tutorials on platforms like YouTube where you can find countless DIY coastal decor ideas using Dollar Tree finds.
We’d love to see your coastal DIY creations! Share a picture of your Dollar Tree coastal decor project in the comments below and inspire others to bring the beach vibes home.