
Spring is in the air, and with it comes the perfect opportunity to refresh your home with vibrant, cheerful decorations! Whether you’re celebrating Easter or simply embracing the beauty of the season, spring-inspired decor can brighten up any space. From DIY wreaths and floral centerpieces to adorable Easter-themed crafts, there are endless ways to infuse your home with fresh, festive charm. Get ready to transform your space with these 20+ creative spring and Easter decorations that will bring warmth and joy to your home!
1. Repurposed Easter Egg Wreath: A Burst of Color on Your Door

Wreaths are a timeless way to welcome visitors, and Easter is no exception. But who says your wreath has to be made of twigs or flowers? This clever idea repurposes everyone’s favorite Easter symbol – the egg!
Materials:
- Wire wreath frame (any size)
- Plastic or blown-out eggs (various colors and sizes)
- Acrylic paint (optional)
- Hot glue gun
- Embellishments (ribbons, buttons, feathers – optional)
Steps:
- Get Crafty with Paint (Optional): If you’re using plain white eggs, unleash your inner artist! Paint them in solid colors, create patterns, or write cheerful messages. Let the paint dry completely.
- Egg-cellent Bonding: Using the hot glue gun, carefully apply glue to the flat side of each egg. Press it firmly onto the wire wreath frame, ensuring even distribution.
- The Finishing Touches: Once the eggs are secured, unleash your creativity! You can add ribbons for hanging, glue on buttons for polka dots, or even stick on delicate feathers for a touch of whimsy.
This wreath is a fantastic way to reuse plastic eggs or showcase your beautifully decorated real eggs.
2. Blooming Egg Centerpieces: From Humble Eggs to Floral Delights

Eggs are a natural symbol of new life, and what better way to celebrate spring than by transforming them into blooming centerpieces? This elegant decoration brings the beauty of flowers indoors.
Materials:
- Real or fake eggs (various sizes)
- Floral foam (cut to fit inside the eggs)
- Silk flowers in various spring colors
- Ribbon (optional)
Steps:
- Preparing the Eggs: If using real eggs, carefully create a small opening at the top and remove the contents. Wash and dry the inside thoroughly.
- Floral Oasis: Cut floral foam to fit snugly inside the eggshells. This will provide a base for your flower arrangements.
- Blooming Beauty: Now comes the fun part! Arrange your silk flowers creatively within the eggs. Use a variety of colors and textures to create a vibrant display.
- A Touch of Elegance: For an extra touch, tie a beautiful ribbon around the base of the egg for a polished look.
These blooming egg centerpieces are perfect for your dining table, mantlepiece, or even as individual place settings.
3. Hoppy Bunny Wall Art: Let Your Creativity Run Wild

Looking for some adorable Easter wall art that’s easy and fun to make? Look no further than these charming bunny silhouettes!
Materials:
- Choose your weapon! This project can be adapted to various materials:
- Paper (construction paper, cardstock)
- Felt (various colors)
- Stencils (bunny shapes) and paint
- Markers, crayons, or paint (depending on your chosen material)
Steps:
- Bunny Bonanza: Select your preferred material. If using paper or felt, cut out bunny shapes following a template or freehand drawing. If using stencils, secure them to your chosen surface and paint bunny shapes.
- Personalize Your Bunnies: Now comes the fun part – decorating! Use markers, crayons, paint, or even glitter to add details like eyes, noses, floppy ears, and whiskers. You can even create entire bunny families or scenes.
- Hang with Care: Once your bunnies are complete, attach them to your wall using double-sided tape, thumbtacks, or string them together for a bunny garland.
This easy and versatile project is perfect for involving children and creating a personalized Easter display.
4. Nest & Egg Tablescape: A Charming Touch of Nature

Easter is a time for family gatherings, and what better way to set the mood than with a beautiful tablescape? This charming idea incorporates bird’s nests, creating a natural and inviting atmosphere.
Materials:
- Twigs (various sizes)
- Twine or yarn
- Moss (real or artificial)
- Colorful Easter eggs (dyed or decorated)
- Feathers (optional)
Steps:
- Weaving a Nest: Using the twigs, carefully construct small, circular nests. You can secure them with twine or yarn as you weave. Aim for a natural, rustic look.
- Moss Mania: Line the inside of your nests with moss, creating a soft and inviting base.
- Egg-cellent Display: Place your beautifully decorated Easter eggs inside the nests. You can use a variety of colors and patterns to create a vibrant display.
- The Finishing Touches: For an extra touch of whimsy, scatter some loose feathers around the nests.
This nest and egg tablescape is a delightful way to bring the spirit of spring to your dining table.
5. Peeping Tom Peeps Upcycled: Reimagine the Classic Candy

Peeps, those marshmallow chicks that have become synonymous with Easter, can be more than just a sugary treat. With a little creativity, you can transform them into adorable and unique decorations.
Materials:
- Peeps in various colors
- Toothpicks
- Glue (hot glue gun recommended)
- Craft supplies for customization (buttons, googly eyes, pipe cleaners, markers)
Steps:
- Peep Potential: Think beyond the chick! Use Peeps in different colors and shapes (bunnies, hearts) to create a variety of characters.
- Get Sticky: Using toothpicks and glue, secure additional craft supplies to your Peeps. Buttons make great eyes, googly eyes add a touch of fun, and pipe cleaners can be transformed into bunny ears or chick feet.
- Let Your Imagination Peep: Don’t be afraid to get creative! You can draw faces with markers, create little scenes with multiple Peeps, or even glue them onto popsicle sticks for mini Peeps pops.
These upcycled Peeps decorations are a fun and easy project for both children and adults. Plus, they’re a great way to use up any leftover Easter candy!
6. Mossy Basket Bunnies: Hoppy and Adorable Decorations

Baskets are a staple for Easter egg hunts, but this year, why not turn them into adorable bunny figures? This charming idea is perfect for adding a touch of whimsy to your décor.
Materials:
- Small wicker baskets (various sizes)
- Craft paper or felt (for ears)
- Moss (real or artificial)
- Googly eyes
- Pink pom poms (optional, for noses)
- Pipe cleaners (optional, for whiskers)
Steps:
- Bunny Basket Base: Select your baskets, making sure they have a sturdy base.
- Floppy Fun: Cut out two bunny ear shapes from your chosen material (craft paper or felt). You can create simple triangles or more elaborate floppy ears.
- Attach the Ears: Secure the bunny ears to the front of the basket using glue or double-sided tape.
- Moss Makeover: Fill the baskets with moss, creating a fluffy and textured bunny body.
- Bringing it to Life: Glue on googly eyes for a whimsical touch. You can also add pink pom poms for noses and pipe cleaners for whiskers for an extra dose of cuteness.
These mossy basket bunnies are perfect for displaying Easter eggs, small treats, or simply adding a touch of springtime charm to your home.
7. Giant Floral Eggs: A Show-Stopping Statement Piece

Looking to create a truly awe-inspiring Easter decoration? Look no further than these giant floral eggs! This project is perfect for those who love a challenge and want to make a bold statement.
Materials:
- Balloons (large, round balloons)
- Chicken wire (cut into manageable pieces)
- Floral supplies (floral foam, silk flowers, leaves, vines)
- Wire cutters
- Floral tape
- Optional: Spray paint (for the balloons, if desired)
Steps:
- Balloon Base: Blow up your balloons to a large size, ensuring they are all roughly the same size. For a more uniform look, you can consider spray painting the balloons in a soft pastel color before this step.
- Chicken Wire Magic: Carefully drape and secure pieces of chicken wire over the inflated balloons. The chicken wire will provide a base for attaching the flowers. Use wire cutters to trim any excess chicken wire.
- Securing the Frame: Use floral tape to firmly secure the chicken wire to the balloon, ensuring it remains in place and creates a smooth, egg-shaped form.
- Floral Paradise: Now comes the fun part – transforming your wireframe into a blooming masterpiece! Cut floral foam into pieces that will fit inside the chicken wire “egg.” Secure the floral foam using floral tape or wire.
- Blooming Beauty: Begin arranging your silk flowers, leaves, and vines onto the floral foam. Use a variety of colors, textures, and sizes to create a vibrant and realistic floral display. You can even incorporate Easter-themed elements like small chicks or butterfly embellishments.
Tips:
- Work in sections, focusing on one area of the egg at a time. This will help ensure even floral coverage.
- Use a variety of flower types and sizes to create a more natural and interesting look.
- Consider incorporating greenery like ferns or vines to add depth and texture to your floral creation.
- Be mindful of the weight of your floral decorations. You may need to add support or use a sturdier balloon if your flowers are particularly heavy.
These giant floral eggs are a guaranteed conversation starter and will make a stunning addition to your Easter décor. They can be displayed indoors or outdoors, creating a magical and festive atmosphere.
8. Watercolor Egg Garland: A Delicate and Dreamy Touch

This project is a beautiful way to showcase your artistic flair and create a soft, ethereal atmosphere.
Materials:
- White or light-colored eggs (blown out and dried)
- Watercolors in various spring hues
- Paint brushes
- Twine or string
- Drill (optional, for a more polished look)
Steps:
- Prepare Your Canvas: Carefully blow out the eggs and clean them thoroughly. Let them dry completely before decorating.
- Watercolor Magic: Unleash your inner artist! Use watercolors to paint delicate designs, patterns, or even Easter-themed motifs like flowers, chicks, or bunnies on the eggshells. Experiment with washes of color or create intricate details.
- String it Up: Once your eggs are dry, decide on your hanging method. You can carefully pierce a small hole at the top of each egg using a drill (adult supervision required) and thread twine through it. Alternatively, use a strong adhesive to attach the eggs directly to the string at even intervals.
This watercolor egg garland is perfect for hanging on your mantelpiece, across a window, or even draped over a doorway.
9. Upcycled Tin Can Bunnies: A Fun and Sustainable Choice

Turn your recycling bin into a crafting haven with this eco-friendly project.
Materials:
- Clean tin cans (various sizes)
- Acrylic paint (various colors)
- Paint brushes
- Craft paper or felt (for ears)
- Googly eyes
- Pipe cleaners (optional, for whiskers)
- Hot glue gun
Steps:
- Can-tastic Base: Clean and dry your tin cans. You can use a variety of sizes to create a family of bunnies.
- Paint Power: Paint your tin cans in solid colors or create playful patterns. Let the paint dry completely.
- Hoppy Ears: Cut out bunny ear shapes from your chosen craft paper or felt. You can experiment with different sizes and floppy styles.
- Attaching the Ears: Secure the bunny ears to the top of the painted cans using hot glue.
- Bringing Them to Life: Add googly eyes for a whimsical touch. You can also use pipe cleaners to create whiskers and further personalize your bunnies.
These upcycled tin can bunnies are a sustainable and adorable addition to your Easter décor. They can be used as centerpieces, displayed on shelves, or even filled with small treats.
10. Carrot Patch Placemats: A Fun and Functional Touch

Looking for a way to add a touch of Easter cheer to your dining table? These carrot patch placemats are both cute and practical.
Materials:
- Felt sheets (in orange, green, and brown)
- Fabric scissors
- Sewing machine (optional) or fabric glue
- Embroidery floss (optional, for details)
Steps:
- Felt Fun: Cut out large carrot shapes from your orange felt. You can use a template or freehand draw the shape.
- Leafy Greens: Cut out long, pointed shapes from your green felt to represent carrot tops.
- Bringing it Together: Sew or glue the green felt tops onto the orange carrot bases. You can also add additional details like embroidered lines for a more realistic look.
- Brownie Points: Cut out small brown squares or circles from your felt and glue them to the bottom of the carrot tops to represent dirt patches.
These carrot patch placemats are sure to add a playful touch to your Easter table setting. They’re also easy to clean and can be reused year after year.
11. Hanging Egg Terrariums: A Miniature Spring Garden

Bring the beauty of spring indoors with these charming hanging egg terrariums.
Materials:
- Glass terrariums (various sizes and shapes)
- Real or artificial moss
- Small succulents or air plants
- Decorative pebbles (optional)
- Colorful Easter eggs (mini size, optional)
- Fishing line or twine
- Hooks (for hanging)
Steps:
- Terrarium Prep: Clean and dry your glass terrariums thoroughly.
- Moss Magic: Create a base layer of moss inside the terrarium, ensuring it’s evenly distributed.
- Planting Time: Carefully choose your plants, considering their size and light requirements. Succulents and air plants are perfect for terrariums as they require minimal watering.
- Pebble Power: For an extra touch, add a layer of decorative pebbles on top of the moss. This will help with drainage and add visual interest.
- Egg-cellent Addition (Optional): If using mini Easter eggs, carefully place them inside the terrarium amongst the plants and moss for a festive touch.
- Hanging It Up: Cut a length of fishing line or twine and tie it securely around the top of the terrarium. Attach a hook to the other end and hang your terrarium in a bright spot with indirect sunlight.
These hanging egg terrariums are a unique and beautiful way to celebrate Easter and add a touch of greenery to your home.
12. Button Chick Wreath: A Colorful and Textured Creation

This project is perfect for using up leftover buttons and creating a vibrant and cheerful Easter decoration.
Materials:
- Wire wreath frame (any size)
- Buttons in various colors and sizes (predominantly yellow and orange for a chick theme)
- Hot glue gun
- Felt scraps (optional, for background)
- Googly eyes (optional)
- Orange pipe cleaner (optional, for beak)
Steps:
- Felt Foundation (Optional): If desired, cut a circle of felt slightly larger than your wreath frame and glue it onto the front of the frame to create a smooth background.
- Button Bonanza: This is where your creativity shines! Start by gluing larger buttons in the center of the wreath to represent the chick’s body. Then, use smaller buttons in various colors to fill in the remaining space, creating a textured and colorful design.
- Googly Goodness (Optional): Add googly eyes to the center of some of the larger buttons to create the chick’s face.
- Beaky Business (Optional): Cut a small triangle from the orange pipe cleaner and glue it onto one of the buttons to represent a chick’s beak.
This button chick wreath is a cheerful and eye-catching addition to your Easter décor. It’s also a fun project for children to help with, sorting buttons and gluing them onto the frame.
13. Recycled Book Bunny Stack: A Literary Twist on Easter

Give old books a new lease on life with this creative and whimsical decoration.
Materials:
- Old hardcover books (various sizes)
- Acrylic paint (optional)
- Craft paper or felt (for ears)
- Googly eyes
- Pipe cleaners (optional, for whiskers)
- Hot glue gun
Steps:
- Book Selection: Choose a selection of hardcover books in various sizes. You can use books with colorful covers or paint them in Easter pastels if desired.
- Stacking Up: Carefully stack the books on top of each other, building a pyramid shape with the largest book at the bottom.
- Bunny Bonanza: Cut out two bunny ear shapes from your chosen craft paper or felt. You can experiment with different sizes and floppy styles.
- Attaching the Ears: Secure the bunny ears to the top book using hot glue.
- Bringing it to Life: Add googly eyes to the front cover of the top book to create a whimsical bunny face. You can also use pipe cleaners for whiskers and further personalize your bunny stack.
This recycled book bunny stack is a unique and literary way to celebrate Easter. It’s a perfect conversation starter and a great way to give old books a new purpose.
14. Disco Ball Chicks: A Glittery and Groovy Twist

Embrace the fun and festive spirit of Easter with these sparkly disco ball chicks.
Materials:
- Small Styrofoam balls
- Sequins (in various colors and sizes)
- Straight pins
- Craft glue (optional)
- Googly eyes
- Orange pipe cleaners (optional, for beaks)
- Twine or string (for hanging)
Steps:
- Sequin Spectacle: This is where the magic happens! Starting from the bottom of the Styrofoam ball, begin carefully pushing straight pins into the ball, leaving a small space between each pin. On each pinhead, secure a sequin using craft glue (optional) for extra hold. Continue adding sequins in a random or patterned design, covering the entire Styrofoam ball.
- Googly Goodness: Once the ball is completely covered in sequins, add googly eyes to the front for a whimsical chick face.
- Beaky Business (Optional): Cut a small triangle from the orange pipe cleaner and glue it onto the front of the ball to represent a chick’s beak.
- Hanging High: Cut a length of twine or string and tie it securely to the top of the disco ball chick for hanging.
These disco ball chicks are a guaranteed conversation starter and will add a touch of glamour and sparkle to your Easter décor. They’re perfect for hanging on a tree branch, from the ceiling, or even as a centerpiece on your table.
15. Watercolor Nest Placemats: A Soft and Serene Touch

Create a calming and elegant atmosphere on your Easter table with these watercolor nest placemats.
Materials:
- White or light-colored fabric placemats
- Fabric paints in various spring hues
- Paint brushes
- Stencils (optional, for nest shape)
- Fabric markers (optional, for details)
Steps:
- Watercolor Wash: Using watered-down fabric paints, create a soft wash of color on your placemats. Experiment with different shades and techniques to achieve the desired effect.
- Nesting Instinct: Here comes the fun part! You can freehand draw a nest shape on your fabric placemat or use a stencil for a more precise design.
- Adding Details (Optional): Once the base color and nest shape are complete, you can use fabric markers to add details such as twigs, leaves, or even tiny eggshells for a more realistic look.
These watercolor nest placemats are a beautiful and unique way to dress up your Easter table. They’re perfect for creating a serene and springtime atmosphere.
16. Upcycled Tin Can Chicks: A Sustainable and Charming Addition
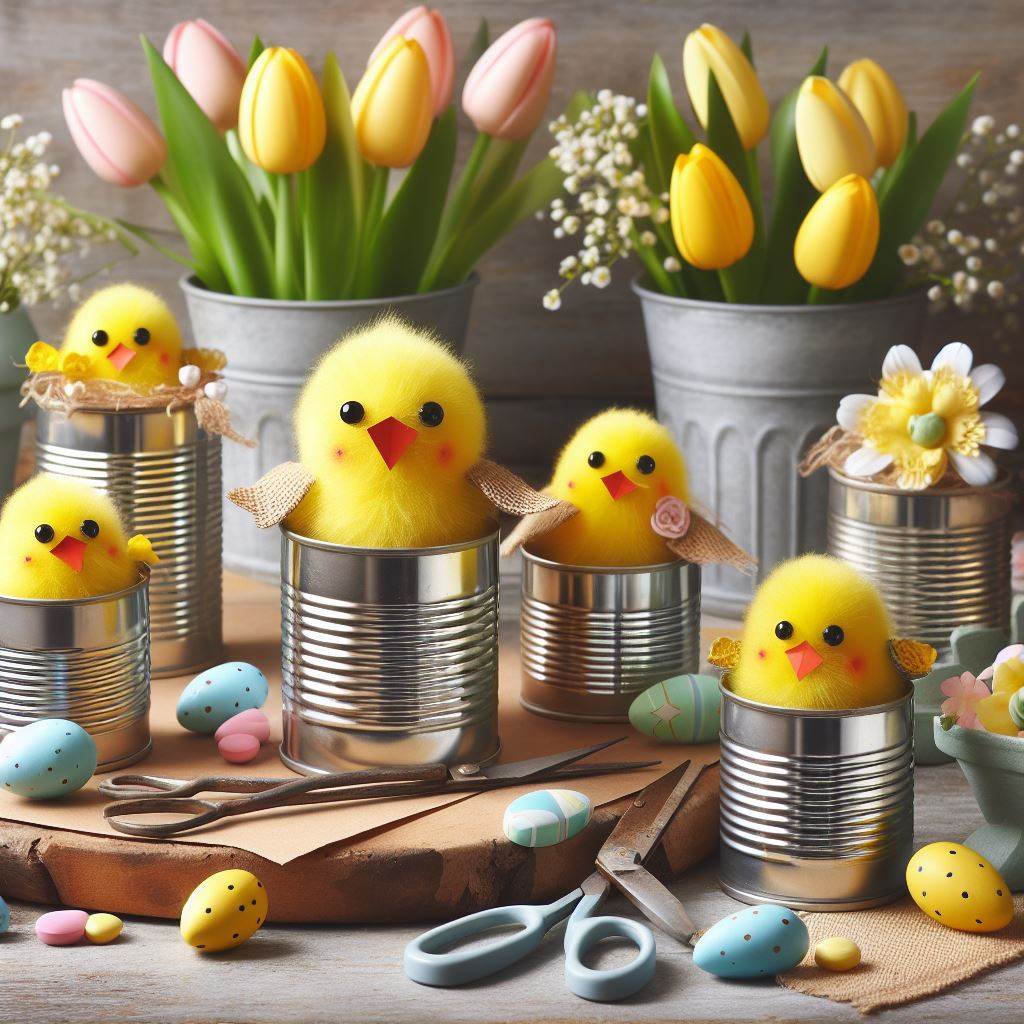
Similar to the upcycled tin can bunnies (idea #9), this project offers another adorable Easter decoration made from recycled materials.
Materials:
- Clean tin cans (various sizes)
- Acrylic paint (yellow)
- Paint brushes
- Construction paper (orange and black)
- Scissors
- Hot glue gun
Steps:
- Can-Do Chicks: Clean and dry your tin cans. You can use a variety of sizes to create a family of chicks.
- Sunny Yellow: Paint the entire tin can a bright yellow to represent the chick’s body. Let the paint dry completely.
- Paper Perfect: Cut out two small triangles from orange construction paper for the chick’s beak. Cut out small circles from black construction paper for the eyes.
- Attaching the Features: Secure the orange beak triangles and black eye circles onto the painted tin can using hot glue.
These upcycled tin can chicks are a sustainable and adorable way to add a touch of Easter cheer to your home. They can be displayed on shelves, filled with small treats, or used as centerpieces on your table.
17. Easter Egg Garland with Pom-Poms: A Fluffy and Fun Decoration

This project combines the classic Easter egg with a touch of playful texture.
Materials:
- Plastic or blown-out eggs (painted or decorated)
- Yarn (in various spring colors)
- Scissors
- Cardboard (optional, for pom-pom template)
- Embroidery floss (optional, for hanging)
Steps:
- Pom-Pom Power: Create pom-poms in various sizes and colors using your chosen yarn. You can use a cardboard template or simply wind the yarn around your fingers to create the desired shape.
- Egg-cellent Garland: Thread your decorated Easter eggs onto a length of embroidery floss or string at even intervals.
- Fluffy Fun: Tie your yarn pom-poms onto the string between the Easter eggs.
18. DIY Easter Egg Pinata: A Smashing Good Time

Add a touch of excitement to your Easter celebration with this DIY pinata.
Materials:
- Large balloon
- Colorful tissue paper squares
- White school glue (diluted with water)
- Paintbrush
- Scissors
- Ribbon or string
- Candy or small treats (to fill the pinata)
Steps:
- Balloon Base: Blow up a large balloon to the desired size. The bigger the balloon, the bigger the pinata!
- Paper Paradise: Cut your colorful tissue paper squares into smaller squares. Using the diluted white school glue, carefully brush the balloon and adhere the tissue paper squares, creating a mosaic pattern. Overlapping the squares will help create a sturdier pinata. Leave a small opening at the top of the balloon uncoated for filling later.
- Layer Up: Repeat step 2, adding several layers of tissue paper squares to ensure the pinata is strong enough to withstand a good whack. Allow each layer to dry completely before adding the next.
- Drying Time: Let your pinata dry completely, which can take up to 24 hours depending on the number of layers.
- Filling Fun: Once dry, pop the balloon and carefully remove the deflated balloon remnants from the opening. Fill the pinata with candy, small toys, or confetti.
- Hanging High: Secure a ribbon or string to the opening of the pinata for hanging. You can decorate the opening with additional tissue paper or ribbons for a festive touch.
Tips:
- Use a variety of bright and cheerful colors for your tissue paper squares.
- Consider reinforcing the opening of the pinata with masking tape or duct tape for extra durability.
- Hang the pinata outdoors or in a spacious area where participants can swing freely.
This DIY Easter egg pinata is a fun and interactive activity for children of all ages. Just be sure to have a sturdy bat or stick ready for the smashing finale!
19. Springtime Floral Chandelier: A Breathtaking Centerpiece

Transform your ordinary chandelier into a breathtaking springtime masterpiece.
Materials:
- Existing chandelier (any style)
- Artificial flowers and vines (in various spring colors)
- Floral wire
- Floral tape
- Ribbon (optional)
Steps:
- Flower Power: Start by gathering a variety of artificial flowers, vines, and leaves in spring colors. Consider using silk flowers for a more realistic look.
- Securing the Blooms: Using floral wire, carefully secure individual flowers and vines to the frame of your chandelier. You can create clusters of flowers or drape vines organically around the frame.
- Floral Finishing Touches: Use floral tape to secure the floral wire attachments and ensure everything stays in place.
- Ribbon Flair (Optional): For an extra touch of elegance, you can weave ribbons in between the flowers and vines, adding another layer of color and texture.
This springtime floral chandelier is a show-stopping centerpiece that will add a touch of magic to your Easter celebration.
20. Upcycled Book Page Bunnies: A Literary and Artistic Creation

Give old book pages a new life with these charming and artistic bunny decorations.
Materials:
- Old book pages (preferably with interesting text or illustrations)
- White cardstock
- Scissors
- Craft glue
- Googly eyes
- Pink pom poms (optional, for noses)
- Black marker (optional, for details)
Steps:
- Bunny Template: On white cardstock, draw a simple bunny silhouette or find a template online. Cut out the bunny shape.
- Paper Piecing: Tear or cut the old book pages into small squares or shapes. Using craft glue, carefully adhere the book page pieces onto the white cardstock bunny template, creating a collage effect.
- Bringing it to Life: Once the bunny is covered in book page pieces, glue on googly eyes for a whimsical face. You can also add a pink pom pom for a nose and use a black marker to draw details like whiskers or a mouth.
These upcycled book page bunnies are a unique and artistic way to celebrate Easter. They’re perfect for displaying on shelves, mantels, or even as part of a centerpiece.
Wrap Up
With just a few thoughtful touches, you can create a beautiful and inviting atmosphere that captures the essence of spring and Easter. Whether you go for handmade crafts, floral arrangements, or festive table settings, these ideas will help you refresh your home effortlessly. So gather your supplies, get creative, and let the spirit of spring fill your home with color, joy, and seasonal charm! 🌸🐰✨