

The paper is rarely the reason a wrapped gift looks sloppy. The usual culprit is the sheet itself: cut a few inches too narrow, so the seam gapes, or cut so generously that the ends bunch into a lumpy wad of folds. Tape shows along the edge, corners tear on thin stock, and the finished package looks worse than the plain box underneath.
The fix costs less than most people expect. A roll of plain paper, sharp scissors, and a few supplies from a kitchen drawer or craft bin can produce wrapping that looks deliberate, and often more interesting than a printed roll from the store. The ideas below are grouped by the kind of gift and recipient they suit, but nearly all of them can be swapped between categories. Before the ideas, though, a short section on the basics, because a clever design on badly measured paper still looks off.
Measure First, Cut Once: How Much Paper a Box Really Needs
Lay the box on the paper and wrap the paper around it, the way you would if you were going to tape it. The paper has to cover the full distance around the box with about 2 inches of overlap, and it has to hang past each end by roughly half the depth of the box.
A worked example makes the rule concrete. Take a box that is 10 inches long, 7 inches wide, and 3 inches deep, wrapped so the paper travels around the 7-by-3 cross section:
- Distance around the box: 7 + 3 + 7 + 3 = 20 inches. Add 2 inches of overlap and the sheet needs to be about 22 inches wide.
- Length of the box plus its depth: 10 + 3 = 13 inches. Add an inch of cushion and the sheet should be about 14 inches long.
Treat those numbers as a rule of thumb, not a law. Thick paper needs a little more room to fold, and very thin paper can be trimmed closer. If the box is an unusual size, test the fold on a scrap of newspaper before cutting the good sheet. Paper that is too big is easy to trim after wrapping begins. Paper that is too small cannot be fixed without a patch.
Two habits improve nearly every wrapped box. First, put the seam on the bottom or back of the package, where nobody looks. Second, fold the overlapping edge under by about half an inch so the visible edge is a crisp fold instead of a raw cut. A raw edge tends to look ragged on kraft and fibrous on tissue.
Picking Paper by What It Needs to Do
Different papers behave differently once glue, paint, or a heavy marker meets them. Choosing the material before choosing the design saves a lot of redoing.
| Paper | Strengths | Limits |
| Brown kraft | Sturdy, hides box edges, takes stamps, paint pens, and markers well | Dark base means light inks need to be opaque to show |
| Tissue | Soft, colorful, good for layering and fluffy toppers | Tears at corners, shows box edges, colored sheets can bleed if they get damp |
| Newsprint, maps, sheet music | Free or nearly free, gives a printed look without a pattern roll | Thin, so it may need a plain layer underneath; newsprint ink can rub off on pale items |
| Plain white or butcher paper | Smooth, a blank canvas for watercolor and drawing | Shows tape and glue marks more than darker papers |
| Glossy, metallic, or glitter-coated paper | Eye-catching straight off the roll | Often difficult to recycle, and hard to write or stamp on |
One caution on butcher paper: the plastic- or wax-coated freezer paper sold next to it is a different product. It repels ink and paint, so it is the wrong choice for any of the decorating ideas here.
The Small Toolkit That Makes Paper Look Professional
None of this requires specialty equipment, but a few items make a visible difference:
- Sharp scissors. Dull blades chew paper and leave a fuzzy edge. Keep a pair reserved for paper if possible.
- Double-sided tape. It hides the seam entirely. On dark paper, ordinary clear tape shows up as a shiny stripe, so this is worth buying if you only buy one thing.
- A ruler or bone folder. Running the edge of a ruler along a fold sharpens the crease. A credit card works too.
- A hole punch, twine, and a pencil. These three cover most toppers, tags, and ties.
- A cutting mat or a thick magazine underneath, if you plan to use a craft knife for stencils or cut-outs.
Brown Paper Gift Wrapping Ideas That Look Better Than They Should
Plain brown kraft is the most forgiving paper to decorate. Its neutral color makes almost anything look intentional, and its fibers are strong enough that a corner will survive a clumsy fold. Many rolls are made partly or wholly from recycled fiber, though that varies by brand, so check the label if it matters to you.
1. Kraft, Twine, and a Sprig of Something Green
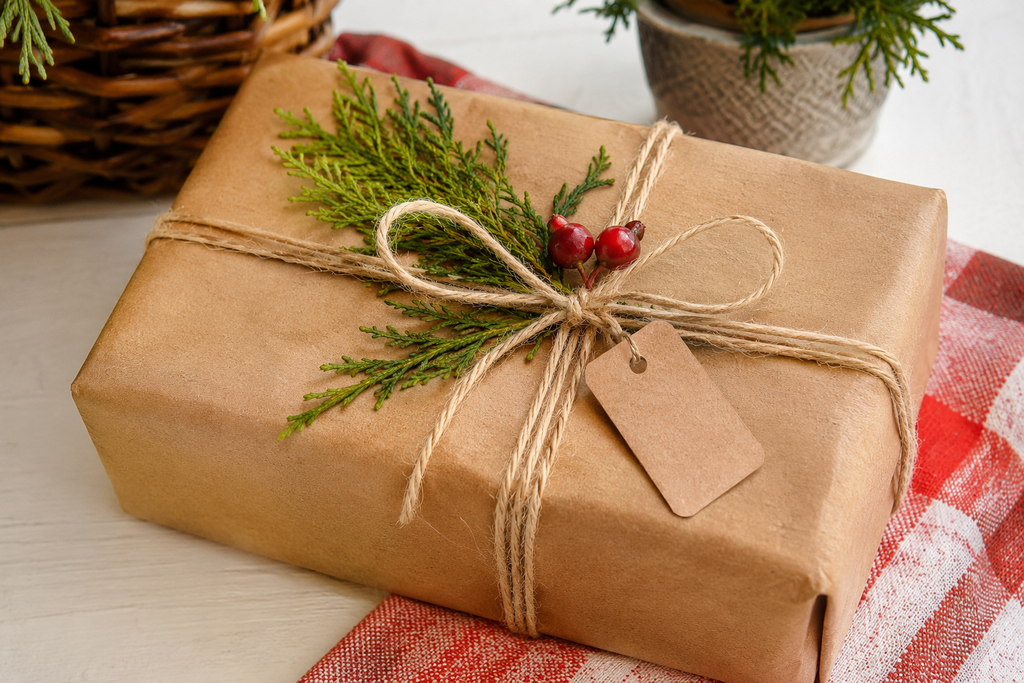
This is the baseline version, and it earns its reputation. Wrap the box with the seam hidden, then tie a length of twine around it twice, crossing the strands on top. Tuck a sprig of greenery, a dried herb stem, or a small paper flower under the knot.
A few details separate the polished version from the careless one. Wrap the twine tightly enough that it does not slide when the package is lifted, and knot it on the front rather than the back, so the knot becomes part of the design. If the twine keeps slipping on a smooth box, a small strip of double-sided tape under the cross point holds it in place.
On greenery: fresh evergreen and rosemary hold up for several days, but some common sprigs, including eucalyptus, are toxic to cats and dogs if chewed. If the recipient has pets, faux greenery or a paper leaf is the safer pick.
2. Potato-Stamped Kraft
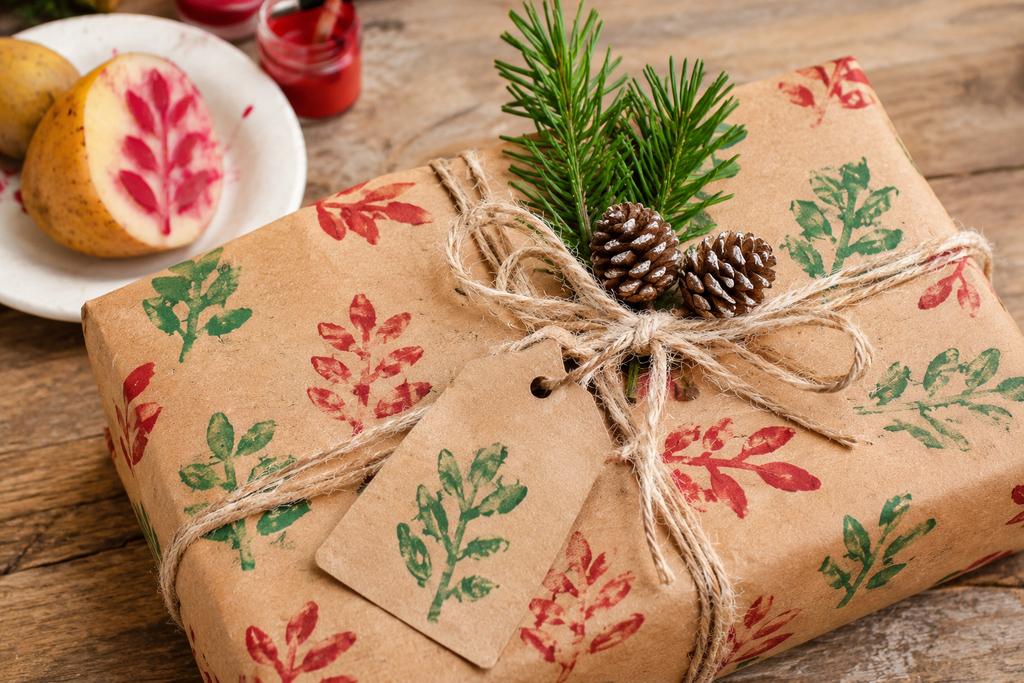
A stamp made from a potato sounds like a children’s craft, and it can be one, but the result on brown paper is surprisingly refined when the shape is simple. Cut a potato in half, pat the cut face dry with a paper towel, and cut away the area around a simple shape, such as a small heart, a leaf, a diamond, or a short dash, leaving the raised shape about a quarter inch high. Press it into acrylic craft paint spread thinly on a plate, then onto the paper.
A few things decide whether it looks charming or messy. Light colors, like white, cream, or pale gold, read clearly on kraft; dark paint disappears. Stamp a test pattern on a scrap first, because the first print from a loaded stamp is usually too heavy. Space the shapes evenly by lightly marking a grid in pencil on the back of the sheet, or by using a ruler. Let the paint dry completely before wrapping. Depending on thickness, that can be anywhere from a few minutes to half an hour, and paint that is still tacky will stick to itself where the paper folds.
An eraser carved with a craft knife works the same way and lasts longer than a potato, but requires more care with the blade. Cut away from your body, on a mat.
3. White-Ink Doodles and Hand Lettering
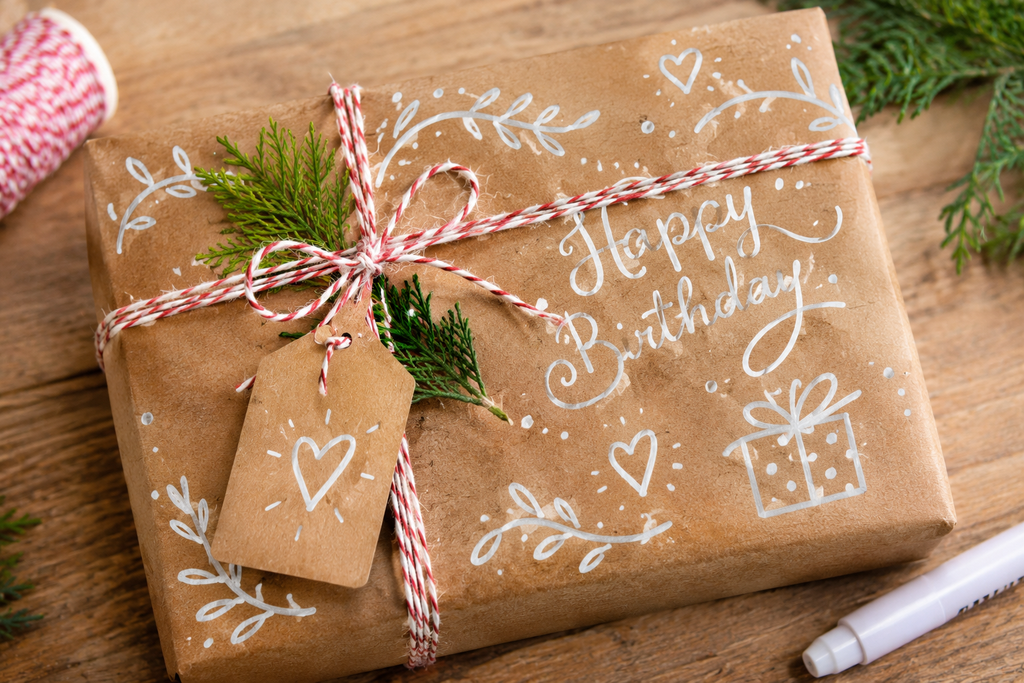
A paint pen with white or metallic ink shows up beautifully on brown paper. Because you are working on a plain, forgiving surface, simple repeating marks work better than ambitious drawings: small stars, tiny dots in triangles, a loose wave pattern, or the recipient’s name written large in one corner.
Oil-based paint pens give the most opaque coverage, but they have a strong smell, so work somewhere ventilated. Water-based paint pens are milder and dry quickly. Ordinary ballpoints and felt-tip markers often look thin on kraft, and some markers bleed through thin paper into the wrapped gift or onto your work surface, so protect the table with a spare sheet underneath.
4. A Contrast Band Around Plain Kraft

If stamping and drawing feel like too much, a single band of contrasting paper across the middle of the package changes the look significantly. Cut a strip about 2 inches wide from colored cardstock, patterned scrapbook paper, or a page from an old book. Wrap it around the box and join the ends on the underside with double-sided tape. Add a small tag or a paper leaf where the band meets the twine, and the package looks planned.
The width matters. Very thin bands look like a mistake. Very wide ones cover the point of having a plain base. Somewhere between 1.5 and 3 inches usually looks right for a standard shirt or shoebox, and the band can be a bit slimmer for small gift boxes.
Paper Gift Wrapping Ideas for Birthdays That Feel Celebratory
A birthday package usually needs more energy than a quiet holiday gift. The most useful approach is to keep the base simple, and put the color into one or two spots, so the package looks cheerful without looking crowded.
5. Hole-Punched Confetti Dots
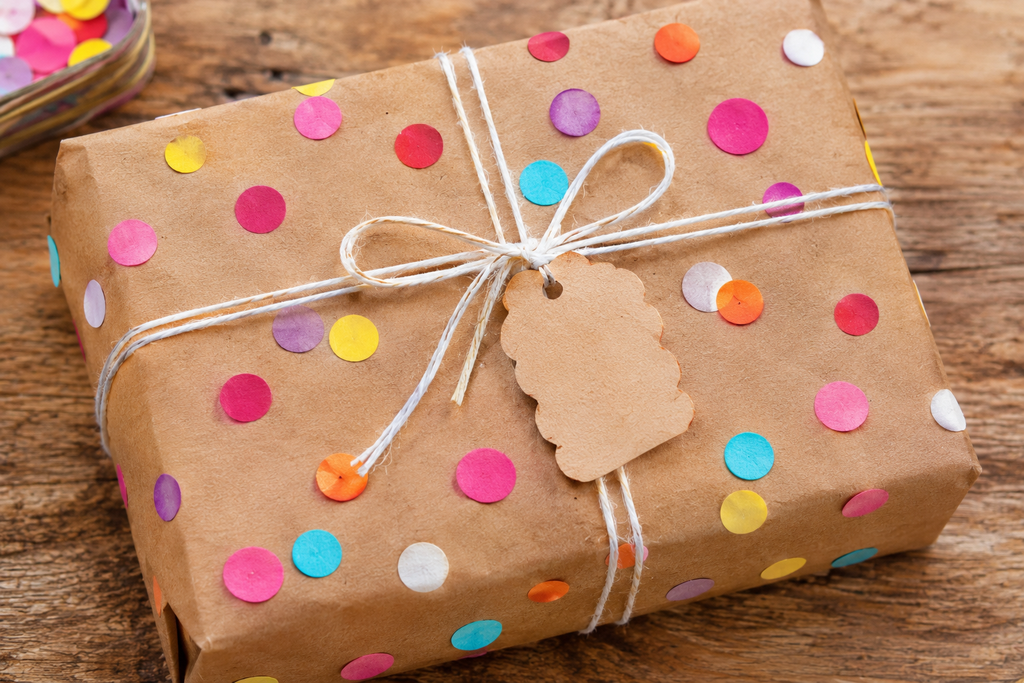
Punch circles out of colored paper, using a standard hole punch for small dots or a larger circle punch if you have one. Glue them in a loose scatter across a white or kraft sheet, letting some overlap and leaving gaps between others. A glue stick works for most papers; use a thin line of clear-drying craft glue for heavier cardstock.
Why it works: the repeated shape reads as a pattern from a distance, but each dot is a different color, so the sheet looks lively rather than uniform. Using colors pulled from the recipient’s favorite palette or a party theme ties the wrap to the occasion. The punched-out paper is a good use for leftover scraps from other projects, which is where this idea earns its place as a budget wrapper.
If the paper will be folded around sharp box corners, add the dots after wrapping. Gluing them first can create bumps along the creases that tear.
6. A Cardstock Number or Initial as the Topper

Cut the recipient’s age, or their initial, from a piece of cardstock and glue or tape it to the top of the package. Large block numbers about 4 to 6 inches tall read well. The most reliable way to cut them neatly is to draw the shape lightly in pencil first, then cut slowly, turning the paper instead of the scissors.
A small variation is to cut the number from a contrasting color and mount it on a slightly larger piece of a second color, which gives it a border. Fixing the topper with removable adhesive or a small loop of tape means the recipient can pull it off and keep it, which is a pleasant extra if the birthday is a milestone.
7. Curled Paper-Strip Pom Toppers

Cut strips of colored paper about a half inch wide and 8 to 10 inches long. Wrap each strip tightly around a pencil, hold for a few seconds, and release, so it keeps a loose curl. Gather ten to fifteen of the curls and glue them to the same spot on the package, pointing outward. The result looks like a burst of confetti ribbon, but it uses scrap paper rather than a spool of curling ribbon.
Paper weight changes the result. Standard printer-weight paper curls easily but looks floppy, while lightweight cardstock holds a tighter spiral. Mixing two or three colors, like turquoise, yellow, and pink, makes it look more festive than a single color.
Paper Gift Wrapping Ideas for Women That Go Beyond Pink and Floral Prints
Gift wrapping aimed at women often defaults to pastel florals, which can feel generic. These options add softness through texture and layering instead, and they work for a mother, a sister, a friend, or a coworker without leaning on stereotypes.
8. Layered Tissue With Torn Edges
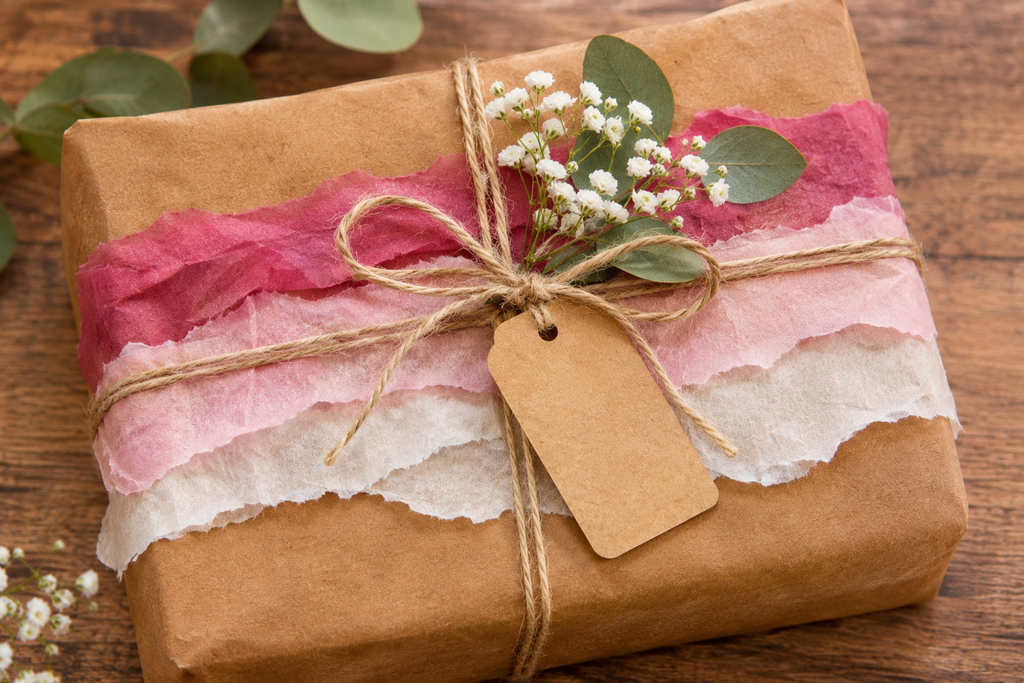
Tissue paper looks flimsy by itself but becomes interesting in layers. Wrap the box first in plain white or kraft paper so the box edges do not show through. Then cut or tear two or three sheets of tissue in different shades, such as blush, cream, and a muted green, and drape them over the top, letting them crumple slightly. Tear the edges by hand rather than cutting them, because the uneven fibers give a soft, deckled look.
Secure the tissue with a single strip of double-sided tape on the underside, or with a ribbon or twine tied around the whole package. Because tissue can bleed color if it gets damp, keep dark or saturated sheets away from white paper if there is any chance of rain or a damp car trunk on the way to the party.
9. Pressed Flowers Under Vellum
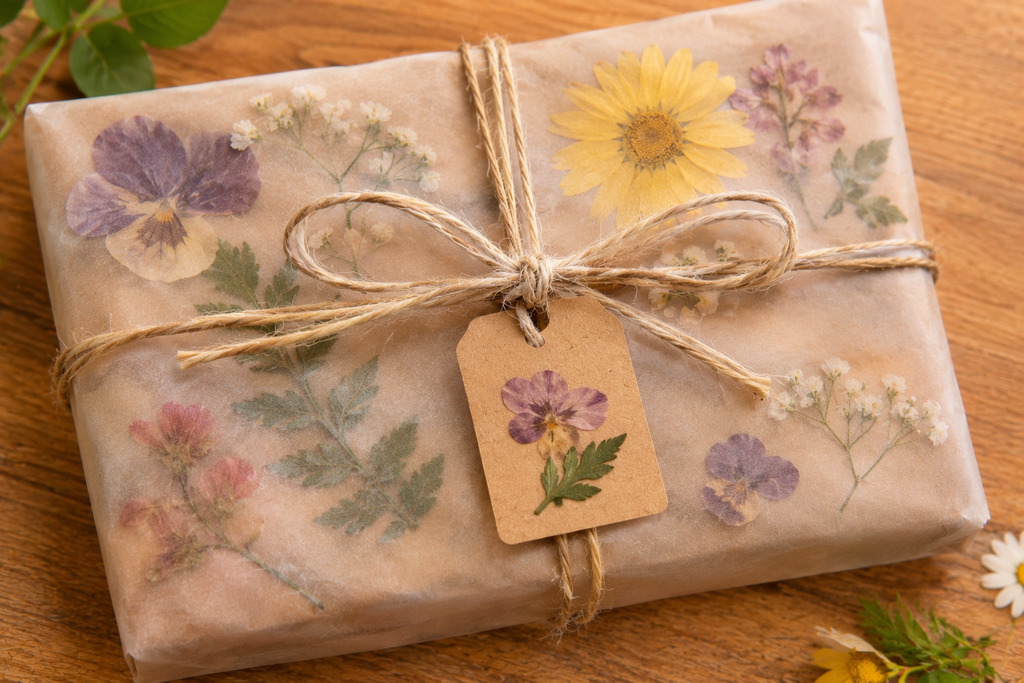
This one takes planning, but it is among the most elegant options. Press small flowers or leaves in a heavy book between sheets of paper, usually for a week or two, and longer for thick blooms. Thin, flat flowers like pansies, violas, and small ferns press better than fleshy ones. The plant needs to be completely dry before it goes onto a gift, or moisture can stain the paper and eventually mold.
Once dry, wrap the gift in white or kraft paper, then lay a sheet of vellum or tracing paper over the top. Slide a pressed flower or two between the layers and tape the vellum underneath so nothing shifts. A dab of clear-drying glue holds a fragile stem.
The flowers are delicate, so avoid this for a package that will be shipped or stuffed in a bag. Keep it for a gift handed over in person.
10. Watercolor Wash Wrapping Paper
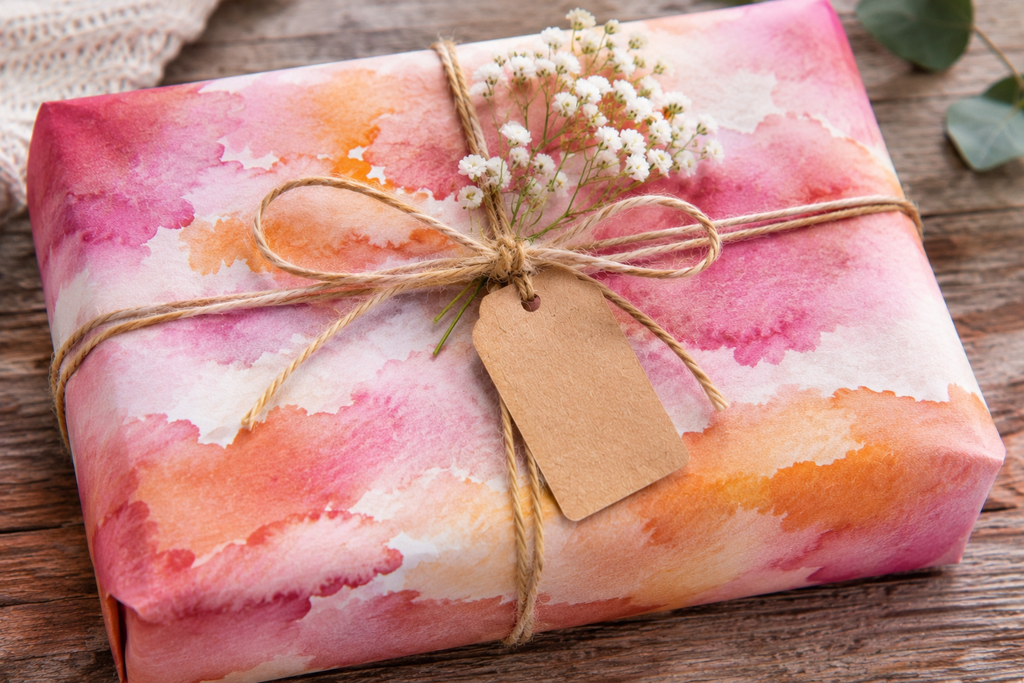
A light watercolor wash on white paper produces a one-of-a-kind sheet at almost no cost. Choose heavier paper than ordinary printer stock, since thin sheets buckle when wet. Mix a pale color with plenty of water, sweep it across the sheet in loose horizontal strokes, and let a second color blend in at the edges. Lay the sheet flat to dry, and press it under a stack of books for an hour or so before wrapping if it has warped.
The trick is restraint: a pale, soft wash looks like a design choice, while a heavily saturated sheet can look like a spill. The paper also needs to be completely dry before folding, or the colors will transfer to the box.
Paper Gift Wrapping Ideas for Men That Avoid the Obvious Stripes
Men’s gift wrapping tends toward navy stripes or tool-themed prints, and both can feel like a default. The three ideas below lean on texture, graphic lines, and meaning instead, and they hold up for fathers, brothers, partners, and friends.
11. Maps, Newspaper, and Printed Pages With a Point
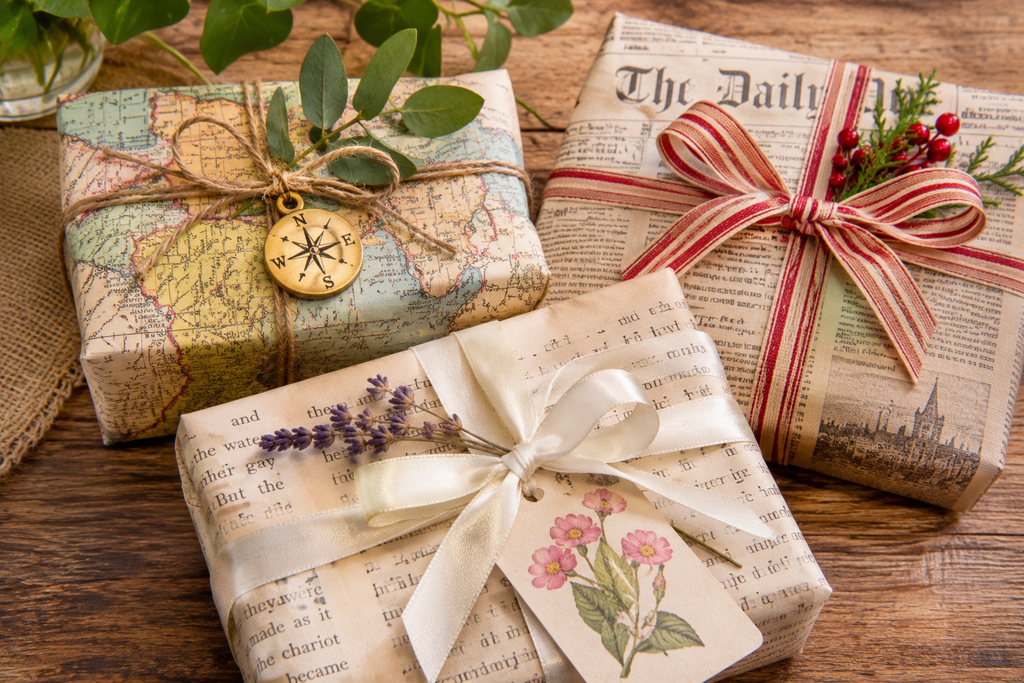
Printed pages make good wrap because they carry a message without any decorating at all. The decision rule is simple: pick a printed page that means something to the recipient. A map of the city he grew up in, a road atlas page from a trip he took, the sports section from the day his team won a title, or a page of sheet music from a song he plays.
There are practical points to consider. Newsprint is thin, so wrap the box in plain paper first if the box has a printed logo that might show through. Newsprint ink can also rub off on pale items, so avoid wrapping white or cream clothing directly in it. Maps printed at home on regular paper are usually smaller than a standard sheet, so tape two or three together on the back before wrapping. Finish with plain twine and a simple tag so the printed paper remains the focus.
12. Washi Tape Plaid on Kraft
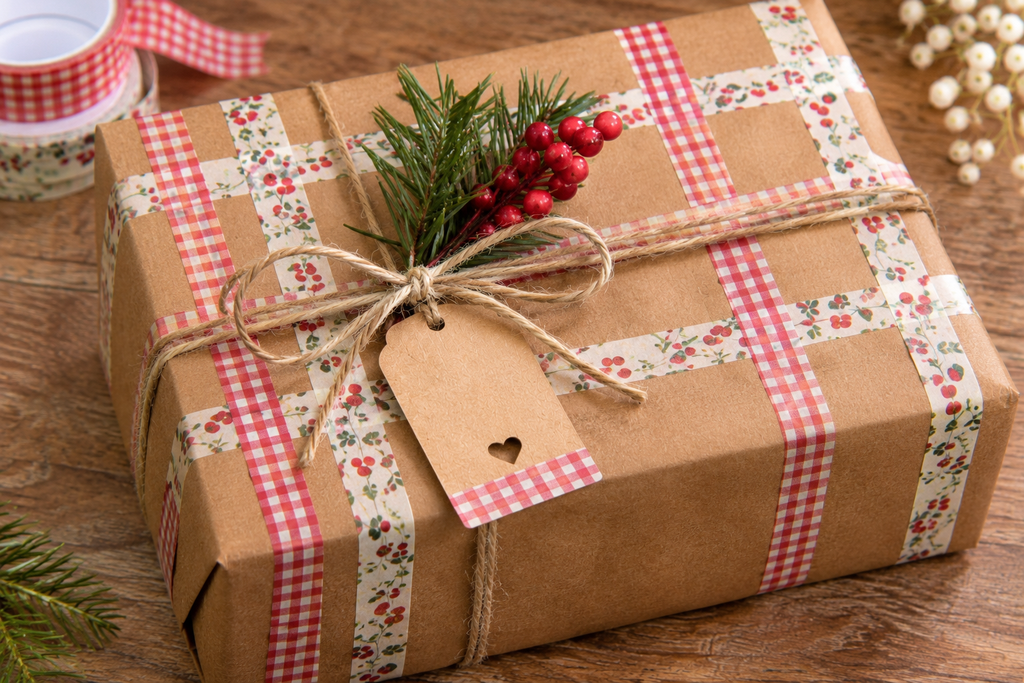
Plaid reads as classic and masculine without feeling forced, and it is easier than it looks. Wrap the box in brown kraft. Then apply strips of washi tape vertically across the front, spaced about 2 inches apart, and run a second set horizontally across them. Use two tape colors, such as deep green and navy, plus one thin accent color, so the crossings look like woven plaid.
Washi tape peels cleanly, so mistakes cost nothing, and it can be removed by the recipient without tearing the paper. If you do not have washi tape, thin strips of colored paper glued in the same pattern work almost as well, and a ruler with a fine marker can draw the grid by hand.
13. White Line Drawing on Black or Navy Paper

A dark sheet with a few white lines looks graphic and modern, a bit like a blueprint. Using a white gel pen, a paint pen, or a chalk-style marker, draw a loose grid, a set of contour lines, or a simple repeating geometric shape across a black or dark blue sheet. Fine lines look crisp, and a ruler helps if the lines are straight.
Because dark paper highlights fingerprints, tape residue, and dust, handle the sheet by the edges and use double-sided tape for the seam. Chalk-style markers can smudge, so a very light spray of workable fixative, used outdoors or in a ventilated area, helps, though it is optional. Pair it with a plain white or kraft tag so the dark paper gets some contrast.
Paper Gift Wrapping Ideas That Reuse What You Already Have
14. A Paper Bag Turned Into a Gift Bag
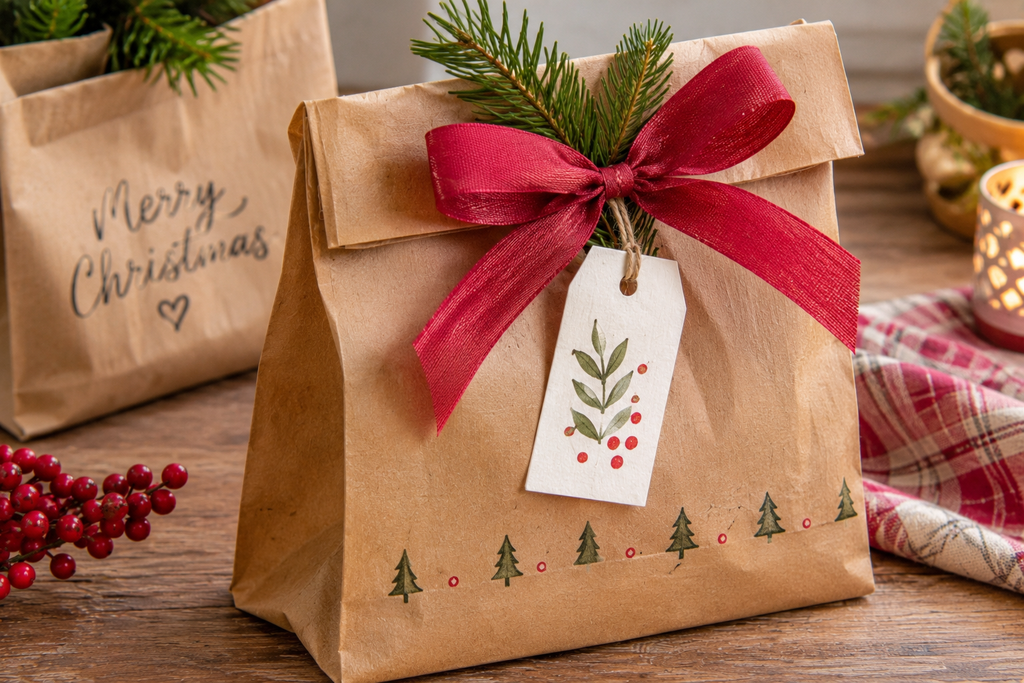
A sturdy paper grocery or shopping bag works as a gift bag with very little effort. If the bag has a logo, turn it inside out so the plain inner side faces out. Fold the top edge over about 2 inches, then fold it again for a crisp cuff. Punch two holes through the cuff, thread twine or ribbon through for a handle, and knot it on the inside.
This is the best option for awkward items that resist a box, like a bottle, a pair of shoes, or a bundle of soft clothing. Add a layer of tissue paper inside so the contents are not visible, and keep the gift weight under what the bag originally carried, since reused bags may have weak spots.
15. The Diagonal Envelope Wrap for Flat Gifts
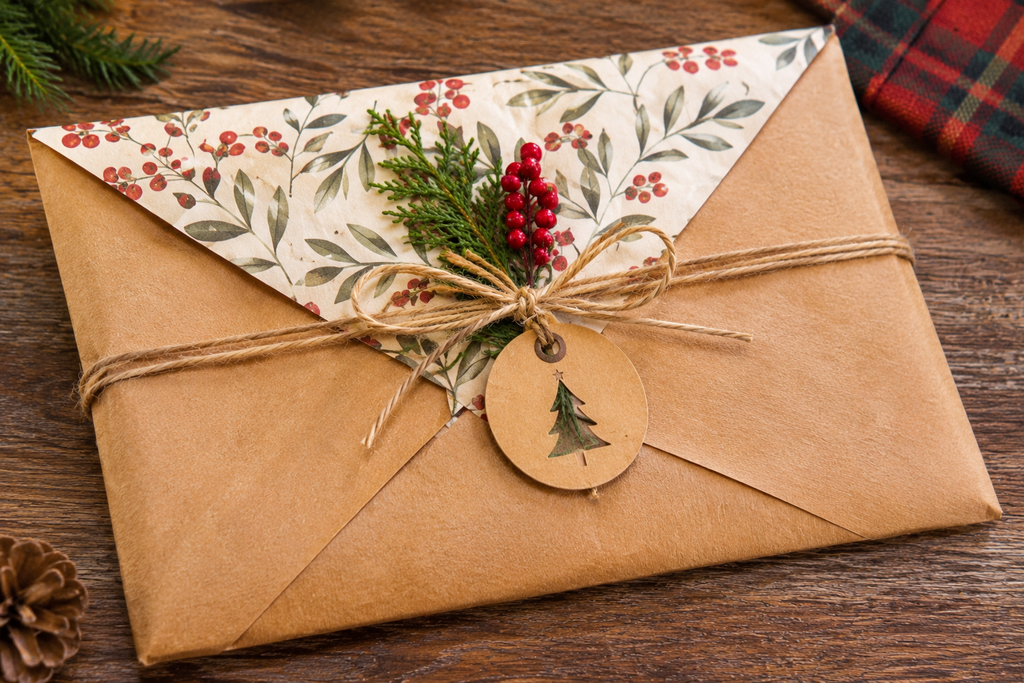
Books, scarves, framed prints, and gift cards can be wrapped without a box using an envelope-style fold. Start with a square sheet at least as wide as the item’s longest side plus its thickness, with extra room on all sides. Set the gift diagonally in the center, so that the corners of the paper point up, down, left, and right. Fold the left and right corners in over the gift, then the bottom corner up, then the top corner down to meet it. Tape the center seam, or secure it with a belly band of twine or a paper strip.
This fold uses a single sheet and requires almost no trimming, which makes it a good use for a map page, a wall calendar page, or a leftover sheet of printed paper. Practice the fold once on newspaper, because the proportions are easy to misjudge.
Wrapping Awkward Shapes Without a Box
Not every gift is a rectangle. A few approaches cover most of the common problems:
- Bottles: Wrap the bottle in a sheet of paper rolled lengthwise, twist the neck end, and tie with twine. Alternatively, slip it into a paper bag with the top folded over.
- Cylinders (candles, tins, rolled posters): Roll the paper around the object, tape the seam, then gather each open end and tie with twine or ribbon. Pleating the ends before tying produces a neat, fan-like finish.
- Soft items (sweaters, scarves): Fold flat and use the envelope wrap from idea 15, or tuck into a bag with tissue paper.
Where Paper Wrapping Tends to Go Wrong
A few mistakes show up again and again, and most are cheap to avoid:
- Decorating after wrapping the box, not before. Stamped patterns, doodles, and painted washes are easier to apply on a flat sheet. The exception is anything three-dimensional, such as paper toppers and pressed flowers, which should go on last.
- Using paper that is too thin for the design. Heavy paint or wet watercolor on printer paper warps, and the warping shows once the sheet is folded.
- Hot glue on thin paper. It can melt through lightweight sheets and leave a hard lump, and it can burn fingers. Use double-sided tape, a glue stick, or clear craft glue instead.
- Forgetting the tag. Plain wrapping without a label looks like a mystery package. A small kraft tag with a name and a short note finishes the look.
- Small embellishments on gifts for young children. Beads, tiny dried flowers, and small cut-outs can become choking hazards if they come loose. For toddlers, stick to large paper shapes that are firmly attached.
- Craft knife shortcuts. Always cut on a mat, away from the body, and replace blades when they dull, since dull blades slip.
What Can Go in the Recycling Bin Afterward
Plain kraft paper, newsprint, and uncoated tissue are generally accepted in curbside paper recycling, as long as the tape is removed. Ink and light paint are rarely a problem for recycling mills, but heavy glitter, foil, plastic coating, and glued-on embellishments usually are. A commonly used test is to scrunch the paper in your hand: if it stays crumpled, it is more likely to be recyclable, and if it springs back, it probably contains plastic or foil. Local programs vary, so confirm with your city or hauler if you are unsure. Paper that is still in good shape can also be reused, so a careful unwrapper can save a sheet to wrap another gift.
Questions Readers Often Ask
Can wrinkled kraft paper be smoothed out?
Yes. Kraft paper that has been folded in storage often flattens with a dry iron on a low setting, with a thin cloth between the iron and the paper. Keep the iron moving, and skip steam, which can warp or stain paper. If the paper has been painted or stamped, test on a scrap first, because heat can affect some paints. A simpler alternative is to roll the paper around a tube for a day, against its natural curl.
What marker works best on brown paper?
Paint pens, either oil-based or water-based, show up most clearly, particularly in white, gold, and silver. Gel pens in light colors also work. Regular felt-tip markers in dark colors mostly disappear on kraft, and some alcohol-based markers bleed through thin sheets, so test one on a scrap before committing to the final sheet.
Does double-sided tape hold on kraft paper?
It generally does, since kraft is a plain, uncoated surface with a bit of texture. On very rough or fibrous kraft, press the tape firmly and hold for a few seconds. For heavy items, add a second strip so the seam does not pop open in transit.
Key Takeaways
Good paper wrapping depends more on measurement and material than on artistic ability. Cut the sheet to the box, with roughly 2 inches of overlap and about half the box’s depth hanging over each end, and the rest gets easier. Choose a paper that can handle the decoration you have in mind: sturdy kraft for stamping and paint pens, white or heavier paper for watercolor, tissue for layering over a plain base.
If you are choosing a first project, start with brown paper, twine, and a hand-drawn tag. If the gift is for a birthday, add confetti dots or a cardstock number. If it needs a softer look, try layered tissue or pressed flowers under vellum, and if it needs a more graphic one, try washi tape plaid or white lines on dark paper. All of them can be done in an evening with materials that cost very little, and nearly all of them can be pulled apart and recycled afterward.

About Syprose Kiche
Syprose Kiche is the creator and writer behind My Besuited Home, a practical home and garden website covering DIY projects, gardening, lawn care, landscaping, home improvement, and outdoor living. She focuses on turning everyday homeowner questions into clear, practical guides backed by careful research and useful real-world considerations.