
Your patio is maybe eight feet wide. A landlord who frowns on “modifications.” Zero ground soil. And still — still — you want homegrown tomatoes. I respect that completely. Because I’ve been that person, crammed onto a third-floor balcony in a city apartment, arguing with a single grow bag like it owed me money.
Here’s the truth nobody tells you: small spaces don’t mean small harvests. They just mean smarter decisions. The Japanese concept of a bento box is a perfect analogy — everything has a place, nothing is wasted, and the result is somehow more satisfying than a plate twice the size. That’s exactly how I approach my patio vegetable garden now, and it’s how you should approach yours.
Let me walk you through everything I know — the wins, the disasters, and the stuff I wasted $40 on that now lives in my shed collecting cobwebs.
Why Container Vegetable Gardening on a Patio Actually Works
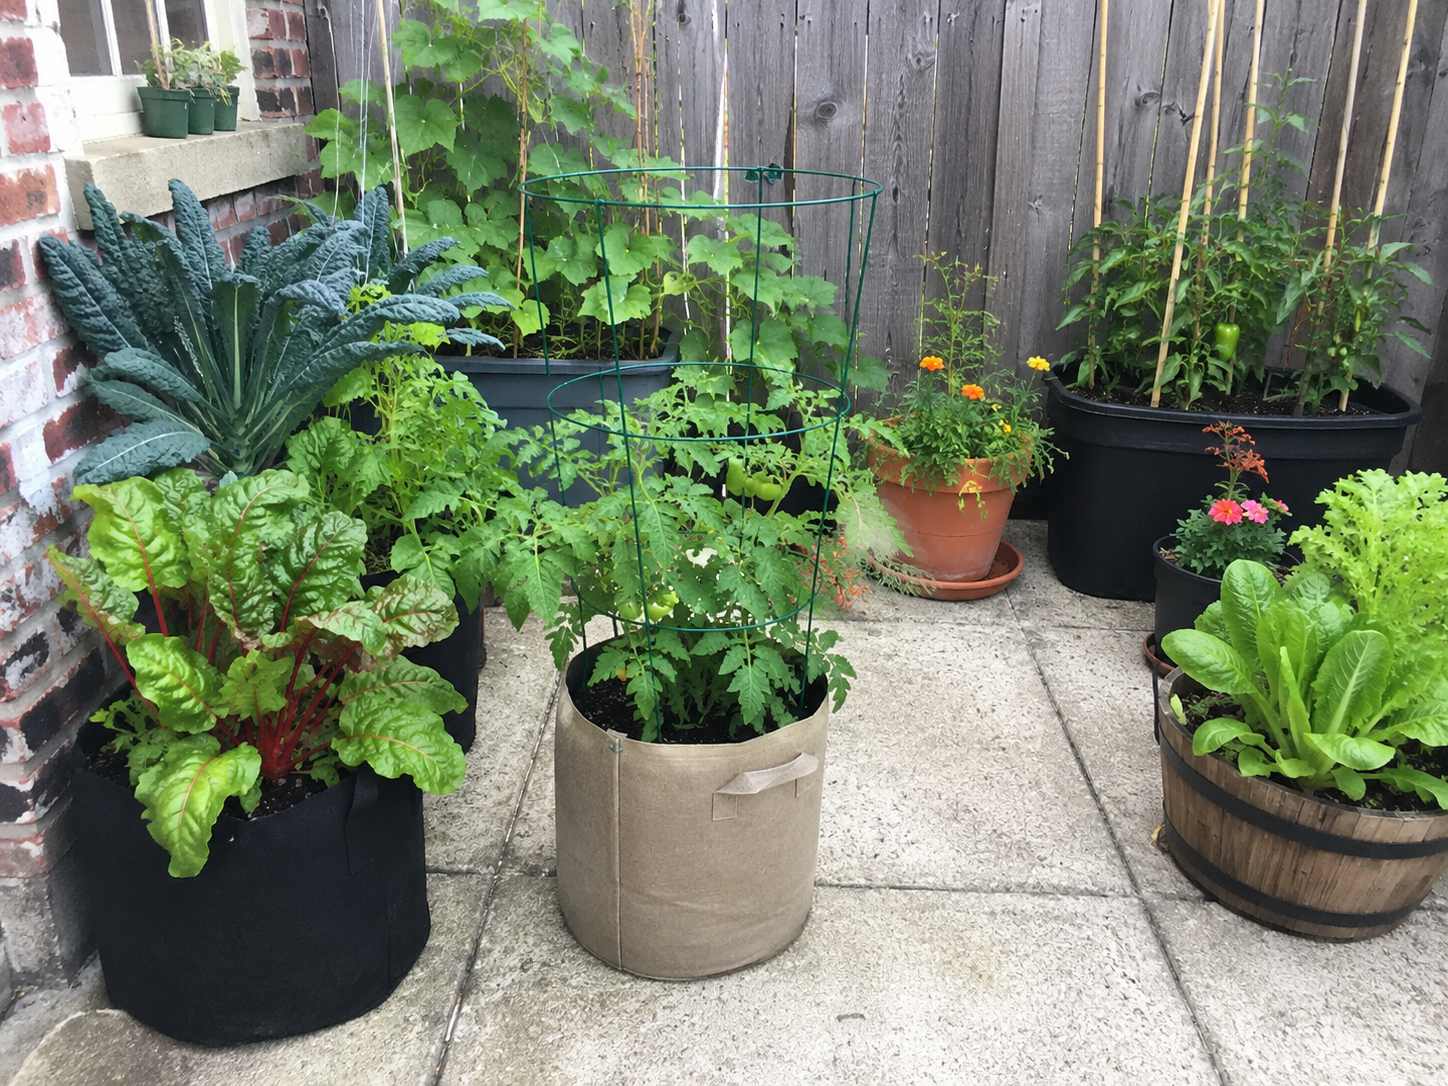
Before we get into the how, let me kill a myth: small-space vegetable gardening is not a consolation prize for people without yards. My in-ground garden bed out back produces a decent haul, but my patio container setup? That thing is efficient. I control the soil quality completely. I can move things around to chase the sun. I lose almost nothing to ground pests or soil-borne diseases. And I harvest within arm’s reach of my kitchen door.
The key insight — one that took me two growing seasons to fully appreciate — is that a container garden rewards intentionality. Every square inch is real estate. You’re not scattering seeds across a patch of dirt and hoping for the best. You’re curating a collection of productive plants the way a chef plates a dish.
Container vegetable gardening also scales beautifully. Starting with a 10×6 foot balcony? Great. Working with a narrow 4-foot strip beside your apartment door? Still workable. Even a single south-facing windowsill with two pots has grown me enough cherry tomatoes for a week’s worth of salads.
The science backs this up too. Raised container growing warms up faster in spring, drains better than compacted ground soil, and can extend your growing season on both ends. That’s not a small thing when you’re trying to squeeze maximum productivity out of a limited footprint.
Step 1: Know Your Light Before You Buy a Single Seed
This is the mistake that derailed my very first patio garden. I bought a six-pack of bell pepper starts, a bag of potting mix, and three cheerful ceramic pots — all before I had spent even one full day watching where the sun actually hit my patio. The result? Sad, leggy, non-fruiting pepper plants that I kept moving around like chess pieces until August, when I finally gave up.
Track your sun hours before anything else. Stand on your patio at 9am, noon, and 3pm and note where the light falls. Do this for at least two days. You’re counting “full sun” hours — direct, unobstructed sunlight. Here’s the quick rule I use:
- 6+ hours of direct sun: You can grow almost anything — tomatoes, peppers, cucumbers, eggplant.
- 4–6 hours (part sun): Stick to leafy greens, herbs, bush beans, radishes, and peas.
- Less than 4 hours: Lettuce, spinach, mint, and parsley will still do fine. Everything else will struggle.
Apartment balconies with overhangs are sneaky. They can look sunny but the overhead structure blocks the high midday sun that really drives fruit production. I lost a full season of tomatoes to an overhang I didn’t account for. These days I always calculate the angle of the sun, not just whether light is hitting the floor of the patio.
South and west-facing patios are gold. East-facing is workable. North-facing? Commit to salad greens and herbs, and be proud of it — I’ve eaten better lunches from a north-facing herb wall than from plenty of full-sun setups I’ve seen.
Step 2: Choose the Right Containers for Small Patio Vegetable Gardens
I’ve grown vegetables in everything from a 5-gallon Home Depot bucket to a $90 fabric grow bag to a cracked stock tank I rescued from a farm sale. Container choice matters more than most beginner guides admit — and it matters in ways that aren’t always obvious.
Fabric grow bags are my personal gold standard for patios. They air-prune roots (meaning the roots hit the air at the bag’s edge and stop growing, instead of circling and strangling themselves), they prevent overwatering because they drain from every surface, and they fold flat for storage in winter. A 10-gallon fabric bag costs about $8. A good ceramic pot with the same volume costs $40 and weighs as much as a toddler.
Here’s my rough container-to-crop guide based on years of trial and error:
- 5-gallon (the minimum for most veggies): Lettuce, spinach, herbs, radishes, one pepper plant, or a compact cherry tomato variety.
- 10-gallon: One standard tomato plant, two peppers, a cucumber trained vertically, or a generous herb garden.
- 15–20 gallon: Large tomato varieties like ‘Better Boy’, zucchini (one plant only — I learned this the hard way), or a mix of companion plants.
- Window boxes (6–8 inches deep): Herbs, lettuce, green onions, strawberries. Perfect for railing mounts.
A quick word on weight: if you’re on a balcony or elevated deck, this is non-negotiable safety information. A 20-gallon container filled with wet potting mix can weigh 80–100 pounds. Multiply that by several pots and you may be exceeding your balcony’s load rating. Check with your building’s specs if you’re not sure. Use lightweight potting mixes (more on that in a moment) and consider fabric bags, which weigh significantly less than ceramic or terracotta.
The one container type I’ve found to be a total waste of money, even if it looks pretty on Pinterest, is those multi-pocket vertical “strawberry planters” for growing vegetables. They dry out unevenly, the bottom pockets never get enough light, and the whole thing needs to be watered twice as often as anything else on my patio. My strawberry planter now holds succulents. That’s its calling.
Step 3: Build the Best Potting Mix for Patio Container Vegetables
This is where I get a little intense, and I make no apologies for it. The soil in your containers is everything. Your plants can’t go looking for nutrients anywhere else. Whatever you put in that bag or pot is their entire world for the season.
Do not — I repeat, do not — fill your patio containers with straight bagged potting soil from the discount rack. Most of those mixes are too heavy, compact quickly, and don’t drain well enough for container use. I wasted three growing seasons using whatever was on sale before I finally dialed in my mix.
My go-to patio container mix recipe:
- 60% high-quality potting mix (I use Espoma or Fox Farm, but any well-reviewed brand works)
- 20% perlite (for drainage and aeration)
- 20% compost (homemade if you have it; bagged is totally fine)
To this base, I add a slow-release granular fertilizer worked in at planting time — something with a balanced N-P-K ratio like 10-10-10 or a tomato-specific formula if I’m growing heavy feeders. This feeds plants for the first 2–3 months and cuts down on the amount of liquid fertilizing I need to do later.
The perlite is the ingredient most beginner gardeners skip, and it’s the one I’d argue is most important for containers specifically. It keeps the mix from compacting over the season, which means roots can breathe and water moves through properly rather than sitting and souring. A 4-quart bag of perlite costs about $6 and lasts multiple seasons. Buy it once.
Step 4: Pick the Best Vegetables for Small Patio Container Gardens
Here’s where strategy kicks in. Not every vegetable deserves precious patio real estate. I have ruthlessly eliminated certain crops from my patio lineup after years of disappointing returns, and I’ll tell you exactly which ones made the cut and which ones didn’t.
The Patio All-Stars (High Yield, Low Drama)
Cherry tomatoes are the undisputed MVP of patio container gardening. Varieties like ‘Sun Gold’, ‘Sweet 100’, or ‘Juliet’ produce hundreds of fruits per plant in a 10-gallon container. They’re forgiving of inconsistent watering (compared to large slicers), they grow happily with vertical support, and the flavor is genuinely better than anything you’ll find at the grocery store. I grew ‘Sun Gold’ in a fabric bag zip-tied to my apartment railing and ate tomatoes every single day from July through the first frost.
Lettuce and salad greens are tailor-made for small patios. They’re shallow-rooted (6 inches of depth is enough), they grow fast enough that you’re harvesting in 30–45 days, and you can cut-and-come-again for weeks. I keep a window box of mixed greens running from March through June and again from September through November. It’s the easiest, most consistent thing in my whole garden.
Bush beans are underrated for containers. Unlike pole beans (which need a serious trellis), bush varieties stay compact and produce an impressive harvest in a 10-gallon bag. ‘Provider’ and ‘Contender’ are my two standbys. Plant densely, harvest often, and you’ll get multiple flushes from one planting.
Herbs deserve their own dedicated container, full stop. Basil, parsley, cilantro, chives, and thyme — these are the high-use, high-reward crops that transform every meal you cook. A single 12-inch pot of mixed herbs pays for itself in grocery savings within about three weeks of harvest.
My Personal Patio Crop Ranking Bonus Pick
Radishes. I know, I know — nobody gets excited about radishes. But here’s why they earn a spot: they go from seed to harvest in 25–30 days, they fit in the gaps between larger containers, and they act as a natural deterrent for certain pests. Plant them in the edges of your bigger pots as living mulch. You’ll thank me in June.
Step 5: Master Vertical Space in Your Patio Vegetable Garden
If you’re not growing up, you’re wasting half your patio’s potential. Vertical gardening for small spaces is one of the most genuinely impactful strategies in my toolkit, and it changed the math on what I can grow in a limited footprint.
The basic idea: train vining and climbing crops upward using trellises, cages, twine, or wall-mounted structures, and suddenly your floor-level container square footage becomes much less of a constraint.
What grows well vertically on a patio:
- Cucumbers (compact varieties like ‘Spacemaster’ or ‘Bush Pickle’)
- Pole beans
- Small-fruited squash (like ‘Patio Star’ or ‘Bush Baby’)
- Cherry tomatoes trained to a single central stake
- Peas (spring and fall crops, both love climbing)
For trellises, I’ve had the best luck with simple bamboo stake teepees (cheap, reusable, store flat), nylon trellis netting stretched between two stakes, and cattle panel arches bent over a container for cucumbers to climb. The elaborate metal trellises you see at garden centers look beautiful and cost $35–$50 each. The bamboo stakes cost $8 for a 25-pack. My plants do not notice the difference.
One structural note from personal embarrassment: anchor your trellises well before the plants get heavy. A full-season cucumber vine loaded with fruit in a wind event will absolutely pull your whole setup over. I once watched a very beautiful trellis system collapse in slow motion during a summer storm, taking two neighboring pots with it. Stake deep. Tie to the railing if you have one.
Step 6: Watering and Feeding Your Patio Container Vegetable Garden
Containers dry out fast. Faster than you expect, especially in summer when temperatures spike and wind accelerates evaporation. This is the single biggest management challenge in patio veggie growing, and underwatering is the #1 killer of container vegetables in my experience.
My daily watering rule: Stick your finger two inches into the potting mix. If it’s dry at that depth, water. If it’s still moist, leave it. In peak summer, most of my 10-gallon containers need watering every day, sometimes twice a day for fast-draining fabric bags in direct heat.
Self-watering containers (ones with a built-in reservoir at the bottom) are genuinely useful for anyone who travels or forgets to water — I use two of them for my basil and peppers and they’ve saved me more than once. They’re more expensive upfront (usually $20–$40 depending on size) but I’ve found them worth every penny for high-maintenance crops in the heat of July.
For feeding, container plants need more frequent fertilization than in-ground plants because nutrients leach out with every watering. After the initial slow-release fertilizer at planting, I switch to a liquid fertilizer every two weeks once plants are actively growing. I use a fish and kelp emulsion for leafy greens (higher nitrogen) and a tomato-specific liquid feed for fruiting crops (higher potassium and phosphorus). The fish emulsion smells appalling for about 20 minutes and then completely disappears. It’s worth it.
Real Talk: What Goes Wrong with Patio Container Vegetable Gardening
Every garden has a reality check section. Here’s mine, earned through genuine failure.
Overplanting is the most common mistake, and I’ve made it every single year in some form. There’s something about an empty container that makes the brain say “just one more plant.” Resist this. A crowded container produces less than a properly spaced one — plants compete for water, nutrients, and light, and nobody wins. One tomato per 10-gallon bag. One cucumber per 10-gallon bag. That’s it.
Full-sized zucchini is not a patio crop. I know the tag says “container-friendly.” The tag is lying to you. Zucchini plants in containers still get enormous, still demand 15–20 gallons minimum, and still produce far more squash than any two humans can eat. If you really want zucchini, grow ‘Patio Star’ (a genuine compact variety) and accept that you’ll get six zucchini per season, not sixty. If you want sixty, you need a yard.
Ceramic and terracotta pots overheat roots in direct sun. This one surprised me. Black containers are the worst offenders — they absorb heat all day and cook the root zone. If you love the look of terracotta, move them to a spot where they get afternoon shade, or double-pot them (put the terracotta inside a slightly larger fabric bag). Or just use fabric bags and stop worrying about it.
The “just add Miracle-Gro” approach eventually backfires. I went through a phase of over-fertilizing my tomatoes because I wanted bigger, faster harvests. What I got was lush, beautiful, four-foot-tall tomato plants with almost no fruit. Too much nitrogen pushes vegetative growth at the expense of flowering. Feed appropriately, not excessively.
The Wrap-Up: Your Patio Can Feed You
After more than ten years of growing vegetables in spaces ranging from a cramped balcony to my current modest patio, the lesson I keep coming back to is this: the garden that works is the garden you actually tend. A fancy setup you ignore is worth less than two fabric bags and a bag of potting mix that you water every morning with your coffee.
Start small. Really small. Three containers, three crops you actually eat, one season of paying attention. Track what worked and what didn’t. Adjust next year. That cycle of observation and improvement is the whole game — and it never stops being interesting, even after a decade.
My parting wisdom: grow what you eat, not what looks impressive on a garden blog. If your household eats salads three times a week, a dedicated lettuce and herb setup will transform your cooking and your grocery bill. If you’d rather have tomatoes in August, plant cherry tomatoes in May. Match your garden to your kitchen, not your aspirations — and your small patio space will absolutely deliver.
Over to you: What’s the one crop you’ve been dying to try in containers but haven’t pulled the trigger on yet? Or maybe you’ve had a container gardening disaster that still haunts you? Drop it in the comments below — I read every single one, and some of my best troubleshooting ideas have come from readers who asked exactly the right question. Let’s figure it out together.