20+ Easy Pumpkin Painting Ideas
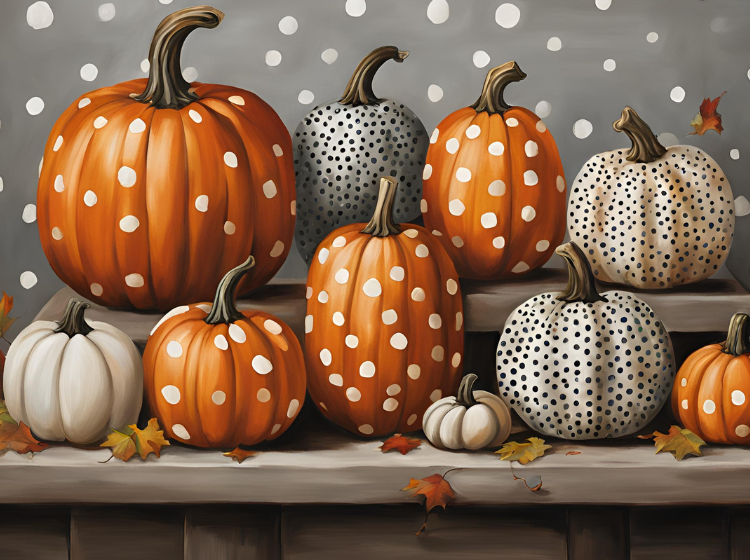
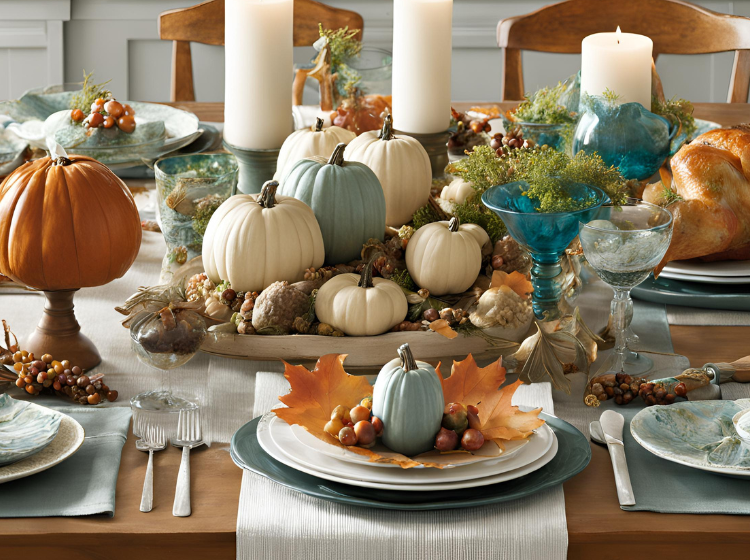
As autumn approaches, pumpkins become the quintessential symbol of the season, adorning our homes, porches, and local markets. While carving pumpkins is a time-honored tradition, painting them offers a creative and family-friendly alternative that can be enjoyed by all ages. Painting allows for endless possibilities, enabling you to unleash your artistic flair while avoiding the mess and potential hazards of carving. Whether you’re hosting a pumpkin painting party, looking for a fun family activity, or simply want to beautify your home for fall, these 20+ easy pumpkin painting ideas will inspire you to create stunning seasonal décor. Getting Started with Pumpkin Painting Before you begin painting, selecting the right pumpkins is essential. Look for pumpkins that are firm and free of blemishes. Consider the size and shape; smaller pumpkins can be easier to paint for younger kids, while larger pumpkins offer a bigger canvas for more elaborate designs. Also, think about the type of pumpkin: traditional orange pumpkins are popular, but white pumpkins or even green and blue varieties can make for unique painted pieces that stand out in any setting. Another fun option is to use mini pumpkins, which can serve as adorable accents around larger painted pumpkins or be turned into a festive centerpiece. These smaller pumpkins allow for experimentation with different designs and color combinations without needing to commit to a larger surface area. Plus, their compact size makes them perfect for decorating tabletops, window sills, or even for creating a whimsical fall vignette. Essential Supplies Needed for Painting Pumpkins Once you’ve chosen your pumpkins, it’s time to gather your supplies. Essential materials include a variety of paints, such as acrylics, which are durable and provide vibrant colors. You may also opt for spray paint if you’re looking for a quick and even coat. Brushes of various sizes will allow for detailed work as well as broader strokes for filling larger areas. Don’t forget to have a palette for mixing colors, as well as cups of water and paper towels for easy clean-up. In addition to basic painting supplies, consider adding stencils, painter’s tape, or even stickers to your toolkit. Stencils can help create intricate designs, while painter’s tape can be used to mask off sections of your pumpkin for geometric patterns. For those who want an extra sparkle, a sealant can be applied once the paint is dry to protect your artwork from the elements and prolong its life. With the right supplies in hand, you’ll be ready to embark on your pumpkin painting adventure. 20+ Easy Pumpkin Painting Ideas 1. Classic Polka Dots One of the simplest and most cheerful designs for pumpkin painting is the classic polka dot. To create this look, start by painting your pumpkin a solid base color of your choice, such as bright orange or soft white. Once the base coat is dry, use a small round brush or a dotting tool to add polka dots in contrasting colors. You can choose a monochromatic palette for a modern look or go for a vibrant rainbow of colors for a playful touch. For a more sophisticated twist, consider using metallic or glitter paints for the dots. This will add a touch of elegance to your pumpkin while also making it shine in the light. You can even mix sizes of polka dots to create depth and visual interest. If you’re working with kids, let them choose their favorite colors and sizes, making this a fun and interactive project for everyone involved. When displaying your polka dot pumpkins, group them together in clusters to create a lively centerpiece. They look fantastic on dining tables, as porch decorations, or even in a garden setting, brightening up any fall landscape. 2. Ombre Effect The ombre effect is a trendy painting technique that blends colors seamlessly, creating a beautiful gradient. To achieve this look on a pumpkin, start by selecting two or three colors that complement each other. For instance, you might choose shades of orange and yellow for a warm fall feel or go for blues and greens for a fresh, cool look. Begin by painting the top portion of the pumpkin with the darkest color. As you work your way down, gradually mix in the lighter colors, using a dry brush technique to blend the edges where they meet. It’s essential to work quickly before the paint dries, ensuring a smooth transition between the colors. If you’re new to painting, practicing this technique on a paper plate or scrap material can help build your confidence. The beauty of ombre pumpkins lies in their versatility. They can serve as elegant décor pieces on their own or be integrated into a more extensive fall display. Place your ombre pumpkins among real or faux autumn foliage, and you’ll create an eye-catching centerpiece that draws attention and admiration. 3. Animal Faces Bring your painted pumpkins to life by transforming them into adorable animal faces. This idea is perfect for families with kids, as it invites creativity and imagination. Choose animals that your child loves, such as cats, owls, or even whimsical creatures like unicorns. Start by painting the pumpkin a solid base color that matches your chosen animal, such as orange for a cat or brown for an owl. Once the base coat is dry, use paint and brushes to add the facial features. Start with the eyes; large, round eyes can be created using white paint with black dots for pupils. Add ears, a nose, and any additional details that will bring the animal to life. You can even incorporate accessories like bow ties or crowns for a fun twist! Animal face pumpkins can be delightful decorations for a child’s room, Halloween parties, or as part of a festive outdoor display. Not only will they bring smiles to those who see them, but they also provide a fantastic opportunity for family bonding through art and creativity. 4. Glitter Glam For those who love a bit of sparkle, adding glitter to your painted pumpkins can elevate … Read more