
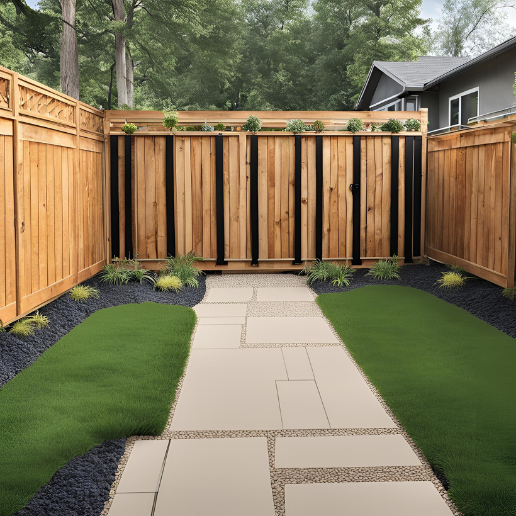
If your backyard currently looks more like an open field than a private sanctuary, I feel your pain. A few years back, I tried to save money by “fencing” my garden with nothing but a prayer and some leftover fishing line. Spoiler alert: the local deer treated my Swiss chard like an all-you-can-eat buffet, and my neighbor’s golden retriever decided my prize hydrangeas were his new favorite fire hydrant.
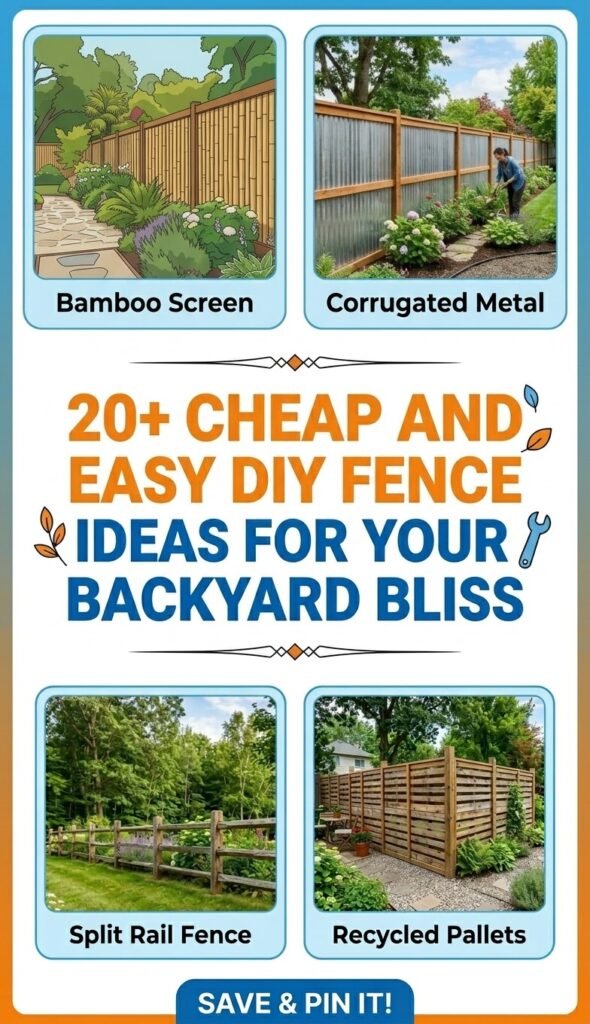
You need a boundary, but you don’t need a $10,000 contractor bill. I’ve spent the last decade digging post holes and hauling timber, and I’m here to tell you that “cheap” doesn’t have to mean “tacky.” Whether you’re trying to keep a toddler in or a nosy neighbor out, these DIY fence ideas will actually work without draining your savings.
1. Pallet Wood Privacy Fence for Zero Dollars

Let’s start with the king of budget DIY. I’ve built everything from compost bins to vertical planters out of pallets, but a full-scale privacy fence is where they really shine. The trick is finding the “clean” pallets—look for the “HT” (Heat Treated) stamp rather than the chemically treated ones. I once ignored this rule and my prize tomatoes ended up tasting vaguely of industrial solvent.
To get this right, you aren’t just leaning boards against a tree. You’ll need 4×4 pressure-treated posts set in quick-set concrete. Once those are rock solid, you can slide the pallets over the posts or dismantle them to create a tight, gap-free wall. It gives off a rugged, rustic vibe that looks intentional rather than “I found this behind a grocery store.”
If you want to level up the look, grab a five-gallon bucket of exterior stain. Natural wood turns a sad, ghostly grey after one winter if you don’t seal it. I prefer a dark walnut stain because it hides the imperfections in the wood grain. It makes a free pallet look like high-end reclaimed timber from a boutique hotel.
For those of you worried about the “hoarder” aesthetic, try alternating the direction of the boards. Horizontal slats feel modern and expensive, while vertical ones are better for keeping critters from climbing over. Just make sure you pre-drill your holes; pallet wood is notorious for splitting the second a screw touches it.
2. Classic Split Rail Fence for Large Backyards

If you have a massive perimeter to cover, a solid privacy fence is going to cost you a kidney. That’s where the split rail comes in. It’s the ultimate “boundary” fence. It says, “This is my land,” without blocking the view of the sunset. I put one of these in around my back acre, and it’s the only project that didn’t leave me with a week-long tension headache.
The beauty of a split rail is that it doesn’t have to be perfect. In fact, if the rails are a little crooked, it just looks more “country chic.” You don’t even necessarily need concrete for the posts if your soil is heavy clay. I just used a manual post-hole digger and a lot of upper-body strength. It’s a great workout if you hate the gym as much as I do.
To keep pets or kids contained, you can staple black vinyl-coated welded wire to the inside of the rails. From the street, the wire is practically invisible, but it keeps the dog from chasing the mailman. I’ve found that the 2-inch by 4-inch mesh is the sweet spot—it’s sturdy enough to stop a determined husky but cheap enough to buy in bulk rolls.
One thing I’ll warn you about: don’t buy the cheapest rails at the big-box store. Look for cedar or pressure-treated pine. I once tried to use “landscape timbers” because they were three bucks each, and they rotted out in two seasons. Spend the extra dollar per rail now so you aren’t redigging holes in twenty-four months.
3. Corrugated Metal Fencing for a Modern Edge
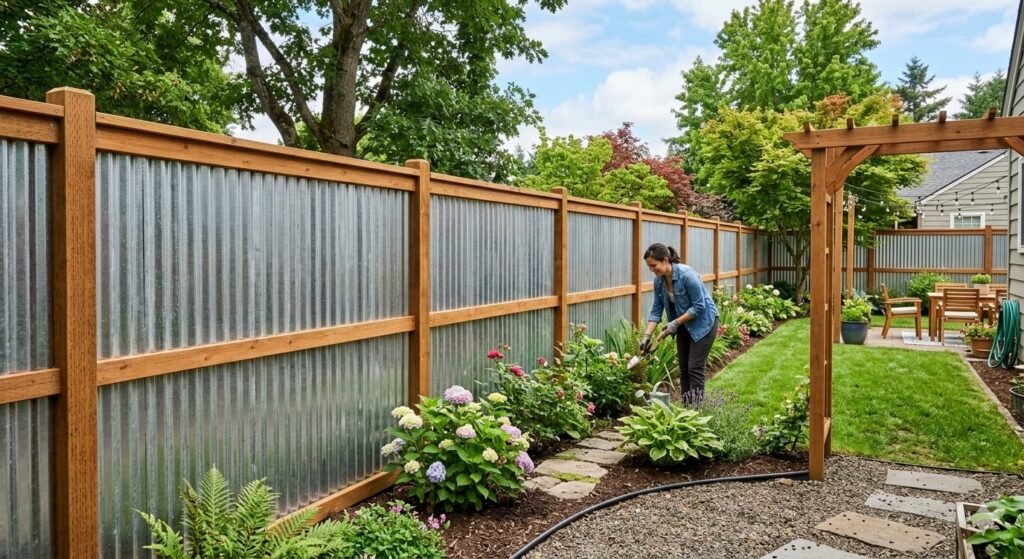
I’m obsessed with the industrial look of corrugated metal. It’s incredibly durable, fire-resistant, and provides 100% privacy. I used this for a small “secret garden” nook behind my shed, and it’s held up better than any wood fence I’ve ever built. Plus, the way it reflects light in the evening is just gorgeous.
Installation is faster than you’d think. You build a standard wood frame with top and bottom rails, then screw the metal panels directly into the wood. Use the screws with the little rubber washers (neoprene washers) to prevent rusting at the puncture points. I learned that the hard way after a rainy April left orange streaks all over my shiny silver panels.
If the “shiny new tin” look is too much for you, you can actually age the metal on purpose. A spray bottle filled with vinegar and a little salt will give it a beautiful, rusted patina in a matter of days. It looks like something straight out of a designer landscaping magazine, but it only costs you the price of a few sandwiches.
A quick side note: corrugated metal gets hot. If you have sensitive plants like hostas or ferns, don’t plant them directly against the metal on a south-facing wall. They’ll basically slow-cook by mid-July. Keep your plantings about eighteen inches away to allow for some airflow.
4. Bamboo Roll Fencing for Instant Privacy
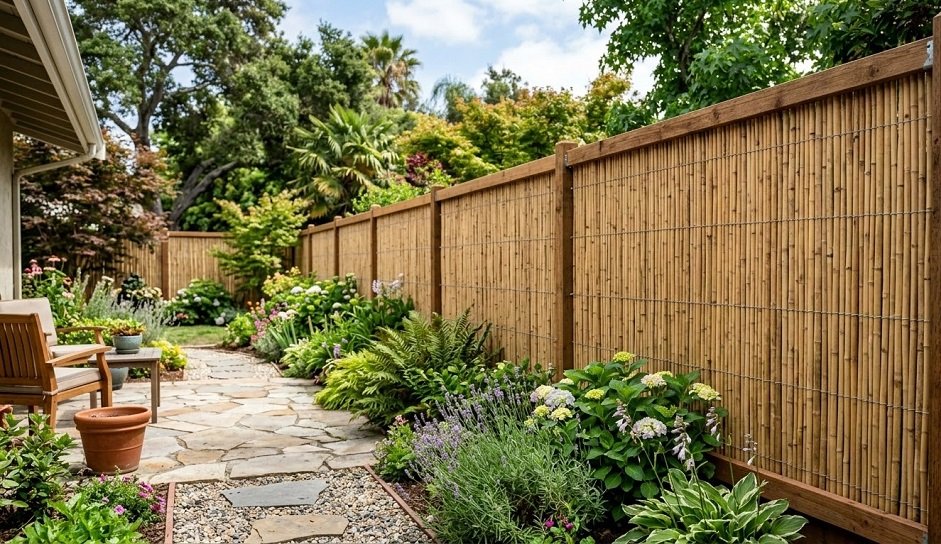
If you need a fence yesterday, bamboo rolls are your best friend. This isn’t a “build from scratch” project as much as it is a “makeover” project. If you have an ugly chain-link fence that makes your yard look like a junkyard, you can zip-tie bamboo rolls to it in about an hour.
I used this trick when I was renting a place with a chain-link eyesore. It turned a cold, metallic backyard into a tropical oasis. It’s also great for blocking the view of the neighbor’s overflowing trash cans. Bamboo is naturally rot-resistant, but it will eventually bleach out to a tan color in the sun.
To make it last, I recommend buying the full-pole bamboo rather than the thin “slat” rolls. The slats tend to break and unravel after a heavy windstorm. I once had a cheap slat fence turn into a giant pile of toothpicks after a rogue thunderstorm. The thicker poles are much more resilient and look way more “high-end.”
One pro-tip: don’t let the bamboo touch the actual dirt. If the bottom of the roll sits in damp soil, it will wick up moisture and start to mold. Mount it about an inch or two off the ground. Your fence will stay pretty for five years instead of two.
5. Hog Wire Fencing for a “Farmhouse” Aesthetic
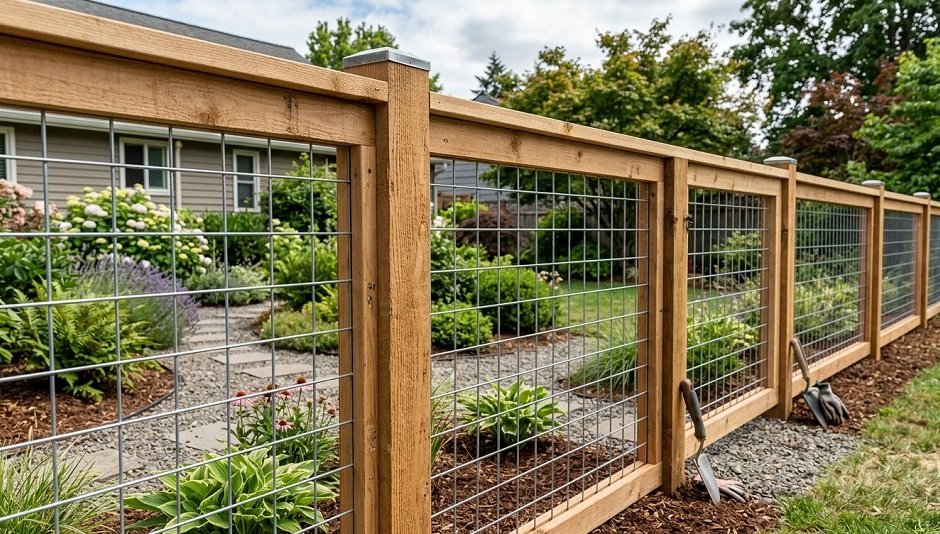
Hog wire is the darling of the DIY world right now, and for good reason. It’s essentially a thick, galvanized wire grid that you frame inside beautiful wood timbers. It keeps the “open” feel of your yard while still providing a very secure barrier. I have this around my vegetable garden to keep the rabbits out.
The “panels” are usually 4 feet by 16 feet, so you get a lot of coverage for about $50 per panel. You cut them down with bolt cutters to fit your frame. I’ve found that using 4×4 posts and 2×4 rails creates a look that is sturdy and timeless. It’s perfect if you have a view you don’t want to hide, like a lake or a forest.
I will say, framing these panels can be a bit of a jigsaw puzzle. You can either staple the wire to the back of the frame (the easy way) or “sandwich” the wire between two pieces of wood (the pretty way). If you’re doing this for a front yard, go the extra mile and sandwich it. It looks professional, and you won’t have sharp wire edges catching on people’s clothes.
6. Live Willow Fencing (The “Wattle” Method)
This is about as old-school as it gets. A “wattle” fence is made by weaving flexible branches—usually willow or hazel—around upright stakes. I built a small decorative wattle fence around my herb garden, and it’s easily the most commented-on feature in my yard. It’s completely biodegradable and costs exactly zero dollars if you have access to a creek or woods.
You want to cut your “wands” (the flexible branches) while they are still green and bendy. If they’re too dry, they’ll just snap. I spent an entire afternoon trying to weave dried-out maple branches once, and I ended up with a pile of sticks and a very frustrated ego. Willow is the gold standard because you can practically tie it in a knot without it breaking.
The coolest part? If you stick live willow stakes into the ground in early spring, they might actually take root and start growing. You end up with a “living fence” that gets stronger and greener every year. It’s a bit of a commitment in terms of pruning, but it’s the ultimate eco-friendly boundary.
7. Reclaimed Shutters for a Shabby-Chic Privacy Screen
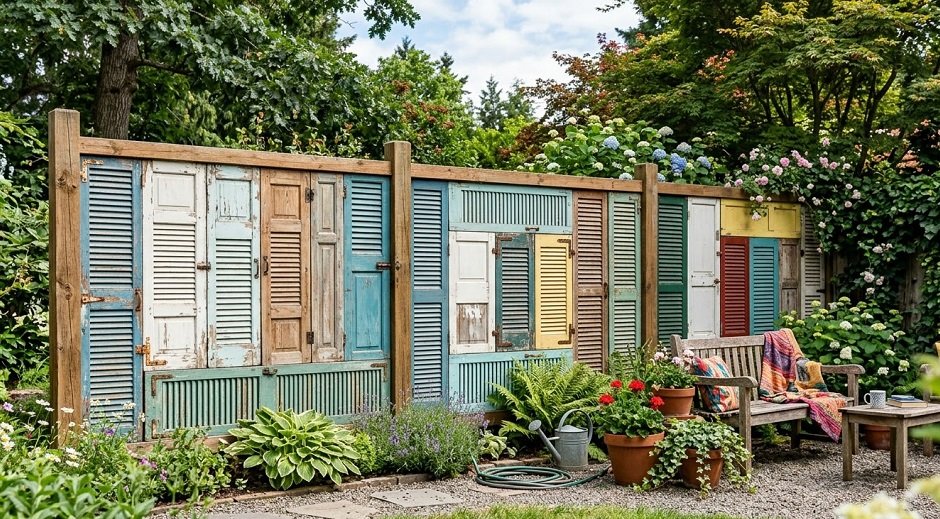
I have a soft spot for architectural salvage, and using old window shutters is a genius way to get a fence that looks like it belongs in a French countryside magazine. I once found a stack of fifteen solid wood shutters at a local estate sale for twenty bucks. My husband thought I’d lost my mind, but once they were scrubbed and bolted together, even he had to admit they looked incredible.
The key here is the “staggered” look. You don’t want them all perfectly level, or it looks like a wall of louvered doors. Instead, vary the heights slightly. You’ll need a sturdy 2×4 frame to mount them to, because old shutters are surprisingly heavy—especially when they soak up a bit of rain.
I’m a big fan of leaving the original “chippy” paint if it’s lead-free, but if you want a cohesive look, spray them all a matte charcoal or a soft sage green. It ties the different styles and sizes together instantly. Just make sure you hit them with a clear outdoor sealer, or they’ll rot faster than a dropped peach in July.
One quick side note: because shutters have slats, they allow for excellent airflow while still blocking the direct line of sight. This is perfect for a seating area where you want a breeze but don’t want the neighbor watching you eat your ribs.
8. The “Woven” Wood Slat Fence
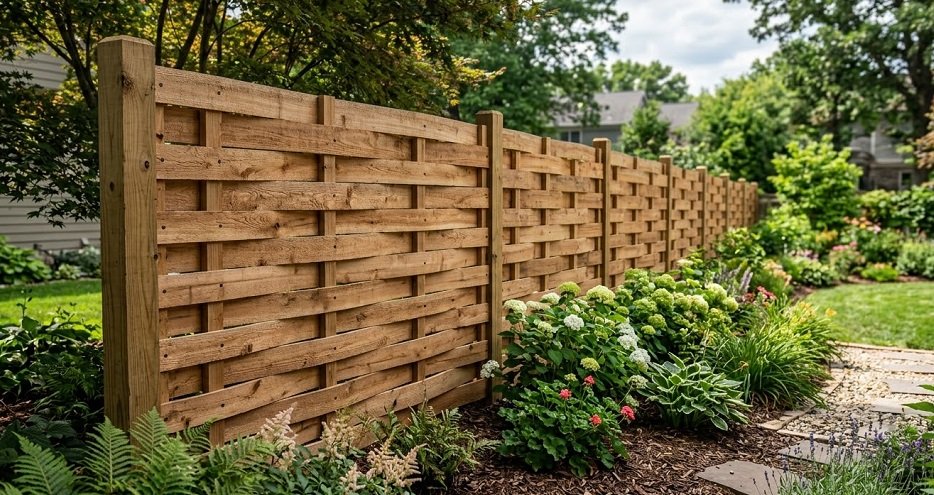
If you want a modern, high-end look on a budget, go for the horizontal woven style. Instead of nailing boards flat against the posts, you weave thin, flexible redwood or cedar slats around the posts. I tried this with some thin pressure-treated pine, and while it took a bit of muscle to bend the boards, the resulting 3D texture was stunning.
You’ll want to space your posts closer together for this—about 4 feet apart instead of the usual 8 feet. The tension of the wood holding itself in place makes the fence incredibly strong. It looks like a giant basket woven right into your landscaping. It’s the kind of project that makes people stop their cars and ask who your contractor was.
I’ve found that using 1×4 boards works best for the weave. Anything thicker is too stiff and will likely snap, which I learned the hard way when a piece of “heavy-duty” oak smacked me right in the forehead. Wear safety glasses, folks; wood under tension is basically a giant spring waiting to ruin your day.
9. Cattle Panel and Cedar Post Fence
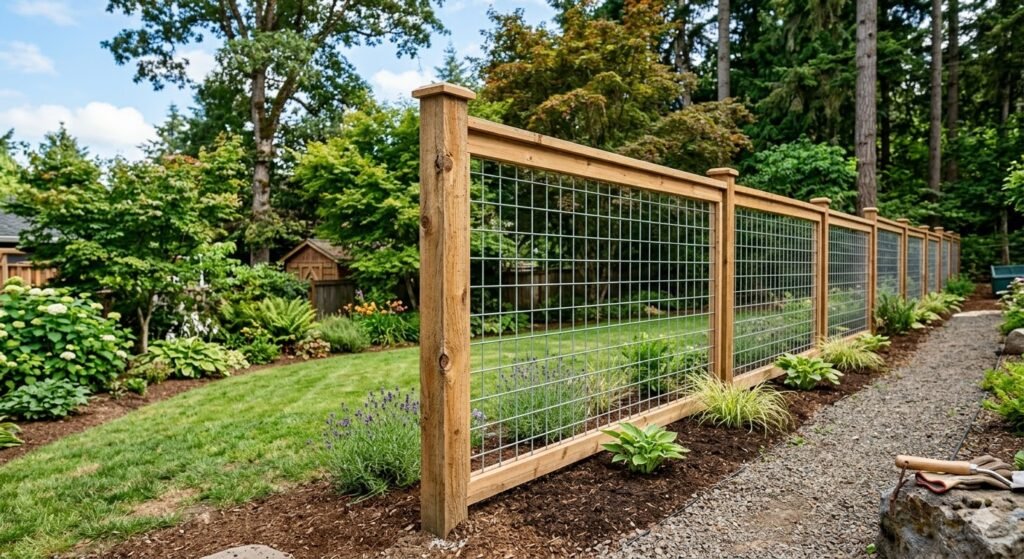
This is the cousin to the hog wire fence but on a larger scale. Cattle panels are usually 50 inches tall and 16 feet long, and they are tough as nails. I used these for my side yard because they’re nearly impossible for a dog to dig under or climb over. The galvanized steel has a clean, minimalist look that pairs perfectly with chunky cedar posts.
To keep costs down, you can buy the panels at a farm supply store rather than a specialty garden center. They are significantly cheaper when they’re marketed for cows instead of “decorative landscaping.” I saved nearly $200 just by driving ten miles further to a tractor supply shop.
Installation is a breeze if you have a pair of heavy-duty fencing staples and a hammer. Just level your posts, stretch the panel, and staple it into place. I like to add a 2×6 “cap” rail along the top to give it a finished look and a place to set my coffee mug while I’m pulling weeds in the morning.
10. Rope and Post Boundary for Nautical Vibes
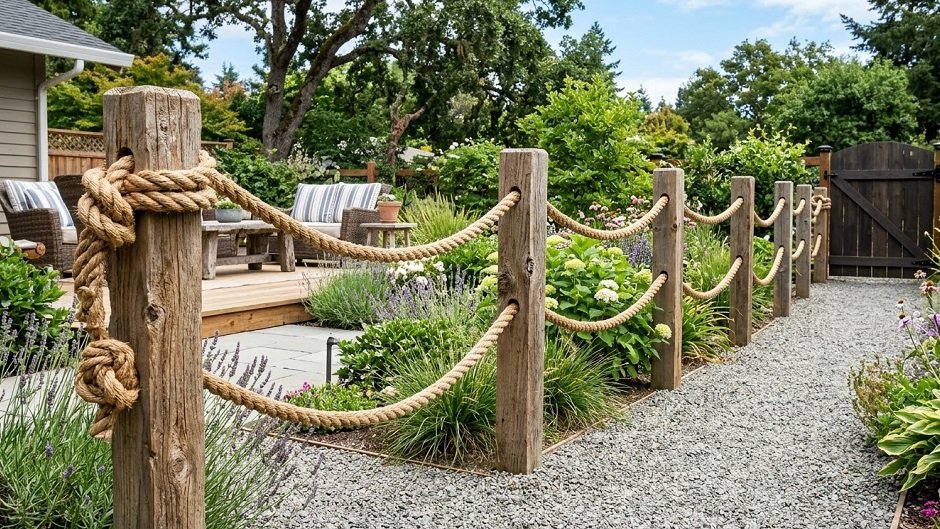
If you don’t actually need to keep anything in or out—like a dog or a toddler—but you want to define a path or a property line, a rope fence is the way to go. I installed one along my front walkway using thick manila rope and 4×4 cedar posts with holes drilled through the center. It gives off a very relaxed, coastal vibe that feels like a permanent vacation.
Make sure you buy “synthetic” manila rope if you can find it. Real hemp rope looks great for about six months, but then it starts to fray, shrink, and eventually smell like a wet basement. The synthetic stuff stays looking crisp and won’t sag nearly as much when it gets wet.
For the posts, I like to cut the tops at a 45-degree angle (a “bishop’s hat” cut) to help shed water. It’s a tiny detail that makes a DIY project look professional. I once left the tops flat on a pine fence, and within three years, the centers of the posts were soft enough to poke a finger through.
11. Upcycled Bicycle Wheel Fence
Okay, this one is for the eccentric souls out there. I saw a fence made entirely of old bicycle rims at a community garden, and I fell in love. You can usually get old wheels for free from bike shops that are just going to scrap them. You bolt the rims together in a honeycomb pattern and secure them to metal or wood posts.
It’s essentially a piece of industrial art that doubles as a garden boundary. It won’t give you much privacy, but it’s a fantastic trellis for climbing plants like morning glories or clematis. By mid-summer, the wheels are covered in blooms, and it looks like a magical floating garden.
One word of caution: make sure you remove the rubber tires and just use the metal rims. Rotting rubber smells terrible in the summer heat and attracts all sorts of unwanted pests. Stick to the metal, maybe give them a coat of colorful rust-oleum paint, and you’ve got a conversation starter that cost you nothing but a few bolts.
12. Gabion Stone Walls (The “Wire Basket” Fence)
If you have a lot of rocks on your property—and I mean a lot—a gabion fence is your best friend. These are basically wire cages filled with stones. They are incredibly heavy, permanent, and look like they cost a fortune. I used a low gabion wall to terrace a sloped part of my yard, and it hasn’t budged an inch in eight years.
You can buy the wire kits online, or you can make your own using heavy-duty hardware cloth. The trick is to “face” the front of the cage with your prettiest stones and fill the center with cheaper gravel or rubble. I spent a whole weekend hand-placing river rocks on the outside while my kids dumped “ugly” rocks in the middle.
A quick side note: because these are so heavy, you don’t actually need to dig post holes for a low wall (under 3 feet). The weight of the stones keeps it in place. However, if you’re going higher, you absolutely must use internal support posts, or the whole thing could topple over and turn your lawn into a rock slide.
13. Horizontal Slat “Shadow Box” Fence
A shadow box fence is designed so that the slats are alternating on either side of the rail. This means it looks the same from both sides—no “ugly” side for you or the neighbor. It also allows the wind to whistle through, which is vital if you live in a gusty area. I’ve seen solid fences catch the wind like a sail and snap right at the base.
By running the slats horizontally, you give the fence a mid-century modern feel. I used 1×6 cedar fence pickets for this, and by spacing them about two inches apart, I got the perfect balance of privacy and airflow. It’s my favorite style for a modern backyard makeover.
I recommend using a spacer block (just a scrap piece of wood) while you’re nailing the boards up. It ensures your gaps are perfectly even. I tried to “eye-ball” it once on a small section behind the garage, and by the time I got to the top, the boards were slanted so badly it looked like the fence was melting.
14. Living Hedge “Fencerow”
Why build a fence when you can grow one? A “fencerow” of dense evergreens or shrubs is the ultimate long-term privacy solution. I planted a row of Arborvitae along my north border ten years ago, and now I have a 12-foot solid green wall that blocks out the sound of the nearby highway.
The “cheap” part comes in if you buy smaller “starter” plants. Don’t go to the nursery and buy the 6-foot tall trees for $100 each. Buy the 2-foot ones for $15. Yes, you’ll have to wait a few years for them to fill in, but your wallet will thank you. I spent the “savings” on a good drip irrigation system to make sure they didn’t die in the first August heatwave.
Privet, Boxwood, and even some types of tall grasses (like Miscanthus) can work as a fence. Just be sure to check if the plant is invasive in your area. I once planted “running” bamboo without a root barrier, and three years later, it was coming up through the floorboards of my garden shed. Don’t be like me.
15. The “Junkyard” Corrugated Plastic Fence
If you want a translucent look that lets light into your garden but blurs the view, corrugated plastic (polycarbonate) panels are a hidden gem. They come in clear, smoked, or white. I used the white panels for a “spa-like” screen around my outdoor shower. It feels bright and airy but provides total modesty.
These panels are incredibly lightweight, so you can get away with a much lighter frame than you would for wood or metal. However, they can be brittle. If you live in an area with heavy hail, make sure you get the “high-impact” rated panels. I didn’t, and one bad spring storm left my privacy screen looking like it had been through a target practice session.
To keep it looking “clean” and not like a construction site, frame the panels in dark-stained wood. The contrast between the bright plastic and the dark wood is very chic. It’s a great way to get a “frosted glass” look for about a tenth of the price.
16. Reclaimed Log or “Stumpery” Fence
If you’ve recently had a tree taken down, don’t pay someone to haul away the logs. You can stack them horizontally between upright posts to create a “log cabin” style fence. It’s incredibly sturdy and looks right at home in a wooded or rustic backyard.
I’ve also seen “stumperies” where you turn the stumps upside down and interlock the roots to create a wild, gothic-looking boundary. It’s a bit niche, but it’s a haven for local wildlife. My “log wall” has become a literal hotel for beneficial toads and chipmunks.
The downside? It will eventually rot. To slow this down, peel the bark off the logs before you stack them. Bark traps moisture against the wood and invites beetles to move in. It’s a tedious job—I spent three days with a drawknife—but it adds years to the life of the fence.
17. The “Picture Frame” Picket Fence
Standard picket fences are a bit boring, right? You can spice them up by “framing” sections of pickets with 2x4s so they look like individual pieces of art hanging between your posts. It’s a small structural change that makes a huge visual impact.
I used this for a front yard fence and painted the “frames” white and the “pickets” a soft blue. It’s charming without being too “Leave it to Beaver.” It also makes it much easier to replace a broken picket later—you just pop out that one frame instead of dismantling the whole run.
A quick side note: don’t let the pickets touch the ground. If you leave a 2-inch gap at the bottom, your weed-whacker won’t chew up the wood, and the moisture from the grass won’t rot the tips. I’ve seen so many fences with “black-foot” rot because they were installed flush to the dirt.
18. Decorative Trellis Panels
Sometimes a “fence” is just a support system for your favorite vines. You can buy pre-made wooden trellis panels and mount them to 4×4 posts. On their own, they don’t offer much privacy, but once they are covered in English Ivy or Climbing Roses, they are as solid as a brick wall.
I have a trellis fence on one side of my patio, and the fragrance in June is enough to make me never want to go inside. It’s a living, breathing barrier that changes with the seasons. Plus, it’s much cheaper than solid wood because it uses about 60% less lumber.
Make sure you choose a sturdy trellis. Those flimsy plastic ones will buckle under the weight of a mature Wisteria vine. I’ve seen Wisteria literally crush a wooden gazebo; don’t underestimate the power of a thirsty plant. Buy the heavy-duty cedar lattice or build your own with 1×2 strips.
19. The “Firewood” Stack Fence
This is my favorite “functional” fence. You build two rows of posts with wire mesh between them, and then you simply stack your winter firewood inside. It’s a massive, solid, and incredibly heavy privacy wall that you slowly “eat” through the winter.
It obviously requires a lot of wood, but if you heat with wood anyway, it’s a brilliant way to store your fuel in plain sight. I love the way the different colors of the bark and wood grain look when stacked tightly. It feels very Scandinavian and cozy.
The “Real Talk” here: you have to be careful about termites. Don’t build a firewood fence directly against your house or a wooden deck. Keep it at least ten feet away so the bugs don’t decide your floorboards look tastier than your fence.
20. Simple Wire and Vine “Invisible” Fence
If you truly want your fence to disappear, use “deer fencing”—a thin, black plastic or wire mesh—and string it between thin metal T-posts. On its own, it’s ugly. But if you plant fast-growing vines like Honeysuckle or Clematis at the base, the mesh disappears within a single season.
I used this for a “dog run” in the back corner of my yard. From the patio, you can’t even see the fence; it just looks like a thick hedge. It’s the cheapest way to secure a large area, but it offers zero privacy until the plants grow in.
A quick side note: T-posts are the easiest things in the world to install. You just need a “post driver” (a heavy metal tube with handles) and a bit of aggression. It’s a great way to blow off some steam after a long day at the office.
The “Real Talk”: What’s Not Worth Your Time
I’m going to be brutally honest with you: do not bother with plastic “picket” fencing from the dollar store. It looks okay for about three weeks, but the first time a rogue weed-whacker touches it, it’ll shatter like glass. It’s a total waste of money and ends up in a landfill way too fast.
Also, be wary of “pre-assembled” wood panels from the big-box stores. They are often held together with tiny staples rather than screws or nails. I bought a set once because I was feeling lazy, and after one particularly windy March, half the pickets were laying in my lawn like fallen soldiers. If you want a fence that lasts, build it board by board or at least reinforce the pre-made ones with proper galvanized screws.
Finally, check your local HOA and city codes before you dig. Nothing ruins “backyard bliss” faster than a $500 fine and a legal order to tear down your beautiful new corrugated metal fence because it’s three inches too tall. I’ve seen it happen, and it is a heartbreaking sight.
Parting Wisdom
At the end of the day, a fence is just a frame for your life. It doesn’t have to be perfect; it just has to serve its purpose and make you feel at home. Don’t be afraid to mix and match materials, and definitely don’t be afraid to ask for help—bribing a friend with a pizza and some cold drinks is the oldest “cheap labor” trick in the book.
Which of these styles fits your backyard vibe the best? Or do you have a crazy DIY fence story of your own? Drop a comment below and let’s talk shop!