
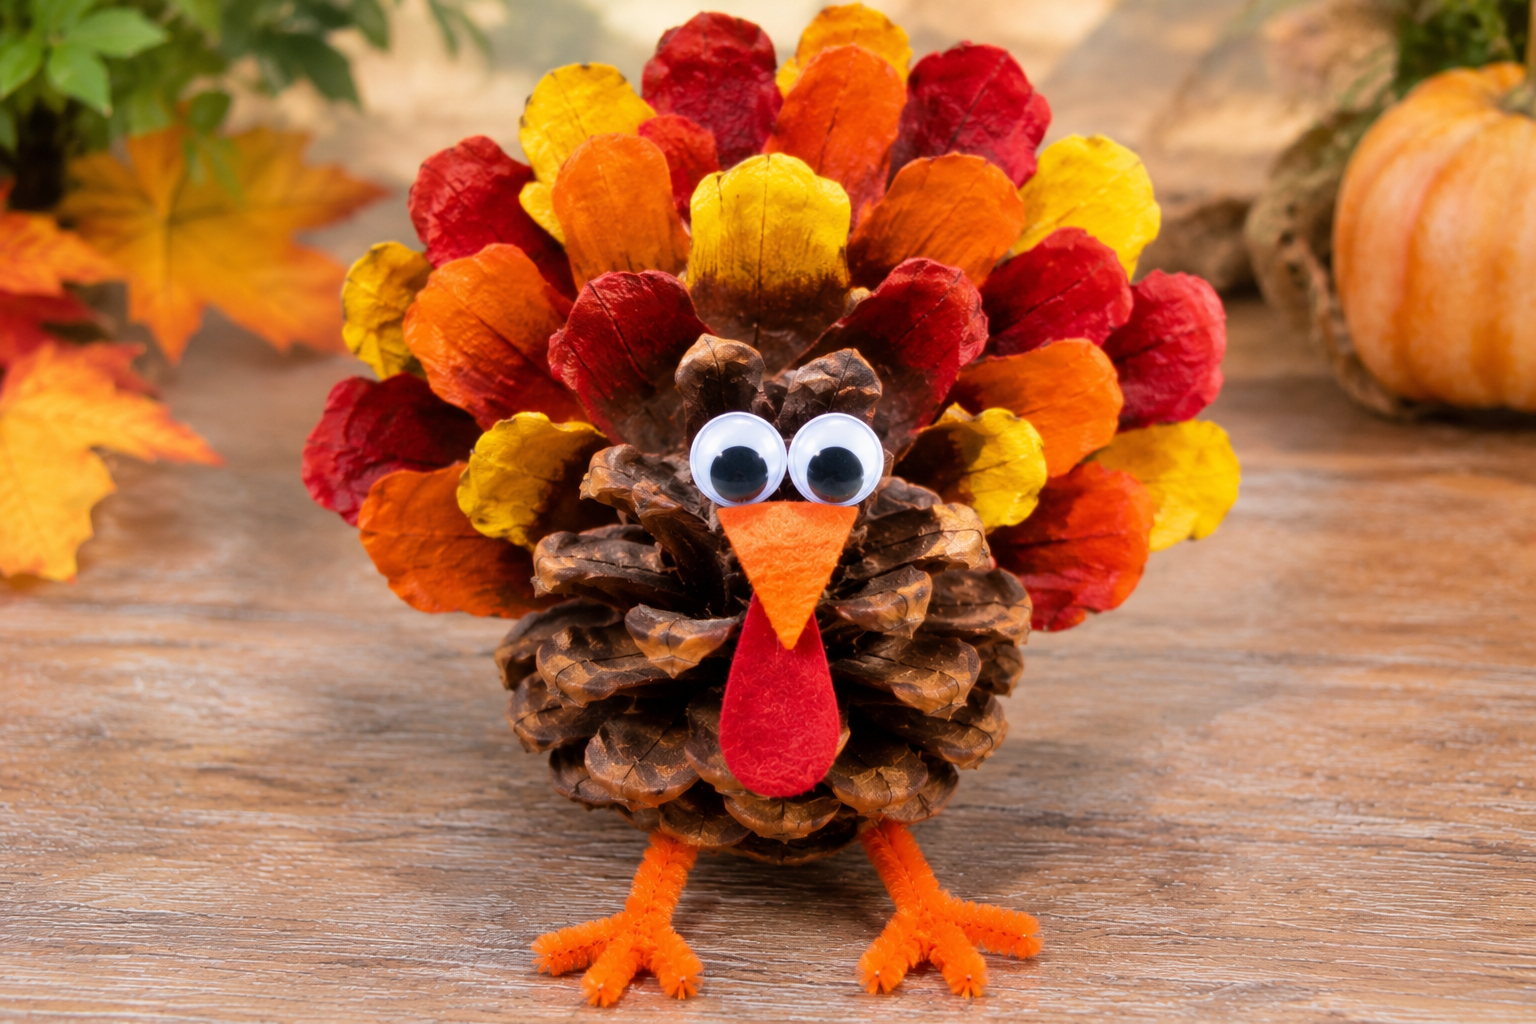
Most pinecone turkeys fail before anyone picks up a glue bottle. The cone rocks on the table because its base is lopsided. The scales are still damp with sap, so the glue slides off. Or the feathers are far too heavy for the cone, and the whole bird pitches forward onto its beak. Kids lose interest fast when that happens, and adults end up finishing the craft themselves.
The fix is mostly in how you choose and prepare the pinecone, then in matching the decoration method to the child’s age. Below you’ll find eleven turkey designs, from a no-glue-gun version that a four-year-old can finish alone to a table centerpiece that older kids can build for Thanksgiving dinner, plus the prep steps and troubleshooting that keep them standing.
Choosing and Preparing Pinecones So the Turkey Actually Stands
The cone matters more than any other supply. A few minutes of sorting saves a lot of frustration later.
What to look for
Pick cones that are fully open, with scales that fan out like petals. Open scales give you slots for feathers, pipe cleaners, and paper tabs, and they leave room for glue to grab. Cones from pines, such as white pine, loblolly, and ponderosa, tend to be the most useful for this because they are long and sturdy. Spruce cones are lighter and papery, which suits the lighter designs below. Sweetgum balls, cypress cones, and hemlock cones are much smaller and work for miniature turkeys.
Check the base before anything else. Set the cone on a flat table. If it rocks, look for the stem end that was attached to the branch; many cones sit better stem-down, and a lot of them stand best when you simply trim a quarter inch off the base with pruning shears (an adult job). Aim for cones roughly three to five inches tall. Anything taller than that gets top-heavy once feathers go on.
Cleaning and drying
Cones collected outdoors often carry dirt, dried sap, and tiny insects. Rinsing is optional, but soaking is a common way to clean them: a bucket of water with a splash of white vinegar for 20 to 30 minutes, then a thorough drying. The cones will close up tight while wet. That’s normal for many species, and they reopen as they dry.
To speed that up and to deal with hitchhikers, a common approach is baking the cones on a foil-lined baking sheet at a low temperature, roughly 200°F, for 30 to 60 minutes, checking often. Sap can drip and, in rare cases, ignite at higher temperatures, so keep the oven low and stay in the kitchen. Sources differ on exact times and temperatures, so check a university extension or similar craft-safety guide for the figure you trust. Let the cones cool completely before kids handle them, since they hold heat longer than they appear to.
If the cones are from a store, they are usually already cleaned, scented, or sometimes dyed. Scented cones can bother sensitive noses, so skip them for classroom crafts.
A note on collecting
Collecting cones from your own yard is generally fine. Rules vary in parks and forests, and some public lands restrict gathering, so check before bagging up a pile from a trail.
Supplies, Glue Choices, and Safety by Age
Almost all of the crafts below draw from the same small kit:
- Pinecones, preferably five to ten so kids can choose their favorite shape
- Felt sheets in fall colors (brown, red, orange, yellow, gold)
- Craft foam or construction paper
- Googly eyes, in two sizes, for the turkey’s face
- Pipe cleaners (also called chenille stems)
- Acrylic craft paint and a couple of brushes
- Craft glue, a low-temperature hot glue gun, and a hot glue gun’s worth of patience
- Scissors, preferably kid-safe for ages four to six
- A paper plate to use as a palette and a newspaper-covered table
Which glue for which job
Tacky or white craft glue is the friendliest option for kids. It’s non-toxic in most brands and washes off hands, but it dries slowly on pinecone scales, which means a felt feather can slide until the glue sets, often 15 to 30 minutes of holding or propping. A low-temperature hot glue gun sets in under a minute, which is why many adults use one for the structural parts (the head and the base) while the child does the decorating with tacky glue. Even low-temp guns can cause painful burns, so an adult should always operate it. Wood glue grips well on rough bark and scales and works for the slow, careful version.
Age and small-parts safety
Googly eyes, beads, buttons, and pom-poms are choking hazards for children under three, and many manufacturers recommend supervising kids under six closely with small craft pieces. For toddlers, draw the eyes with a marker or cut them out of felt, and use larger pom-poms. Craft paint labeled non-toxic is the right choice for kids, but even non-toxic paint isn’t food. Keep scissors, pruning shears, and glue guns at an adult’s end of the table. Wash hands afterward, particularly if the cones were gathered outdoors.
One more thing: some children and adults react to pine sap, dust, or the fragrance on store-bought cones. If anyone sneezes or breaks out in a rash, switch to felt or paper-only versions.
1. The Classic Felt-Feather Turkey
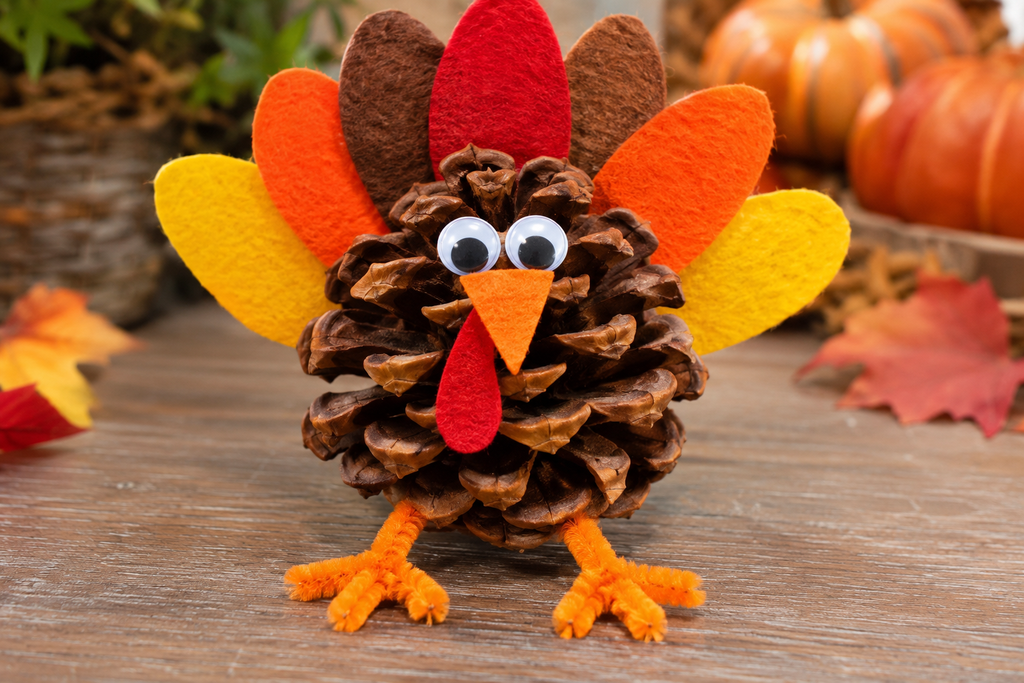
Ages: 5 and up with help on glue. Time: about 25 minutes.
This is the version most people picture, and it’s the best starting point because every other design in this list borrows something from it.
You’ll need: one open pinecone, scraps of felt in at least four colors, a small piece of brown or tan felt for the head, a bit of red felt for the wattle, a small orange or yellow piece for the beak, two googly eyes, glue.
How to make it:
- Cut five to seven feather shapes from felt, each about 2 to 3 inches long. Teardrop or oval shapes work well, since sharp corners curl and fray.
- Glue each feather behind the upper scales on the cone’s tall end, so the feathers fan out behind it like a tail. Overlap them slightly.
- Cut a circle about 1.5 inches wide for the head, then add eyes, a tiny diamond of orange for the beak, and a thin strip of red for the wattle.
- Attach the head near the cone’s base, where the scales are smallest, so the cone reads as the turkey’s body.
The feathers should extend upward, not fall forward. That’s the whole secret to a bird that doesn’t tip: keep the heaviest decoration behind the cone’s center of gravity, and keep the head small.
2. Paper-Feather Turkey With No Hot Glue
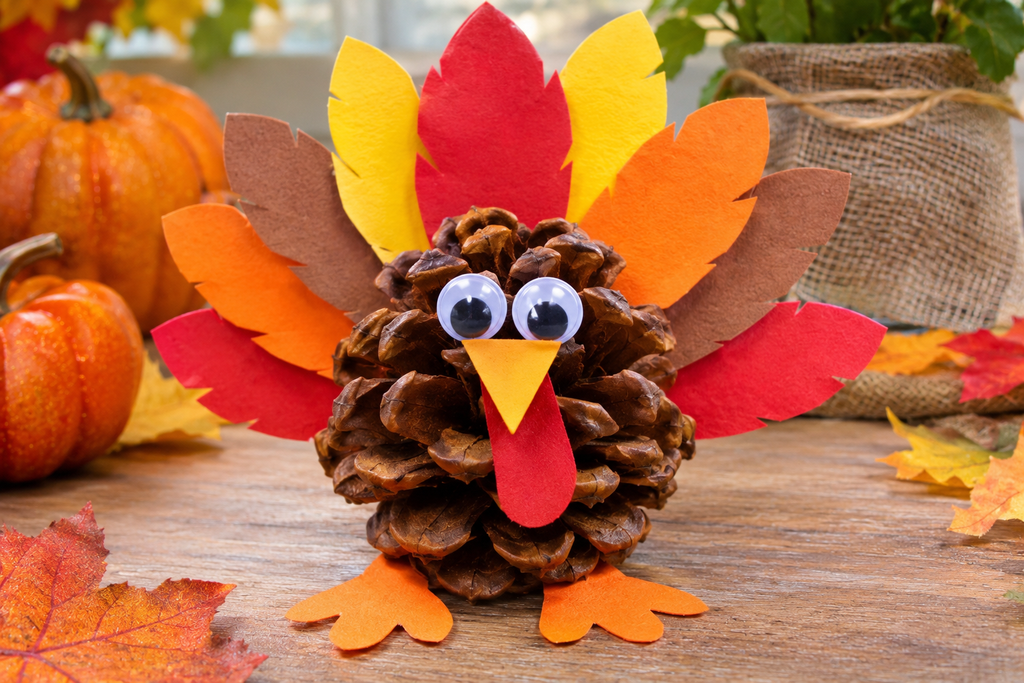
Ages: 3 to 6. Time: 15 to 20 minutes.
This one is built for the youngest kids, and it uses almost nothing but paper and tacky glue.
Cut strips of construction paper about 1 inch wide and 4 inches long. Have the child glue or tuck them into the scales, so the tops of the strips poke out like feathers. Folding each strip in half and gluing the ends together makes a loop that stands up better than a flat strip. Draw the face with a marker on a small paper circle.
There are two things to know. Paper bends under its own weight, so thicker cardstock holds a fan shape longer than lightweight paper. And, since there is no hot glue, give it a good 30 minutes to dry before anyone picks it up. Standing it on a folded paper plate while it dries keeps the little ones from nudging it.
3. Pipe Cleaner Feather Turkey
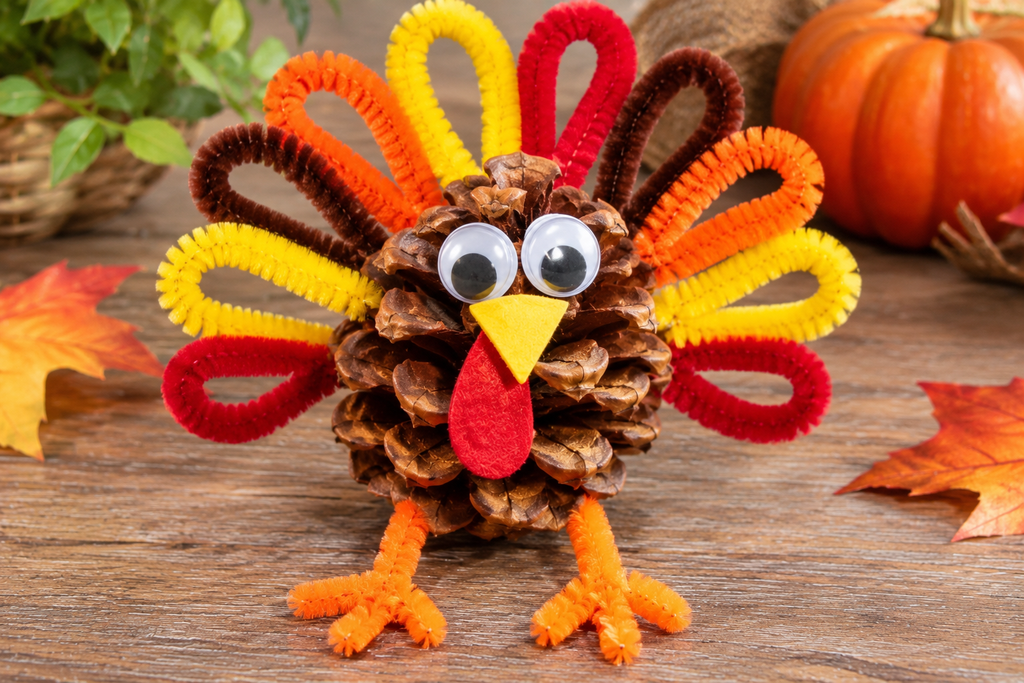
Ages: 4 and up. Time: 20 minutes.
Pipe cleaners are the most forgiving material in this list, because they bend, twist, and weave without glue.
Give the child four to six pipe cleaners in different colors. Thread each one between two scales near the cone’s upper half, then bend the ends up and out into a loop or a curl. The scales hold the wire by friction, and a dab of glue underneath makes it permanent. Twisting two colors together creates a striped feather.
The main limitation: the exposed wire ends can poke. Fold each end into a small loop or bend it back on itself, and don’t hand this craft to a child who might put the ends in their mouth.
4. Painted-Tip Pinecone Turkey (The Cone Is the Tail)
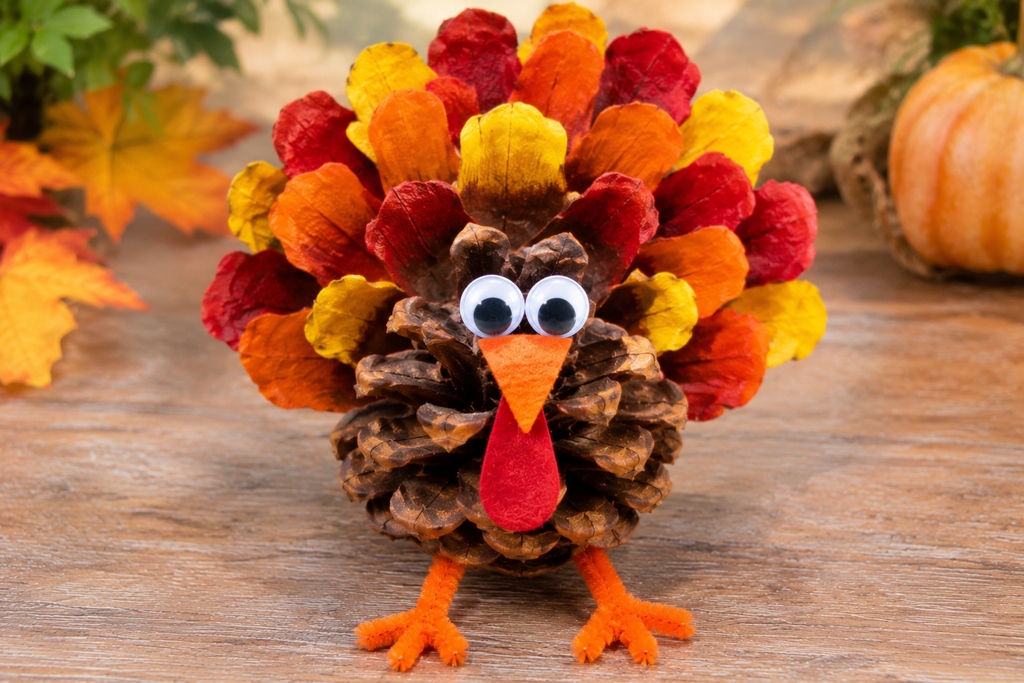
Ages: 5 and up. Time: 30 minutes, plus drying.
Here the pinecone itself becomes the fan of tail feathers, so there’s nothing to glue except the face.
Stand the cone upside down on a paper plate, with the tip pointing down and the open base facing up, then dab fall colors on the exposed scale tips with a small brush or a cotton swab. The scale edges catch paint nicely, and a gradient of red to orange to yellow looks convincing without much skill. Let the paint dry fully, then turn the cone upright and glue a felt head to the front.
It pays to use thick acrylic paint straight from the bottle, since watered-down paint soaks into the wood and dulls. If a child presses hard, the scales can snap, so a lighter touch, or a cone that has been baked and dried, helps.
5. Real Fall Leaf Turkey
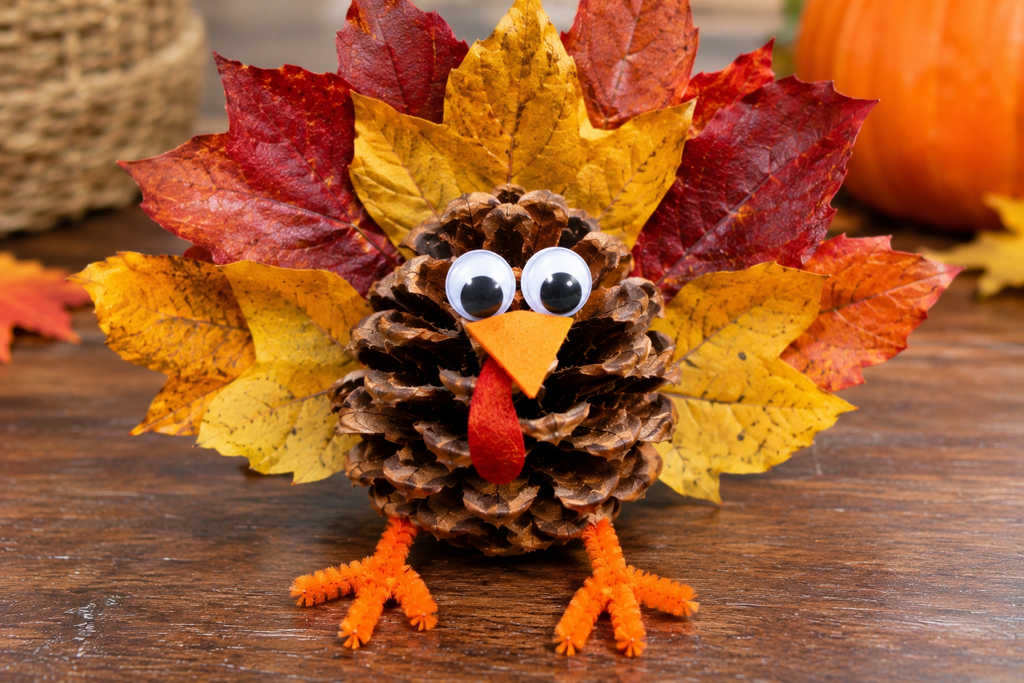
Ages: 4 and up. Time: 20 minutes after a walk to collect leaves.
Leaves from the yard make surprisingly good feathers, and this version doubles as a nature walk.
Choose small, flat, still-flexible leaves, such as maple, oak, or birch. Leaves that have already dried to a crisp will shatter, while freshly fallen ones bend. Pressing them under a heavy book for a day or two flattens them and keeps them from curling. Tuck the stems between the scales with a drop of glue, then add a felt or paper head.
Real leaves fade and shrivel within days, so this is a short-term decoration rather than a keepsake. If you want it to last, brush a thin coat of clear sealer or decoupage medium over the leaves once they’re attached.
6. Acorn Cap Turkey Using Only Natural Materials
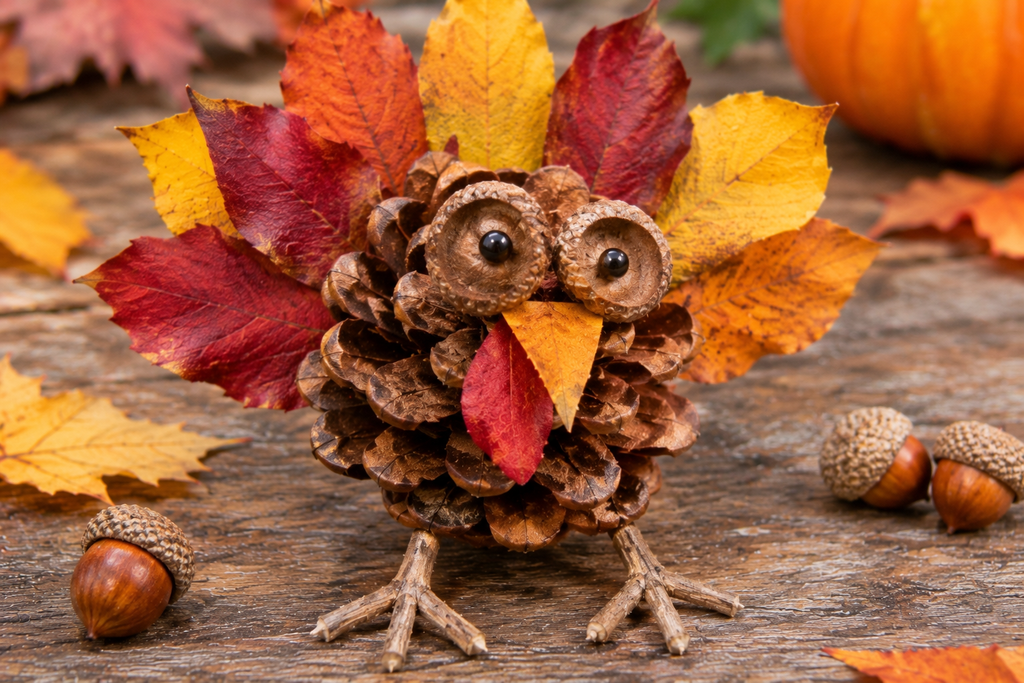
Ages: 6 and up. Time: 30 minutes.
This design avoids store-bought craft supplies. The body is a pinecone, the head is a whole acorn, and the cap sits on top like a tiny hat, while the face is drawn on with a marker or a dot of paint.
A low-temperature glue gun is the easiest way to secure an acorn to a cone, though wood glue works with patience. For feathers, use a fan of dried grass, small twigs, or flat leaves.
One warning about acorns: they sometimes hold tiny larvae (those little holes are exit points). Pick acorns that are intact, with no holes, and bake them at the same low temperature as the cones if you’re bringing them indoors.
7. Pinecone Turkey Place Cards
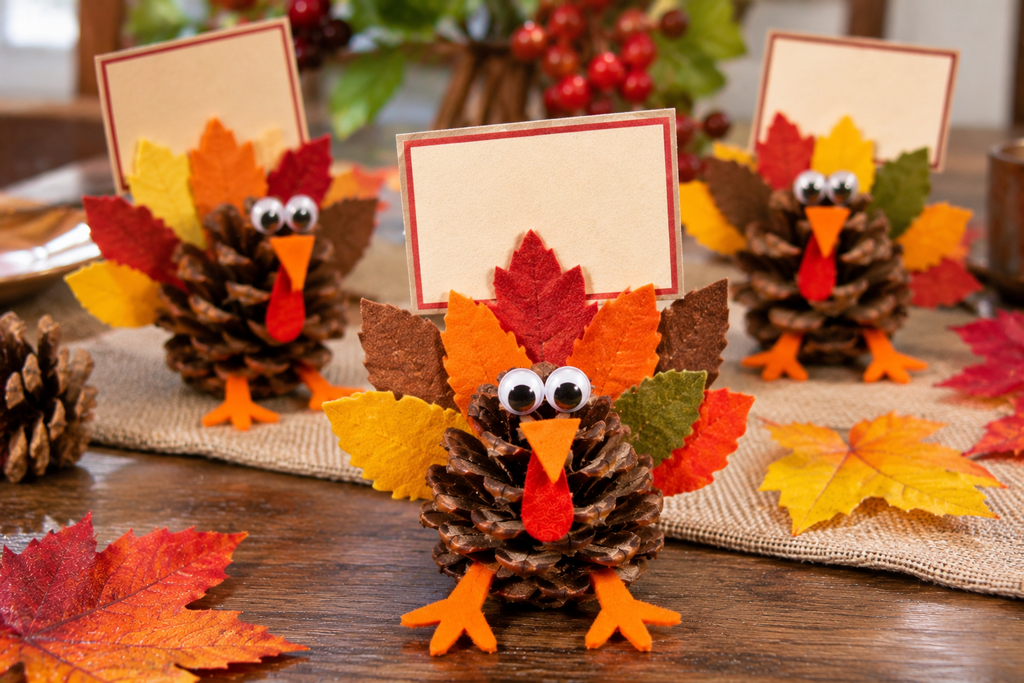
Ages: 6 and up. Time: 20 minutes per card.
A pinecone turkey at each seat gives kids a job at the Thanksgiving table. Use a smaller cone, three inches or less, and glue the usual felt feathers to the back. Write a guest’s name on the center feather with a paint pen or marker, so the name reads from across the table.
Small cones tip more easily, so glue the bird onto a flat circle of cardboard, a wood slice, or a large button for a wider footprint. Make one extra for someone who may show up unexpectedly.
8. Gratitude Turkey With Feathers That Hold Messages
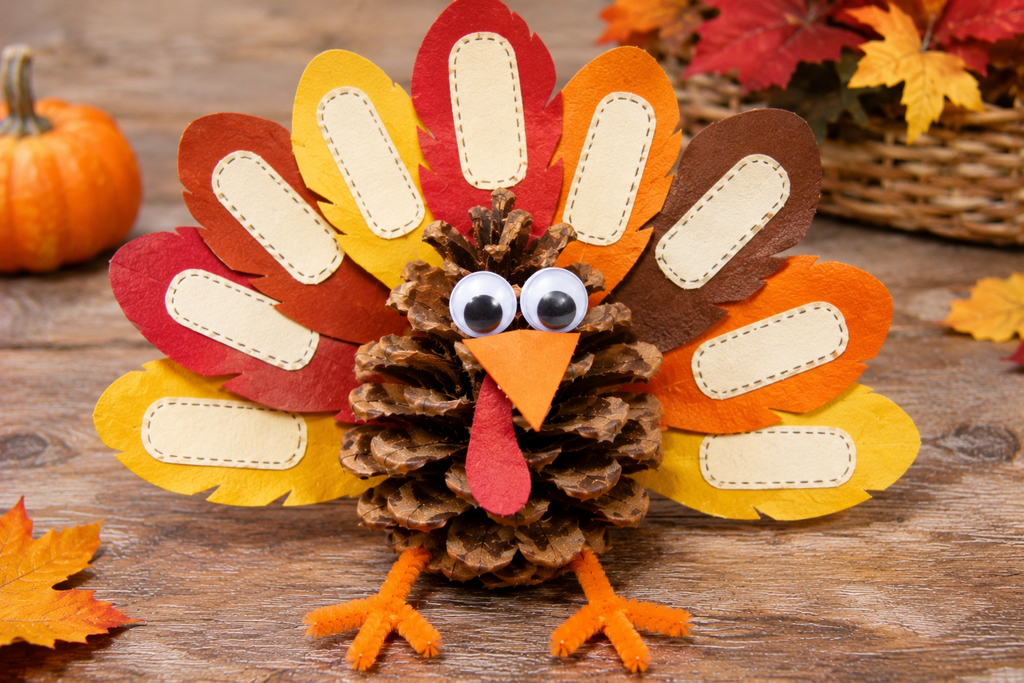
Ages: 5 and up. Time: 30 minutes.
This variation turns the craft into a conversation. Each feather is a small paper tab with something the child is thankful for, written or drawn in marker. Younger kids can dictate to an adult.
Cut feather shapes from cardstock, which holds up under writing better than felt. Have the child write one thing on each, then tuck the tabs into the scales so they stay readable. At dinner, guests can pull one feather and read it aloud.
Plan for fewer feathers than you think you need, since five or six legible ones beat ten crowded ones.
9. Button and Pom-Pom Turkey
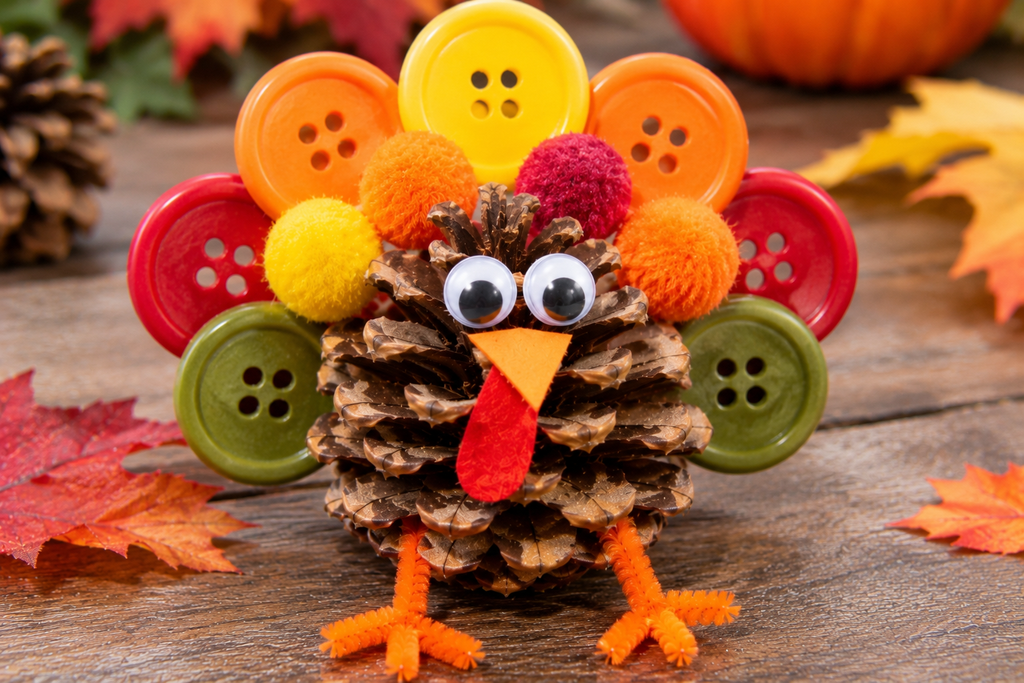
Ages: 5 and up for buttons; 3 and up for large pom-poms. Time: 20 minutes.
This suits kids who like sorting and patterns. Instead of feathers, glue a row of buttons or pom-poms in a rainbow arc across the cone’s upper scales. Large pom-poms, around an inch across, are safer than buttons for younger children and have a bonus: they’re soft, so the finished turkey can sit on a shelf without scratching it.
Because pom-poms and buttons are heavy, they need a strong hold. A low-temp glue gun is the better tool here, applied by an adult, and the child places each piece. Buttons are choking hazards for toddlers, so skip them for that age group.
10. Pinecone Turkey Bird Feeder
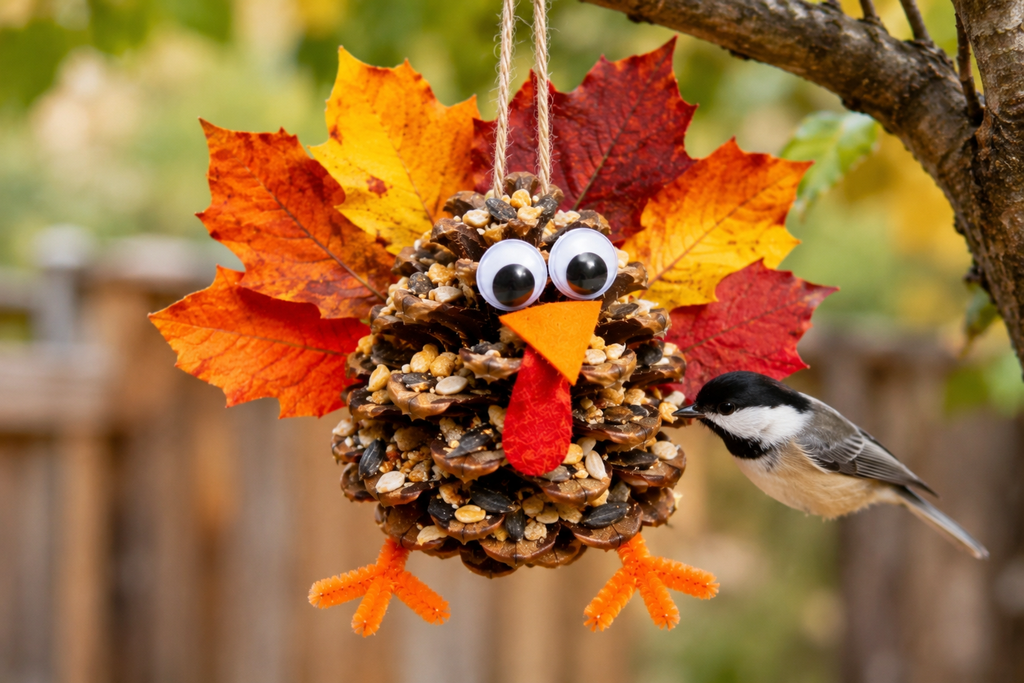
Ages: 4 and up with supervision. Time: 20 minutes, plus chill time.
This one is meant to be hung outside after the table is cleared. It trades googly eyes and felt for edible materials.
You’ll need: a pinecone, a length of twine, sunflower seed butter or peanut butter, a plate of birdseed, and, if you want a face, a dried cranberry for the wattle and a sliver of dried apricot for the beak.
- Tie the twine around the top of the cone in a firm knot, leaving a loop for hanging.
- Press seed butter into the scales with a butter knife or spoon.
- Roll the cone through birdseed until it’s thickly coated.
- Press the cranberry and apricot into the seed butter near the base. Set it in the refrigerator for 20 minutes to firm up, then hang it from a branch.
Birds care about seed, not about the turkey face, so the decoration is for the kids. A few practical points: peanut butter is a common allergen, so use sunflower seed butter if a child with allergies will handle it, and wash hands well. Use unsalted products. Squirrels may raid this, so hang it where they can’t easily jump from a trunk or fence. Seed butter can turn rancid in warm weather, so this suits cool fall and winter days. Remove it if it begins to smell or grow mold.
11. Pinecone Turkey Centerpiece on a Wood Slice Platter
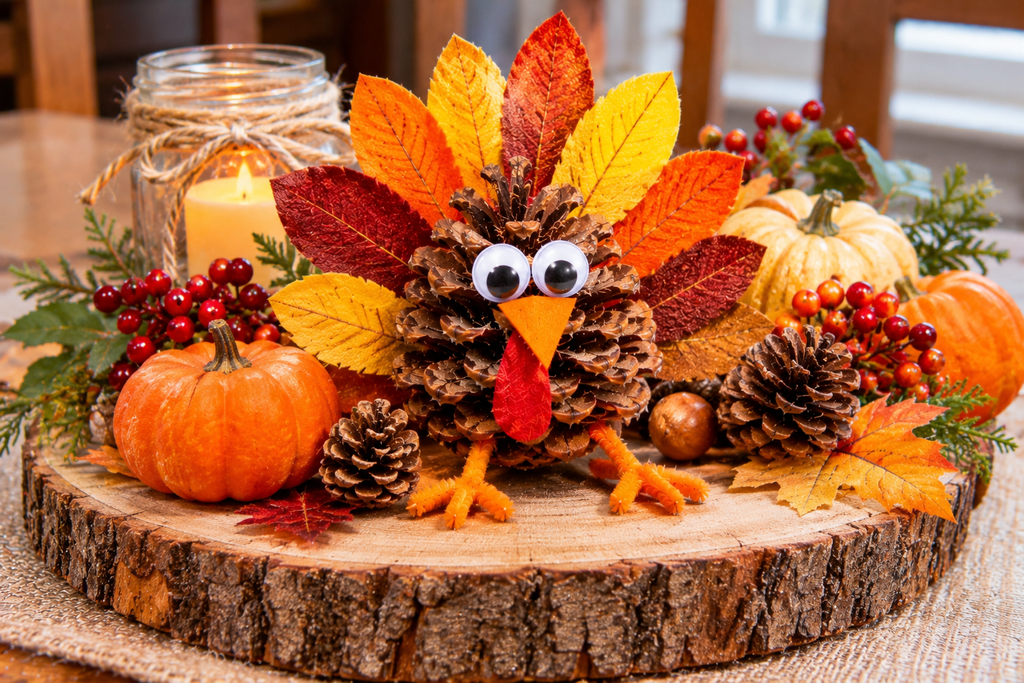
Ages: 8 and up, or any age with adult help. Time: 45 minutes.
This is the project for older kids, or a group craft. Arrange several turkeys in different sizes on a large wood slice, a long cutting board, or a tray covered with moss or a runner of burlap. Use three to five turkeys: one large cone as the “father,” two or three medium ones, and a few mini cones as chicks.
Vary the feather colors so the group doesn’t look like a row of identical birds. Add acorns, mini pumpkins, and a few sprigs of eucalyptus or dried wheat, and keep any candle well away from the paper, felt, and dried material, since they burn quickly. Better yet, skip the candles altogether and use battery-operated LED tea lights.
Fixing the Most Common Pinecone Turkey Problems
The turkey tips forward. The feathers are too heavy or the head is too large. Move the feathers farther back, shrink the head, or glue the cone to a wide flat base.
The glue won’t hold. Sap is usually the culprit. Wipe the cone with rubbing alcohol on a paper towel and let it dry before gluing. Otherwise, switch to hot glue for that join.
Felt feathers droop. Thin felt flops under its own weight. Stiffen it by gluing two layers together, or use craft foam or cardstock instead.
The cone closed up. Cones close when humid. Warm them in a low oven or leave them on a sunny windowsill, and keep finished turkeys away from steamy kitchens.
The paint is flaking. Acrylic paint can peel from resinous scales. Wipe off sap first, and use a thin coat of paint rather than a thick one.
Feathers from a bag. Craft feathers are usually dyed and sold for this purpose. Avoid picking up feathers from wild birds. In the United States, possessing feathers from most native bird species is restricted by federal law (the Migratory Bird Treaty Act), so check current rules before using any you find outside.
Questions Parents and Teachers Actually Ask
Do pinecones from the yard need to be treated before using them indoors? It’s a good idea. Cones can carry sap, dirt, spiders, and insect eggs. Brushing, rinsing, and a low-temperature bake are the common steps, and they also reopen cones that closed in the rain.
What if we don’t have an oven? Let the cones air-dry indoors for several days in a dry spot. They may not open as widely, but brushing off dirt and checking for insects is still worthwhile.
Can toddlers do any of these? The pipe cleaner turkey (#3) and the paper-feather turkey (#2) work best, with an adult doing every step involving glue guns, scissors, or small parts. Draw the eyes on instead of using googly eyes.
How long will a finished turkey last? Felt, foam, and paint versions can last for years if stored dry. Leaf, paper, and edible versions are seasonal.
Wrapping It Up
A pinecone turkey stands or falls on three decisions: choosing an open cone with a flat base, keeping the heavy decoration behind the center of gravity, and picking a glue that suits the child’s age. If you’re short on time, start with the felt-feather version, since it teaches the basic build, then move to the pipe cleaner, leaf, or gratitude versions as kids get comfortable. Save the bird feeder for after the holiday, when the table is cleared and the cones can go outside.

About Syprose Kiche
Syprose Kiche is the creator and writer behind My Besuited Home, a practical home and garden website covering DIY projects, gardening, lawn care, landscaping, home improvement, and outdoor living. She focuses on turning everyday homeowner questions into clear, practical guides backed by careful research and useful real-world considerations.