

Your soil is cracked. Your water bill is terrifying. And your tomatoes look like sad little raisins by mid-July. If you garden in the desert, you already know that the rules everyone else follows don’t apply to you. What works in a Pacific Northwest raised bed will absolutely destroy your Tucson garden — and nothing taught me that faster than the summer I mulched my entire front yard with fresh wood chips and watched my soil temperature spike to 140°F two weeks into June.
Mulching in a desert climate is a completely different game. The wrong material can trap salts, cook your roots, invite pests, or make your waterlogged soil even worse. But the right method? It can drop your soil temperature by 20 degrees, slash your watering frequency in half, and turn your sad, sandy hardpan into something that actually grows food.
Here are the seven mulching methods I’ve tested, trusted, and occasionally cursed at over more than a decade of desert gardening. I’m going to be straight with you about what works, what’s a waste of money, and what sounds great on gardening forums but will wreck your beds if you’re gardening in Phoenix, Albuquerque, or anywhere else where the sun has actual malice.
1. Gravel and Rock Mulch for Desert Landscaping: The Xeriscaper’s Best Friend
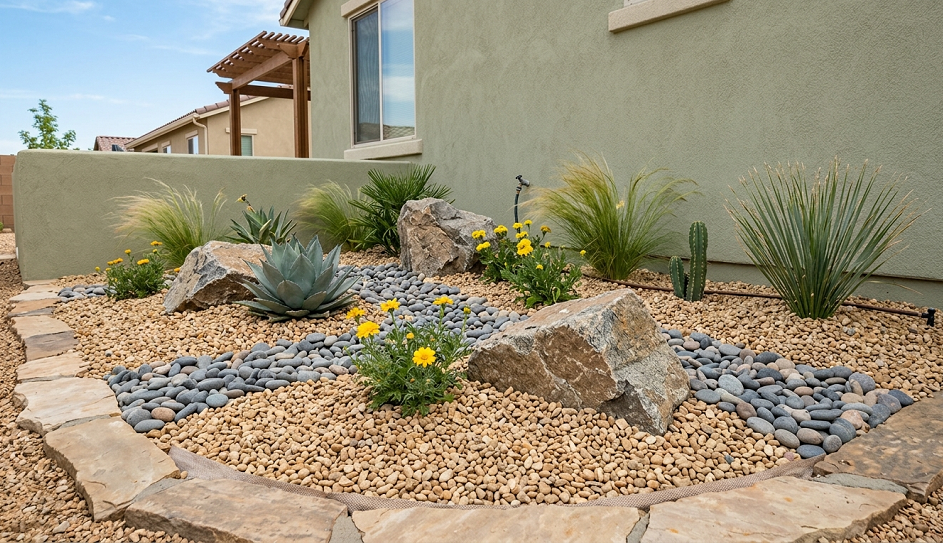
Gravel mulch is the native language of desert gardening, and for good reason. A 2–4 inch layer of decomposed granite, pea gravel, or crushed rock does something organic mulches genuinely struggle with in arid climates: it reflects heat during the day and radiates it back at night without decomposing, compacting, or blowing away in the Santa Ana winds.
The reason this works so well for desert-adapted plants — your agaves, palo verdes, brittlebush, and native salvias — is that it mimics the natural rocky substrate these plants evolved in. Their root systems expect dry air pockets, drainage, and the kind of temperature fluctuation that comes from rocky soil. When I switched my front xeriscape beds from shredded bark to decomposed granite, my desert willows looked healthier within a single season. Less root rot, less fungal activity, and a lot less me dragging a hose out at 6 a.m.
That said, gravel mulch is not a universal solution. It pulls heat aggressively. On a 108°F day in Phoenix, the surface temperature of dark gravel can exceed 150°F. That’s fine three feet away from your plants if airflow exists, but if you pack it right up against stems and crowns, you’re essentially putting your plant in a convection oven. Always leave a few inches of clearance around the base of any plant, and stick to lighter-colored gravel if your summers are brutal.
It’s also essentially permanent. Once you lay decomposed granite, removing it is a project measured in weekends, not hours. Think hard before you commit it to a bed where you plan to rotate annuals.
Best for: Native desert plants, xeriscape landscapes, areas with strong winds, slopes prone to erosion.
Depth: 2–3 inches for most situations. No more than 4 inches unless you’re specifically preventing weed growth in a non-planting zone.
2. Straw Mulch for Desert Vegetable Gardens: Cheap, Effective, and Slightly Chaotic
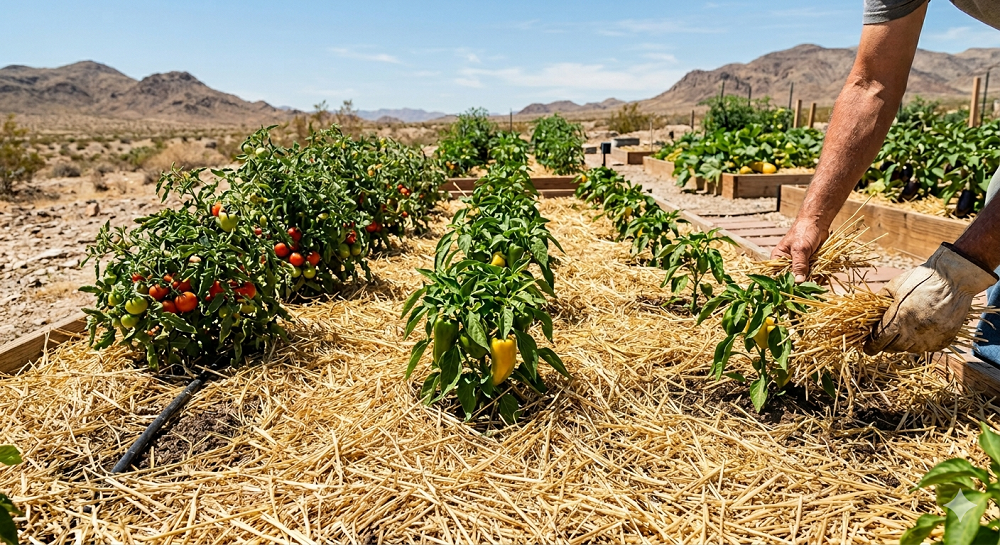
If you’re growing food in the desert — and I think you should be — straw is the mulching workhorse I keep coming back to. It’s cheap, it’s widely available, it breaks down slowly enough to last a full growing season, and it does an excellent job of insulating roots from the wild temperature swings that desert vegetable gardens deal with every single day.
My preferred application: 3–4 inches of straw around my fall and winter vegetable beds starting in October. Peppers, tomatoes growing into November, winter squash — all of them handle the cooler desert nights dramatically better with a straw buffer protecting their roots. I’ve measured a consistent 8–12°F difference in soil temperature between mulched and un-mulched beds on a cold January night in the low desert. That margin is the difference between a thriving pepper plant and a dead one.
The spring and summer application is trickier. In summer desert heat, straw can harbor earwigs, pill bugs, and the occasional scorpion looking for a cool dark place to spend the day. I’ve found this more. I once picked up a straw bale barehanded in August and disturbed what I can only describe as a small scorpion community with strong opinions about trespassers. Gloves are non-negotiable.
Straw also blows. In any garden that gets regular afternoon winds — which in the Southwest is all of them — loose straw becomes a nuisance. Wet it down when you apply it and tuck the edges. And always use straw, not hay. Hay is full of seed heads that will germinate. I made that mistake my first year and spent the following spring pulling grass out of every single bed.
Best for: Vegetable gardens, fruit trees, annual beds during cooler growing seasons.
Depth: 3–4 inches. Refresh halfway through the season if it breaks down or blows away.
3. Organic Compost as a Top-Dressing Mulch: The Two-for-One Desert Soil Builder
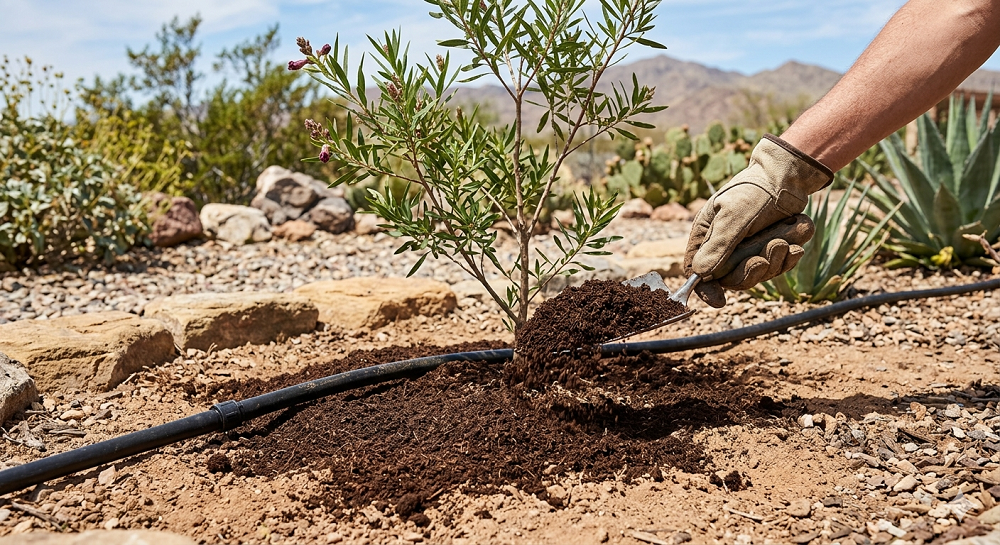
Here’s something most mulching guides skip over: compost doesn’t just feed your soil. Applied as a 1–2 inch top-dressing, it functions as a legitimate mulch for desert gardens — especially in high-desert climates like Albuquerque, Santa Fe, or Flagstaff, where temperatures are milder and soil building is actually achievable.
When I garden in my higher-elevation beds at around 5,000 feet, compost top-dressing is my go-to for annual flowers and vegetable starts. It suppresses weeds well enough for a single season, introduces beneficial microbial activity right at the root zone, and slowly incorporates into the soil over time, improving the water-holding capacity of sandy or caliche-heavy ground. Desert soils are notoriously low in organic matter — often less than 1% — and every inch of compost you work in makes a measurable difference in how long your soil stays moist after watering.
The catch in low-desert climates (think Yuma, Phoenix, Palm Springs) is that compost mulch breaks down fast. Seriously fast. At 110°F in direct sun, a 2-inch layer of compost can essentially cook and disappear within six to eight weeks. In those environments, I use it as a soil amendment worked into the top few inches rather than as a surface mulch, and pair it with a thicker layer of something more durable on top.
Quality matters enormously here. Bagged compost from a big-box store ranges from fine to genuinely terrible. If your county has a municipal composting program, that’s often your best source for bulk material at a reasonable price. I’ve found the commercial stuff labeled “soil amendment” in those cubic-yard bags to be hit or miss — sometimes it’s barely broken down, and you end up with a mat of half-composted wood fiber that repels water instead of absorbing it.
Best for: High-desert gardens, soil building, vegetable beds, established perennial borders.
Application: 1–2 inches as a mulch, or work 3–4 inches into the top foot of soil as an amendment.
4. Wood Chip Mulch in Arid Climates: Powerful When Used Correctly

Wood chips are having a well-deserved moment in gardening circles, and for good reason — a properly applied wood chip mulch is one of the best things you can do for tree roots, shrub borders, and pathways in a desert garden. The key phrase there is “properly applied,” because this is also the method I’ve seen go wrong more often than any other in desert conditions.
The magic of wood chips in dry climates is that they create a sponge-like layer that captures what little precipitation you get and holds it long enough for roots to use it. Under a 4-inch layer of aged wood chips, soil can stay measurably moist for four to five days after a monsoon rain that otherwise would have evaporated within 24 hours. I’ve probed soil under established wood chip paths that were moist three inches down in the middle of August. That’s legitimately impressive.
But the word “aged” is doing heavy lifting in that last paragraph. Fresh, green wood chips — the kind you can sometimes get free from a tree service — are not what you want piled against the trunks of your established plants. Fresh chips can introduce pathogens, create nitrogen drawdown as they decompose (essentially stealing nitrogen from your soil), and generate heat during the decomposition process that can damage root zones. Let fresh chips age in a pile for at least four to six months before applying them close to plants. Aged chips can go right on. Fresh chips belong on pathways, not planting beds.
Keep wood chips 4–6 inches away from the crown or trunk of any plant. This is non-negotiable. Crown rot is one of the leading ways desert gardeners accidentally kill shrubs and young trees, and piling mulch against a trunk is the express lane to that outcome.
Best for: Fruit trees, native shrubs, pathways, borders around established plants.
Depth: 4–6 inches. Replenish annually as it breaks down.
5. Living Ground Cover Mulch: The Slow-Build Strategy That Pays Off Big
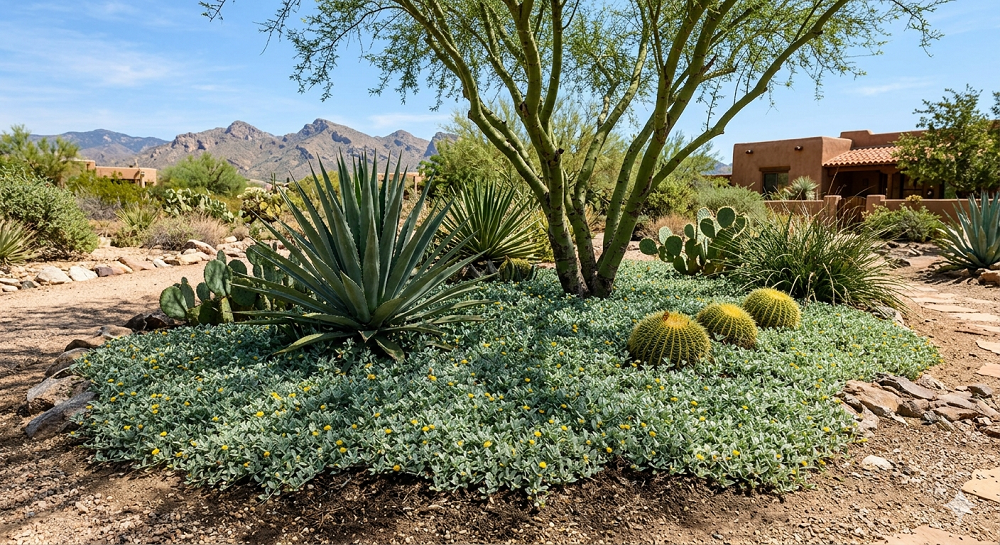
This one takes patience, and if you’re the kind of gardener who wants results this weekend, skip ahead. But if you’re thinking about your desert garden three to five years from now, establishing a living mulch — low-growing, water-thrifty ground covers that function as living insulation — is one of the most underrated strategies for arid-climate gardeners.
Plants like desert marigold, trailing rosemary, prostrate germander, or low-growing species of Dalea and Dyssodia can knit together into a dense mat that shades the soil surface, reduces evaporation, suppresses weeds, and provides habitat for beneficial insects — all without you doing anything once they’re established. I’ve got a section of my back garden where trailing rosemary has basically taken over a slope, and I haven’t watered it in two years. The soil underneath stays noticeably cooler and more moist than the surrounding bare ground.
The establishment phase is the hard part. Living ground covers need regular irrigation for their first one to two growing seasons while they develop root systems deep enough to survive on their own. I’ve lost two attempts at creeping thyme on a south-facing slope because I underestimated how quickly shallow-rooted cuttings dry out in June. The third time, I used a temporary straw mulch underneath the transplants while they established, and that made all the difference.
Living mulch also works beautifully between vegetable rows in a winter garden. Low-growing sweet alyssum, creeping thyme, or even a thin broadcast of clover can hold the soil surface, fix nitrogen, and attract pollinators all at once. The flip side: in a summer vegetable garden, ground covers can compete with your crops for the water and nutrients they desperately need. Save living mulch strategies for your ornamental beds or low-maintenance zones.
Best for: Ornamental borders, slopes, pathways, low-traffic zones where establishment irrigation is possible.
Establishment time: 1–2 growing seasons before full coverage.
6. Cardboard Sheet Mulching (Lasagna Mulching) for Desert Weed Control
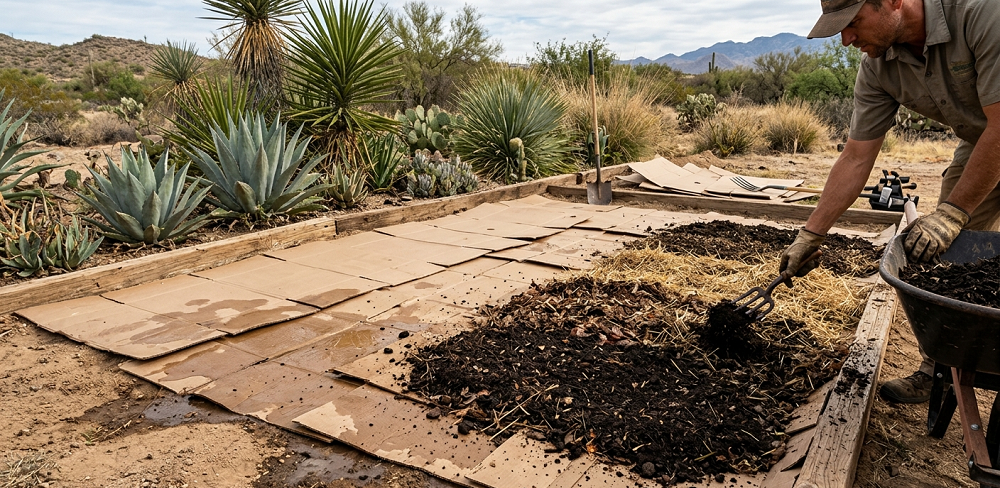
Cardboard mulching gets called “lasagna gardening” in cheerful blog posts, which makes it sound fancier than it is. Strip the tape and staples off some cardboard boxes, lay them down overlapping by several inches, wet them thoroughly, and top with 3–4 inches of organic material. That’s it. What you get is exceptional weed suppression, a physical barrier that breaks down over one to two years and feeds soil organisms, and a way to smother bermudagrass without chemicals — which, if you’ve ever battled bermudagrass in the desert, you know is the closest thing to a miracle cure this side of napalm.
Bermudagrass is the desert gardener’s nemesis. It spreads by rhizome underground and by stolons above ground, laughs at hand-pulling, and goes dormant enough in winter to survive almost anything. I converted a bermudagrass-infested side yard into a productive garden bed using sheet mulching over one winter. The grass was mostly dead by spring. Mostly. Some of it came back through gaps where my cardboard layers didn’t overlap enough. Lesson learned: overlap by at least 8 inches, and expect to pull a few stragglers in year one.
The limitation in hot desert climates is moisture management. Cardboard holds water extremely well, which is great in a low-rainfall environment — until it becomes a prime habitat for termites and pill bugs. If you’re in an area with active termite pressure (and most of the desert Southwest qualifies), be judicious about using cardboard directly against wooden fence posts, wood frames, or the foundation of your house. Keep sheet mulching in open garden beds, away from structural wood.
One more thing: in direct desert sun with no top mulch cover, cardboard can dry out, crack, and blow away within two weeks. Always cap it with a substantial layer of organic material.
Best for: Converting lawn to garden, killing bermudagrass, establishing new beds, weed suppression in ornamental areas.
Depth of topping material: Minimum 3 inches. I prefer 4–6 inches of wood chips or straw on top.
7. Caliche-Breaking Organic Mulch Layers: Dealing With the Desert’s Worst Soil Problem
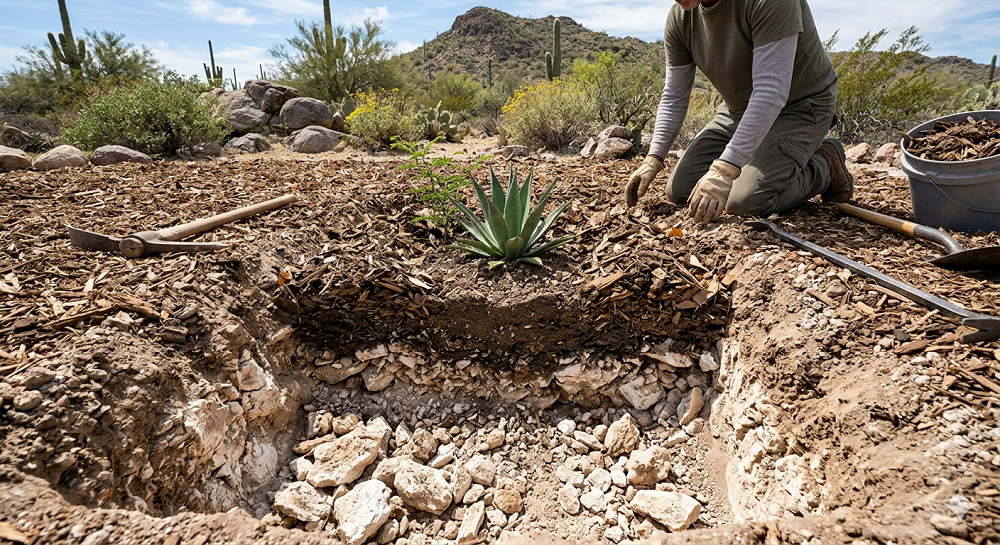
This last method is less of a standalone technique and more of a long-game soil rehabilitation strategy — but it deserves its own section because caliche is the single biggest obstacle desert gardeners face and nobody talks about it enough.
Caliche is a layer of calcium carbonate that forms in arid soils, often just 6–18 inches below the surface. It ranges from a thin hardened crust to a solid layer inches thick that roots simply cannot penetrate and water cannot drain through. Dig almost anywhere in the Sonoran or Chihuahuan desert and you’ll hit it. I’ve had caliche layers so thick I needed a rented jackhammer to break through in spots where I wanted to plant a tree.
The mulching strategy for caliche remediation works like this: repeatedly applying thick layers of compost and aged organic matter to the soil surface, combined with deep watering, gradually acidifies the upper soil profile and encourages the downward migration of organic acids that slowly dissolve calcium carbonate over years. It’s slow. I’m not going to pretend otherwise. But combined with physical breaking of the caliche layer at planting holes and the establishment of deep-rooted native plants, it genuinely works.
The practical mulching application: apply 4–6 inches of compost in fall, water it in thoroughly, and let it sit over winter. In spring, work the partially decomposed top layer into your soil and repeat. After three to four seasons of this cycle in a single bed, I’ve seen measurable improvement in water infiltration in areas that previously ponded for hours after irrigation. The soil biology that the organic matter feeds is doing a lot of the work here.
This method is a commitment. It won’t fix caliche in a single season, and it requires ongoing inputs of organic material. But if you’re planting fruit trees or establishing a long-term vegetable garden on desert ground, there is no shortcut worth taking. Build the soil or fight it forever.
Best for: Long-term garden establishment, areas with caliche issues, fruit tree zones, permanent raised beds.
Timeframe: 3–5 years for significant improvement in compacted caliche soils.
Real Talk: What’s Not Worth Your Time or Money in a Desert Garden
I want to be honest with you about a few things that get promoted heavily in general gardening content but just don’t hold up in desert conditions.
Rubber mulch is, in my opinion, a waste of money even if it looks tidy on Pinterest. It doesn’t improve soil biology, it gets scorching hot in full desert sun — hotter than bare soil, in some studies — and it off-gasses compounds that I’d rather not have in a food garden. Yes, it lasts forever. That’s also a liability when you want to change your garden layout.
Cocoa hull mulch smells wonderful for about a week and then turns into a water-repelling mat that’s genuinely difficult to wet back down. In a high-humidity climate, it’s fine. In the desert, it cakes up like chocolate concrete.
Dyed wood mulch — the bright red or black bagged stuff — often contains recycled wood products from unknown sources, including sometimes treated lumber. I’m not interested in arsenic compounds near my vegetable roots. Uncolored, natural wood chips or shredded bark every time.
And one more thing: mulching too deep is a real and common problem. More is not always better. Beyond 6 inches of any organic mulch, you start creating conditions where water actually struggles to penetrate to root zones, and where fungal issues can develop. Four to six inches is your ceiling for most materials. The desire to pile on eight or ten inches “just to be safe” will hurt your plants.
Parting Wisdom: Match Your Mulch to Your Microclimate
The biggest thing I want you to take away from all of this is that desert gardening is local. A technique that works brilliantly in my slightly-elevated, monsoon-influenced backyard in Tucson might be a disaster in your flat, irrigated yard in Las Vegas. Your soil type, your average low temperatures, your prevailing wind direction, your sun exposure — all of it matters.
Start with one method in one bed. Watch what happens. Dig down into it after two months and see what’s living there and whether your soil is holding moisture better than the un-mulched area next to it. The best gardening knowledge you’ll ever get comes from paying attention to your own dirt.
My single best piece of advice after all these years: whatever mulching method you choose, commit to doing it consistently rather than doing it perfectly. An imperfect mulch applied reliably every season beats a perfect mulch applied once.
What mulching methods have you tried in your desert garden? Are you fighting caliche, bermudagrass, heat, or all three at once? Drop your questions or experiences in the comments below — I read every single one, and sometimes the solutions you’ve figured out on your own are better than anything I’ve come up with.