
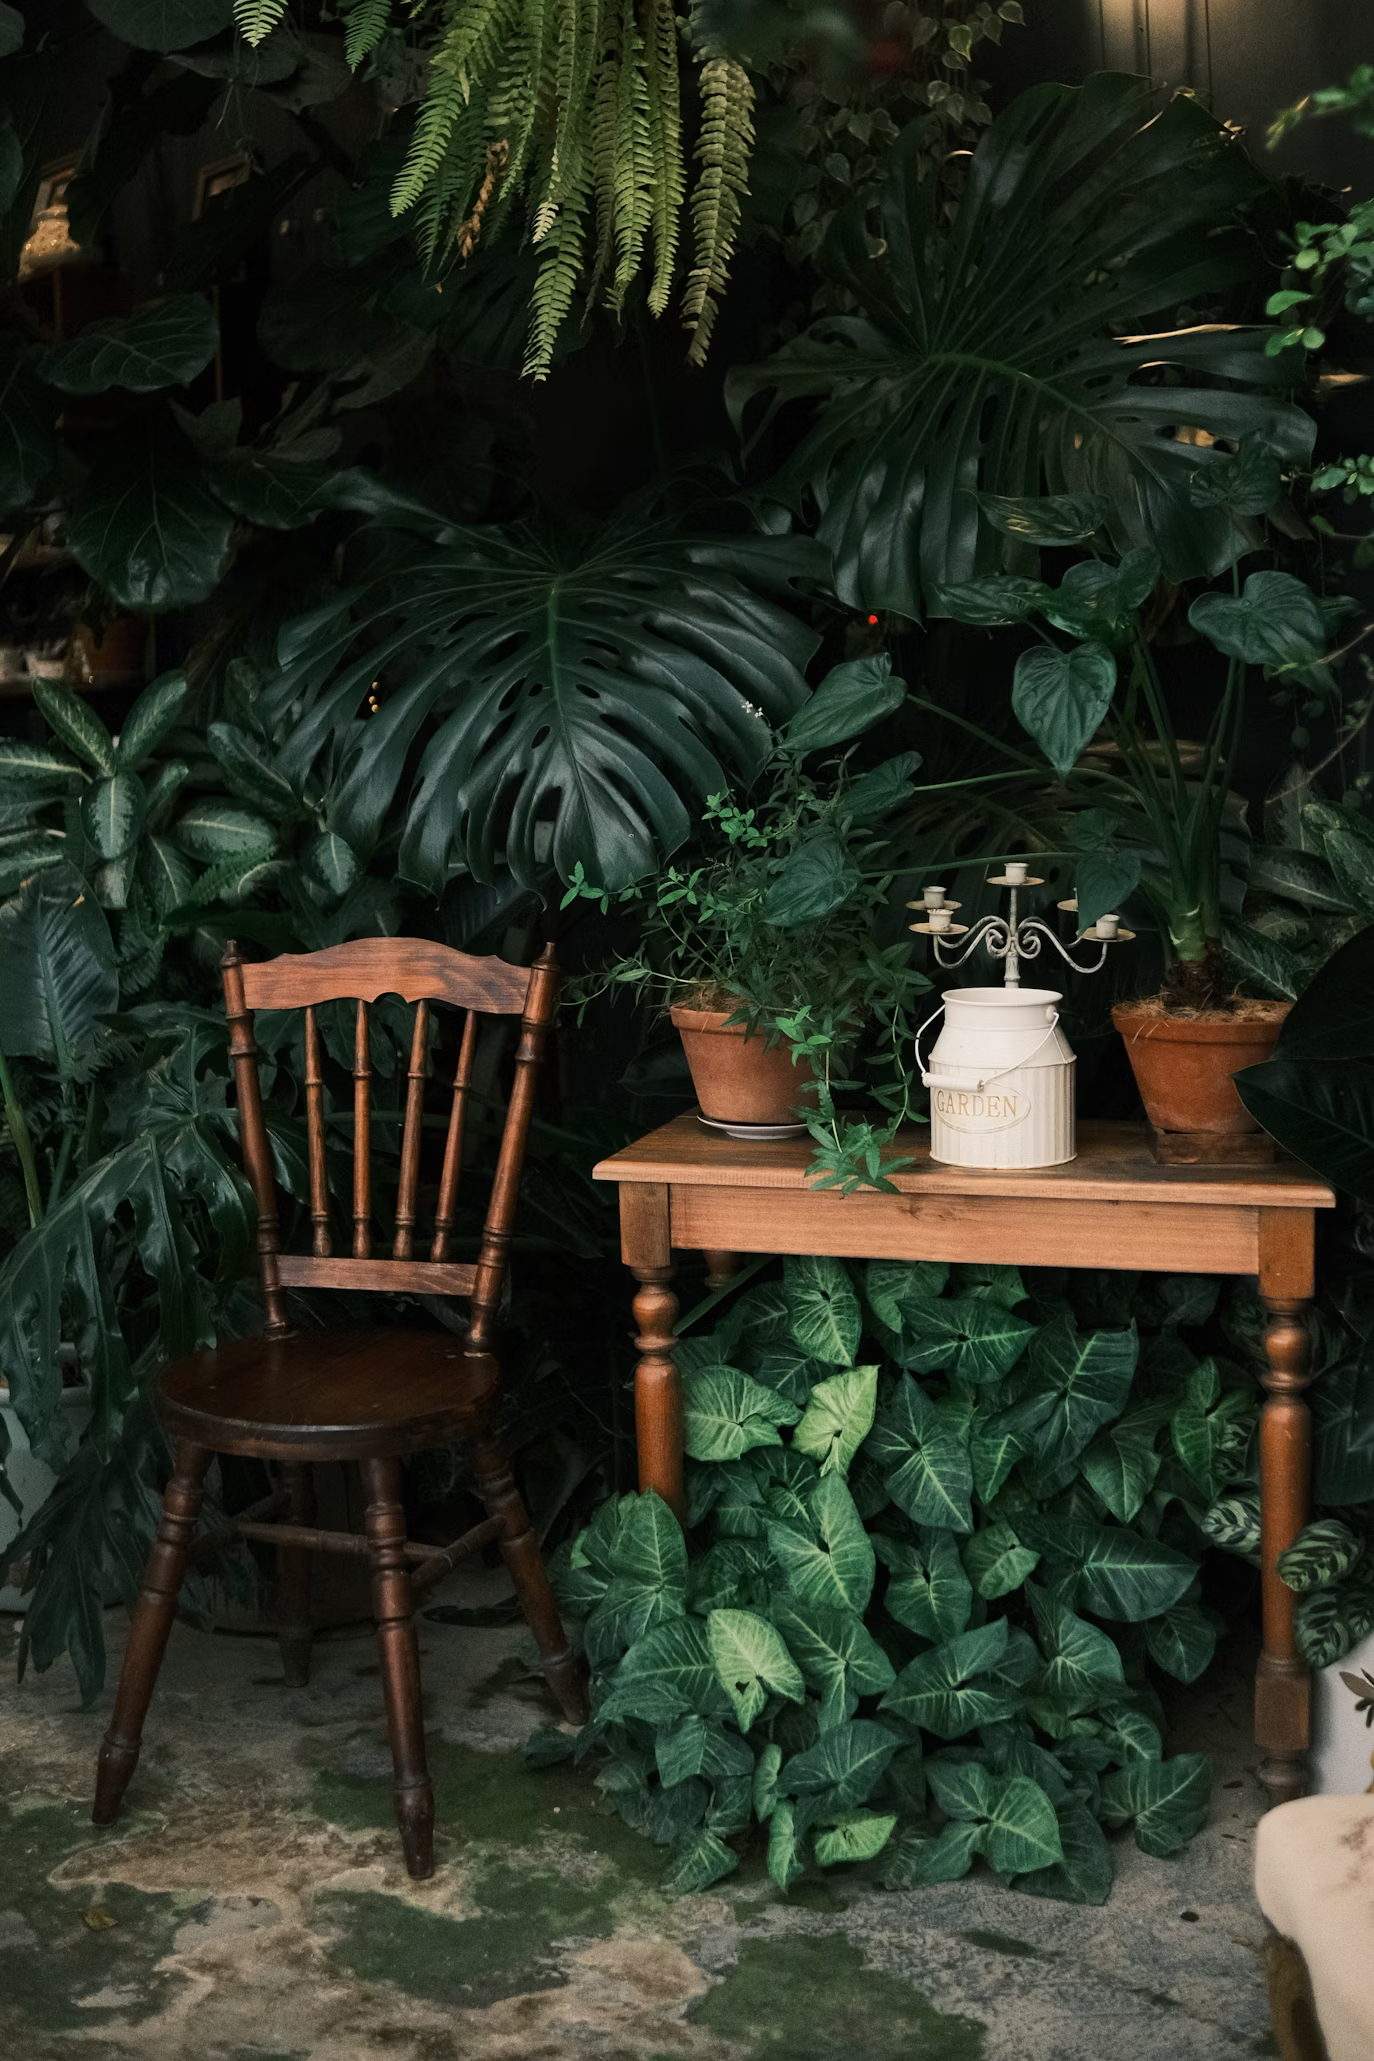
Creating a vintage garden is like stepping back in time, bringing a sense of nostalgia and charm to your outdoor space. Whether you’re a gardening enthusiast or just looking to add a touch of classic elegance to your yard, vintage garden ideas can transform any space into a picturesque haven. In this article, we’ll explore 21 DIY vintage garden projects that you can create with a bit of creativity and effort. From repurposing old items to adding unique touches, these ideas will help you design a garden that’s full of character and timeless beauty.
1. Vintage Tea Cup Planters
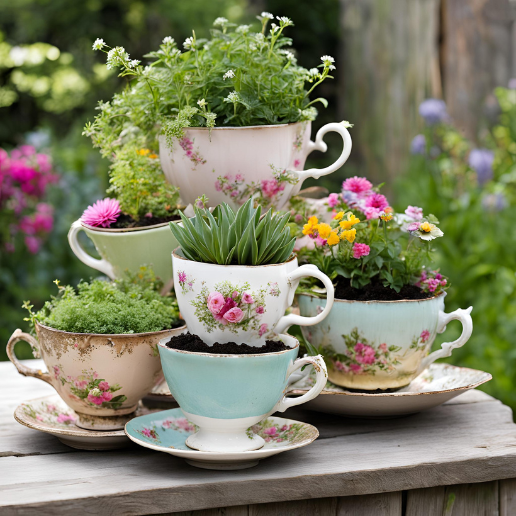
Materials Needed:
- Old tea cups (find them at thrift stores or flea markets)
- Potting soil
- Small plants or succulents
- Drill with a small bit (optional, for drainage holes)
Instructions:
- Prepare the Tea Cups: If your tea cups don’t have drainage holes, carefully drill a small hole in the bottom to prevent waterlogging.
- Add Soil: Fill each cup with potting soil, leaving some space at the top.
- Plant: Place small plants or succulents into the soil. Gently press down to secure the plants.
- Water: Lightly water the plants, ensuring the soil is moist but not soggy.
Tips:
- Choose plants that have shallow roots and don’t require much water.
- Arrange the tea cups on a vintage tray or shelf for a charming display.
2. Repurposed Wooden Crates as Garden Storage
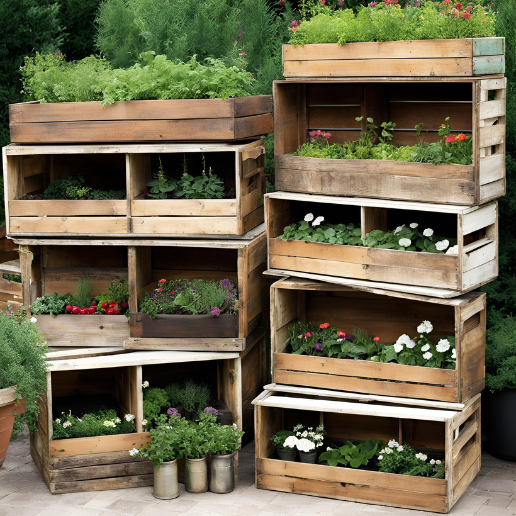
Materials Needed:
- Old wooden crates (available at thrift stores or reclaimed wood suppliers)
- Paint or stain
- Hardware (optional, for added stability)
- Paintbrush or roller
Instructions:
- Clean and Sand: Remove any dirt or old paint from the crates. Sand them down to create a smooth surface.
- Paint or Stain: Apply paint or stain to the crates, using a brush or roller. Allow them to dry completely.
- Assemble (if needed): If using multiple crates, you may want to secure them together with hardware for stability.
- Use: Arrange the crates in your garden to store tools, pots, or other garden essentials.
Tips:
- Stack crates for vertical storage or use them as shelving units.
- Line the crates with burlap or fabric to protect the contents.
3. Vintage Ladder Planters
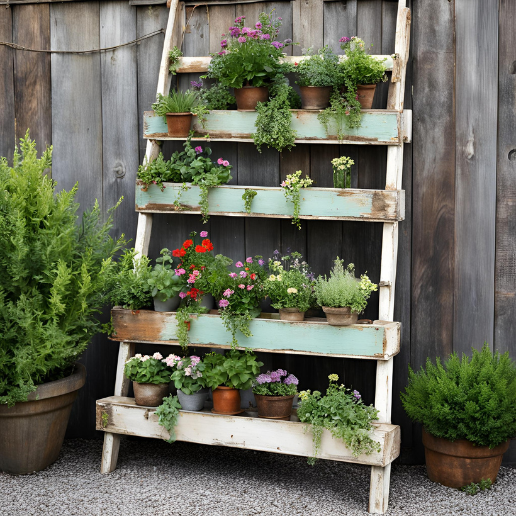
Materials Needed:
- Old wooden ladder
- Paint (optional)
- Pots or planters
- Potting soil
Instructions:
- Prepare the Ladder: Clean and sand the ladder. Paint it if you want to add a pop of color or to match your garden decor.
- Arrange Planters: Place pots or planters on the rungs of the ladder, securing them with ties or clamps if needed.
- Plant: Fill the planters with potting soil and add your favorite plants.
Tips:
- Choose plants of varying heights to create visual interest.
- Place the ladder against a wall or in a sunny spot to maximize plant growth.
4. Rustic Garden Bench
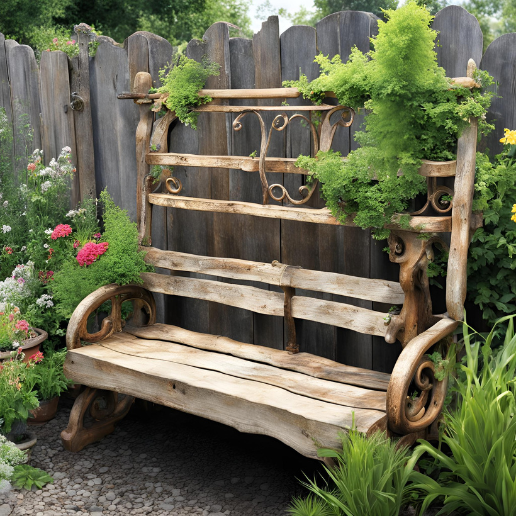
Materials Needed:
- Old wooden pallets or reclaimed wood
- Screws
- Sandpaper
- Paint or stain
Instructions:
- Measure and Cut: Measure the wood to fit your desired bench size. Cut the wood accordingly.
- Assemble: Arrange the pieces to form the bench. Secure with screws.
- Finish: Sand down any rough edges and apply paint or stain for a weathered look.
Tips:
- Add cushions or throws for extra comfort.
- Position the bench in a cozy corner of your garden for a relaxing spot.
5. Antique Frame Garden Art
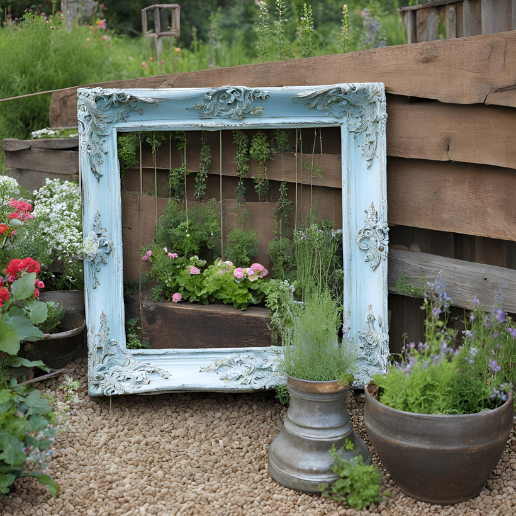
Materials Needed:
- Old picture frames
- Wire mesh or chicken wire
- Paint (optional)
- Staple gun or wire (for attaching)
Instructions:
- Prepare the Frames: Clean the frames and paint them if desired.
- Attach Wire: Cut a piece of wire mesh or chicken wire to fit the frame. Attach it using a staple gun or wire.
- Add Art: Use the framed wire to display garden art, hanging plants, or even fairy lights.
Tips:
- Use multiple frames of different sizes for a gallery-style display.
- Secure the frames to a wall or fence for stability.
6. Vintage Window Frame Trellis
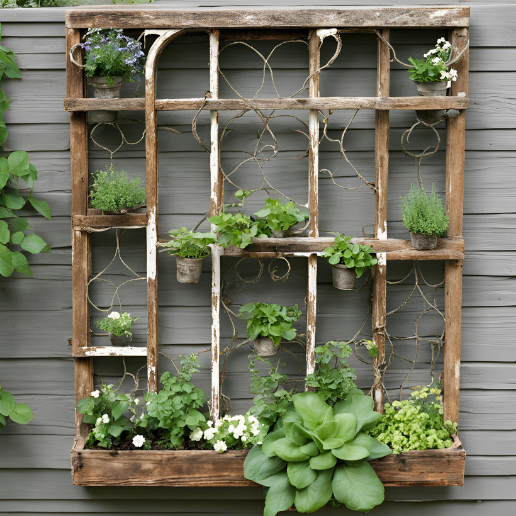
Materials Needed:
- Old window frames
- Screws or brackets
- Paint (optional)
Instructions:
- Prepare the Frames: Clean and paint the window frames if desired.
- Mount the Frames: Attach the frames to a wall or fence using screws or brackets.
- Plant: Grow climbing plants or vines on the trellis for a charming, vintage look.
Tips:
- Choose climbing plants like roses or ivy that will complement the vintage aesthetic.
- Secure the frames firmly to prevent them from falling.
7. Retro Birdhouses
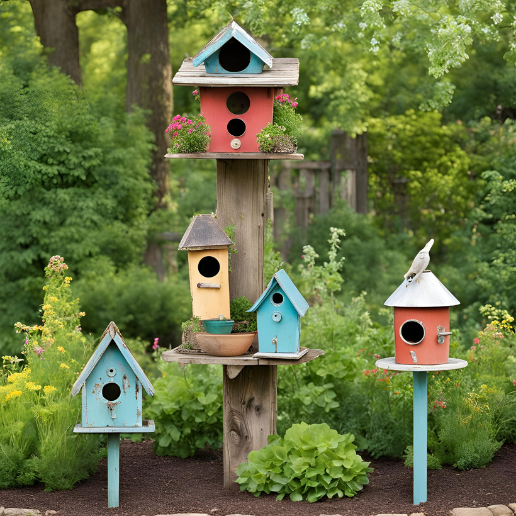
Materials Needed:
- Wood or repurposed materials
- Paint
- Tools (saw, drill, screws)
Instructions:
- Cut and Assemble: Cut the wood into birdhouse pieces and assemble them using screws.
- Paint: Decorate the birdhouses with retro colors or patterns.
- Hang: Place the birdhouses in strategic locations around your garden to attract birds.
Tips:
- Ensure the birdhouses have proper ventilation and drainage.
- Hang them in quiet areas away from predators.
8. Charming Mason Jar Lanterns
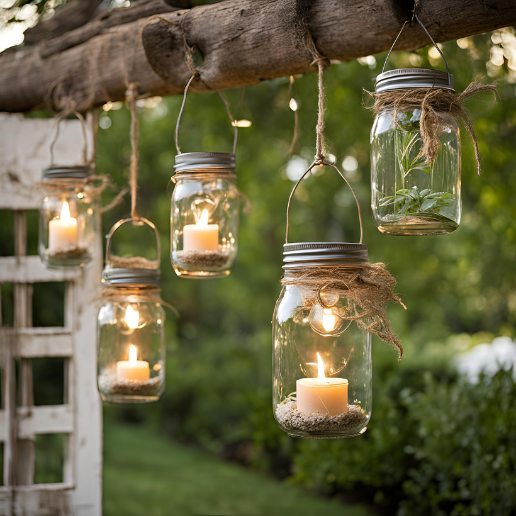
Materials Needed:
- Mason jars
- Candles or LED lights
- Decorative elements (ribbons, lace, etc.)
Instructions:
- Prepare Jars: Clean the mason jars and remove any labels.
- Add Lights: Place a candle or LED light inside each jar.
- Decorate: Add decorative elements to the jars, such as ribbons or lace.
Tips:
- Place the lanterns along pathways or hanging from tree branches.
- Use LED lights for a safer, longer-lasting option.
9. Vintage Garden Tools as Decor
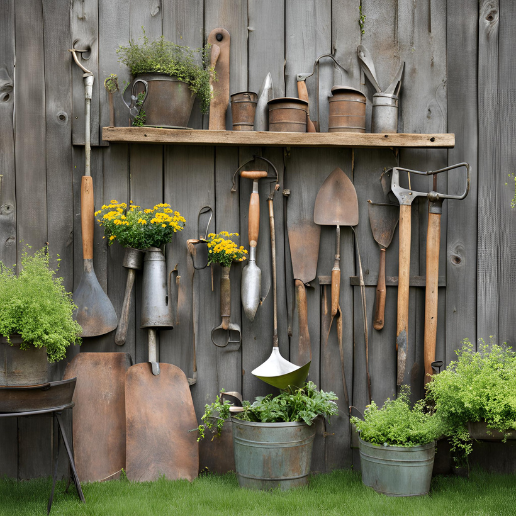
Materials Needed:
- Old garden tools (spades, rakes, hoes)
- Paint or polish
Instructions:
- Clean Tools: Remove any dirt or rust from the tools.
- Paint or Polish: Paint the tools in vintage colors or polish them to restore their shine.
- Display: Arrange the tools as garden decor, either leaning against a wall or mounted on a fence.
Tips:
- Use tools with interesting shapes or designs for a more striking display.
- Incorporate them into a larger garden art installation.
10. Antique Wheelbarrow Planter
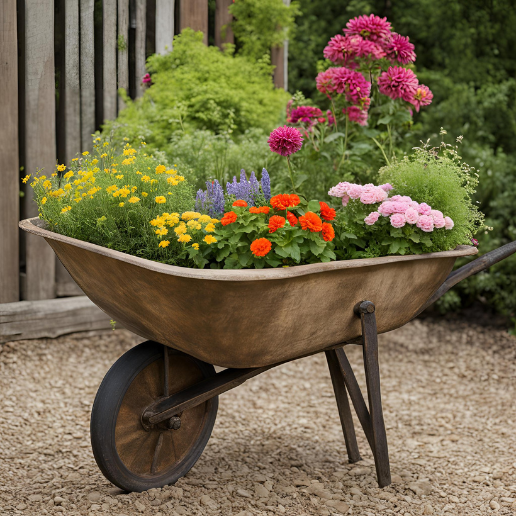
Materials Needed:
- Old wheelbarrow
- Paint (optional)
- Potting soil
- Plants
Instructions:
- Prepare the Wheelbarrow: Clean and paint the wheelbarrow if desired.
- Add Soil: Fill the wheelbarrow with potting soil.
- Plant: Add plants to the soil and water them.
Tips:
- Choose plants that will thrive in the wheelbarrow’s environment.
- Place the wheelbarrow in a prominent spot for maximum impact.
11. Upcycled Garden Furniture
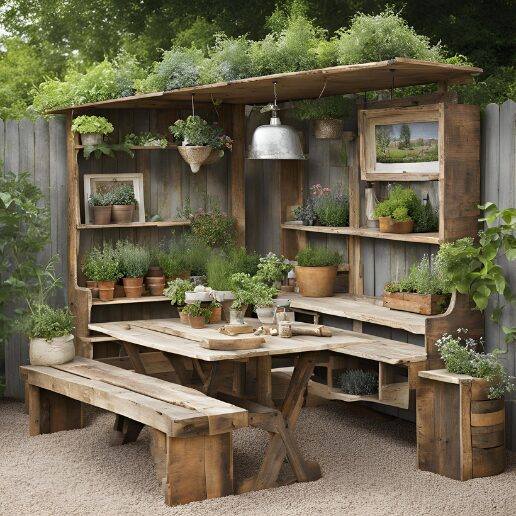
Materials Needed:
- Old furniture pieces (e.g., chairs, tables)
- Paint or stain
- Tools
Instructions:
- Clean and Sand: Remove old paint or varnish from the furniture. Sand it down to prepare for refinishing.
- Paint or Stain: Apply paint or stain to give the furniture a vintage look.
- Reassemble: If necessary, reassemble the furniture pieces.
Tips:
- Coordinate the furniture with other vintage elements in your garden.
- Use outdoor-grade paint or sealant to protect against the elements.
12. Vintage Glass Bottle Edging
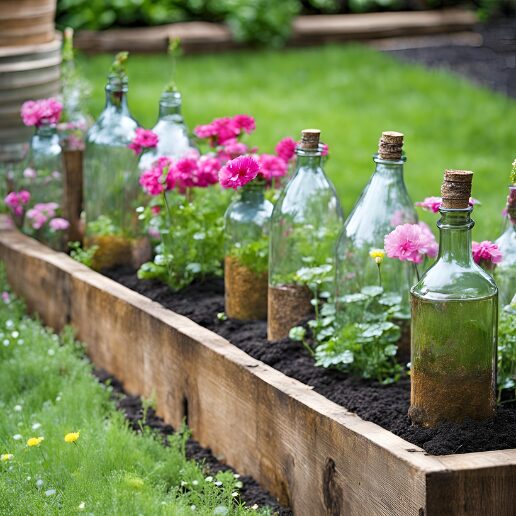
Materials Needed:
- Old glass bottles
- Shovel
- Garden soil
Instructions:
- Prepare Bottles: Clean the bottles and remove labels.
- Create Edging: Dig a trench along the edge of your garden bed. Place the bottles neck-down in the trench.
- Fill: Backfill the trench with soil to secure the bottles.
Tips:
- Use bottles of various colors for a more colorful effect.
- Ensure the bottles are placed securely to prevent them from tipping over.
13. Reclaimed Wood Garden Signs
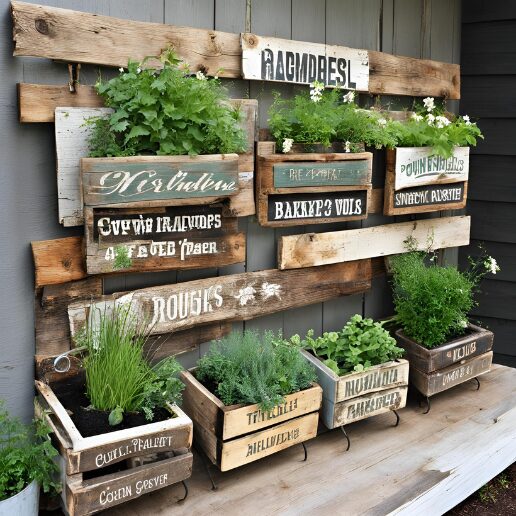
Materials Needed:
- Old wood (e.g., fence boards, pallets)
- Paint or stencils
- Tools (paintbrush, markers)
Instructions:
- Prepare the Wood: Clean and sand the wood pieces.
- Paint or Stencil: Apply paint or use stencils to create garden signs with names, quotes, or directions.
- Install: Place the signs in your garden, either by attaching them to stakes or mounting them directly.
Tips:
- Use weather-resistant paint for longevity.
- Customize the signs to match your garden’s theme or personal style.
14. Antique Teapot Water Fountain
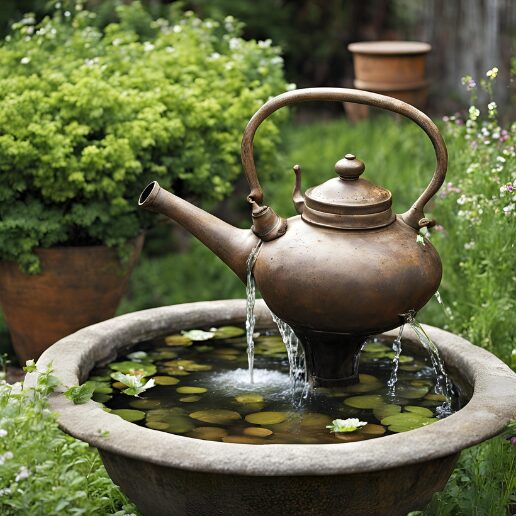
Materials Needed:
- Old teapot
- Small water pump
- Basin
- Tools (drill, screwdriver)
Instructions:
- Prepare the Teapot: Clean the teapot and drill a hole in the bottom for the water pump.
- Assemble Fountain: Place the pump inside the teapot and connect it to a water basin.
- Setup: Position the fountain in your garden and fill the basin with water.
Tips:
- Use a basin that complements the teapot’s style.
- Regularly clean the pump and basin to prevent algae growth.
15. Vintage Bicycle Planter
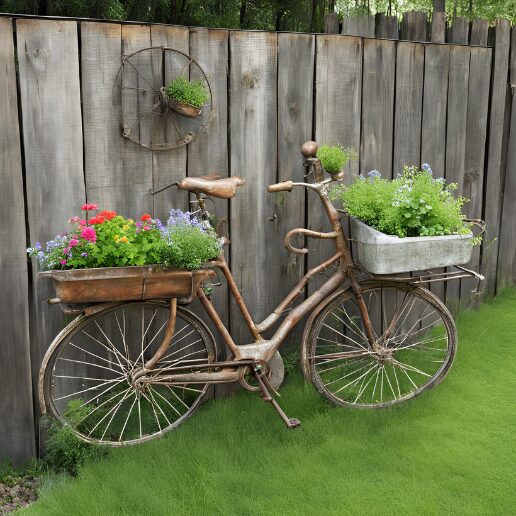
Materials Needed:
- Old bicycle
- Paint (optional)
- Pots or planters
Instructions:
- Prepare the Bicycle: Clean and paint the bicycle if desired.
- Add Planters: Place pots or planters in the bicycle’s basket or in the frame.
- Plant: Fill the planters with soil and add plants.
Tips:
- Choose plants that will cascade or climb for added visual interest.
- Position the bicycle in a sunny spot to ensure healthy plant growth.
16. DIY Vintage Garden Wind Chimes
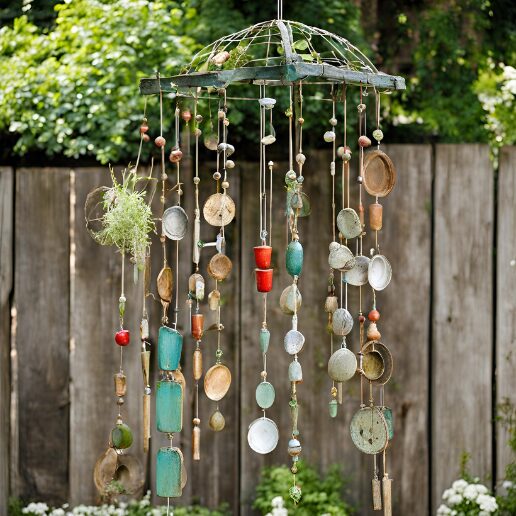
Materials Needed:
- Old silverware (forks, spoons, knives)
- String or wire
- Hooks
Instructions:
- Prepare Silverware: Clean and polish the silverware.
- Assemble Chimes: Attach the silverware to strings or wire, arranging them to create pleasing sounds.
- Hang: Use hooks to hang the chimes in a breezy location.
Tips:
- Experiment with different lengths and arrangements for unique sounds.
- Use a sturdy hook or branch to ensure the chimes hang securely.
17. Old Door Garden Gate
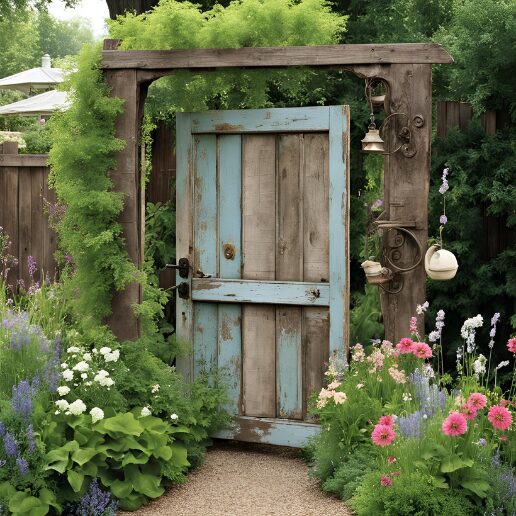
Materials Needed:
- Old door
- Hinges
- Paint (optional)
- Tools (screwdriver, drill)
Instructions:
- Prepare the Door: Clean and paint the door if desired.
- Attach Hinges: Secure the hinges to the door and attach them to a gate frame or wall.
- Install: Position the door in place and ensure it swings open and closed smoothly.
Tips:
- Add a vintage-style latch or handle for extra charm.
- Use the gate as a focal point in your garden design.
18. Vintage Suitcase Planters
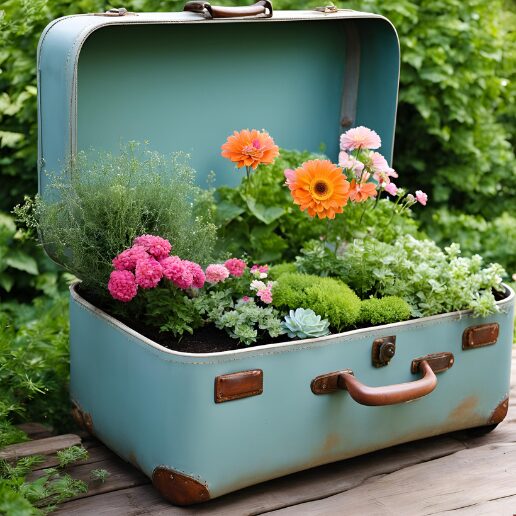
Materials Needed:
- Old suitcases (preferably with a retro design)
- Potting soil
- Plants
- Drill (for drainage holes)
Instructions:
- Prepare the Suitcases: Clean the suitcases thoroughly. If they don’t have drainage holes, drill a few holes in the bottom to prevent waterlogging.
- Add Soil: Fill the suitcases with potting soil, leaving some space at the top.
- Plant: Place your chosen plants into the soil. Compact the soil around the plants to secure them.
- Water: Lightly water the plants, ensuring not to overwater.
Tips:
- Use suitcases in various sizes for a tiered effect.
- Position the suitcases on a stand or within an old wooden crate for added height and visual interest.
19. Retro Garden Windmill
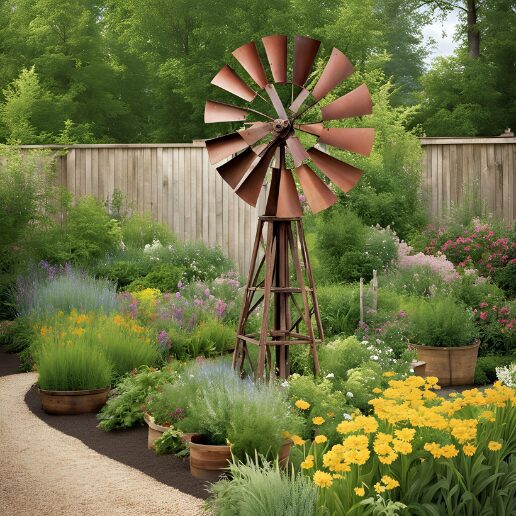
Materials Needed:
- Old metal or wooden windmill blades
- Reclaimed wood or metal pipe (for the base)
- Paint or weatherproof sealant
- Tools (screws, drill)
Instructions:
- Prepare the Blades: Clean and paint the windmill blades if desired. Ensure they are in good condition.
- Create the Base: Attach the blades to a wooden or metal pipe base. Secure with screws and ensure it is stable.
- Install: Place the windmill in a prominent spot in your garden. If using a metal pipe, bury it slightly in the soil to stabilize it.
Tips:
- For a rustic look, use weathered or rusted blades.
- Position the windmill in a spot where it can catch the breeze for a dynamic effect.
20. Vintage Painted Tin Cans
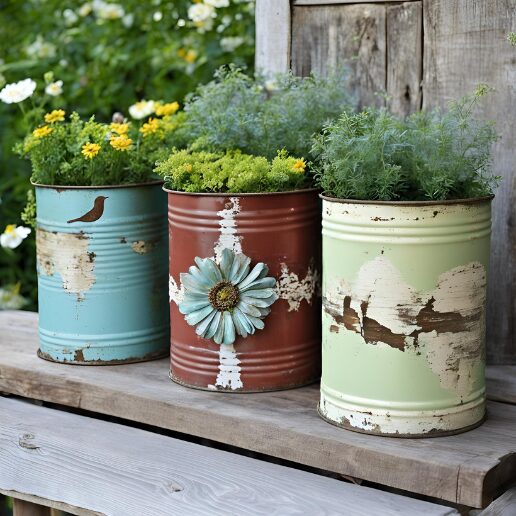
Materials Needed:
- Empty tin cans (soup cans, coffee cans)
- Paint (preferably weather-resistant)
- Small plants or herbs
- Drill (for drainage holes)
Instructions:
- Prepare the Cans: Clean the cans and remove labels. Drill a few small holes in the bottom for drainage.
- Paint: Apply a coat of paint to the outside of the cans. You can use stencils or freehand designs for added charm.
- Add Soil and Plants: Fill the cans with potting soil and plant small herbs or flowers.
- Water: Water the plants as needed, ensuring the soil stays moist but not waterlogged.
Tips:
- Group cans of different sizes and colors together for a colorful display.
- Hang the cans from hooks or display them on a vintage ladder for a creative arrangement.
21. Antique Chandelier Planter
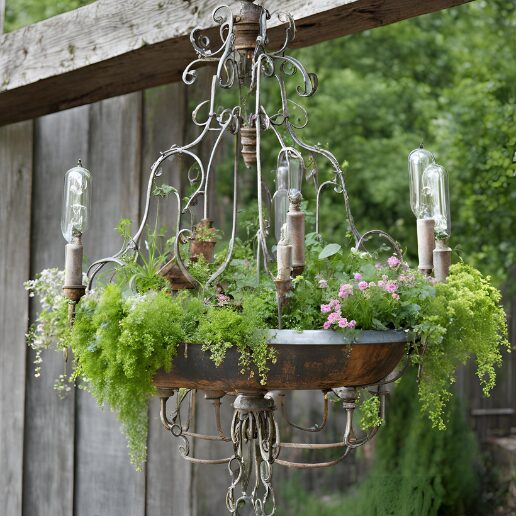
Materials Needed:
- Old chandelier (with or without crystals)
- Potting soil
- Plants (succulents or trailing plants work well)
- Chains or hooks (for hanging)
Instructions:
- Prepare the Chandelier: Clean the chandelier and remove any electrical components if necessary. You can leave or remove the crystals depending on your aesthetic.
- Install Planters: Use the chandelier’s arms or tiers to hold small pots or planters. Secure them with chains or hooks.
- Add Soil and Plants: Fill the planters with potting soil and add your plants.
- Hang: Position the chandelier in a location where it can be seen and enjoyed.
Tips:
- Use trailing plants to create a cascading effect from the chandelier.
- Position the chandelier in a shaded area or where it won’t be exposed to heavy rain to prolong its life.
Conclusion
With these creative vintage garden ideas, you have even more ways to infuse your outdoor space with timeless charm and creativity. From repurposing old suitcases into planters to transforming an antique chandelier into a stunning garden centerpiece, these projects offer endless possibilities for personalization and flair.
Creating a vintage garden is not just about decor; it’s about creating a space that reflects your personality and love for classic design. We hope these ideas inspire you to take on new projects and make your garden a unique and beautiful retreat.
If you’ve tried any of these projects or have your own vintage garden ideas to share, we’d love to hear from you. Share your thoughts, photos, or questions in the comments section!