

I’m going to let you in on a secret: you don’t need a sprawling backyard or even a generously sized deck to enjoy the incredible taste and aroma of fresh, homegrown herbs. For years, I struggled with my small balcony, trying to squeeze pots onto every precious inch of floor space, and it always felt messy and limiting. Then, I discovered the magic of vertical gardening. It’s not just about saving space; it’s about creating a lush, private, and productive green wall that acts as a stunning backdrop to your urban oasis.
If you’re tired of spending $4 on a small plastic packet of basil that wilts the next day, it’s time to look up. Vertical gardening is the game-changer for urban gardeners, providing the perfect blend of functionality, aesthetics, and pure, delicious convenience. Ready to stop hoarding horizontal space and start maximizing your vertical potential? Let’s explore 15 creative, actionable ways to build your own herb sanctuary today.
Before You Start: The Essential Prep
Before you grab a hammer or head to the hardware store, we need to cover three crucial basics that make the difference between a thriving vertical garden and a disappointing mess.
First, you must conduct a Sunlight Check. Step outside at different times of the day and figure out exactly how many hours of direct sun your balcony receives. If you get six or more hours, you’re in the clear for sun-lovers like Rosemary and Basil. If you only get four hours or less (partial shade), focus your selection on herbs like Mint, Parsley, Chives, and Cilantro, which prefer a little afternoon relief.
Second, be smart about Herb Selection. Don’t try to force a large, deep-rooted herb into a tiny, shallow container. Match the herb to the idea. For instance, shallow-rooted Thyme or Oregano are perfect for pocket organizers, while larger, bushier Dill needs a more stable, spacious base like a stacked window box.
Finally, and this is the biggest mistake I see beginners make: Drainage is Key. Every single container in your vertical garden—be it a fancy modular pot or a repurposed tin can—must have at least one functional drainage hole. If water sits, the roots drown, and your herbs will quickly perish. Do not skip this step!
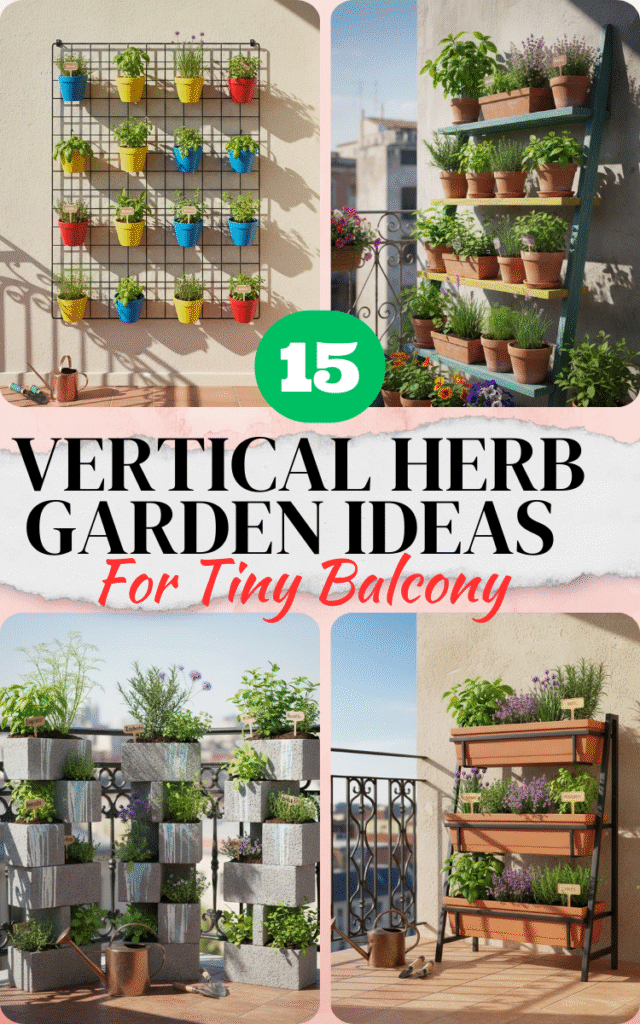
15 Vertical Herb Garden Ideas
I’ve categorized these 15 solutions into three groups, based on how much DIY effort you want to put in.
A. Simple & Ready-Made Solutions (Easy Set-up)
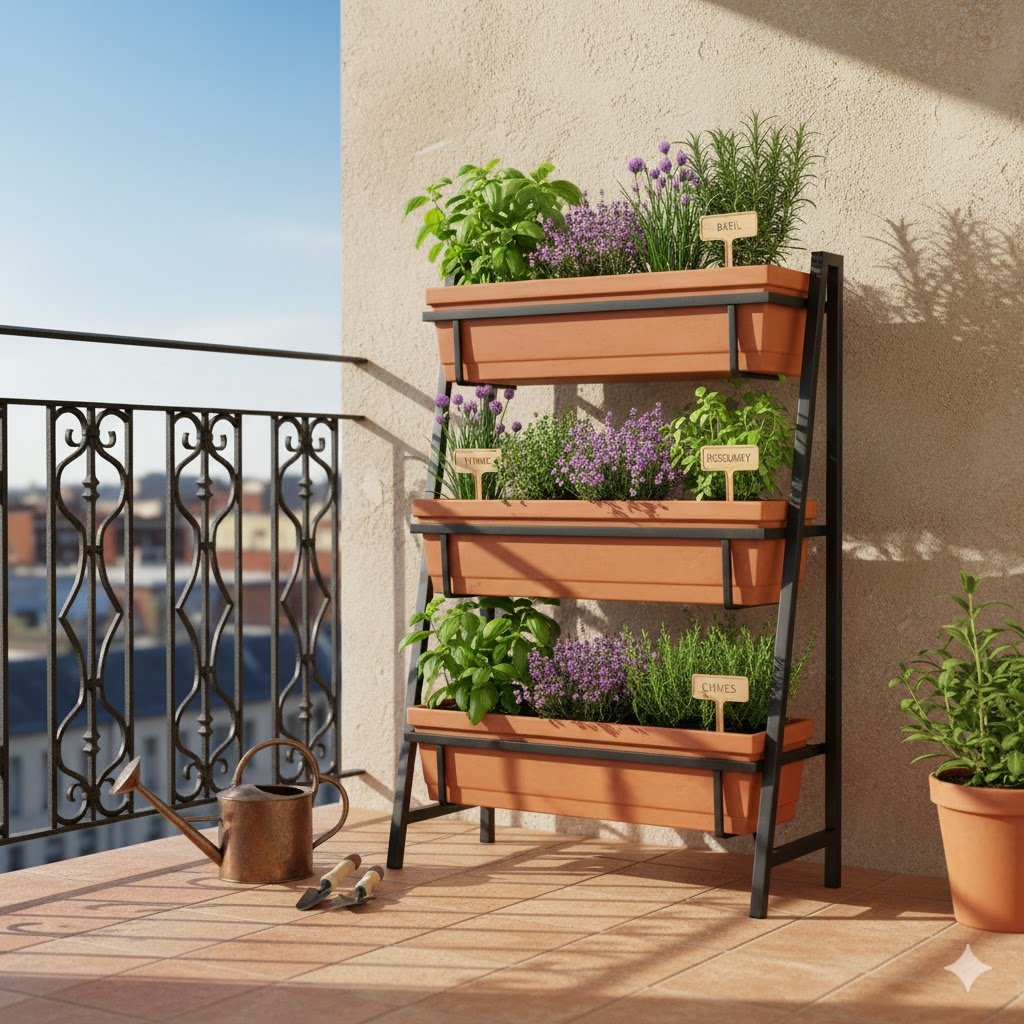
1. The Tiered Ladder Shelf
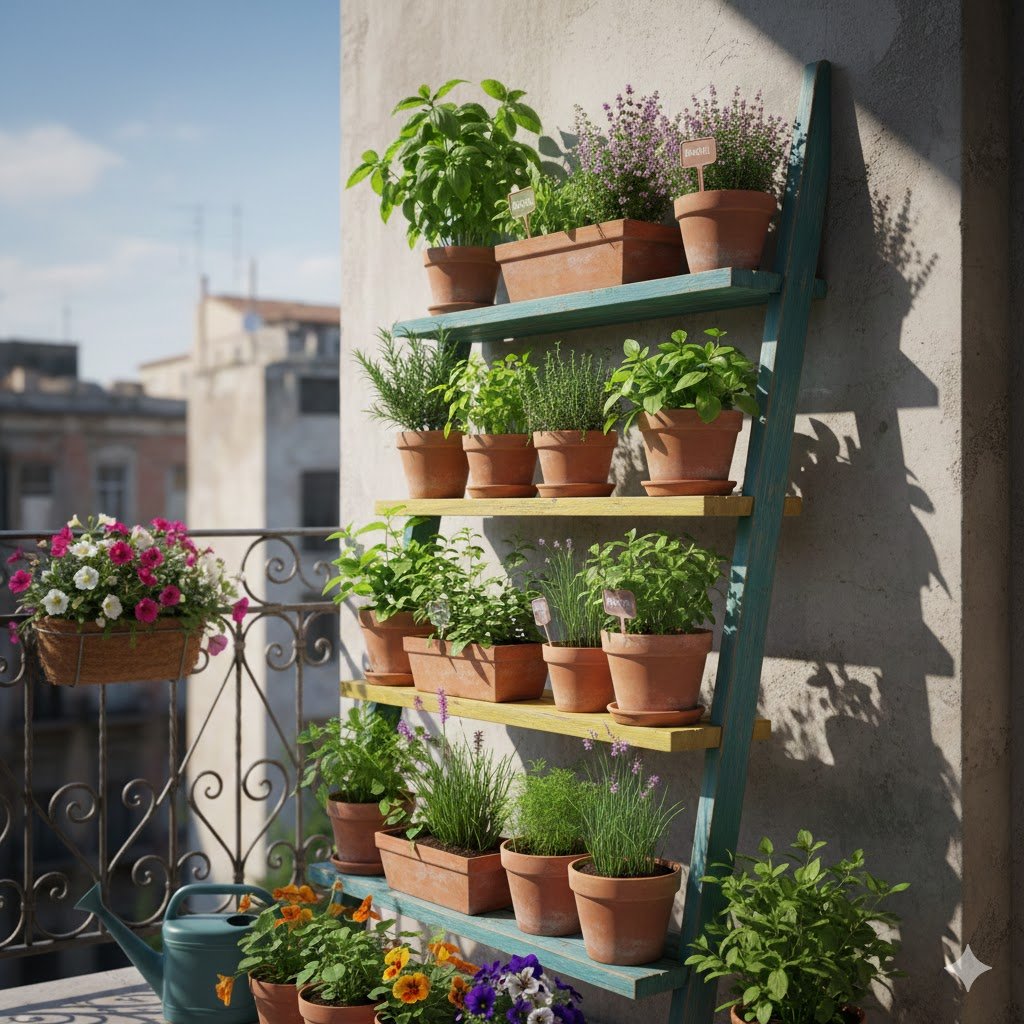
I love the ladder shelf idea because it’s genuinely the easiest way to go vertical instantly. If you’re a renter, or just someone who hates drilling into walls, the tiered ladder shelf is your best friend. It simply leans against the wall, giving you three or four levels of growing space without any commitment. It instantly transforms a bare corner into a lush, multi-level herb display overnight.
You can find these shelves at any home goods store, often marketed as blanket or bathroom storage. Look for one made of treated wood or metal to handle moisture; indoor-only shelves will quickly warp or rust. Once you have it, the setup is as simple as placing rectangular or round pots onto the steps. Just ensure the pots aren’t too deep—shallow roots are fine for most balcony herbs—and make sure the weight is balanced, especially if you have heavier terracotta on the top shelf.
The main thing to remember with a ladder shelf is the sunlight gradient. The top shelf gets the most light, so save that prime real estate for your sun-loving friends like rosemary and basil. The lower tiers are perfect for shadier herbs like mint, chives, or parsley. When watering, start at the top and let the excess water drain down into the pots below (if they are slightly staggered), which saves water and time!
2. Over-the-Railing Planters
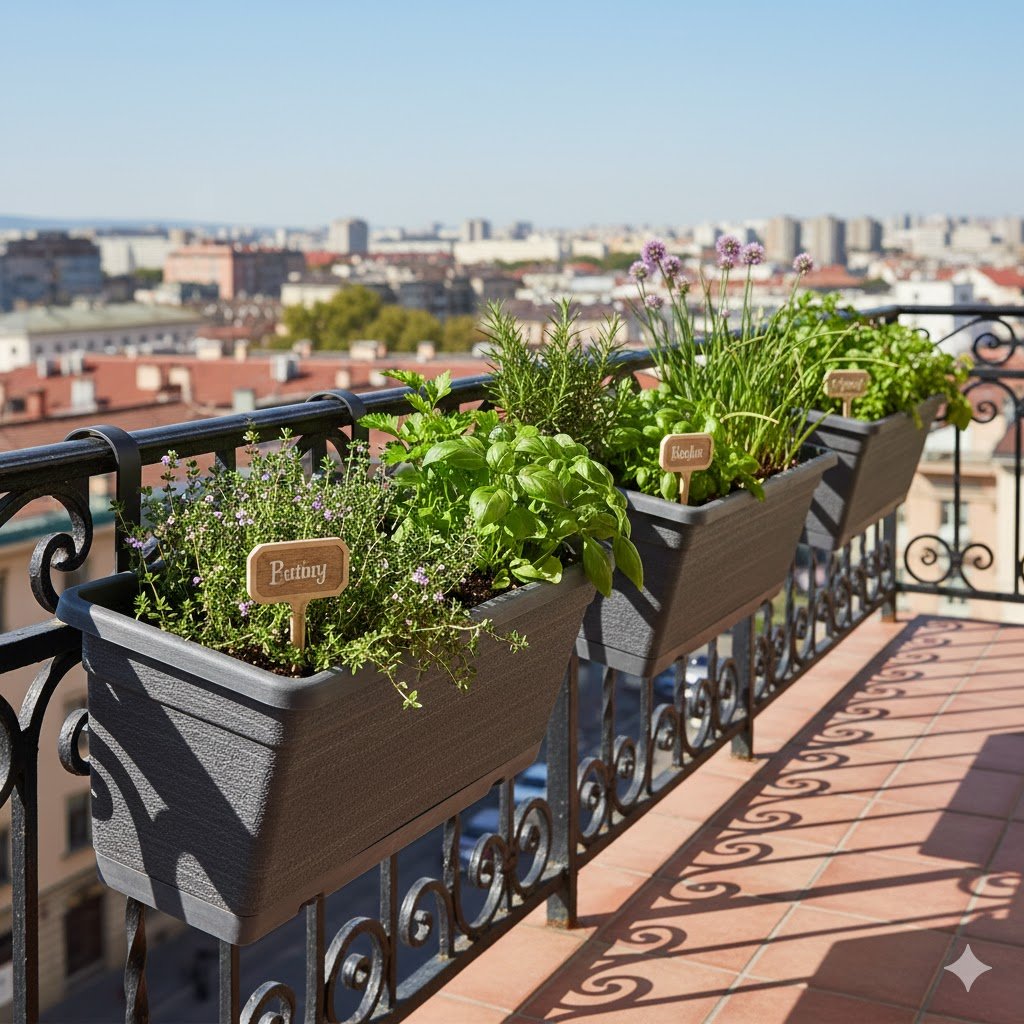
If your railing is currently unused space, you’re missing a trick. These are curved planters that hook securely over the balcony railing, instantly utilizing space that is often neglected. They are simple, durable, and come in various sizes and colors, adding a charming, classic look to your balcony perimeter without taking up any floor space at all.
Installation is usually foolproof: you just hook them over the railing. However, a quick tip is to check the weight distribution when they are full of damp soil. If you have a wide railing, ensure the planter is designed for that size to prevent tilting. Always use a high-quality, lightweight potting mix—this keeps the overall weight down and is much safer for the railing structure.
Since these planters usually get excellent, unobstructed light, they are fantastic spots for sprawling herbs like trailing Thyme or Sage, which will cascade beautifully over the edges. They are also perfect for Basil, which loves consistent, bright light. Just be mindful that they are exposed to wind and sun, so they will often need watering more frequently than wall-mounted solutions.
3. Vertical Pocket Organizer
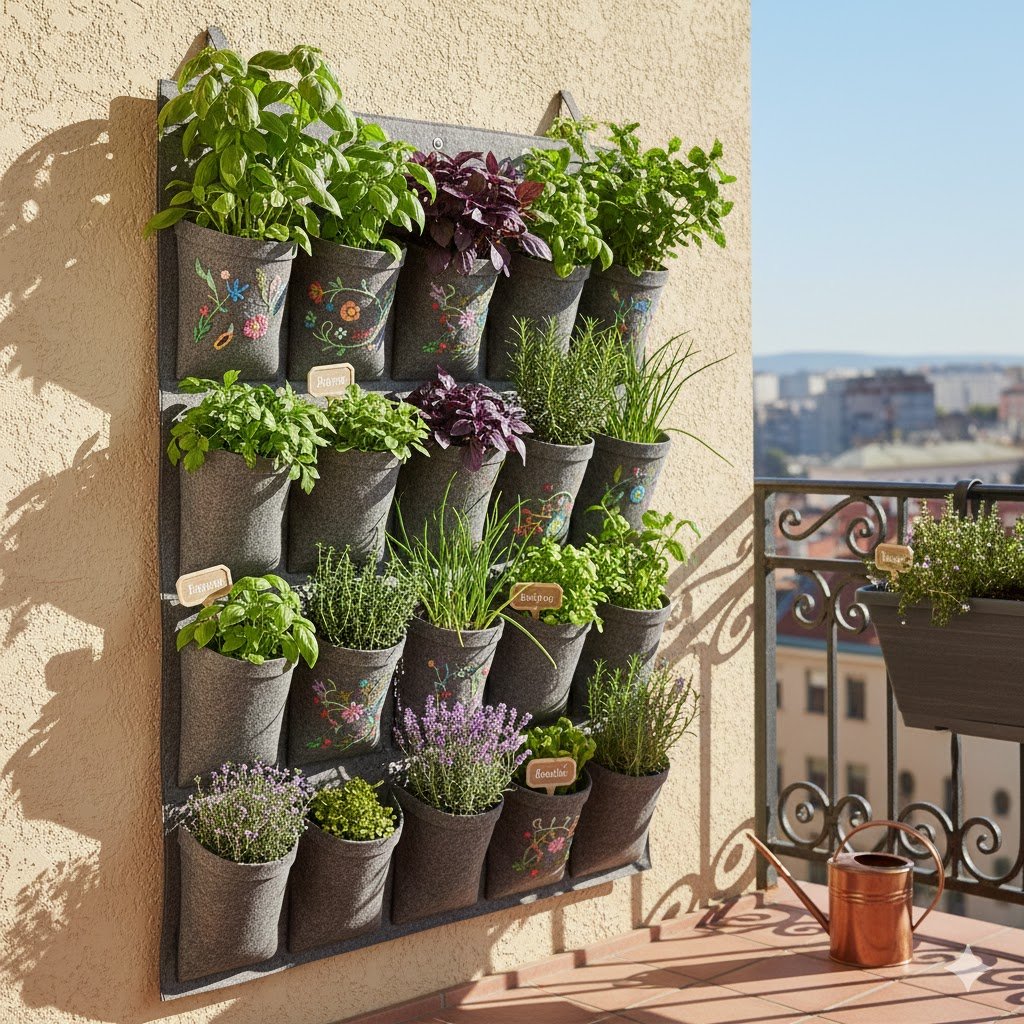
A hanging fabric shoe organizer or felt gardening panel is one of the cheapest and most effective ways to go vertical on a budget. It transforms a blank wall into a matrix of mini-planters. The soft felt is great for moisture retention, and because they are lightweight, they can be easily mounted using simple outdoor hooks or even heavy-duty command strips if your wall allows it.
The setup is straightforward: hang the panel, fill each pocket about two-thirds full with soil, and plant. Because the pockets are shallow, they are best suited for smaller, compact herbs like Thyme, Oregano, and Chives. I always advise lining the bottom of the pockets with a small square of plastic mesh to prevent the soil from washing out through the fabric.
Be aware that these fabric pockets dry out incredibly fast, especially if they are mounted on a sunny wall. They require meticulous watering, often daily in the peak of summer. A great hack is to water with a spray bottle or a slow-drip irrigation line, ensuring every pocket gets soaked evenly. Due to the high moisture retention in the material itself, avoid planting water-sensitive herbs like Rosemary here.
4. Stackable Self-Watering Towers
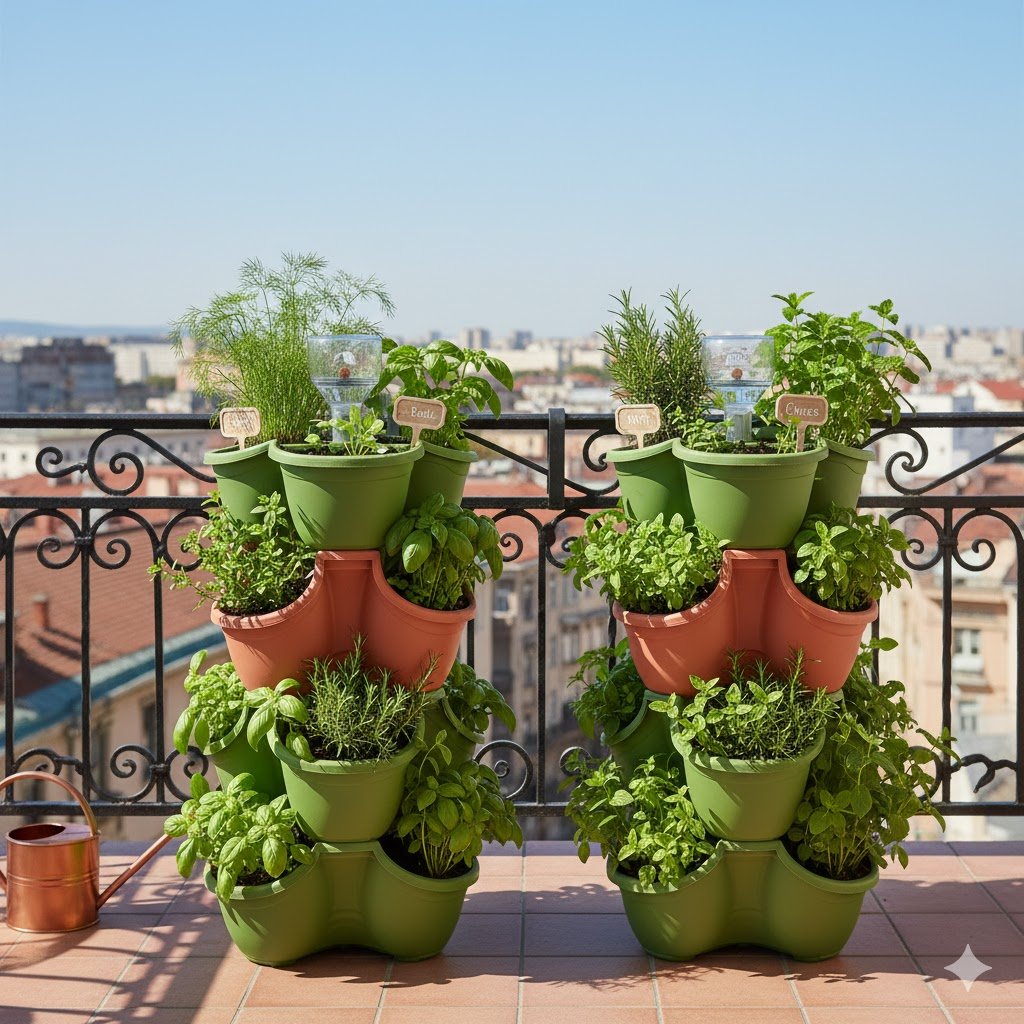
If you’re looking for a clean, almost futuristic approach, stackable modular plastic planters are the way to go. These systems usually consist of three or four tiers that lock together, often featuring a central tube or reservoir for watering. They look neat and are wonderfully efficient for those who travel or simply forget to water regularly.
These towers are typically freestanding, making them a flexible solution you can move if the sun changes its angle throughout the season. When setting them up, place the heaviest soil and plants (or stones for ballast) at the very bottom to prevent the tower from being knocked over by the wind. They usually come with comprehensive instructions, but the trick is making sure the central watering system is installed perfectly to ensure water reaches the lowest tiers.
Since they are designed to water from the bottom up or center out, they are excellent for herbs that like consistent moisture, such as Parsley and Mint. However, keep the moisture-loving Mint on its own tier to prevent it from aggressively overtaking its neighbors! These towers tend to stay humid, which can sometimes attract fungus, so ensure you have good air circulation around the tower.
5. Wall-Mounted Single-Row Rail
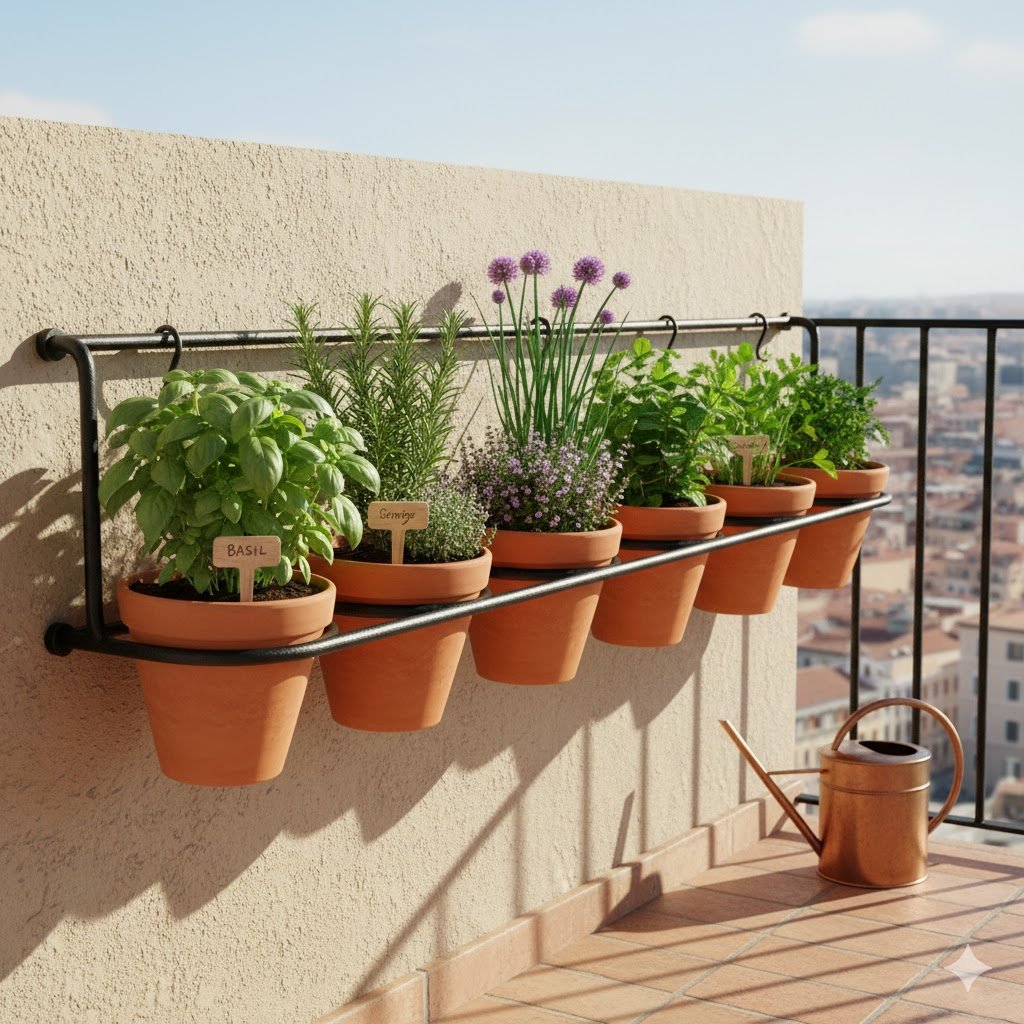
This solution is perfect for achieving a minimalist, modern aesthetic that is also highly functional. The idea is to install a simple kitchen rail (like the famous IKEA FINTORP or similar designs) and hang matching small pots or tins directly from it using S-hooks. It’s flexible, stylish, and easily expandable if you need to add another row later.
Installation requires a few stable mounting points in your wall, but it’s manageable with basic tools. The beauty is that you can adjust the spacing between the pots simply by moving the S-hooks. I recommend using metal pots or galvanized buckets, which are durable outdoors and look fantastic. You can even write the herb names directly on the pots with chalk paint for an extra charming touch.
Because the pots are separate, this setup is ideal for isolating aggressive herbs like Mint (to prevent root spread) or for accommodating herbs that have very different watering needs. For example, you can hang drought-tolerant Sage next to thirsty Basil without any issue. Just remember to use sturdy S-hooks designed for outdoor weight, as wet soil is surprisingly heavy.
B. Upcycled & DIY Creations (Budget-Friendly)
6. The Reclaimed Pallet Garden
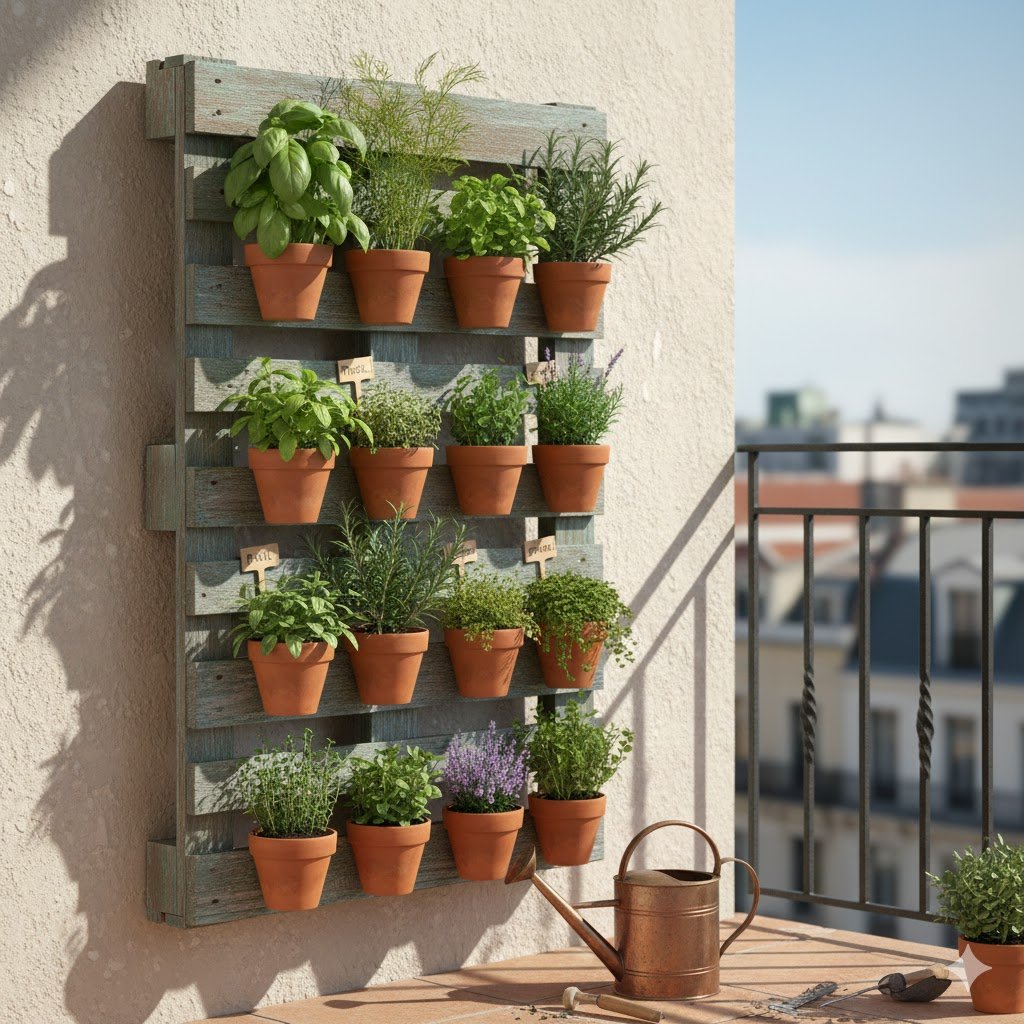
This is probably the most popular DIY vertical garden for a reason: it’s cheap, rustic, and covers a large area quickly. The goal is to stand a wooden shipping pallet upright, attach backing fabric/weed matting, and plant herbs between the slats. It gives your balcony a fantastic farmhouse aesthetic and instantly provides privacy.
First, source a heat-treated (HT stamped) pallet, not chemically treated (MB). Once cleaned and sanded, staple a heavy-duty landscaping fabric across the back and bottom to create deep, internal planting troughs. You may want to paint or stain the front to match your balcony decor, but the rustic look is often the best part!
This method offers relatively deep planting areas, making it suitable for almost all herbs, including larger, bushier varieties like Dill and Fennel. Since the wood absorbs a lot of water, you’ll need to water the entire structure evenly, allowing the moisture to wick down. Place your most sunlight-dependent herbs at the top, and remember that pallet gardens are heavy when wet, so ensure they are leaning securely against a solid wall.
7. Hanging Plastic Bottle Garden
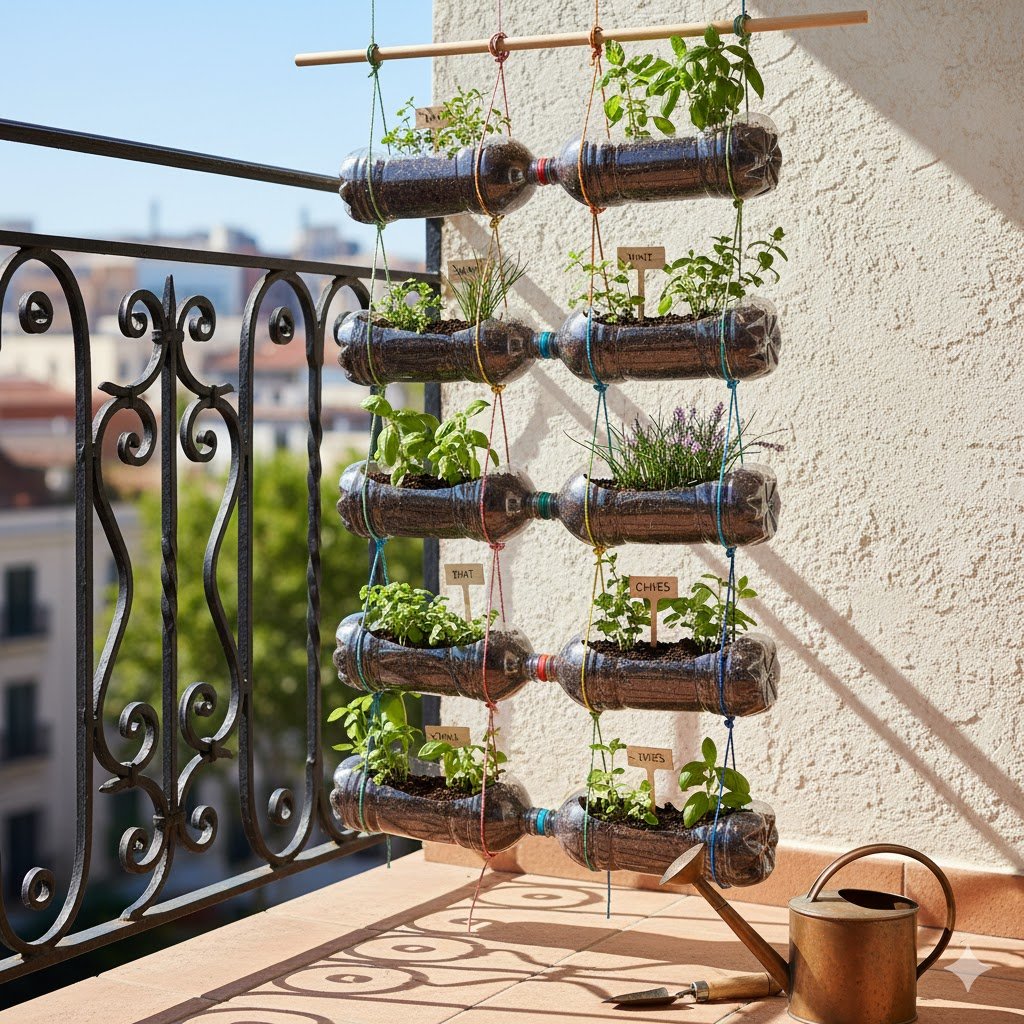
For the ultimate budget-friendly, sustainable project, you can’t beat a plastic bottle garden. This involves cutting large plastic bottles (like 2-liters) horizontally, threading wire or rope through the sides, and hanging them in tiered rows from a wooden frame or railing. It’s maximum upcycling and requires almost zero cost, just a bit of elbow grease.
You’ll need a drill or a hot soldering iron to create several drainage holes in the bottom of the bottle base and two small holes near the top rim for the hanging wire. The plastic is lightweight, so use a sturdy frame or wire to prevent stretching. To make it look less trashy, try spray painting the outside of the bottles a single, uniform color like matte black or terracotta before planting.
Because the containers are small and made of plastic, they are perfect for smaller herbs like Thyme, Chives, Parsley, and small annual Basil plants. These tiny planters heat up quickly and need diligent watering; however, the plastic also helps hold moisture longer than clay. I suggest keeping this system out of direct, intense afternoon sun to prevent the plastic from overheating the roots.
8. Cinder Block Stacks
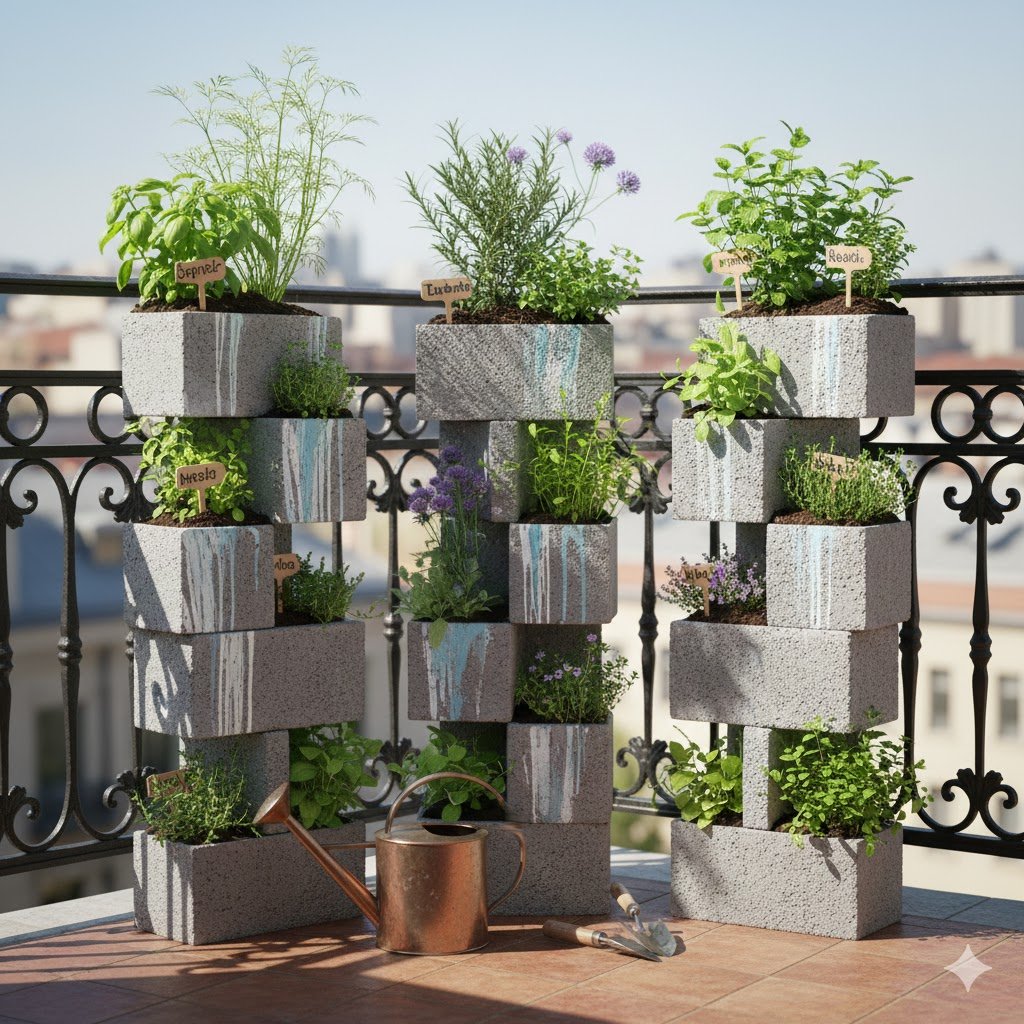
If you like an industrial, robust look, stacking hollow cinder blocks is a fantastic option. You stack the blocks, typically in a staggered formation for stability, and use the wide, hollow holes to plant small herbs like oregano and marjoram. This method is incredibly stable and virtually indestructible, perfect for windy balconies.
You will need to place a piece of screening or fabric at the bottom of the hollow block to keep the soil from falling straight through. Because the blocks are so heavy, plan your layout before you start stacking! Ensure the formation is stable and wide at the base. You can even paint the blocks vibrant colors or use stencils for a more artistic design.
Cinder blocks are porous, meaning they wick moisture away from the soil, so your herbs will dry out quickly. This makes them ideal for Mediterranean herbs like Oregano, Thyme, and Sage, which thrive in drier, well-draining conditions. Avoid planting water-intensive herbs like Mint here. The best part? The flat tops of the blocks can serve as mini-shelves for gardening tools or decorative items.
9. Tin Can Tower

If your DIY style leans toward colorful and cute, a tin can tower is a delightful project. This involves painting and attaching varying-sized tin cans (pierced for drainage) to a narrow wooden plank or pole. The final structure is a cheerful, vertical column of greenery that adds a wonderful pop of color to the balcony.
First, thoroughly wash and smooth the edges of all your cans. Drill a couple of drainage holes in the bottom and then paint them with outdoor spray paint—the brighter, the better! You can then secure them to a backing board using simple nails or screws driven through the back of the can. Make sure to stagger the cans vertically so the lower ones don’t get shaded out completely.
This setup works best for small-to-medium herbs that don’t need a lot of depth, such as Chives, Parsley, and small varieties of Mint. Since the cans are metal, they can heat up significantly under intense sun, potentially cooking the roots. I highly recommend placing this tower against a wall that receives morning sun but is shaded from the harsh afternoon heat to prevent root damage.
10. Old Gutter Troughs
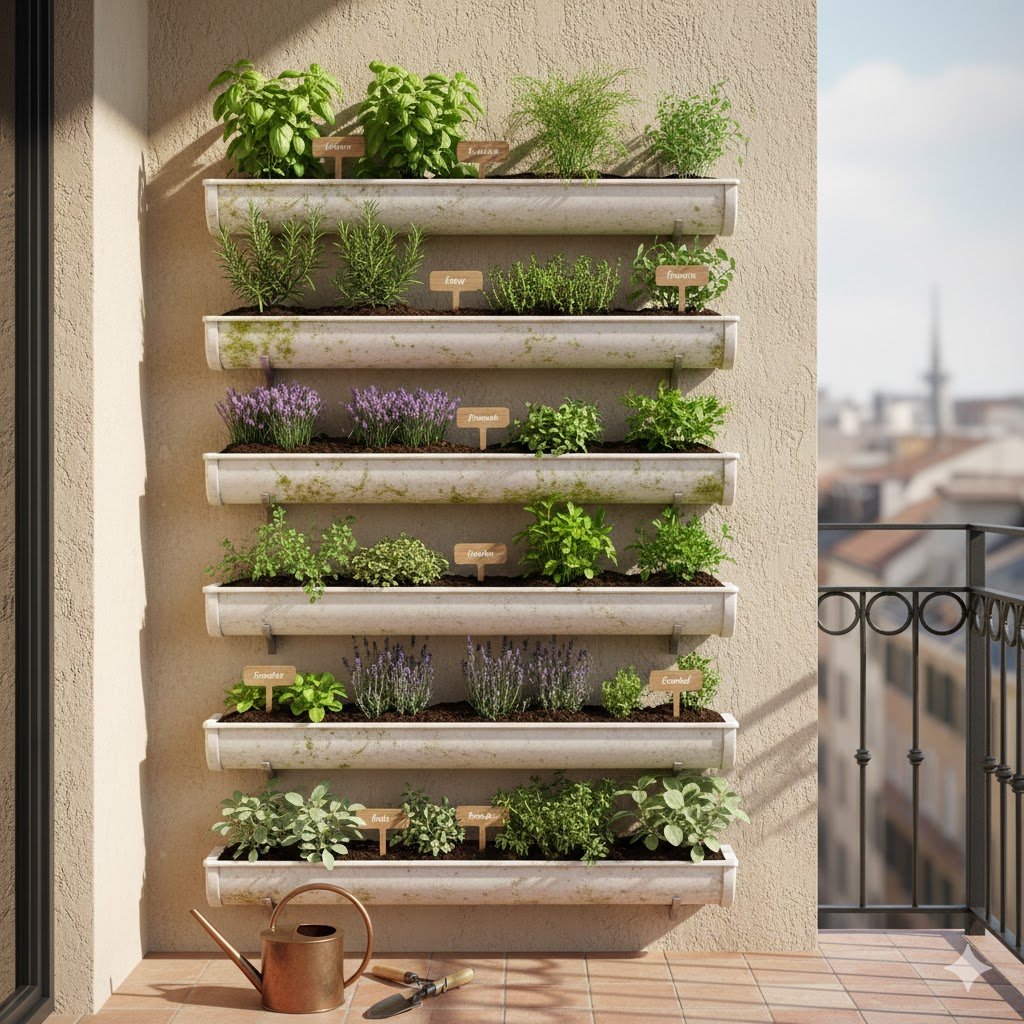
Reusing old aluminum or vinyl gutter sections is a brilliant way to create long, linear planting spaces. You mount the sections horizontally onto a wall or fence, creating neat, successive rows of herbs. This method is excellent for providing uniform planting depth across a large wall area.
Cut the gutters into manageable lengths (usually no more than four feet) and attach gutter end caps. Drill plenty of drainage holes along the bottom of the gutter—this is non-negotiable! Use simple brackets or L-shaped shelf supports to mount them to the wall, ensuring they are perfectly level (or slightly tilted forward) so water doesn’t pool in the middle.
Gutter troughs are fantastic for long-rooted herbs or anything you harvest often, such as Microgreens, Leaf Lettuce, Cilantro, or Parsley. They provide a lot of lateral root space, which encourages lush, bushy growth. The downside is that since the soil volume is shallow, the gutters are prone to drying out very quickly. For best results, use a high-quality, water-retentive potting mix and monitor moisture levels frequently.
C. Structural & Aesthetic Walls (Modern Look)
11. Wire Mesh Grid (Trellis Style)
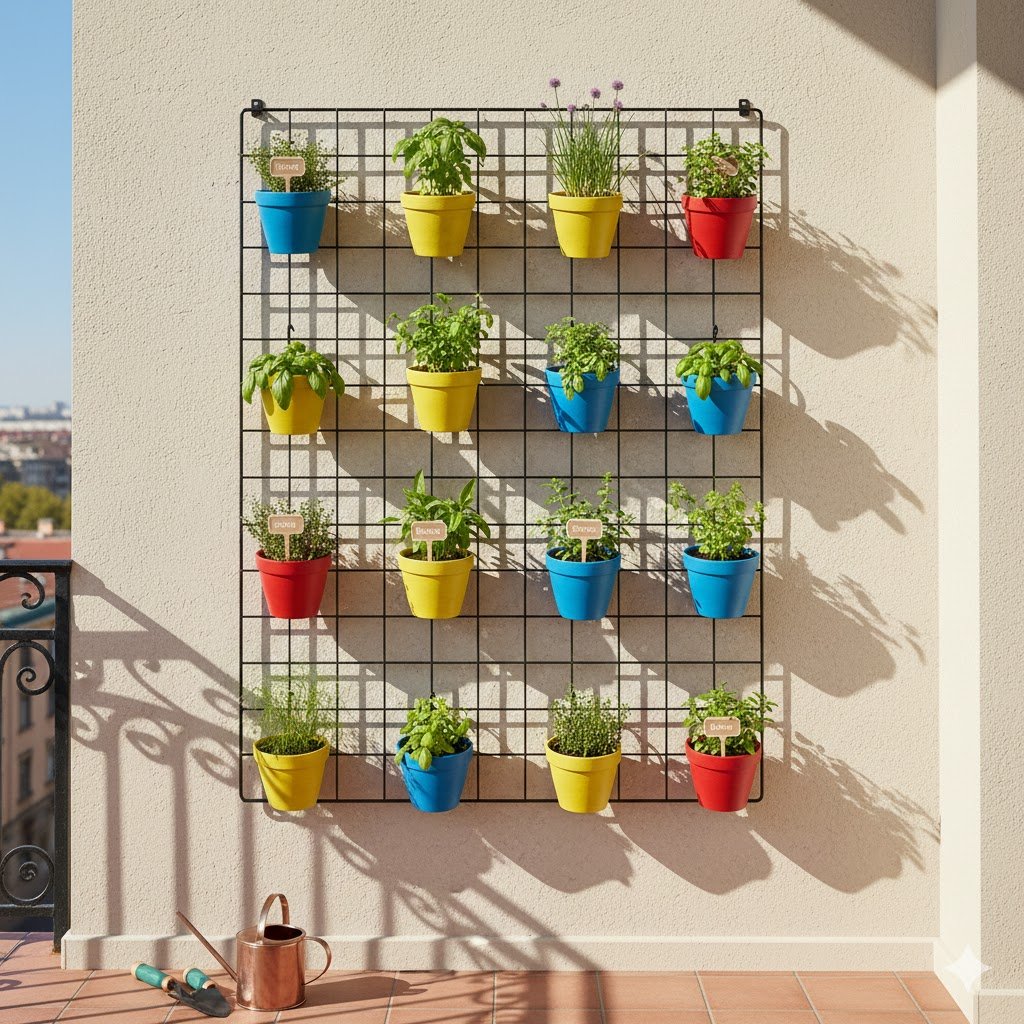
For a modern, industrial, and highly adaptable look, use a simple sheet of wire mesh, often sold as a gardening trellis or concrete reinforcement grid. Once mounted securely to the wall, you use S-hooks to hang individual pots or containers anywhere you like on the grid. It’s highly customizable and allows for maximum flexibility.
The initial setup requires securing the large, flat grid safely to the wall. Use standoffs or spacers to ensure the grid sits a few inches away from the wall—this improves air circulation and prevents moisture from building up against your balcony surface. Then, simply hang small terracotta pots, galvanized buckets, or even glass jars with wire handles.
Because you can easily move the containers, this is the best setup for rotational gardening. You can shift a sun-loving Basil pot up, and move a shade-loving Mint pot down, optimizing light exposure constantly. Use herbs that look great dangling, like trailing Rosemary or creeping Thyme, which will weave themselves through the grid over time, creating a beautiful effect.
12. PVC Pipe Wall
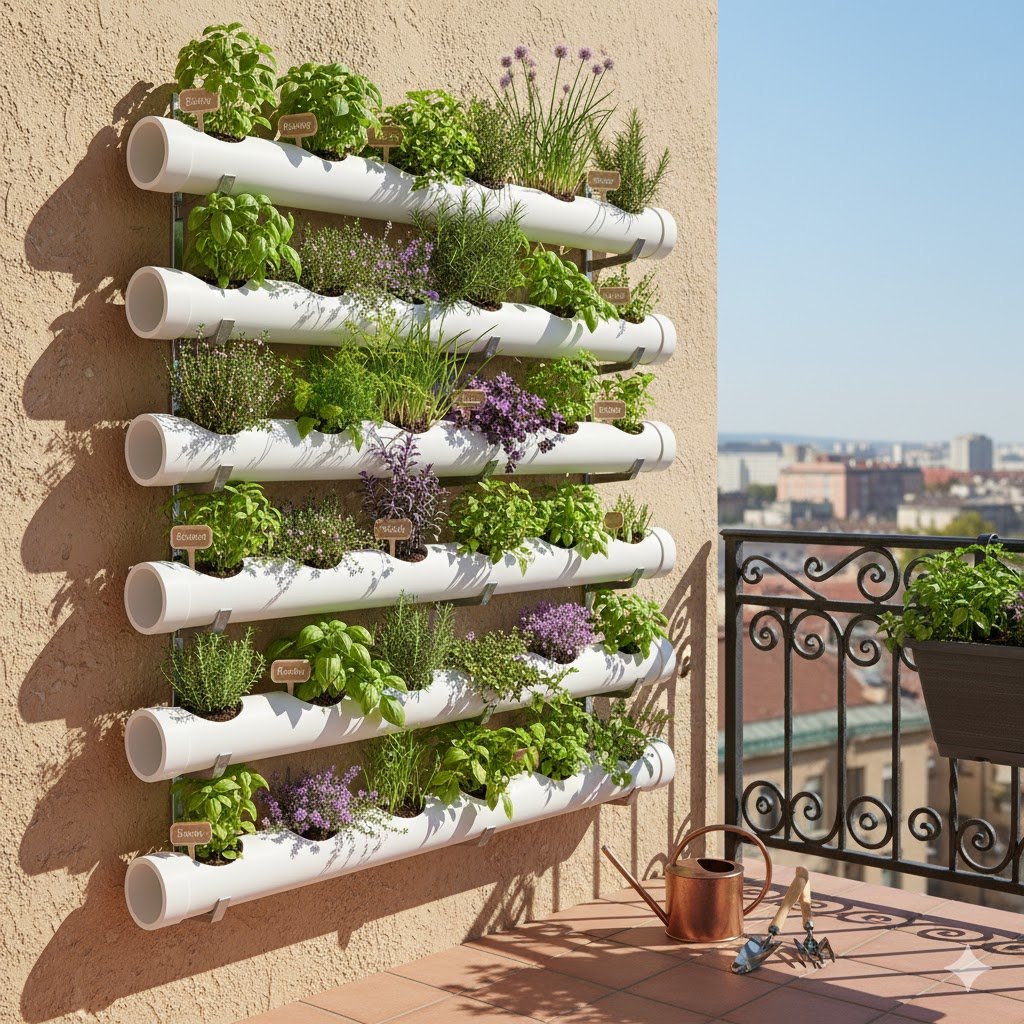
A PVC pipe wall is ideal if you are considering a small-scale drip irrigation system, as the pipes are already built for water transport. The idea is to cut large diameter PVC pipes into sections, drill specific holes for planting, and mount them horizontally or vertically on the wall. It’s a clean, futuristic look that is highly practical.
To create horizontal planters, cut large holes (4-6 inches wide) every 10 inches along the top of the pipe, leaving the ends capped. Drill several small drainage holes underneath the pipe, opposite the planting holes. Use strong, heavy-duty brackets to mount the pipes to the wall. You can even run a single hose line through the top pipe that trickles down to the layers below.
This method works well for herbs that are naturally shallow and benefit from controlled watering, such as Chives, Cilantro, and bush-type Basils. The white plastic reflects heat, which can be a bonus in extremely hot climates. However, the limited soil volume means plants will need frequent feeding with liquid fertilizer to replace nutrients washed away by the controlled watering.
13. Wooden Pegboard Planter
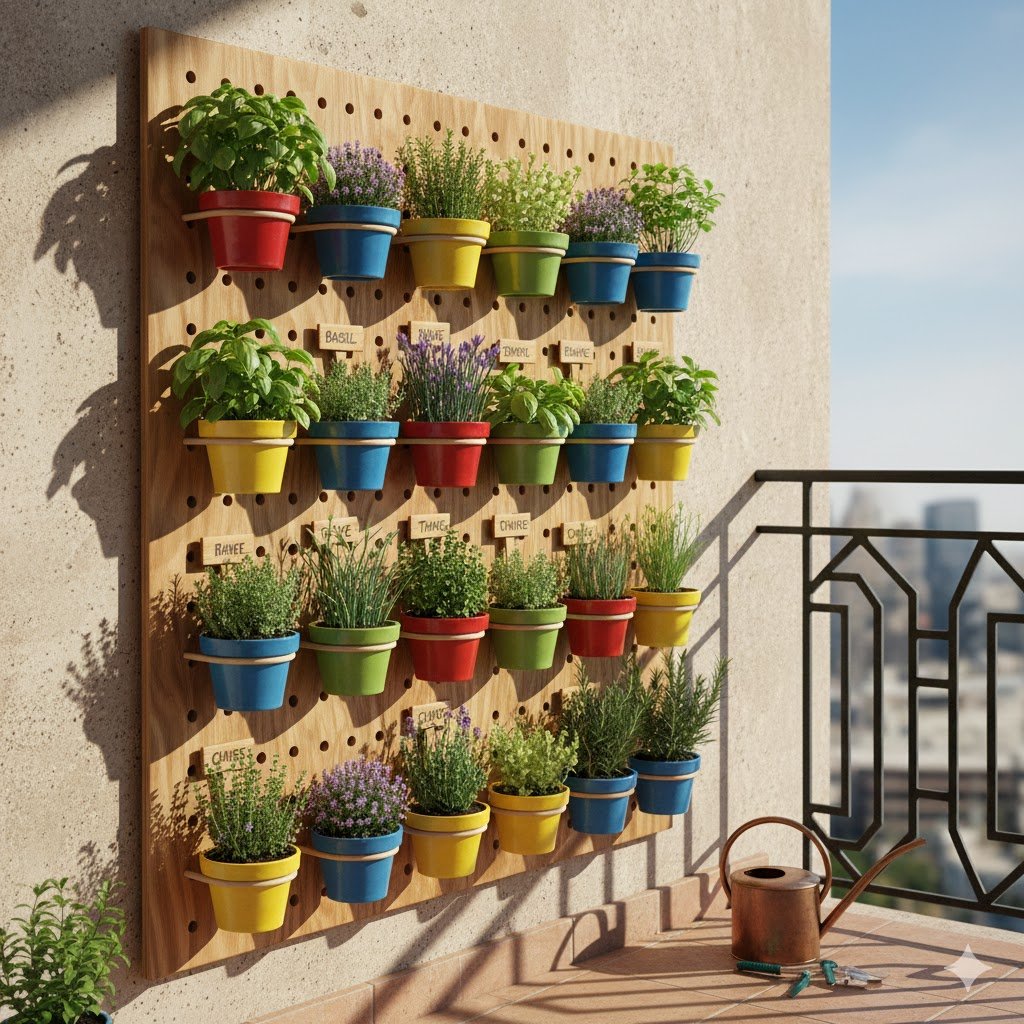
A wooden pegboard offers a delightful mix of structure and flexibility, giving your balcony the look of an organized workspace. You use a large sheet of painted wooden pegboard and attach small, simple shelves, brackets, or hooks that can be moved around as your herbs grow or as you change your design whim.
Source exterior-grade pegboard or ensure you seal a standard board thoroughly with an outdoor varnish before installation to prevent warping. Mount the board securely to the wall using spacers, just like the wire grid. You can then buy small L-shaped brackets to hold pots or get creative by hanging small woven baskets.
This is a fantastic option for a mixed display. Use small pots of Basil and Thyme on the shelves, and use the pegs to hang your harvesting scissors or small hand tools. The main benefit is the ability to adjust the height of your pots easily. If a plant starts getting shaded out, you simply move its shelf up a row! Ensure your shelves are stable, especially against high winds.
14. Framed Moss/Kokedama Wall
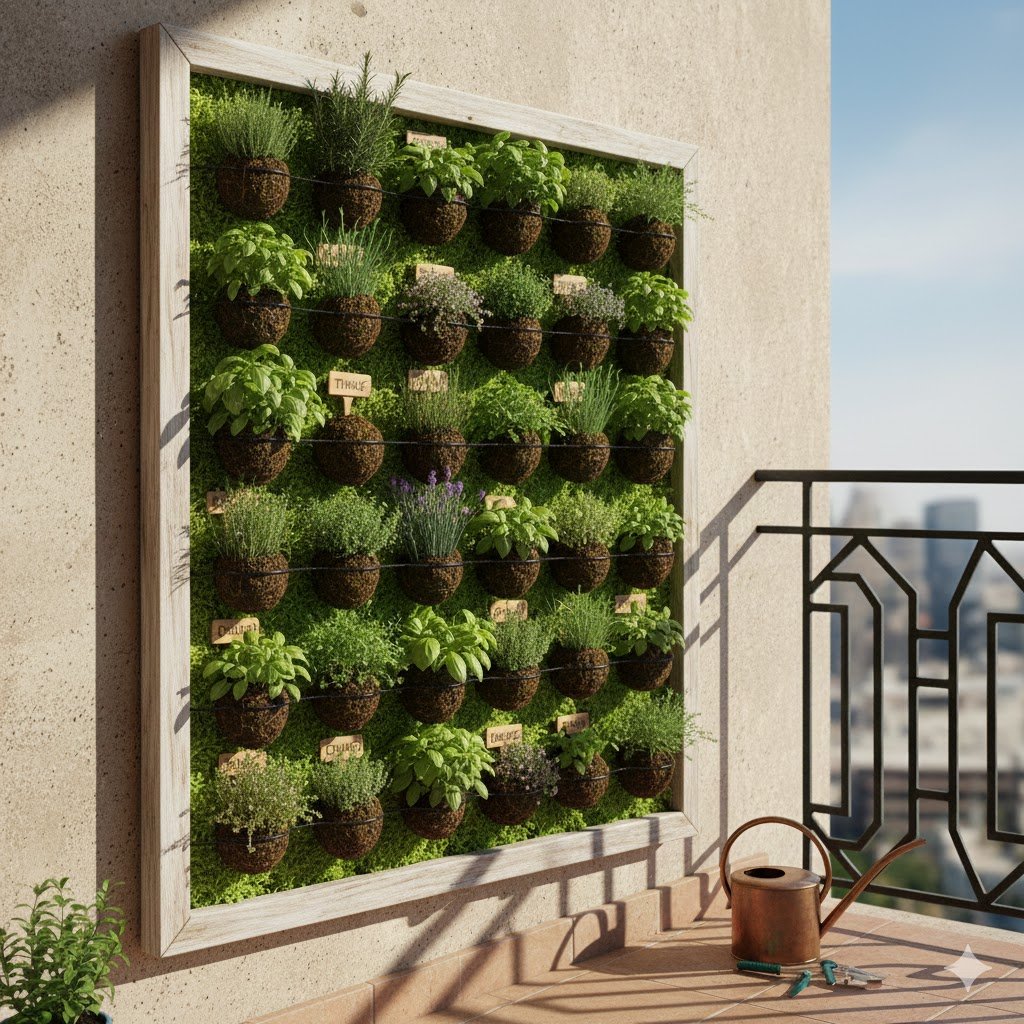
For the truly aesthetic-minded gardener, a Framed Moss or Kokedama Wall is a minimalist and sculptural showstopper. Kokedama are Japanese moss balls, and the idea is to mount these balls, which contain the herb’s roots, directly onto a decorative backing board or frame using twine or wire. This creates a living, artistic mosaic.
This setup is definitely more advanced. You’ll need to create the moss balls first (mixing peat moss, soil, and clay) and wrap them tightly around the herb roots. Mount these to a piece of waterproof wood or a sleek metal frame. This works best when you group the moss balls tightly together for a cohesive look.
This technique is best for smaller, less aggressively rooted herbs like Thyme, Oregano, and maybe a small-leafed Mint. The key to care is ‘dunking’—you take the moss ball off the wall and submerge it in water for a few minutes until it’s saturated, then let it drain before rehanging. This is a high-effort, high-reward method that results in a stunning visual impact.
15. The Window Box Stacker
The window box stacker is a modern twist on a classic gardening container. Instead of placing the boxes on a sill, you mount traditional window boxes or long troughs directly to the wall, staggering them vertically to allow light and water to reach the lower tiers. It provides a clean, uniform look with excellent soil volume.
You must use heavy-duty wall brackets for this system, as a single window box full of wet soil is extremely heavy. Install the top box first, and then measure carefully so that the box below sits far enough in (or down) to avoid shading out the plant life beneath it. Ensure every box has great drainage, as the staggered positioning means water from the top can run into the bottom ones.
Because window boxes hold a substantial amount of soil, they are ideal for larger, deep-rooted herbs like Rosemary, Sage, and Lavender, which really need room to grow. You can also mix several smaller herbs in one box (e.g., three types of basil). Just remember to water the soil line in each box individually, rather than relying solely on runoff from the layer above.
Vertical Garden Care & Maintenance
Once your garden is built, the real fun begins. Vertical gardens have specific needs you need to address consistently.
- Watering Challenges: Your biggest challenge will be moisture retention. Vertical gardens dry out significantly faster than traditional ground pots because they are exposed to air on all sides. My top advice is to use a large watering can and always water slowly, using a top-down approach for stacked systems. You can also use a misting bottle on the foliage of humidity-loving herbs like Mint.
- Rotation: Balconies are often directional, meaning one side of your vertical wall might get morning sun and the other afternoon shade. To ensure even growth, make it a habit to rotate your pots (especially the single-hanging ones) every week or two. This prevents your plants from getting leggy as they stretch desperately toward the sun.
- Harvesting: Knowing how to harvest is crucial for encouraging bushy, beautiful growth. Never just strip the leaves from the top of the plant. Instead, prune your herbs by pinching or snipping just above a set of two small leaves. This signals the plant to branch out, resulting in a fuller, higher-yielding herb.
- Pest Control: The good news is that pests are often easier to spot in a vertical arrangement. For common invaders like aphids or spider mites, I stick to simple, organic solutions. A mix of water and a few drops of dish soap in a spray bottle works wonders. Spray the undersides of the leaves every few days until the problem subsides, but always test on a small leaf first.
Final Thoughts
Moving your herb garden onto a vertical plane is the single best decision you can make for a small balcony space. It’s an effective way to maximize your harvest while creating a stunning, high-impact feature wall. I hope one of these 15 designs inspires you to start building! Which space-saving idea are you going to tackle this weekend? Share your before-and-after pictures with us!