

I remember the frustrating days of traditional gardening—spending entire Saturdays battling aggressive, deep-rooted weeds only to end up with a sparse harvest scattered across a huge, disorganized plot. It felt like I was working for the garden, not the other way around. If you’ve ever looked at your existing garden space and felt overwhelmed by the sheer size, the poor soil quality, or the constant need to amend and re-amend, I’m here to tell you that there is a better, smarter way to grow an absurd amount of food in a surprisingly small area. It’s a complete shift from the sprawling rows of the past to a method focused purely on density and efficiency.
The solution we’re discussing today is the powerful combination of a raised bed and the Square Foot Gardening (SFG) method. This isn’t just about putting walls around some dirt; it’s a systematic, high-yield, low-maintenance approach that organizes your entire growing space into manageable, predictable units. We’re essentially engineering a perfect micro-environment for our plants, drastically cutting down on weeding, watering, and backbreaking labor. I can personally attest that moving to this method transformed my gardening from a seasonal chore into an enjoyable, productive hobby.
In this comprehensive guide, we’re going to tackle every part of the process together. We’ll start by gathering the right materials—specifically, building a sturdy, standard 4’x4′ frame. Then, we’ll move into creating the secret ingredient: the perfect SFG soil mix. Finally, we’ll mark out the signature 1-foot grid that makes this system so effective, giving you the complete map you need to start planting smarter, not harder. By the end of this article, you’ll have a beautiful, productive garden ready for its first growing season.
What Is Square Foot Gardening (SFG)?
Square Foot Gardening is a brilliant, formalized method pioneered by Mel Bartholomew. The core concept is wonderfully simple: instead of planting in long, wide rows, you contain your garden in a raised bed (typically 4 feet by 4 feet) and divide the planting area into a grid of 1-foot squares. The magic of this approach lies in the philosophy that you only need to work and maintain the small space where the plants are actively growing, allowing you to maximize yield by planting densely according to specific rules for each square.
The beauty of SFG is that it forces you to think vertically and intensively. You are maximizing the use of the square footage you dedicate to gardening, treating it like a well-organized apartment building rather than a sprawling ranch. This method completely changes how you interact with your plants. Since you never walk on the soil within the bed, the growing medium stays light and fluffy, meaning the plant roots don’t have to fight compacted dirt.
This structured approach makes gardening highly scalable and manageable, perfect for beginners who might be intimidated by large plots. Bartholomew didn’t just invent a planting pattern; he created a full system complete with a custom soil recipe, dense planting guidelines, and a strong emphasis on vertical gardening through trellising. Understanding these fundamentals is the bedrock of successful SFG, giving you the clarity and structure you need before you even grab a hammer.
Benefits of SFG in a Raised Bed
The first major benefit you’ll notice is the incredible Space Efficiency this system offers. By using the SFG grid, you can plant up to five times as many vegetables in the same area compared to traditional row gardening. This is because we eliminate the wasted space traditionally reserved for pathways between rows and focus the nutrients exactly where they are needed. For those of us with small urban lots, a tiny backyard, or even just a patio, a 4×4 SFG box delivers a surprising amount of food—it truly is gardening optimized for small footprints. You’ll be shocked at the variety you can harvest from just 16 squares.
SFG also dramatically reduces the need for constant labor, primarily through effective Weed Reduction. The custom soil mix (which we’ll detail later) is sterile and fluffy, meaning it doesn’t contain dormant weed seeds from your native yard. Furthermore, because we plant vegetables so densely in each square, the plants’ mature leaves quickly form a canopy that naturally shades the soil. This lack of sunlight prevents new weed seeds from germinating, meaning you spend maybe five minutes a week pulling an occasional sprout, rather than hours on your hands and knees fighting crabgrass.
From an Ergonomics standpoint, raised beds paired with the SFG method are a game-changer for your body. If you build your bed 12 inches high, you bring the soil level up, minimizing the need for deep bending or kneeling. The 4-foot width is also key: you can reach every single square easily from the perimeter without ever stepping on the soil. This prevents soil compaction, keeps the precious Mel’s Mix healthy, and saves your back.
Finally, the greatest advantage lies in having Custom Soil. Unlike traditional gardening where you’re forced to work with whatever heavy clay or rocky dirt nature gave you, a raised SFG bed is filled with a specific, nutrient-rich, lightweight mix. This ensures perfect drainage and aeration, giving your plants the ideal, fluffy environment to thrive from day one, completely bypassing the headaches of dealing with native soil problems.
Materials and Tools Checklist
1. Lumber Shopping List (for a standard 4′ x 4′ x 12″ bed)
When selecting lumber for your 4×4 raised bed, stability and longevity are paramount. For a bed that is 12 inches high (which is ideal for root depth and ergonomics), you will need two stacked layers of 2″x6″ lumber. If you buy four 2″x6″x8′ boards, you can cut each one in half to get eight 4-foot pieces, which perfectly creates two layers of 4’x4’ boards (eight pieces total). Remember to use rot-resistant wood like cedar, redwood, or untreated pine, as chemically treated wood can leach into your food.
For assembly, don’t skimp on the Corner Fasteners. Since this bed will be holding hundreds of pounds of moist soil, you need robust connections. I always recommend using 3-inch exterior-grade wood screws or, even better, carriage bolts for maximum strength and durability, especially if you plan on moving the bed later. These long fasteners ensure your corners remain perfectly square and won’t buckle under the pressure of the soil.
The final piece of material is the Lining, which is optional but highly recommended. If you have any gophers, moles, or aggressive weeds in your yard, hardware cloth (a fine metal mesh) stapled to the bottom will protect your plants from below. Even if pests aren’t an issue, stapling a layer of permeable landscape fabric to the inside of the frame will prevent the Mel’s Mix soil from leaching out of the gaps over time, while still allowing for proper drainage.
2. Tools
You won’t need a huge arsenal of equipment, but the right tools make this DIY project safe and fast. At a minimum, you’ll need a measuring tape, a pencil, and reliable eye and ear protection for safety. Precise measurements are important, especially if you are using the interlocking joint method for the corners, so a quality tape measure is essential.
For cutting the lumber, a power saw is required. A miter saw is the easiest and most accurate tool for cutting clean, straight 90-degree angles, but a simple circular saw will work just fine for the straight cuts required for a simple box frame. If you plan to make many beds or use special joints, renting or borrowing a miter saw might be worth the small investment.
Finally, you’ll need a powerful drill/driver for assembly. A cordless model with good torque is ideal for sinking those 3-inch exterior screws quickly and completely. Always remember to pre-drill pilot holes, especially when driving screws close to the ends of the boards. This prevents the wood from splitting, which is frustrating and can weaken your frame significantly, ensuring your box lasts for many growing seasons.
Step-by-Step Construction of the Raised Bed
1. Site Selection and Preparation
Choosing the right spot is the first and most critical step in this entire project. Vegetables thrive on sunlight, so you absolutely must select a location that receives a minimum of 6 to 8 hours of direct, unfiltered sunlight per day. Watch your yard throughout the day before committing to a location—a spot that is sunny at 10 AM might be completely shaded by a tree or roofline by 2 PM, which can seriously stunt the growth of most fruiting vegetables.
Once you’ve confirmed the perfect sunny spot, it’s time to ensure the ground is perfectly level. This is not a step to skip, as a bed built on uneven ground will twist, put stress on the joints, and look messy, leading to uneven watering and drainage. Use a long level or a simple board with a level on top to check the entire 4×4 area, adding or removing soil as needed until the base is flat.
The final preparation involves clearing the area beneath the future bed. Remove any large rocks, sticks, or existing turf. If you’re dealing with stubborn grass or weeds, you can layer down several sheets of cardboard before placing the bed down. This acts as a natural weed barrier that breaks down over time, providing a clean slate for your perfect garden.
2. Cutting the Lumber
For a simple and strong 4×4 box with two stacked layers, you will be primarily cutting eight pieces of wood, each exactly four feet long (48 inches). This simple cut list keeps the process straightforward and minimizes mistakes. If you purchased four 8-foot boards, simply cut them in half. Always measure twice and cut once, making sure your cuts are perfectly square to ensure tight joints that hold the soil in place.
If you decide to use overlapping joints (where the end of one board overlaps the face of the next), you will need to adjust the length of the interior boards. For example, if your lumber is 1.5 inches thick, two of the side pieces on each layer should be cut to 45 inches (4 feet minus two wood thicknesses). However, for simplicity and speed, the basic butted joint with strong corner screws is usually more than enough strength for a home SFG bed.
Regardless of the joint type, label your pieces after cutting. This is particularly helpful if you have different lengths. For instance, marking the eight pieces “Side A” ensures you grab the correct boards during assembly. Having all your lumber pre-cut and stacked neatly by length saves immense time and mental energy during the actual construction phase.
3. Assembling the Frame
Now for the rewarding part: assembling the frame! Start by building the first 4’x4′ square (the bottom layer). Lay two long pieces parallel, and connect them with the other two pieces at the ends, using wood clamps to hold the joint tight and perfectly square before drilling. I always stand the boards on edge to make sure the full 6-inch height is exposed.
Once the first layer is complete and secure, lay the second layer of boards directly on top of the first. Align them perfectly—you want the second layer to sit flush on the first. This stacking creates the desired 12-inch depth. Then, use your longest screws or carriage bolts to secure the two layers together, fastening them every foot or so along the perimeter to ensure they act as one cohesive unit.
A crucial pro-tip here is to pre-drill all your holes, especially near the ends of the wood. Wood is prone to splitting when a large screw is driven near the edge, which can compromise the integrity of your corner joints. Using a drill bit slightly thinner than your screw diameter for the pilot holes will prevent this splitting entirely, leaving you with strong, professional-looking corners.
4. Securing the Base (Optional but recommended)
Before moving your frame into its final position, you may need to prepare the base depending on your local pests. If gophers or moles are a known issue in your region, securing hardware cloth to the bottom of the frame is non-negotiable. Lay the mesh across the bottom, fold the edges up slightly on the sides, and use heavy-duty staples (like roofing staples) to fasten it securely to the wood. This acts as a permanent subterranean fence.
For all other gardeners, stapling a layer of landscape fabric to the inside of the frame is highly beneficial. While this doesn’t protect against burrowing pests, it serves two critical purposes. First, it acts as a permeable barrier between the new soil and the underlying native dirt, preventing aggressive native weeds from poking through. Second, it keeps your expensive Mel’s Mix inside the box by stopping the finer particles from washing out through the inevitable gaps between the boards, especially at the corners.
The landscape fabric or hardware cloth should be installed before the box is placed in its final location, making the stapling process much easier. Once the box is complete and the base is secured, move it into the sunny, level spot you prepared earlier. Now, it’s ready for the most important ingredient: the custom soil mix.
Filling the Bed with Mel’s Mix (The SFG Soil)
1. The Mel’s Mix Formula
The true secret weapon of Square Foot Gardening is Mel’s Mix, a specialized, proprietary soil recipe that makes the entire system work. Unlike heavy garden soil or potting mixes, Mel’s Mix is designed to be lightweight, airy, perfectly draining, and extremely fertile—essentially, the perfect environment for root growth. The formula is a simple, uniform ratio of 1/3 Peat Moss (or Coco Coir), 1/3 Coarse Vermiculite, and 1/3 Compost.
Let’s break down those components. The Peat Moss or Coco Coir provides the structural bulk and retains moisture beautifully. I personally prefer Coco Coir as it’s a slightly more sustainable choice. The Coarse Vermiculite is crucial; this material is a lightweight, expanded mineral that holds air and water like a sponge, ensuring the mix never compacts and always remains fluffy for happy roots.
The final third, Compost, is where the nutrition comes in. The SFG method specifically recommends using a blend of at least five different types of compost—for example, mushroom, worm castings, leaf mold, aged manure, and homemade vegetable compost. Blending these sources ensures a broad spectrum of trace minerals and nutrients, giving your plants everything they need to flourish without needing constant chemical fertilization.
2. Mixing Process
Once you have your three components gathered, the mixing process needs to be thorough. You must first calculate the volume needed. A 4’x4′ bed at 12 inches deep is 16 cubic feet of space, so you’ll need just over 5 cubic feet of each ingredient (peat, vermiculite, and compost). I highly recommend buying the largest compressed bales of peat or coir you can find, as well as large bags of coarse vermiculite.
The best way to mix is to use a large, inexpensive plastic tarp. Lay it flat on the ground and pour the measured amounts of each component onto the tarp. Then, starting from one corner, lift the edge of the tarp and fold the ingredients over themselves, mixing in small batches. You can also use a hoe or a shovel, but the tarp method is far more effective and less strenuous.
You’ll know the mix is ready when the entire volume looks uniform in color and texture—it should feel light and airy, and not clumpy or heavy. If you can grab a handful and squeeze it, it should hold its shape slightly but crumble easily when poked. Once perfectly mixed, your custom-made soil is ready to be loaded into the raised bed.
3. Filling the Bed
Carefully pour the Mel’s Mix into the completed bed frame. I usually do this with a wheelbarrow or large buckets, slowly distributing the soil evenly across the 4×4 area. If you’ve done your calculations correctly, the mix should fill your 12-inch bed right up to the top of the lumber—or at least within an inch or two.
As you fill the bed, do not compact the soil. The entire point of using the lightweight Mel’s Mix is to keep it fluffy, so avoid stepping on it or tamping it down with a shovel. Simply use the back of a rake or a flat board to gently level the surface. Let gravity settle the mix slightly.
Remember that SFG beds require soil replenishment each season. As the compost breaks down, the level will drop slightly. Before planting next season, simply top up the bed with 2 to 3 inches of fresh compost and mix it into the top layer. This annual feeding system keeps the soil perpetually rich and ready for high-density planting.
Creating the Square Foot Grid (The SFG Signature)
1. Why the Grid is Critical
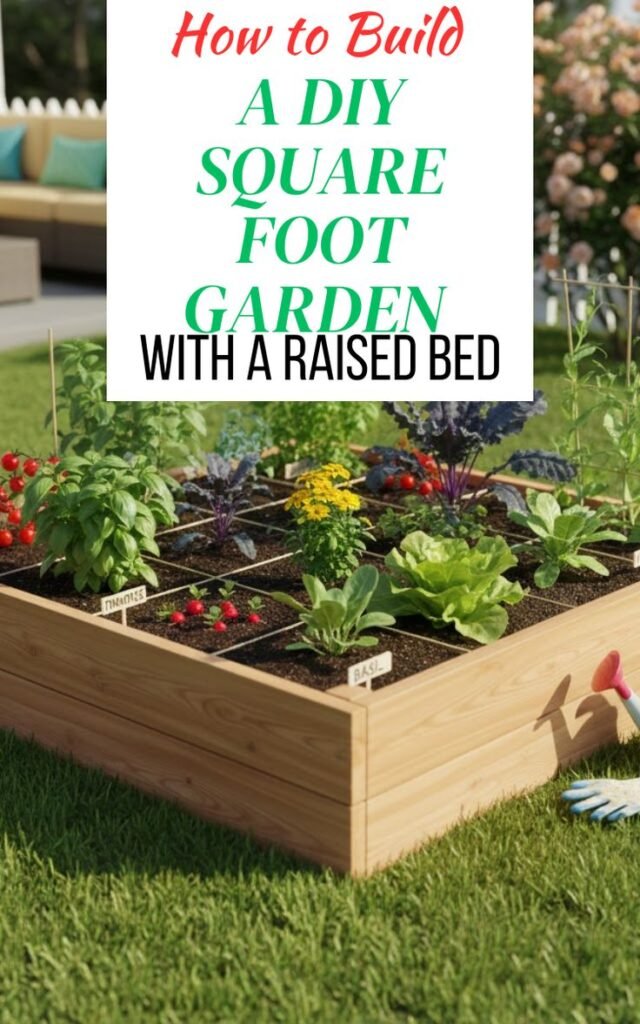
The square foot grid is truly the revolutionary step in this entire process; it is what separates a simple raised bed from a highly efficient SFG system. The grid acts as a permanent, visual garden map that instantly organizes your planting. It completely removes the guesswork involved in spacing by clearly defining 16 separate 1-foot squares within your 4×4 box.
This rigid structure is also what enforces the SFG planting rules. When you know precisely where one square begins and the next one ends, you stop over-planting. This leads to healthier plants because they are given the exact amount of space they need for their root structure, air circulation, and light exposure, preventing overcrowding and competition for resources.
Furthermore, the grid simplifies planning, record-keeping, and crop rotation. Before the season even starts, you can sketch out exactly where your tomatoes, carrots, and lettuce will go. When the season is over, you can easily rotate crops by moving a family of vegetables from one square to a new, non-adjacent square, ensuring your soil nutrients remain balanced year after year.
2. Grid Materials
You have several easy options for creating the permanent grid, and cost and durability are the main differentiators. The easiest and most economical option is durable garden twine. You simply stretch the twine tautly across the bed and secure it at the edges. Twine is flexible and easy to replace, though it can sag slightly over time.
For a more permanent, rigid solution, many gardeners opt for thin wooden slats (like 1-inch strips of cedar) or cheap PVC pipe. These materials are more expensive but provide a long-lasting, highly visible demarcation. Whichever material you choose, the key is that the grid must be visible enough to serve its purpose for the whole season.
I recommend starting with twine for your first bed; it’s non-invasive and easy to install. Just remember that whatever material you choose, it should rest on the soil surface, not be buried in it. It’s simply a visual guide and not meant to impede the roots below the surface.
3. Installation
The installation of the grid begins with marking the edges of the 4×4 bed. Using your measuring tape and a pencil, make a mark every 12 inches along the inside top edge of all four sides. This gives you three marks on each side, which will serve as your anchor points.
Once the marks are made, start running your chosen grid material across the bed. If you are using twine, tie it securely to a small nail or screw at the first mark on one side and stretch it straight across to the corresponding mark on the opposite side, keeping the twine taut and level with the soil. Repeat this process until you have three parallel lines running in one direction.
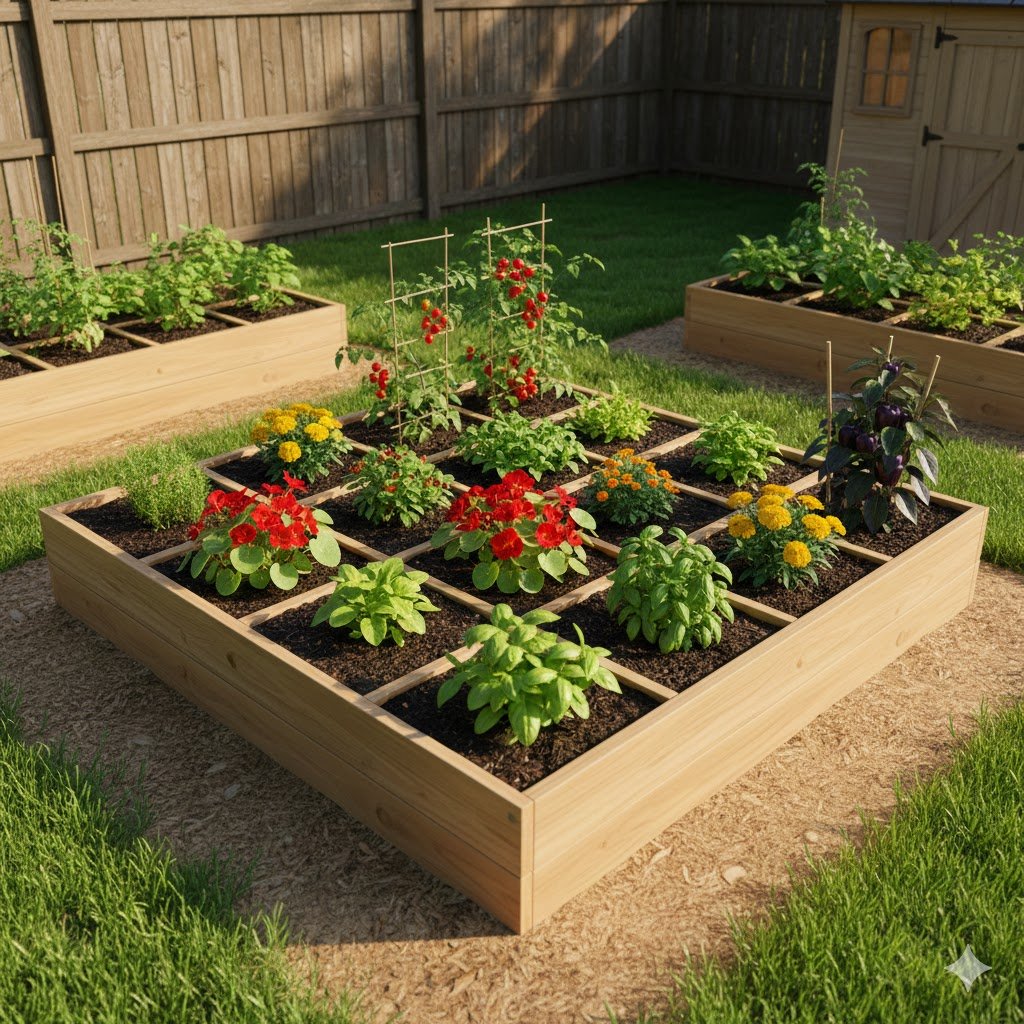
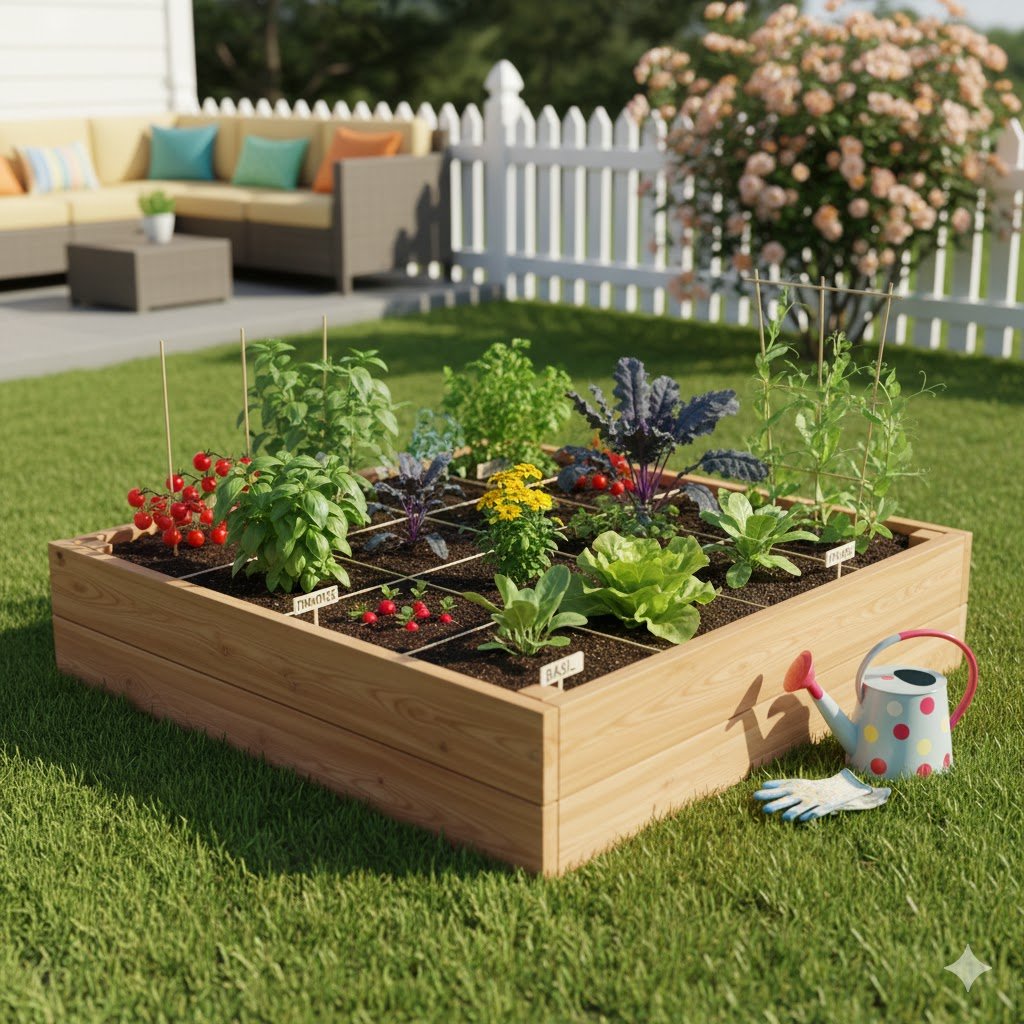
Then, repeat the process with the remaining three lines running perpendicular to the first set. When you are finished, you will have a perfect lattice dividing your bed into 16 distinct 1-foot squares. The finished grid is a satisfying sight—it transforms a simple box of dirt into an organized, productive vegetable factory ready for planting.
Planting and Ongoing Maintenance
1. SFG Planting Rules
The beautiful thing about SFG is that it removes the mystery from planting. Once you have your 16 squares, you simply follow the planting rules based on the size and habit of the mature plant. The density rule dictates how many plants can occupy a single square: large plants like tomatoes or cabbage get 1 plant per square. Medium plants like lettuce, basil, or broccoli get 4 per square. Smaller plants like bush beans or carrots get 9 per square, and tiny plants like radishes can be planted up to 16 per square.
This is also where Trellising becomes essential. Any vining plant—cucumbers, climbing beans, peas, melons, and indeterminate tomatoes—must be trained to grow vertically. By limiting their footprint to a single square at the base and guiding their growth up a trellis, you are utilizing vertical space rather than sacrificing precious horizontal squares. This simple technique exponentially increases your garden’s output.
When planting, ensure you only sow the seeds or transplant the seedlings into the precise number of holes required by the grid density rule. For example, when planting four basil plants per square, place the seeds or seedlings 4-6 inches apart. This intentional overcrowding is what gives SFG its famous weed suppression and massive yields, but it only works if you stick rigidly to the density guidelines.
2. Watering
Because Mel’s Mix is so airy and well-draining, SFG beds often require less water than traditional gardens, but the watering must be done correctly. The goal is to water gently and deeply, ensuring the entire 12-inch depth of the soil is moistened. You should be paying attention to the moisture level in each individual square, as sun exposure or plant size may cause some squares to dry out faster than others.
Avoid using overhead sprinklers, which waste water and can encourage fungal diseases on the foliage. Instead, use a gentle watering wand or a soaker hose system laid directly on the surface of the soil. When hand-watering, focus the water directly onto the base of the plant in each square that needs it, rather than soaking the entire bed mindlessly.
The great advantage of Mel’s Mix is that because it is so fluffy and non-compacting, it holds onto moisture extremely well without ever becoming waterlogged. This quality makes it much more forgiving than native soil. However, during the height of summer, you may need to check the moisture level of the top few inches daily, watering when the soil feels dry to the touch.
3. Weeding
Here’s the part that sounds too good to be true: weeding an SFG bed is almost a non-event. Because the bed is filled with the sterile Mel’s Mix, you don’t introduce a host of dormant weed seeds from your backyard. Any stray seeds that manage to blow in or are dropped by birds will find it difficult to germinate due to the close planting and the dense canopy of your mature vegetables.
The few weeds that do pop up are typically shallow-rooted sprouts, easily removed with a quick pinch or light swipe of the hand. You can patrol your 16 squares in literally minutes, often during your watering or harvesting routines. You will no longer dedicate hours of precious time to backbreaking weeding.
The overall low-maintenance nature is the final reward for your DIY efforts. Your 4×4 garden is contained, organized, fed, and mostly weed-free, allowing you to focus on the joy of harvesting and observing your plants flourish. It truly is gardening simplified and maximized.
Conclusion and Next Steps
You’ve now engineered the perfect environment for highly productive gardening, moving away from traditional, labor-intensive methods toward an organized, efficient system. We started with four simple boards and, through careful planning and assembly, transformed them into a robust, 12-inch-deep container. More importantly, we introduced the magic of Mel’s Mix and capped it with the game-changing square foot grid. This isn’t just a garden bed; it’s a precisely calibrated machine designed to give you a maximum yield with a minimum of effort, all while using less water and virtually no chemical fertilizers.
This approach resolves nearly every common gardening frustration—no more poor drainage, no more compacted soil, and most wonderfully, no more endless weeding. The structured 4×4 bed is entirely self-contained, meaning you can manage your nutrients, track your growth, and harvest your food with precision and ease. It’s an investment of a single weekend of DIY effort that will pay off in fresh, healthy produce for years to come.
Take a moment to admire the completed grid and the beautiful, fluffy soil within. You’ve created a masterpiece of gardening efficiency. Your soil is perfect, your structure is sound, and your planting map is clearly laid out. All that’s left is to bring the seeds and seedlings home and put your new system to the test.
I’m genuinely excited to see the life you bring to your new SFG bed. I’d love for you to share your progress! Snap a picture of your finished, gridded bed and tag us on social media—we always love seeing these DIY projects come to life and hearing about your first planting choices. It’s a great way to inspire others to make the leap to efficient gardening.
Now that the structure is built, the next big step is planning what goes where! You might be wondering how to decide between tomatoes, peppers, and carrots in those 16 squares. That’s a whole topic in itself, so let me know if you’d like to learn some specific Trellis Ideas for SFG or get a list of Recommended Plants for Your First 4×4 Grid. We can make sure you pick the perfect varieties to maximize that first harvest!