
Your fence line is probably the most neglected piece of real estate in your yard. Most people treat it like a property boundary and nothing more, leaving it to become a graveyard for weeds or a boring stretch of sun-bleached wood. I’ve spent way too many Saturdays staring at my own cedar fence, realizing it looked less like a “sanctuary” and more like a high-security enclosure for my lawnmower.
The truth is, if you don’t dress up that perimeter, your yard will always feel unfinished. I learned this the hard way back in ’14 when I planted a row of “fast-growing” bamboo to hide my neighbor’s rusty shed. Within two seasons, that bamboo had tunneled under the fence and was popping up in the middle of his prize-winning hostas. It took three weekends, a heavy-duty pickaxe, and two cases of “apology beer” to fix that mess.
Let’s skip the heartache and get your yard looking like a professional botanical garden without the professional price tag. Here are my favorite battle-tested fence line landscaping ideas that actually work.
1. Best Privacy Plants for Fence Lines
When you’re looking to add some height and hide the neighbors, your first instinct is usually to head to the big-box store and buy whatever is on sale. Big mistake. I once bought ten Leyland Cypresses because they were cheap and promised “instant privacy.” Three years later, they were forty feet tall, thin at the bottom, and brown in the middle. They looked like giant, dying pipe cleaners.
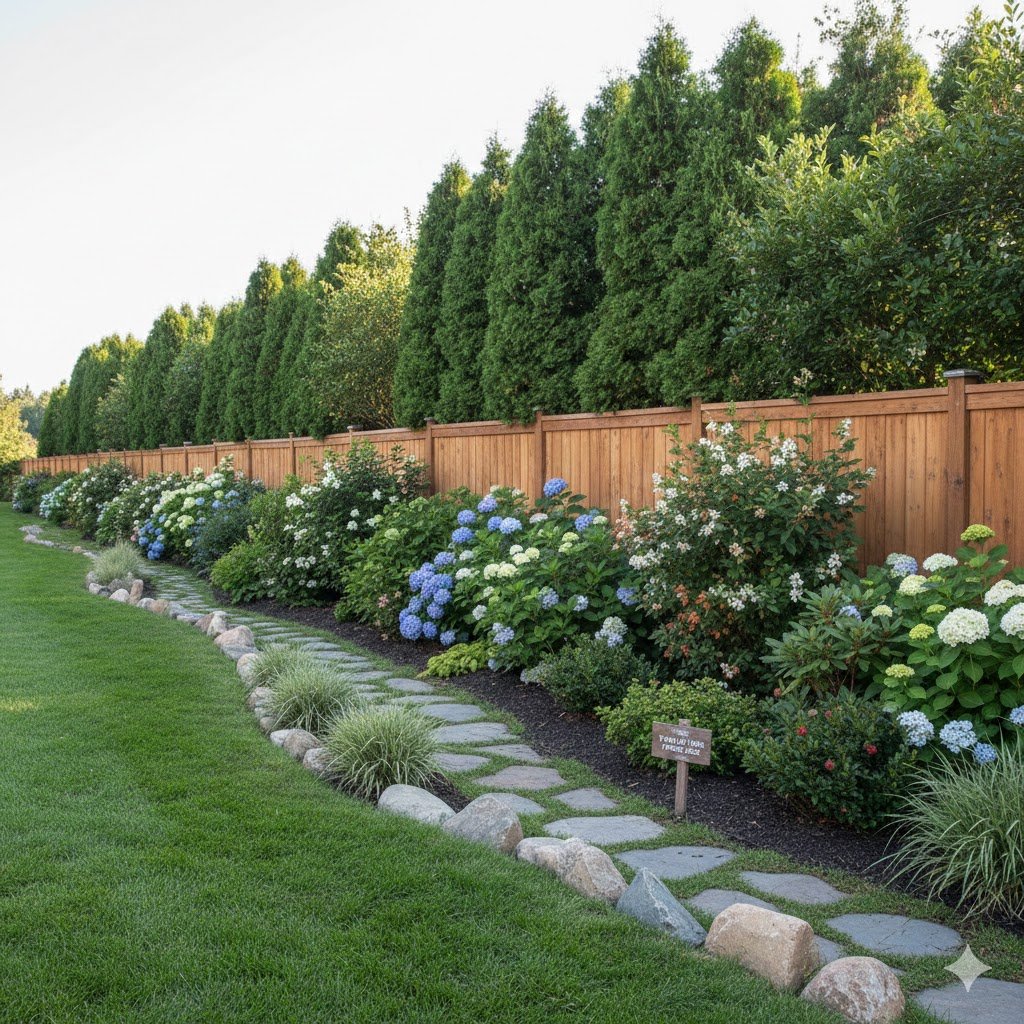
For a privacy screen that doesn’t turn into a maintenance nightmare, I’m a huge fan of Emerald Green Arborvitae. They grow in a tight, columnar shape, meaning you won’t have to spend your entire life pruning them back so you can actually walk on your lawn. They stay green year-round, which is a lifesaver in the middle of February when everything else looks like a scene from a post-apocalyptic movie.
If you want something with a bit more “personality,” go for Sky Rocket Junipers. These things are tough as nails. I’ve seen them survive droughts that turned my lawn into a crisp, and they still looked regal. They have a silvery-blue tint that looks incredible against a dark stained wood fence. Just make sure you space them out; cramming them together is the fastest way to invite root rot.
The secret to success here is the “staggered” look. Instead of planting a boring straight line—which looks like a green wall—offset them in a zigzag pattern. This gives the plants more room to breathe and creates a deeper, more natural look. It also means if one plant dies (and it happens to the best of us), you don’t end up with a literal “toothless” gap in your hedge that screams “I’m a bad gardener.”
2. Low Maintenance Flower Beds Along Fence
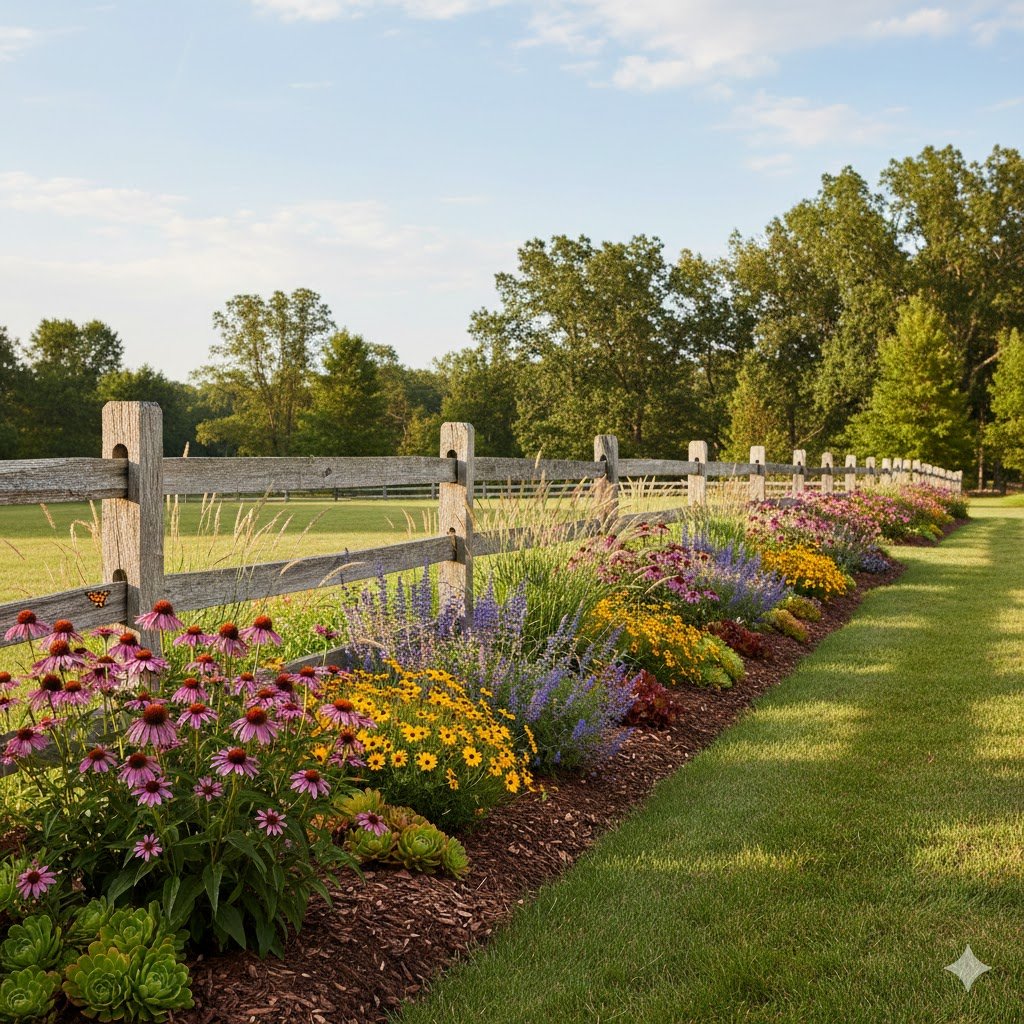
I’m going to be honest with you: if a plant requires me to talk to it or feed it special “formula” every Tuesday, it’s not staying in my yard. I’ve got better things to do, like napping. That’s why I swear by Perennial Borders for fence lines. Once you get these established, they basically take care of themselves while you take the credit for being a “green thumb.”
My absolute “must-have” for a fence line is the Coneflower (Echinacea). These things are the tanks of the flower world. One summer, my irrigation system gave out while I was on vacation, and everything in my yard turned to dust—except the coneflowers. They just kept blooming like nothing happened. They come in every color now, but I still love the classic purple. It pops beautifully against a white vinyl fence.
Pair those with some Black-Eyed Susans and maybe some Stonecrop (Sedum). The Stonecrop is great because it fills in the “feet” of the taller plants. It creates a thick mat that smothers out weeds before they even start. I used to spend hours on my knees pulling dandelions along the fence until I figured out that if you just plant enough “good” stuff, the weeds don’t have a place to sit down.
When you’re building these beds, don’t make them too narrow. A skinny two-foot bed looks like a mistake. Go for at least four feet deep. This gives you enough room to layer your plants—tall ones in the back against the fence, medium in the middle, and short “ground huggers” in the front. It creates a “wave” effect that makes your yard look twice as big as it actually is.
3. Climbing Vines for Chain Link Fences
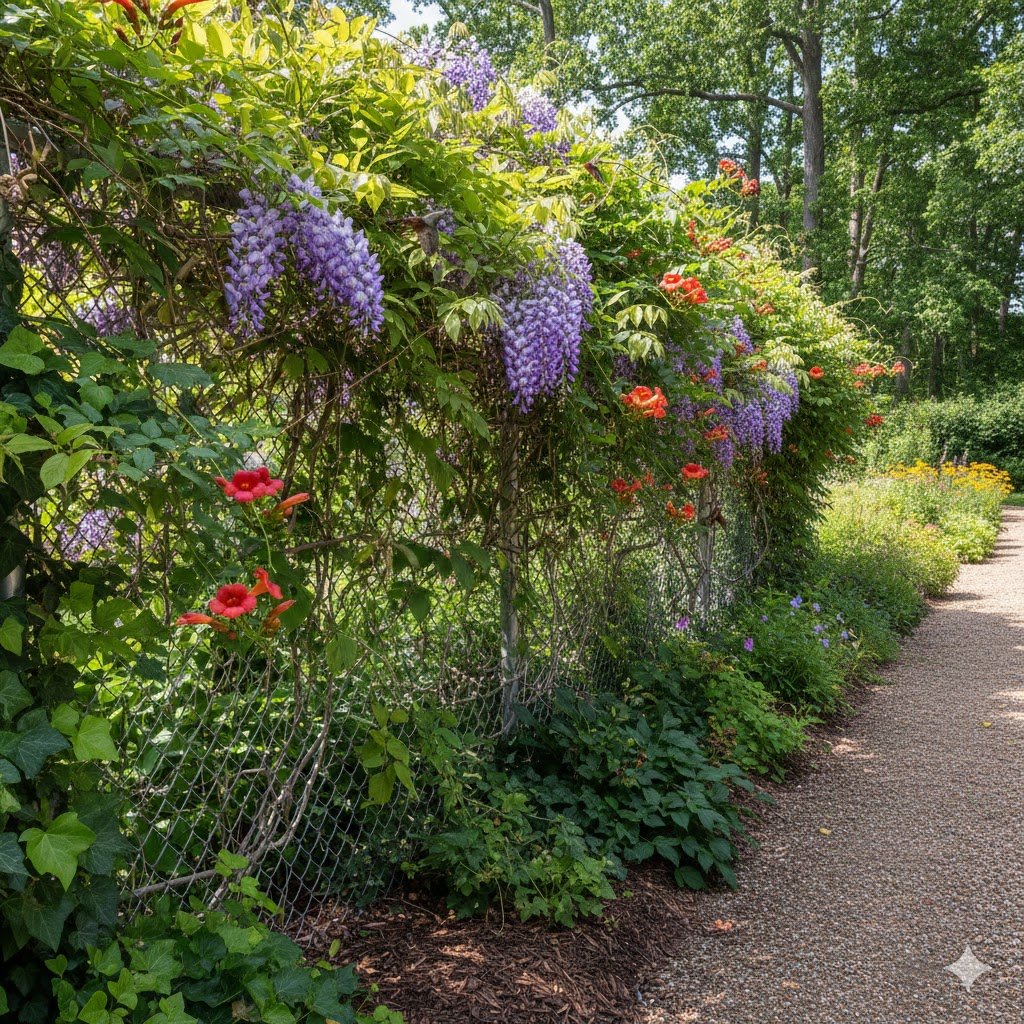
If you’re staring at an ugly chain-link fence, I feel your pain. It’s the “sweatpants” of fencing—functional, but not exactly stylish. The good news is that chain link is basically a giant trellis just waiting for some greenery. However, do not—I repeat, do not—plant Wisteria or Trumpet Vine unless you want to spend the rest of your life fighting a plant that wants to eat your house.
I once planted a “fast-growing” Trumpet Vine on my back fence, and by August, it had reached out, grabbed my grill, and was trying to pry the siding off my garage. It was like living in Little Shop of Horrors. Instead, I highly recommend Clematis. It’s the “Queen of Vines” for a reason. It’s polite, it has stunning flowers, and it doesn’t try to dismantle your property.
Star Jasmine is another winner if you live in a slightly warmer climate. The smell is heavenly. I have some planted near my back patio fence, and every evening in early summer, it smells like a high-end spa back there. It’s evergreen, so you don’t have to look at a tangled mess of brown sticks all winter. It stays lush and green, hiding that cold metal mesh perfectly.
For those of you in colder spots, look at Honeysuckle (specifically the Lonicera sempervirens, or Trumpet Honeysuckle). It’s not invasive like the Japanese variety, and hummingbirds will treat your fence like a five-star buffet. Just remember to weave the young shoots through the chain link early in the season. Once they get woody, they’re harder to train, and you’ll end up with a “blob” of green at the bottom and nothing at the top.
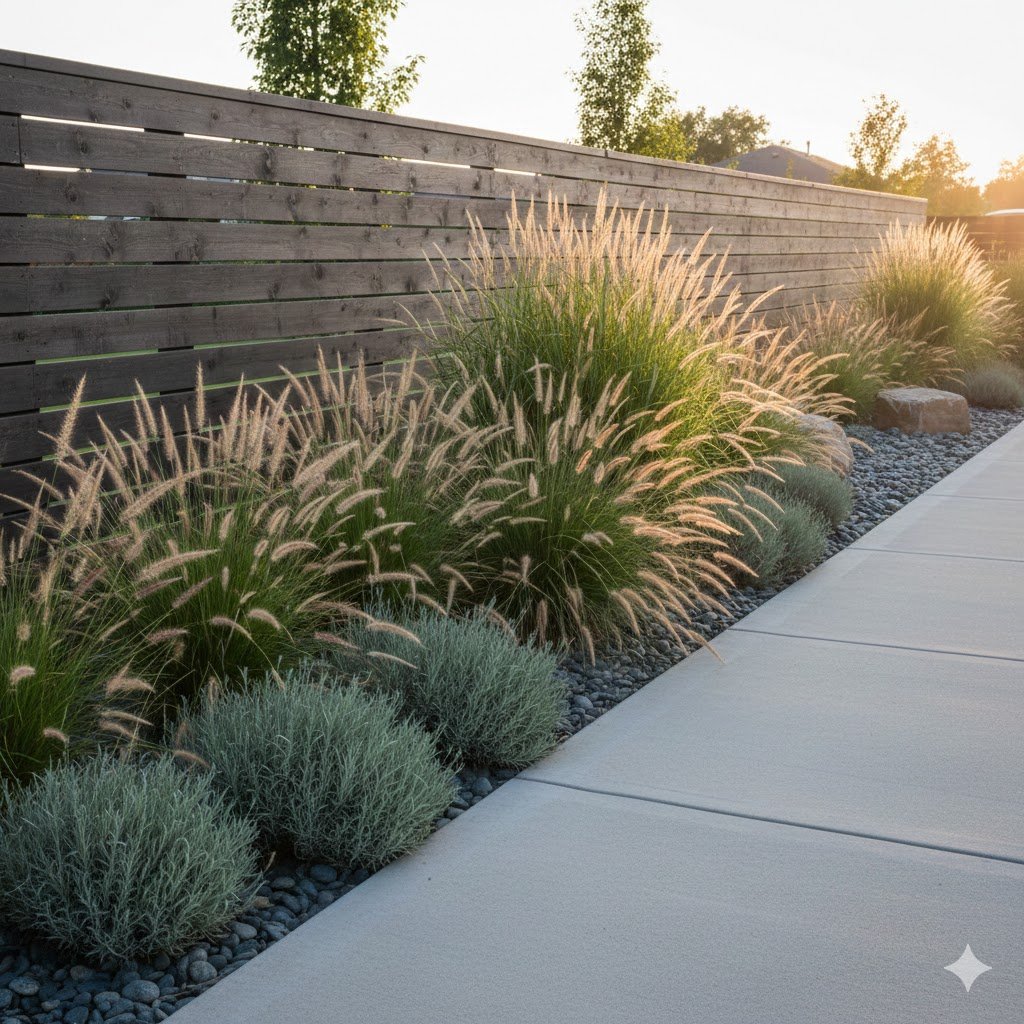
4. Modern Landscaping with Rocks and Grasses
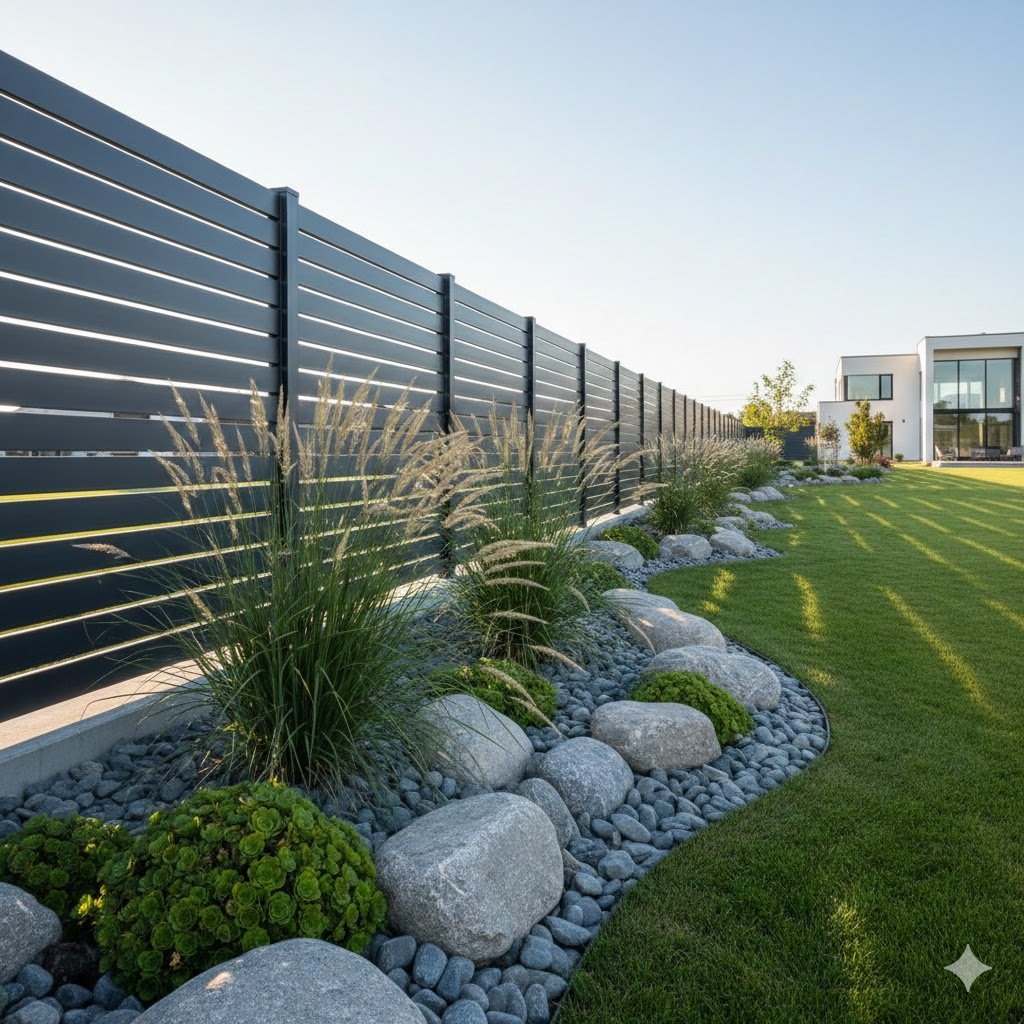
Sometimes you don’t want a “cottage garden” look. Maybe you want something that looks clean, sharp, and belongs in a magazine. This is where Ornamental Grasses and river rock come into play. This is my “lazy gardener’s secret weapon.” It looks expensive, but it’s actually one of the cheapest ways to fill a long fence line.
Karl Foerster Feather Reed Grass is the gold standard here. It grows straight up, doesn’t flop over when it rains, and stays looking good well into the winter. I love the way it catches the wind—it adds movement to the yard that static bushes just can’t match. I planted a row of these along my side fence, and it turned a boring walkway into a “feature” overnight.
To make this look professional, clear out the grass along the fence and lay down some heavy-duty landscape fabric. Then, dump in a few inches of Mexican Beach Pebbles or large river stones. Don’t use that cheap “pea gravel” from the hardware store; it just ends up in your lawn and ruins your mower blades. Go for the bigger, smooth stones. It creates a high-contrast look that makes the green of the grasses really “sing.”
The best part? No mulch. I hate mulching. It’s heavy, it smells weird for a week, and you have to do it every single year. Rocks are a “one and done” situation. Sure, you might get a stray weed popping through every now and then, but a quick zap with some vinegar or a hand-pull takes five seconds. It’s the ultimate “set it and forget it” fence line strategy.
5. Edible Fence Lines: Fruit and Herbs

Why grow a hedge when you can grow a snack? I’m a big believer that every part of the yard should earn its keep. My neighbor once laughed at me for planting Blueberry Bushes along my fence line instead of Boxwoods. Well, who’s laughing now? He’s spent ten years trimming his bushes into squares, and I’ve been making blueberry pancakes every Sunday for a decade.
Blueberries are actually beautiful landscape plants. They have white bell-shaped flowers in the spring, blue fruit in the summer, and—this is the kicker—the leaves turn a brilliant fire-red in the fall. They like acidic soil, so I usually toss my old coffee grounds around the base of the fence. It’s a cheap way to keep them happy, and it keeps the fence line smelling like a diner for an hour or two.
If you have a sunny fence, try Espalier Fruit Trees. This sounds fancy and French, but it just means “training a tree to grow flat.” You can grow apples, pears, or even peaches right against the fence. It takes a little bit of wire and some patience, but it’s a total showstopper. I did this with an apple tree on my south-facing fence, and people literally stop their cars to ask me how I did it.
For a smaller-scale edible fence, go with Rosemary. If you live in a zone where it doesn’t freeze hard, Rosemary can grow into a massive, fragrant hedge. I have a four-foot-tall Rosemary “fence” that I use to screen off my trash cans. Not only does it hide the bins, but it also makes the whole area smell like a roast chicken dinner instead of… well, trash.
6. Living Walls and Vertical Garden Fence Decor
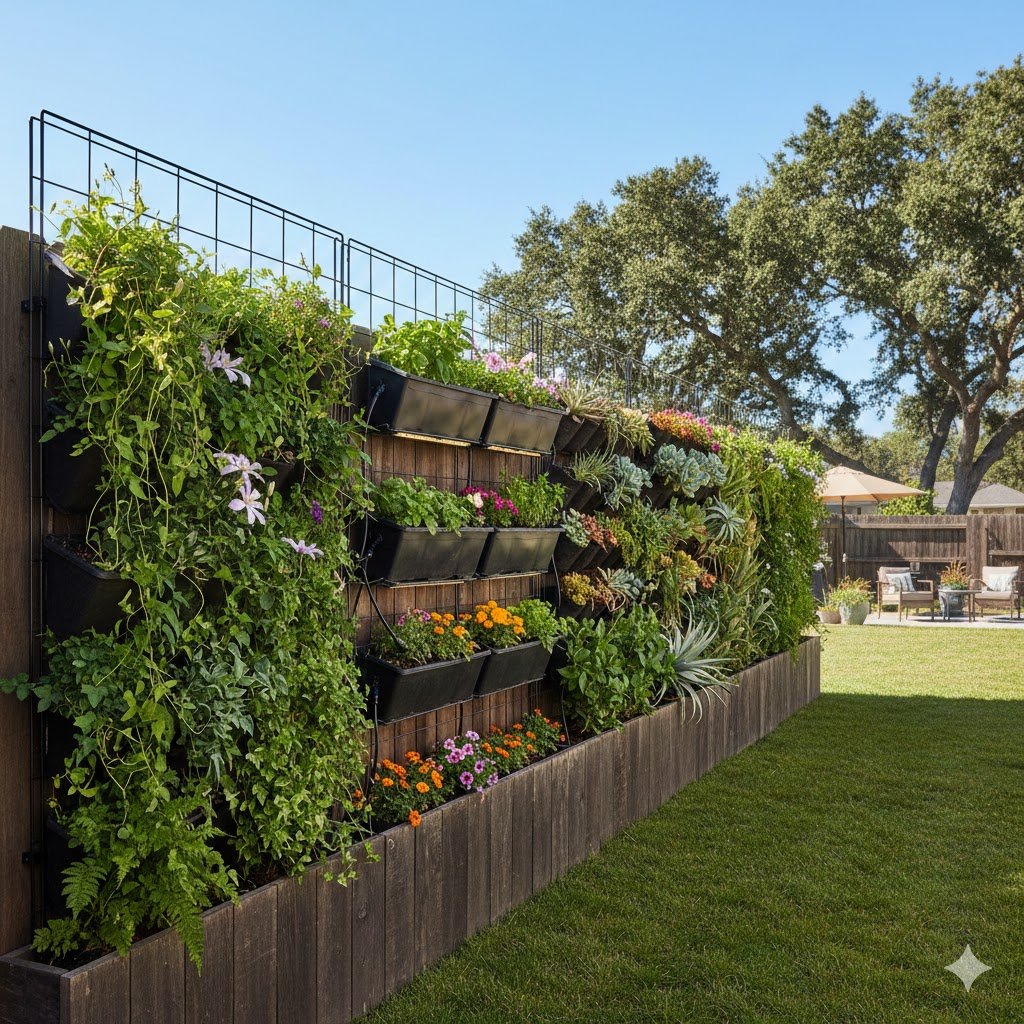
If you have a small yard, you can’t afford to give up three feet of grass for a bulky flower bed. This is where I learned to stop thinking horizontally and start thinking vertically. Back when I lived in a townhouse with a patio the size of a postage stamp, I tried to grow “bushes” along the fence. It was a disaster; I couldn’t even open my back door without hitting a branch.
Then I discovered Wall-Mounted Planters. You can buy these modular pockets or just bolt some cedar crates directly to the fence posts. (Pro tip: always bolt to the posts, not the pickets, unless you want your fence to sag like a wet noodle). I filled mine with Trailing Petunias and Creeping Jenny. By July, the wood was completely hidden behind a curtain of neon green and purple. It looked like a hanging tapestry.
The trick to a vertical garden is the watering. These things dry out faster than a sponge in the desert. I once forgot to water my “fence wall” for two days in August, and I came home to a bunch of crispy brown sticks. If you’re going this route, spend the extra twenty bucks on a simple drip irrigation kit that hooks up to your hose timer. It’ll save you from standing out there with a watering can every single morning.
For a more “rugged” look, you can use repurposed pallets. I’ve seen people go crazy for these on Pinterest, but let me give you the real talk: make sure the pallet is heat-treated (marked with an “HT”), not chemically treated. You don’t want weird pesticides leaching into your soil. Sand it down, staple some landscape fabric inside to hold the dirt, and you’ve got a rustic herb garden that takes up zero floor space.
7. Using Ornamental Trees for Privacy Height
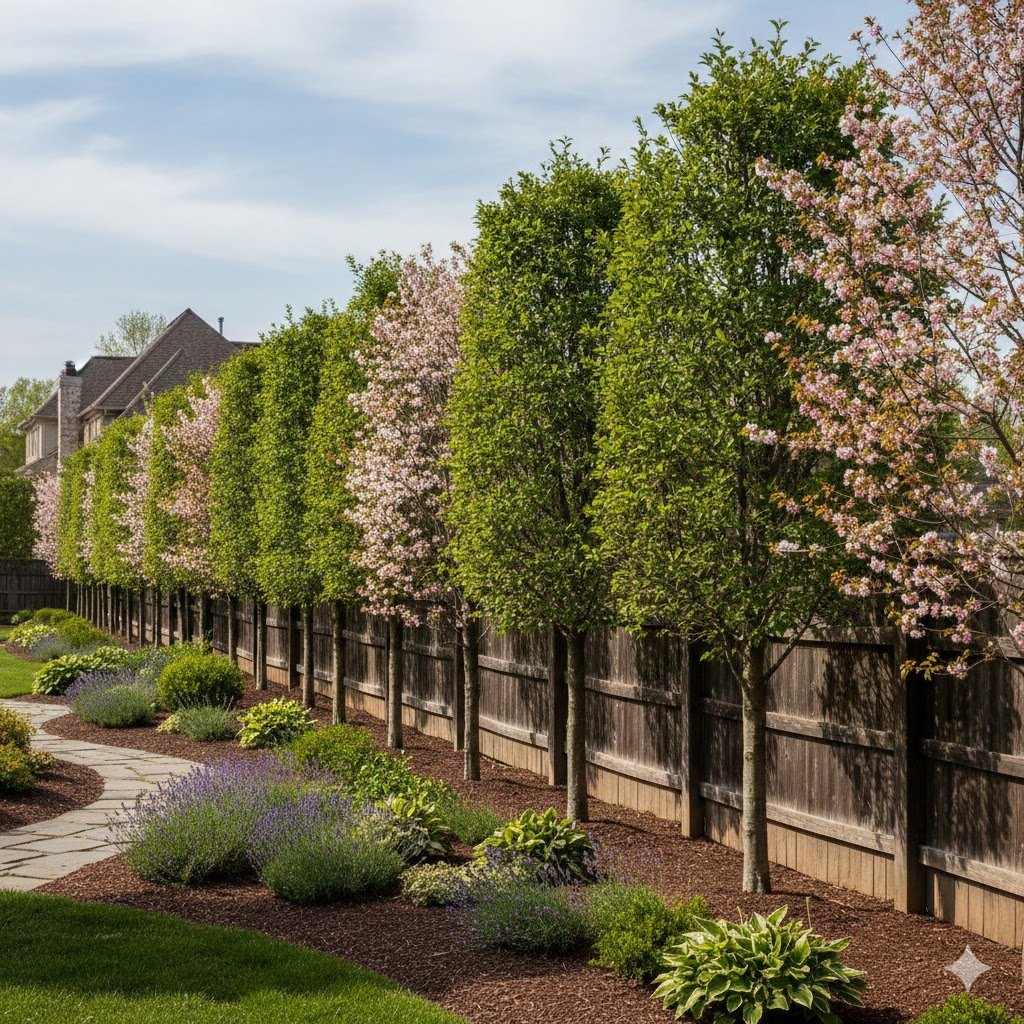
Sometimes a six-foot fence just isn’t enough. Maybe your neighbor’s second-story window looks straight onto your patio, and you feel like you’re living in a fishbowl. I had this exact problem with “Nosy Ned” next door. I didn’t want a wall of giant evergreens that would block all my sunlight, so I turned to Ornamental Trees.
Japanese Maples are the crown jewels of the fence line. They don’t grow at a terrifying speed, and their canopy stays relatively compact. I planted a ‘Bloodgood’ variety in a corner where two fences met, and the deep burgundy leaves against the natural wood look like a million bucks. Plus, they provide “dappled shade,” which is perfect if you want to grow hostas or ferns underneath them.
Another fantastic option is the Serviceberry. It’s a triple threat: white flowers in spring, edible berries in summer (that taste like blueberries mixed with almonds), and stunning orange foliage in the fall. I like to “limb them up,” which means cutting off the lower branches so you can see the pretty bark. This leaves plenty of room for you to plant smaller flowers right at the base of the trunk.
If you’re worried about roots tearing up your fence foundation, look for “columnar” varieties. There’s a version of the Slender Silhouette Sweetgum that grows like a green telephone pole—about 20 feet tall but only 3 feet wide. I planted three of these along a narrow side-yard fence, and they worked like a charm to block the neighbor’s view without turning my walkway into a jungle.
8. Creating a Hydrangea Hedge for Shade
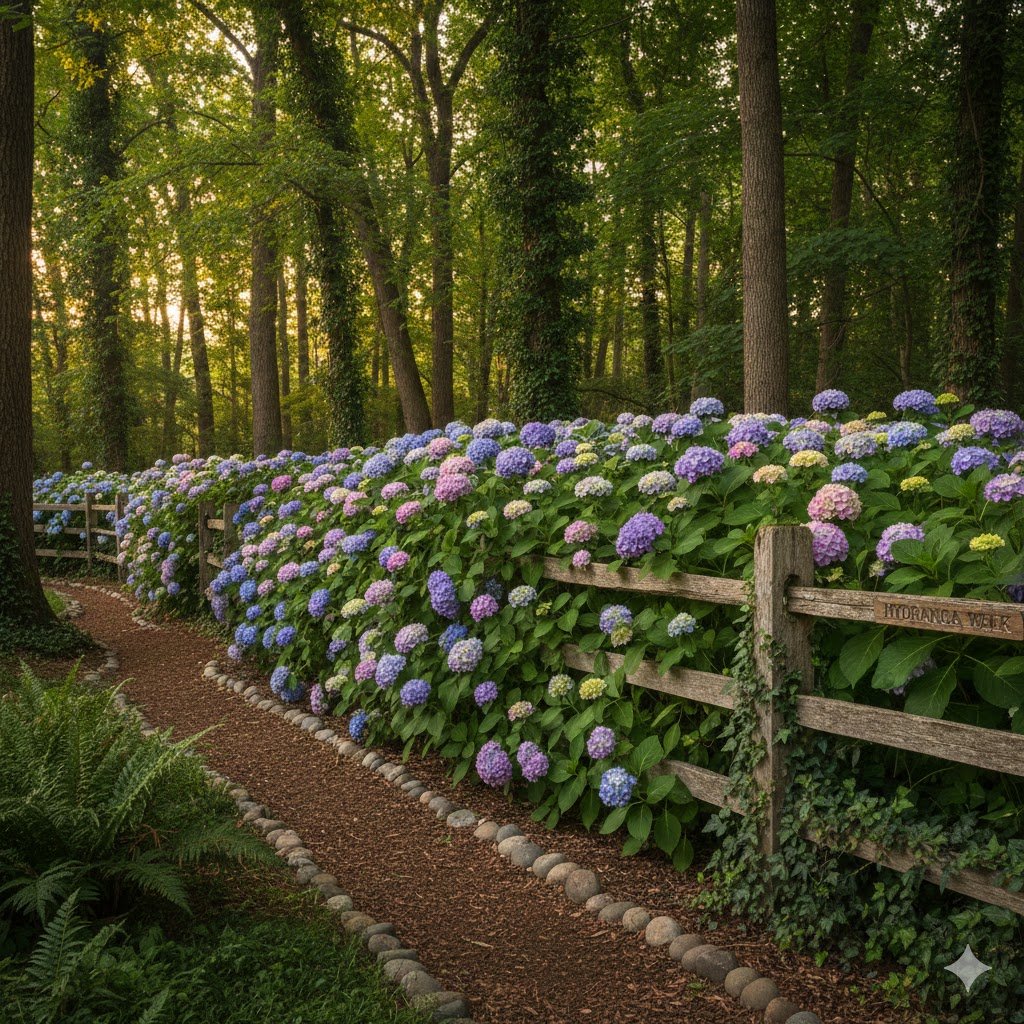
If your fence line is stuck in the shadows of your house or big oak trees, don’t fight it. Stop trying to grow roses where the sun don’t shine. I spent three years trying to force “sun-loving” wildflowers to grow along my north-facing fence, and all I got for my trouble were leggy, sad-looking weeds. Then I switched to Hydrangeas, and everything changed.
The Limelight Hydrangea is my absolute favorite. Unlike the finicky blue ones that wilt if you look at them wrong, ‘Limelights’ are tough. They handle a bit of shade, they grow fast, and the flowers stay on the bush for months. I planted a row of these along my back fence, and by year three, they were five feet tall and covered in giant cone-shaped blooms. It’s like having a fence made of marshmallows.
One mistake I made early on was pruning them at the wrong time. I once “cleaned up” my hydrangeas in the fall and ended up cutting off all the flower buds for the next year. I had a very green, very boring hedge that summer. Most of these “panicle” types should be pruned in late winter. Just give them a light haircut to keep them from getting too floppy.
If you want that classic “English Garden” vibe, mix in some Oakleaf Hydrangeas. They have these big, jagged leaves that look like oversized oak leaves and peel bark that adds interest in the winter. They love the shade along a fence line. Just make sure you give them plenty of water during their first year. Once they’re established, they’re pretty self-sufficient, but they’ll let you know they’re thirsty by drooping their leaves like a dramatic teenager.
9. Decorative Lattice and Trellis Insets

Sometimes the problem isn’t the landscaping; it’s the fence itself. If you have a plain, boring “builder-grade” fence, you can spice it up with Lattice Panels. I’m not talking about that cheap, flimsy plastic stuff from the hardware store. I’m talking about heavy-duty wood lattice that you stain to match your fence.
I once took a boring 20-foot stretch of pressure-treated pine and attached three arched lattice panels to it. Suddenly, it didn’t look like a barricade; it looked like a design choice. I planted Honeysuckle on the lattice, and within two seasons, the fence looked like it belonged in a botanical garden. It breaks up the “monotony” of a long straight line, which is one of the biggest SEO-friendly design secrets for curb appeal.
You can also use Metal Trellises for a more modern or industrial look. I’ve seen people use old rusted iron gates or even heavy-gauge cattle panels framed in wood. I used a cattle panel for my “cucumber fence” last year, and it was the best decision I ever made. The cucumbers hung down through the mesh, making them super easy to pick, and the vines covered the metal completely by mid-July.
The key here is “depth.” Don’t just slap a trellis flat against the fence. Use some spacers (like small blocks of wood) to keep the trellis about two inches off the fence surface. This allows air to circulate behind the plants, which prevents mold and rot. It also gives the vine’s tendrils something to wrap around easily. My first trellis was flush against the wood, and my jasmine struggled because it couldn’t get a good “grip.”
10. Low-Maintenance Grasses for Modern Privacy

If you want a look that says “I have my life together” without actually spending your weekends weeding, Ornamental Grasses are the way to go. I’ve moved away from high-maintenance flowering shrubs and toward grasses because they provide 10 months of beauty for about 10 minutes of work.
Miscanthus ‘Gracillimus’ (Maiden Grass) is a powerhouse for fence lines. It grows into these beautiful, shimmering mounds that can reach six feet tall. I love the way they sound in the wind—it’s like a soft “shushing” noise that helps drown out distant traffic. I planted a row of these along my fence near the street, and it’s the best “white noise” machine I’ve ever owned.
Another great one is Pink Muhly Grass. For most of the year, it’s a nice, tidy green clump. But in the fall? It explodes into a cloud of cotton-candy pink. I put a patch of this against my dark grey fence, and every October, my neighbors literally stop and stare. It’s a total “Pinterest moment” that requires zero effort once it’s in the ground.
The only “work” you have to do with grasses is cutting them back once a year. I do mine in late February. I just take my hedge trimmers, tie the grass into a bundle with some twine, and chop the whole thing down to about six inches from the ground. It looks like a bunch of “flat-tops” for a few weeks, but then the fresh green shoots come screaming out of the ground. It’s the ultimate low-maintenance fence line solution.
11. Lighting Your Fence Line for Nighttime Appeal
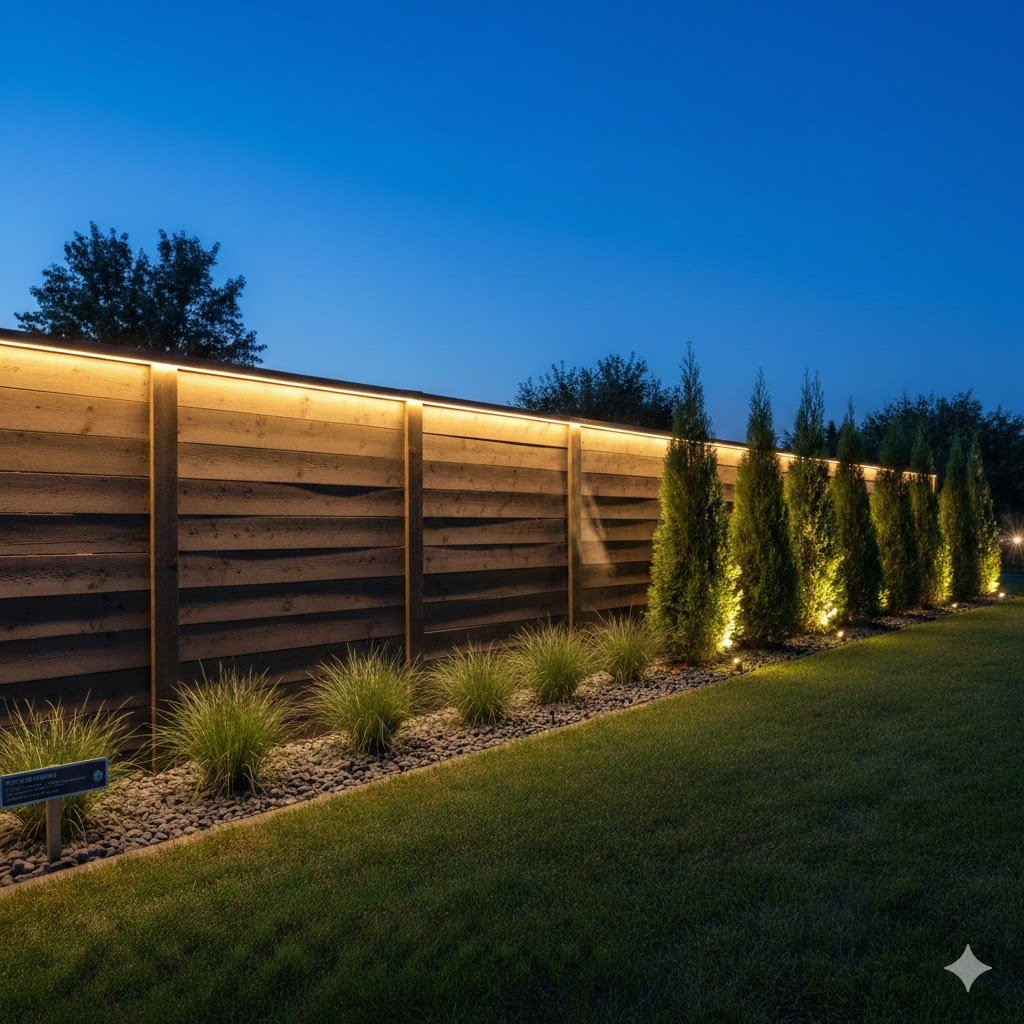
You’ve spent all this time and money on plants; don’t let them disappear the moment the sun goes down. Fence Lighting is the most underrated part of landscaping. I used to have a yard that looked like a “black hole” at night. Then I spent a Saturday installing some simple low-voltage lights, and now it feels like a high-end resort.
I’m a huge fan of Up-lighting. You place a small LED spotlight at the base of your “hero” plants—like that Japanese Maple or those tall grasses—and point it upward. This creates dramatic shadows against the fence. I did this with my Feather Reed Grasses, and the way the light catches the seed heads at night is nothing short of magical.
For the fence itself, look into Solar Post Cap Lights. They’re incredibly easy to install—you literally just pop off your old fence caps and slide these on. No wiring, no electricians, no headaches. I bought a cheap set once that died after two rains, so do yourself a favor and buy the ones with glass lenses and metal housing. They’ll actually last more than one season.
If you want a “party” vibe, String Lights (or “Edison bulbs”) are the way to go. Don’t just drape them haphazardly like Christmas lights. I like to run a thin guide wire from post to post and then clip the lights to the wire. It keeps them from sagging and prevents them from blowing around and breaking during a storm. It turns a boring fence line into a cozy “outdoor room” instantly.
12. Using Potted Plants for Renters or Hard Soil
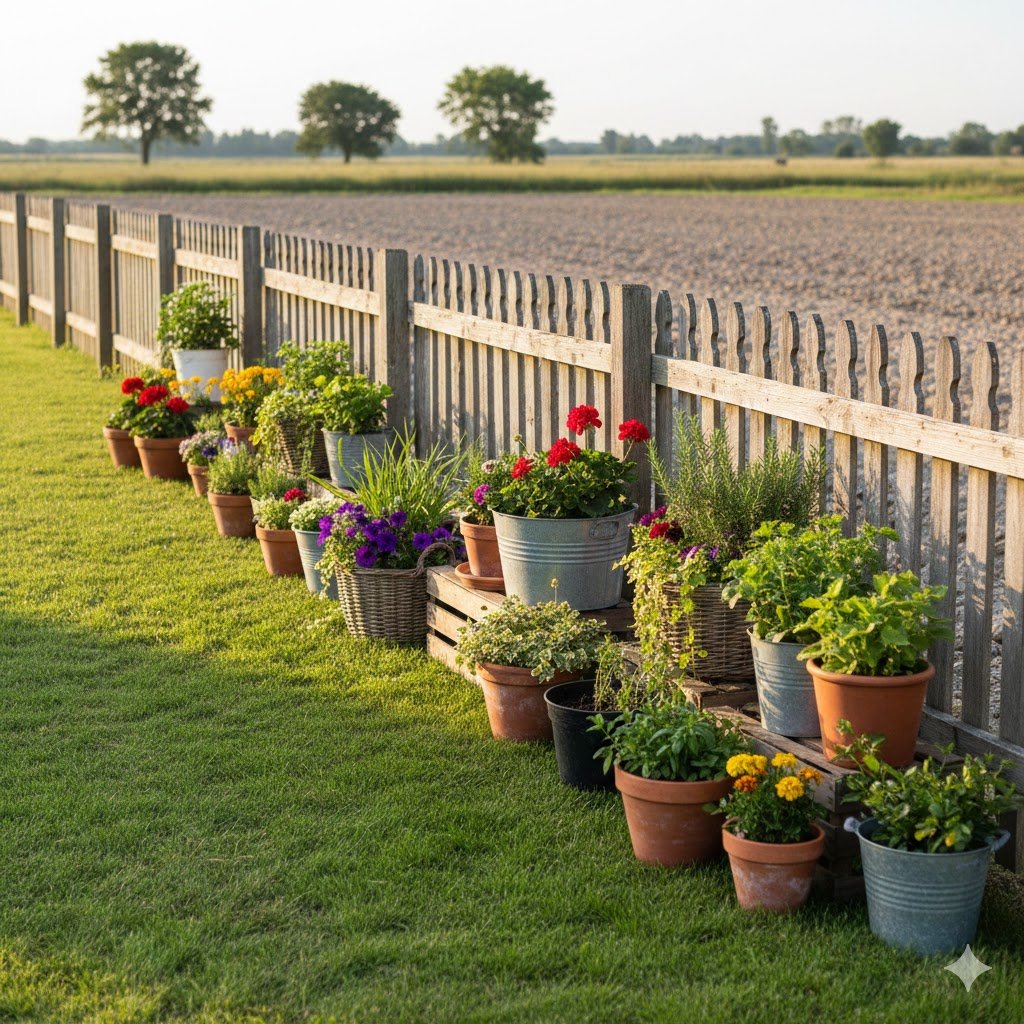
Sometimes you can’t dig. Maybe you’re renting, or maybe your soil is so full of rocks and clay that a shovel won’t even dent it. (I once lived in a place where the “soil” was basically 90% construction debris and 10% spite). In these cases, Container Gardening along the fence is your best friend.
I love using Large Galvanized Troughs along a fence line. They give you that “farmhouse chic” look, and they hold enough soil that you don’t have to water them every five minutes. I filled three of these with Tall Canna Lilies and Sweet Potato Vine. The lilies gave me the height to cover the fence, and the vines spilled over the sides like a green waterfall.
The beauty of pots is that you can move them. If a plant isn’t happy or you decide you want a different look, you just pick it up (or get a friend to help) and move it. I once had a “shade” garden along my fence that became a “sun” garden after my neighbor cut down a massive oak tree. Because my plants were in pots, I just rearranged them over a weekend instead of digging up my whole yard.
One tip: use a “thriller, filler, and spiller” method for your pots. Put something tall in the back (the Thriller), something bushy in the middle (the Filler), and something that hangs down the front (the Spiller). It makes your pots look professionally designed. And always, always make sure your pots have drainage holes. I once drowned a beautiful set of Hostas because I thought the “self-watering” pot would handle everything. It didn’t.
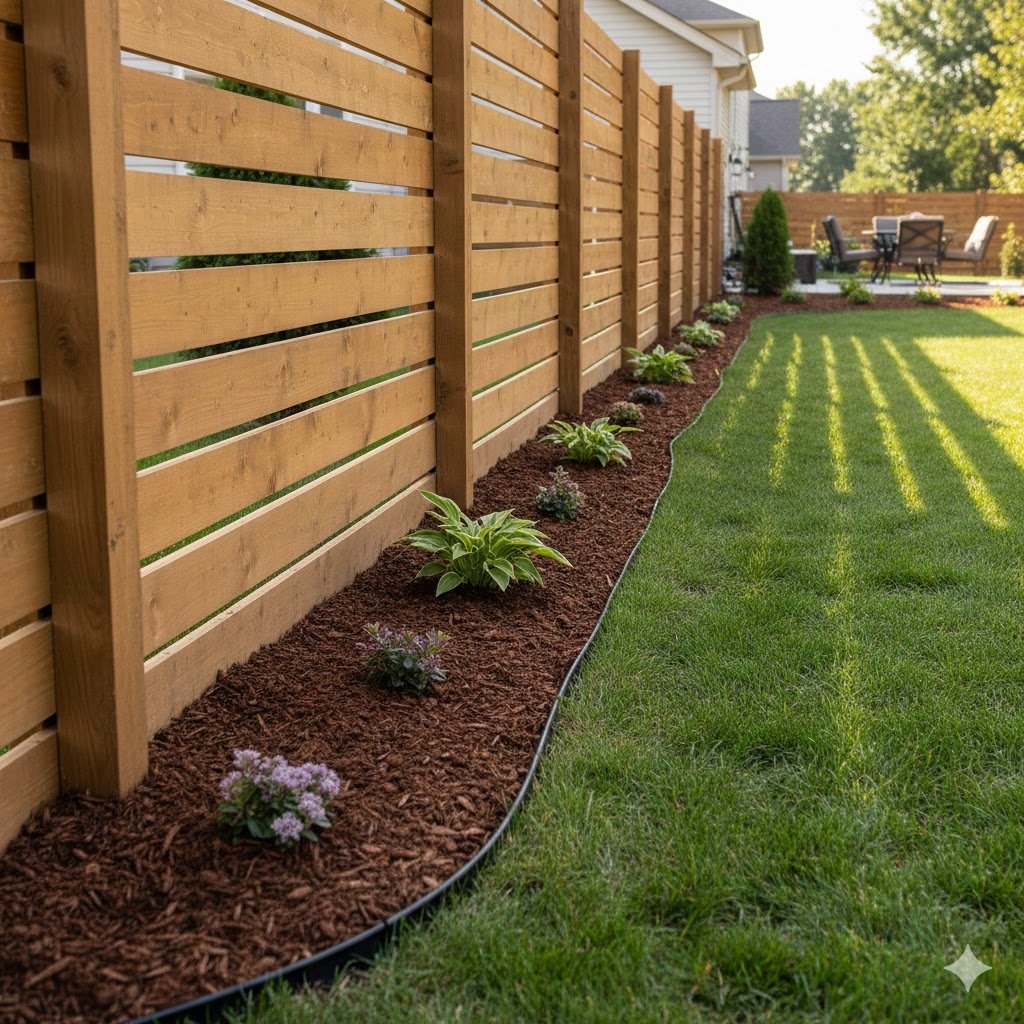
13. Edging and Mulching for a Clean Finish
You can have the most beautiful plants in the world, but if the “line” between your lawn and your fence bed is messy, the whole thing will look like a disaster. Edging is the “mascara” of the garden—it defines everything. I used to use that thin plastic edging that eventually heaves out of the ground and trips everyone. Never again.
Now, I use a Natural Trenched Edge. It’s free, and it looks the best. You just take a sharp spade and cut a 4-inch deep “V” shape between your grass and your mulch bed. It stops the grass roots from creeping into your flowers, and it gives you a clean, crisp line that looks like you hired a pro. I refresh mine every spring, and it takes about 20 minutes for the whole yard.
Once your edge is set, you need Mulch. I have a very strong opinion on this: stay away from the dyed “Red Mulch.” It looks fake, and the dye can be sketchy. Go for a dark brown or natural cedar mulch. It breaks down over time and actually feeds your soil, unlike those rubber chips that stay there forever and smell like a tire fire in the sun.
Mulch does three things: it holds moisture, it stops weeds, and it makes your plants “pop.” I usually put down a layer of wet newspaper or cardboard first, then 3 inches of mulch on top. This is the “no-dig” method of weed control. It’s how I turned a weed-choked fence line into a clean, professional-looking border in a single afternoon.
Real Talk: What Isn’t Worth Your Time
Look, I’m not here to sell you a dream; I’m here to save your back. There are some things that look great on social media but are a total nightmare in reality.
- Mint: Never plant mint directly in the ground along a fence. I did this in my first house thinking I’d have fresh mojitos all summer. Within two years, the mint had traveled 20 feet down the fence line and was choking out my lawn. It’s the “Glitter of the Garden”—once it’s there, it’s there forever. Keep it in pots.
- Cheap Landscape Fabric: If you’re going to use weed barrier, buy the heavy, felt-like stuff from a landscape supply yard. The thin, plastic-y stuff they sell at most stores is useless. Weeds will grow right through it, and then you’ll be trying to pull weeds that are literally woven into the fabric. It’s infuriating.
- Bamboo: I touched on this earlier, but it bears repeating. Unless you are installing a literal underground steel barrier, stay away from “running” bamboo. Even the “clumping” variety can get out of hand. It’s a beautiful plant, but it’s a full-time job to manage.
Parting Wisdom
The biggest mistake I see people make with fence line landscaping is thinking they have to do the whole yard at once. My yard didn’t look like this in year one. It took years of trial, error, and a few “unauthorized” experiments with liquid fertilizer. Pick one ten-foot section of your fence this weekend. Clear the grass, put down some cardboard (it’s a great, free weed barrier), and plant three things you actually like.
Gardening shouldn’t feel like a chore; it should feel like you’re decorating your outdoor living room. If a plant dies, don’t take it personally. It’s just an opportunity to try something else.
What’s the biggest “fail” you’ve ever had trying to landscape your yard? Or do you have a plant that survived against all odds? Tell me about it in the comments below—I’ve seen it all, and I promise I won’t judge!