
Do you ever feel like your backyard is a wasted space? A patch of neglected grass or a forgotten corner of your property? Wouldn’t it be amazing to have an inviting outdoor haven, a place to relax, entertain, and truly enjoy the fresh air? The good news is, you don’t need a hefty budget or a professional landscaper to achieve this. With a little creativity and some simple DIY projects, you can transform your backyard into a personal oasis.
The beauty of DIY backyard transformations is threefold: affordability, personalization, and the satisfaction of creating something yourself. You can tailor these projects to your taste and budget, using recycled materials and readily available supplies. Plus, the sense of accomplishment from completing a project and enjoying the fruits (or vegetables!) of your labor is truly rewarding.
So, grab your tools, unleash your inner designer, and get ready to bring your backyard to life with these 20+ Cheap & Easy DIY Ideas:
1. Upcycled Tire Seating Area
Who knew old tires could be transformed into a comfy and stylish seating area? This project is perfect for those who want to add unique and affordable seating to their backyard.
Materials List:
- Used Tires (all similar size)
- Paint (suitable for outdoor use) in your desired color(s)
- Paint brushes or rollers
- Drop cloths (optional)
- Cushions (optional)
Step-by-Step Instructions:
- Tire Preparation: Begin by thoroughly cleaning the tires with soapy water and a stiff brush. Let them dry completely.
- Painting Time: Decide on your desired paint scheme. You can go for a solid color for a classic look, or get creative with stripes, polka dots, or stencils. If using drop cloths, lay them down to protect your work area. Apply even coats of paint to the tires, allowing each coat to dry completely before adding another.
- Stacking Up: Once the paint is dry, it’s time to assemble your seating area. Here are some options:
- Single Tire Seats: Use a single painted tire as a cute and compact seat.
- Two-Tiered Seating: Stack two painted tires on top of each other for a more substantial seat with added back support.
- Sectional Seating: Create a modular seating area by stacking and arranging multiple painted tires in different configurations.
- Adding Comfort: For extra comfort, consider adding outdoor cushions on top of the tires. Choose weather-resistant cushions that complement your chosen paint colors.
Customization Tips:
- Play with Color: Don’t be afraid to experiment with bold or vibrant colors. You can even paint each tire a different color for a playful touch.
- Side Table Companion: For added functionality, consider upcycling another object like a wooden spool or cinder block into a small side table to place next to your tire seating area.
- Size Matters: While using tires of similar size is ideal, you can also explore using a mix of slightly larger and smaller tires to create a more dynamic seating arrangement.
2. Fairy Light Oasis

String lights are a magical way to add ambiance and transform your backyard into a whimsical escape. This project is perfect for creating a romantic atmosphere for an evening gathering or a delightful space for relaxing under the stars.
Materials List:
- String lights (choose the length and style that suits your space)
- Hooks or cup hooks for hanging the lights
- Extension cord (if needed)
- Optional decorations: fairy lights in jars, lanterns, paper lanterns
Step-by-Step Instructions:
- Plan Your Lighting Scheme: Before hanging the lights, visualize the overall effect you want to achieve. Do you want the lights to drape overhead, outline a specific area, or create a cascading effect? Walk around your backyard to determine the placement of hooks or cup hooks for hanging the lights.
- Hanging the Lights: Start by securely attaching the hooks to your desired locations, such as fences, trees, walls, or pergolas. Carefully uncoil the string lights and begin draping them according to your plan. You can use zip ties or garden ties to secure the lights to the hooks in strategic locations.
- Creating Patterns: For a more decorative effect, consider creating patterns with the string lights. You can weave them through branches of trees, drape them in a zig-zag pattern between posts, or even create a heart shape or other designs.
- Adding a Touch of Whimsy: Elevate your fairy light oasis by incorporating additional lighting elements. Place fairy lights in mason jars or decorative lanterns for a charming touch. You can also hang paper lanterns in various colors and sizes to add a festive flair.
Ideas for Different Lighting Effects:
- Twinkling Lights: Choose string lights with a twinkling or chasing light effect for a magical and dynamic ambiance.
- Solar Lights: Opt for solar-powered string lights to add a touch of sustainability and eliminate the need for extension cords.
- Warm Glow: Use warm white or fairy lights with a warm yellow hue to create a cozy and inviting atmosphere.
3. DIY Pallet Herb Garden
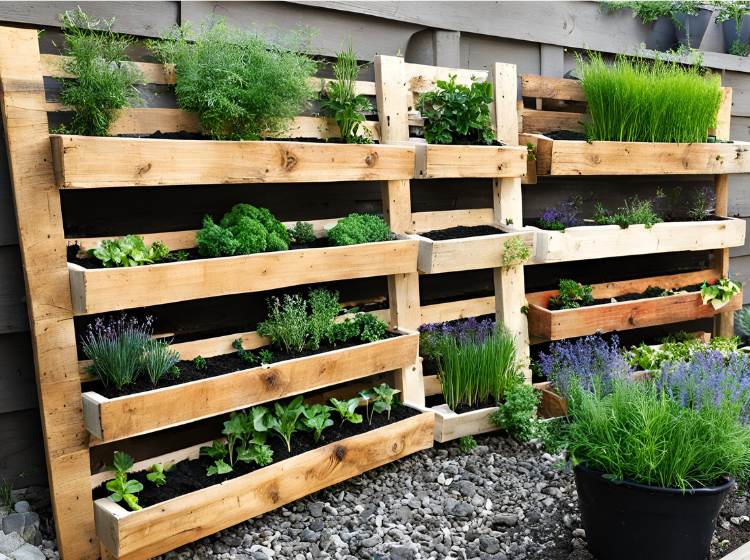
Fresh herbs add a delightful touch to any meal, and with a DIY pallet herb garden, you can have a thriving and functional addition to your backyard. This project is perfect for those who love to cook and appreciate the beauty and satisfaction of homegrown herbs.
Materials List:
- Pallets (choose untreated pallets that are free of splinters)
- Heavy-duty plastic liner
- Staple gun
- Soil
- Selection of your favorite herbs (consider sun and water requirements)
- Hammer and nails (optional)
Step-by-Step Instructions:
- Pallet Preparation: Disassemble the pallet, if necessary, to create individual sections for planting. Sand down any rough edges to ensure safety.
- Lining Up: Cut the heavy-duty plastic liner to size to fit the inside of each pallet section. Secure the liner using a staple gun, ensuring it overlaps the edges of the pallet wood. This will prevent the soil from leaking out.
- Building Your Garden: Reassemble the pallet sections, creating a sturdy planter box. You can use nails or screws for added reinforcement (optional).
- Filling Up with Goodness: Fill the lined pallet sections with high-quality potting soil. Choose a soil mix that is well-draining and suitable for growing herbs.
- Planting Time: Research the specific planting needs of your chosen herbs, including spacing requirements and sun exposure. Plant your herbs in the prepared pallet sections, ensuring they have adequate space to grow.
- Herb Selection Tips: For a beginner-friendly herb garden, consider herbs like basil, mint, parsley, chives, and cilantro. These herbs are relatively easy to grow and thrive in most climates.
Maintaining Your Herb Garden:
- Watering Regularly: Water your herb garden regularly, especially during hot and dry periods. Aim to keep the soil moist but not soggy.
- Sunshine Matters: Most herbs prefer at least 6-8 hours of sunlight per day. Choose a location in your backyard that receives ample sunlight for optimal growth.
- Snip and Enjoy: Regularly harvest your herbs throughout the growing season. This will encourage them to grow bushier and produce more leaves.
4. Painted Patio Makeover

A drab and dull patio can be easily transformed into a vibrant and inviting outdoor space with a fresh coat of paint. This project is a budget-friendly way to add personality and style to your backyard.
Materials List:
- Concrete paint (suitable for outdoor use) in your desired color
- Paint brushes or rollers
- Drop cloths
- Painter’s tape
- Stencils (optional)
Step-by-Step Instructions:
- Cleaning Up: Begin by thoroughly cleaning your patio surface. Sweep away any dirt, leaves, or debris. You can also use a pressure washer for a deeper clean, ensuring proper drying before painting.
- Prepping for Paint: Apply painter’s tape around the edges of your patio, including any walls or structures bordering it. This will protect them from accidental paint splatters.
- Painting Power: Choose a high-quality concrete paint specifically designed for outdoor use. Apply even coats of paint using a roller or paint brush, depending on the size and texture of your patio. Allow each coat to dry completely before adding another.
- Design with Stencils: (Optional) For a more decorative touch, consider using stencils to create patterns on your patio. Choose stencils made for outdoor use and secure them to the desired area with painter’s tape. Apply a thin layer of paint using a sponge or stencil brush, following the stencil design.
- Peeling Back the Tape: Once the final coat of paint is dry, carefully peel off the painter’s tape. Admire your newly transformed patio!
Ideas for Different Design Options:
- Geometric Patterns: Stencils with geometric shapes like diamonds, squares, or chevrons can add a modern and stylish touch.
- Solid Color Statement: Opt for a bold and vibrant color to create a dramatic focal point in your backyard.
- Stenciled Borders: Use stencils to create decorative borders around the perimeter of your patio.
5. Comfy Hammock Retreat
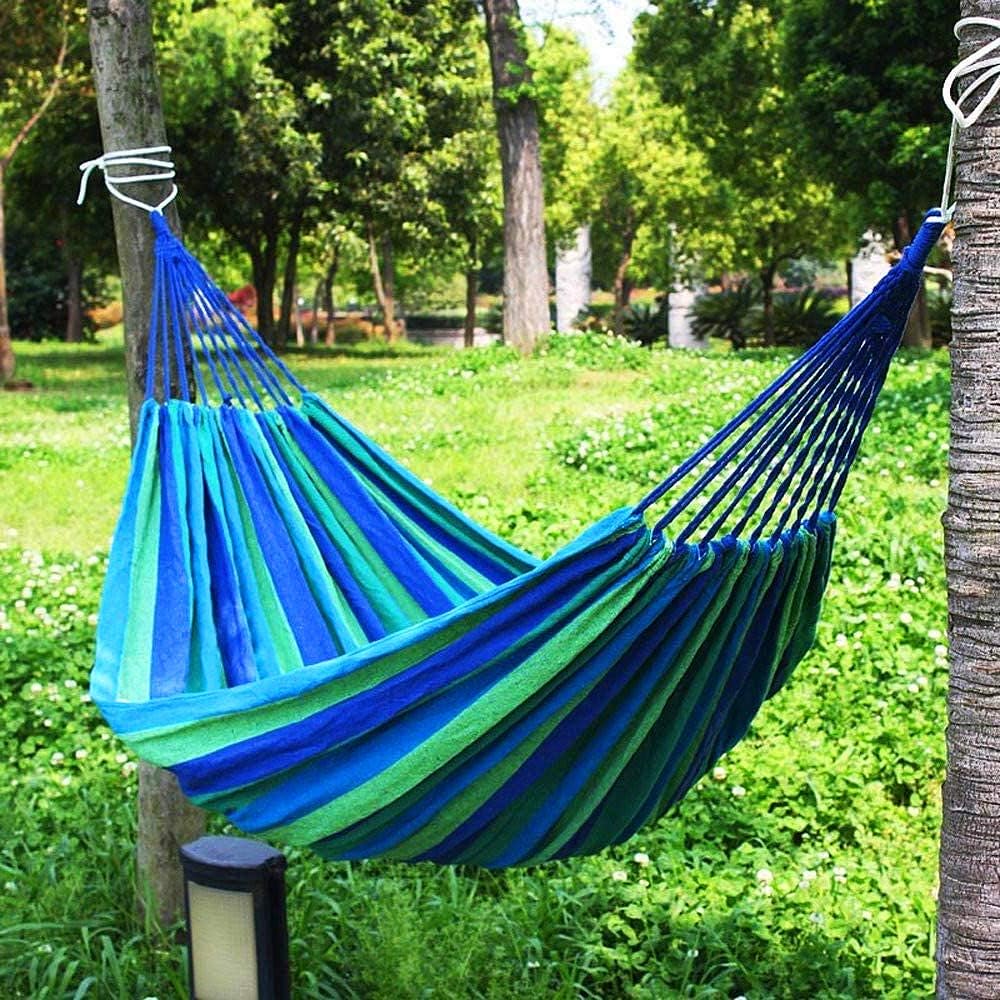
Imagine swaying gently in a hammock, surrounded by the calming sounds of nature. With a DIY hammock retreat, you can create your own personal haven of relaxation in your backyard. This project is perfect for anyone who wants a cozy spot to unwind and soak up the sunshine.
Materials List:
- Hammock (choose a weather-resistant material like nylon or cotton)
- Hanging hardware (suitable for the weight capacity of your hammock and your chosen hanging points)
- Two sturdy trees or posts (ensure they are healthy and strong enough to support the weight)
- Drill (with appropriate drill bits for your chosen hanging hardware)
- Carabiners or shackles (optional, for added security)
- Rope or straps (optional, for additional support)
Step-by-Step Instructions:
- Choosing the Perfect Spot: Select a location in your backyard that offers shade and a peaceful ambiance. Ideally, the spot should have two sturdy trees or posts spaced an appropriate distance apart to accommodate the length of your hammock.
- Installing the Hardware: Follow the manufacturer’s instructions for your chosen hanging hardware. This will typically involve drilling holes into the trees or posts at the desired height (ensure it’s comfortable for getting in and out of the hammock). Secure the hanging hardware using the appropriate screws or bolts.
- Hanging the Hammock: Attach the hammock to the hanging hardware using carabiners or shackles for added security. You can also use heavy-duty rope or straps for additional support, especially if the trees or posts have some sway.
Maximizing Comfort:
- Plush Pillows: Add plush pillows to your hammock for extra comfort and support for your head and neck.
- Cozy Throws: Keep a cozy throw blanket nearby for cooler evenings or to simply add a touch of snugness.
- Mosquito Netting: If mosquitoes are a concern, consider adding mosquito netting around your hammock for a peaceful and bug-free relaxation experience.
Tips for Hammock Safety:
- Weight Capacity: Never exceed the weight capacity limit of your hammock and hanging hardware.
- Even Distribution: Ensure even weight distribution when using the hammock.
- Regular Inspection: Regularly inspect your hammock and hanging hardware for any signs of wear or tear.
6. Outdoor Movie Theater

Turn your backyard into a magical movie night destination with a DIY outdoor movie theater. This project is perfect for creating a fun and memorable experience for family and friends.
Materials List:
- Projector screen (a white sheet, projector screen fabric, or even a large tarp can work)
- Projector (optional, you can use a laptop for movie playback)
- Extension cord (if needed)
- Speakers (optional, for enhanced sound quality)
- Outdoor furniture, blankets, and pillows (for seating)
- Decorative lights (optional, for a festive atmosphere)
Step-by-Step Instructions:
- Setting Up the Screen: Choose a location in your backyard with a clear view of the screen from your desired seating area. Hang the projector screen on a sturdy structure like a fence, clothesline, or even a temporary frame made from PVC pipes.
- Projector Power: If using a projector, position it at an appropriate distance from the screen for a clear and focused image. You may need an extension cord to connect the projector to a power source.
- Sound System: For an immersive movie experience, consider using outdoor speakers. Connect them to your movie source (laptop or projector) and position them strategically for optimal sound distribution.
- Creating the Ambiance: Set up comfortable outdoor furniture, blankets, and pillows for your guests. String fairy lights or use lanterns to create a magical and inviting atmosphere.
Tips for a Memorable Movie Night:
- Movie Selection: Choose a movie that appeals to everyone attending the movie night.
- Snacks and Drinks: Prepare popcorn, drinks, and other movie-night favorites to complete the experience.
- Theme It Up: Consider adding a fun theme to your movie night, like a classic movie night or a genre-specific theme.
7. Mason Jar Fireflies

These enchanting mason jar fireflies are a delightful and easy DIY project that adds a touch of whimsy and magic to your backyard. They’re perfect for creating a captivating ambiance during evening gatherings or simply adding a decorative touch to your outdoor space.
Materials List:
- Mason jars (various sizes can add visual interest)
- Glow sticks (choose your desired colors)
- Decorative items (optional): twigs, pebbles, artificial flowers, glitter
- String or twine (optional, for hanging)
Step-by-Step Instructions:
- Preparing the Jars: Wash the mason jars thoroughly with soap and water and dry them completely. Remove any labels or stickers.
- Glowing Up: Place glow sticks inside the mason jars. You can use a single glow stick or combine different colors for a more vibrant effect. Consider breaking the glow sticks slightly for a softer, diffused light.
- Adding a Touch of Magic: (Optional) This is where you can unleash your creativity! Add decorative elements to your mason jars to create a whimsical firefly effect. Here are some ideas:
- Natural Touches: Place a few small twigs, pebbles, or dried leaves at the bottom of the jar for a natural and rustic look.
- Floral Fantasy: Add a few sprigs of artificial flowers in various colors for a charming and colorful effect.
- Glitter Galore: For a touch of sparkle, sprinkle some glitter inside the jar before adding the glow sticks.
- Hanging Beauties: (Optional) If you want to create hanging mason jar fireflies, tie a piece of string or twine around the rim of the jar and secure it with a knot. You can then hang them from tree branches, fences, or a pergola.
Different Jar Styles and Uses:
- Mason Jar Lanterns: Group several decorated mason jars together on a table or patio for a captivating outdoor lantern effect.
- Pathway Markers: Line your garden path with mason jar fireflies to create a charming and whimsical walkway at night.
Mason Jar Fireflies Safety Tip: Glow sticks contain a chemical liquid. While generally safe, avoid direct contact with skin and eyes. If the liquid leaks from a glow stick, dispose of it properly and wash the affected area with soap and water.
8. DIY Fire Pit for Cozy Gatherings

A crackling fire pit creates a warm and inviting atmosphere, perfect for roasting marshmallows, sharing stories under the stars, or simply enjoying the outdoors on cooler evenings.
Materials List:
- Fire-resistant bricks or pavers (enough to create the desired size and shape)
- Crushed gravel or sand (for base layer)
- Landscape fabric (optional)
- Metal fire ring (optional, for added safety and containment)
- Shovel
- Level
Step-by-Step Instructions:
- Choosing the Location: Select a safe and clear location for your fire pit, away from trees, fences, or overhanging structures. Check local fire regulations for any restrictions on fire pit size and placement.
- Excavating the Area: Mark the desired size and shape of your fire pit. Dig a shallow pit approximately 6-8 inches deep within the marked area.
- Laying the Foundation: Line the bottom of the pit with landscape fabric (optional) to help suppress weeds and prevent the gravel base from settling. Add a layer of crushed gravel or sand, ensuring it’s level.
- Building with Bricks: Begin constructing the fire pit walls using fire-resistant bricks or pavers. Stack the bricks in a single or double layer, depending on your desired height, and create a circular or square shape. Use a level to ensure the walls are straight and stable.
- Metal Fire Ring Option: For added safety and containment, consider placing a metal fire ring inside the brick structure. Choose a fire ring size that fits comfortably within the brick walls.
Enjoying Your Fire Pit Safely:
- Never leave a fire unattended.
- Keep children and pets at a safe distance.
- Only burn clean and dry firewood.
- Extinguish the fire completely before leaving the area.
- Have a fire extinguisher or bucket of sand readily available in case of emergencies.
9. Upcycled Tin Can Wind Chimes
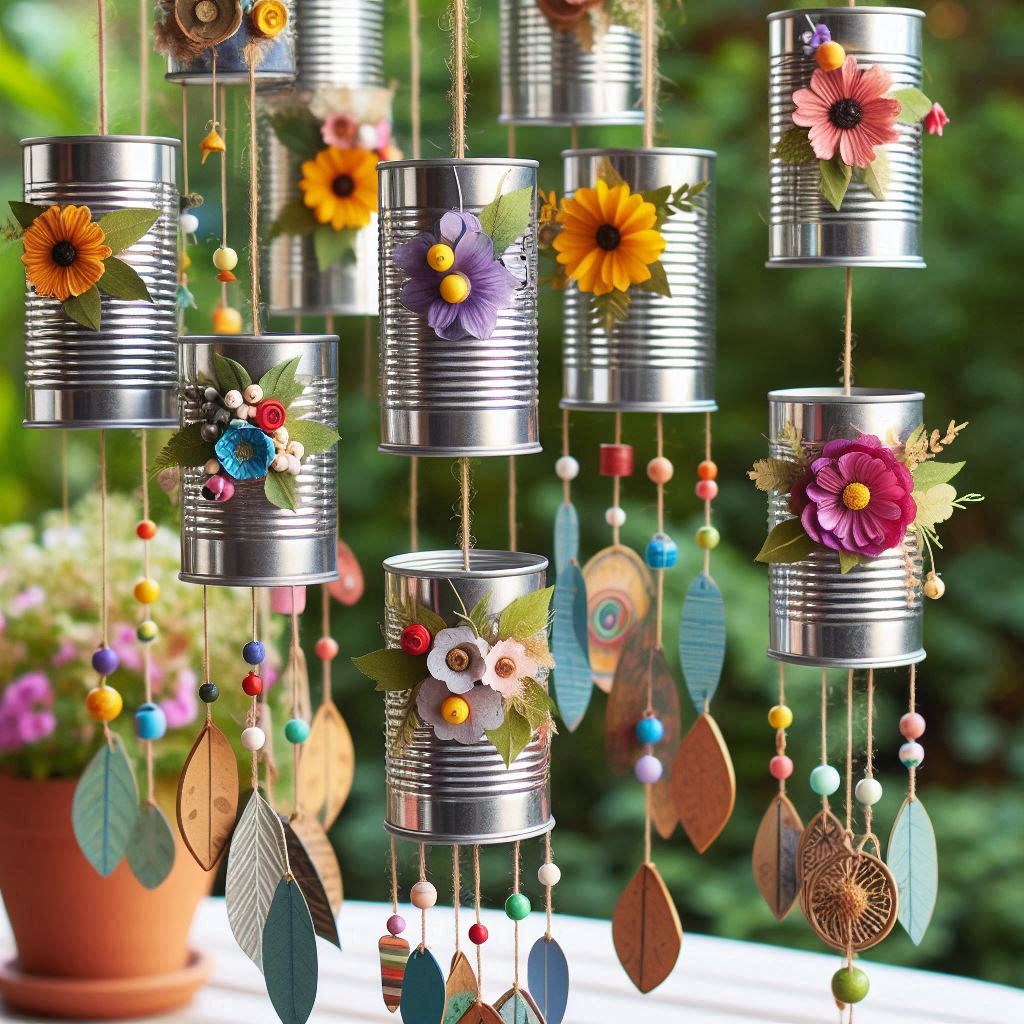
Turn leftover tin cans into a delightful and musical addition to your backyard. This project is perfect for adding a touch of whimsy and creating soothing sounds that will enhance your outdoor relaxation experience.
Materials List:
- Empty tin cans (various sizes and shapes)
- Nylon fishing line or string
- Beads (optional)
- Shells (optional)
- Wind chimes frame (optional, a sturdy branch can also be used)
- Drill
- Hammer and nail (optional)
Step-by-Step Instructions:
- Can Preparation: Wash and dry the empty tin cans thoroughly. Remove any labels or stickers. Using a nail and hammer (optional), carefully punch a small hole near the top rim of each can.
- Threading Up: Cut various lengths of fishing line or string. Thread a bead or shell (optional) onto the string and then pass it through the hole in a tin can. Secure the string by tying a knot at the top of the can. Repeat this process for each can, creating strands of varying lengths.
- Assembling the Chimes: Attach the prepared strings with tin cans to a wind chimes frame (optional) or a sturdy branch. You can tie the strings together at different heights to create a cascading effect.
- Let the Music Play: Hang your upcycled wind chimes in your backyard and enjoy the gentle sounds created by the wind tinkling through the tin cans.
10. DIY Bird Feeder Sanctuary
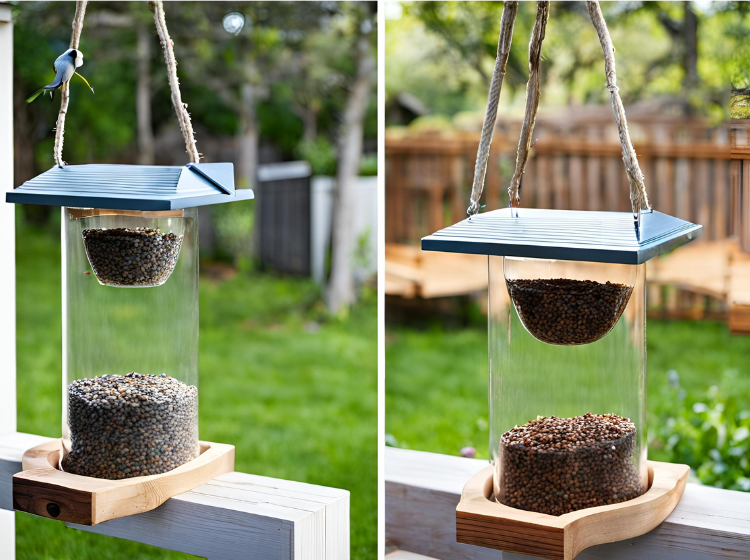
Attract beautiful birds to your backyard and create a delightful display of nature with a DIY bird feeder sanctuary. This project is a joy for bird enthusiasts and anyone who appreciates the beauty of wildlife.
Materials List:
- Recycled plastic bottle (2-liter size works well)
- Wooden spoon
- Birdseed
- Twine or rope
- Scissors or craft knife
- Optional decorations: paint, markers, colorful tape
Step-by-Step Instructions:
- Bottle Transformation: Wash and dry the empty plastic bottle. Using scissors or a craft knife, carefully cut a feeding hole near the bottom of the bottle, large enough for birds to enter comfortably. You can create additional feeding holes on different sides of the bottle for multiple birds to access the seed.
- Perch Time: Cut a small notch near the top rim of the bottle. Insert the handle end of the wooden spoon into the notch, creating a perch for the birds to land on while feeding.
- Hanging Around: Cut a length of twine or rope and tie it securely around the neck of the bottle. This will be used for hanging the feeder.
- Sprucing it Up (Optional): Get creative and decorate your bird feeder! Paint the bottle with bird-friendly colors, add colorful tape stripes, or use markers to draw designs. This will not only add a personal touch but also attract birds with the bright colors.
- Finding the Perfect Spot: Hang your DIY bird feeder sanctuary in a location with easy access for birds, ideally near trees or shrubs where they feel safe. Ensure it’s sheltered from strong winds and direct sunlight.
- Keeping it Full: Fill your bird feeder with a variety of birdseed that attracts different bird species. Research the types of birds common in your area to choose the most suitable seed mix. Regularly refill the feeder to keep the birds coming back.
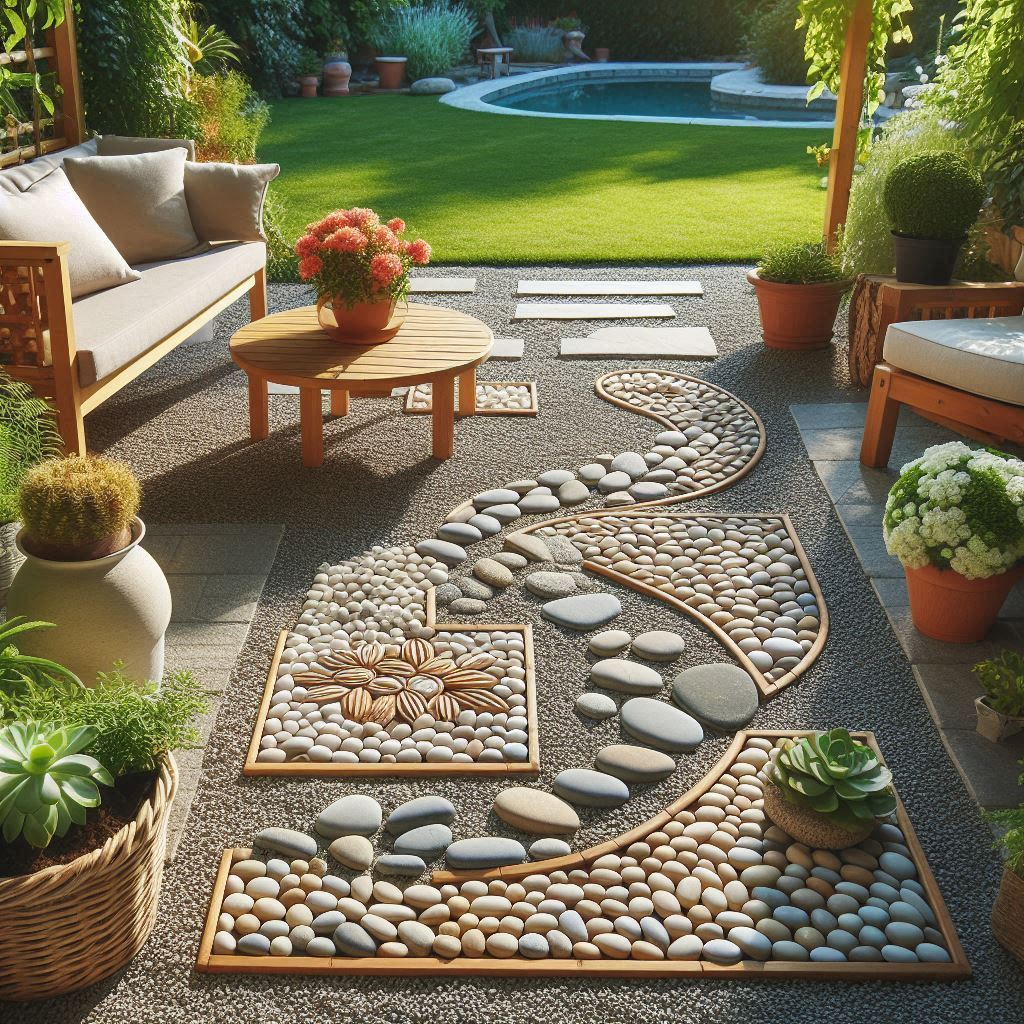
11. Pebble Pathway with a Purpose
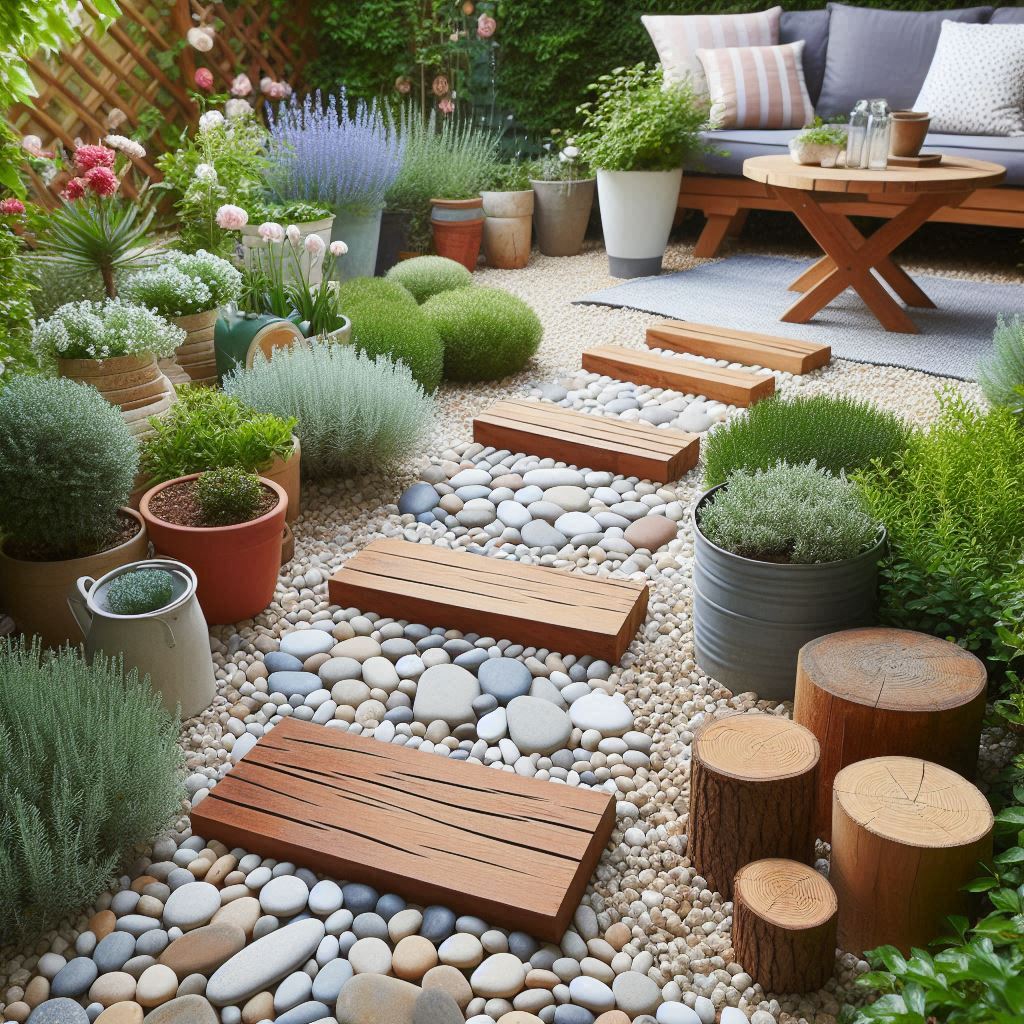
Create a beautiful and functional addition to your backyard with a DIY pebble pathway. This project is perfect for adding definition to your outdoor space, separating different areas, and providing a comfortable walking surface.
Materials List:
- Landscape fabric
- Pea gravel (base layer)
- Decorative pebbles (various sizes and colors for visual interest)
- Edging material (optional: bricks, stones, pavers)
- Shovel
- Tamper (or a flat object for compacting)
Step-by-Step Instructions:
- Pathway Planning: Decide on the desired layout and size of your pebble pathway. Mark the pathway with spray paint or sand to visualize its location.
- Laying the Foundation: Excavate the marked area to a depth of approximately 2-3 inches. Line the bottom with landscape fabric to suppress weeds and prevent the base layer from settling.
- Gravel Base: Add a layer of pea gravel on top of the landscape fabric. Use the tamper to compact the gravel evenly, creating a stable base for the pebbles.
- Pebble Power: Begin placing the decorative pebbles over the compacted gravel base. Arrange the pebbles in a pleasing pattern, using different sizes and colors to create a visually interesting design.
- Edging it Up (Optional): For a more finished look and to prevent the pebbles from spreading, consider adding edging material along the sides of the pathway. You can use bricks, stones, pavers, or even treated wood for this purpose.
12. DIY Outdoor String Art
Liven up a blank fence or wall in your backyard with a captivating piece of DIY outdoor string art. This project is a great way to showcase your artistic side and add a unique touch to your outdoor space.
Materials List:
- Plywood board (cut to desired size)
- Waterproof paint (optional)
- Nails or screws
- Hammer or drill
- String or yarn in various colors
- Stencil (optional, for creating specific designs)
- Hooks (optional, for hanging)
Step-by-Step Instructions:
- Board Preparation: Paint the plywood board with a coat of waterproof paint (optional) to protect it from the elements. Choose a color that complements your chosen string colors or your overall backyard aesthetic.
- Design Time: Decide on the design for your string art. You can create freehand patterns, use stencils for specific shapes (like flowers, animals, or geometric designs), or find inspiration online.
- Hammering the Way: Following your chosen design, hammer nails or screws into the plywood board at designated points to create the outline of your artwork. The spacing of the nails will determine the density and detail of your string art.
- String Symphony: Start wrapping string or yarn around the nails, creating a web of color that fills the design. You can use a single color or experiment with different colors to create patterns and add depth to your artwork.
- Hanging Options: (Optional) Attach hooks to the back of the plywood board for hanging your string art on a fence, wall, or even a post in your backyard.
13. Repurposed Shutter Herb Garden
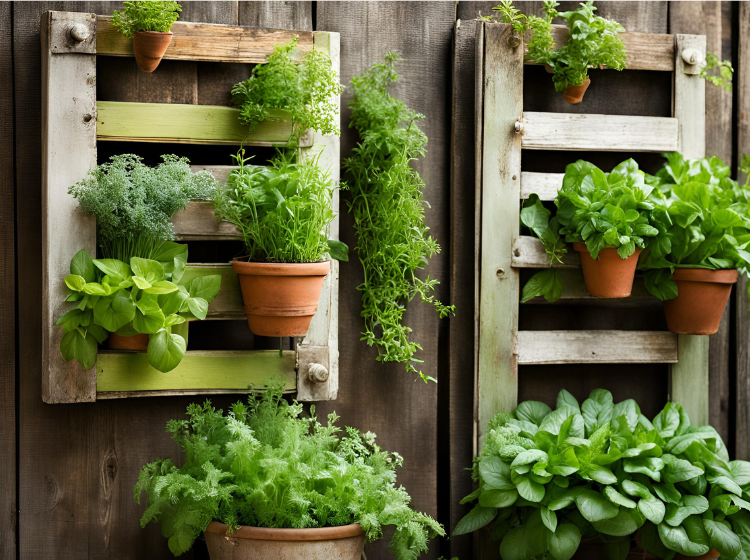
Give old shutters a new lease on life by transforming them into charming vertical herb gardens. This project is perfect for adding a touch of rustic charm and functionality to your backyard, especially if you have limited space.
Materials List:
- Old shutters (ensure they are weather-resistant)
- Heavy-duty plastic liner
- Staple gun
- Potting soil
- Selection of your favorite herbs
- Drill (optional, for drainage holes)
- Screws or nails (optional, for hanging)
Step-by-Step Instructions:
- Shutter Spruce-Up: If necessary, clean and sand down the shutters to remove any dirt or debris. You can also paint them a fresh color to
- Shutter Spruce-Up (continued): You can also paint them a fresh color to match your outdoor décor. Ensure you use outdoor paint suitable for withstanding the elements.
- Lining Up: Cut the heavy-duty plastic liner to fit the inside of each shutter panel. Secure the liner using a staple gun, ensuring it overlaps the edges of the shutter wood. This will prevent the soil from leaking out.
- Drainage Option (Optional): For better drainage, drill a few small holes at the bottom of each shutter panel lined with plastic.
- Planting Pockets: Depending on the size of your shutters, you can create multiple planting sections by stapling the plastic liner to create separate pockets within the shutter frame.
- Herb Heaven: Fill the prepared sections with high-quality potting soil. Choose a soil mix that is well-draining and suitable for growing herbs. Plant your chosen herbs in the prepared sections, ensuring they have adequate space to grow.
- Hanging Your Herb Garden: Attach screws or nails (optional) to the back of the shutters for hanging. Choose a location in your backyard that receives ample sunlight throughout the day, most herbs thrive on 6-8 hours of sunlight.
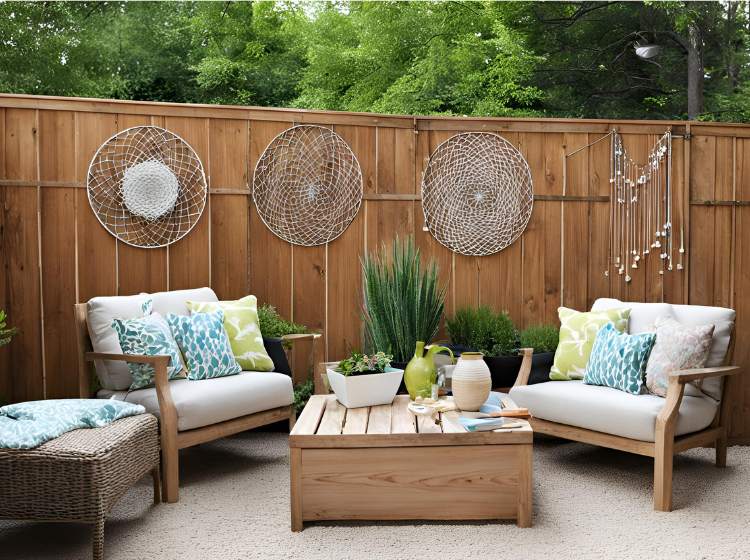
14. Cozy Corner Conversation Pit
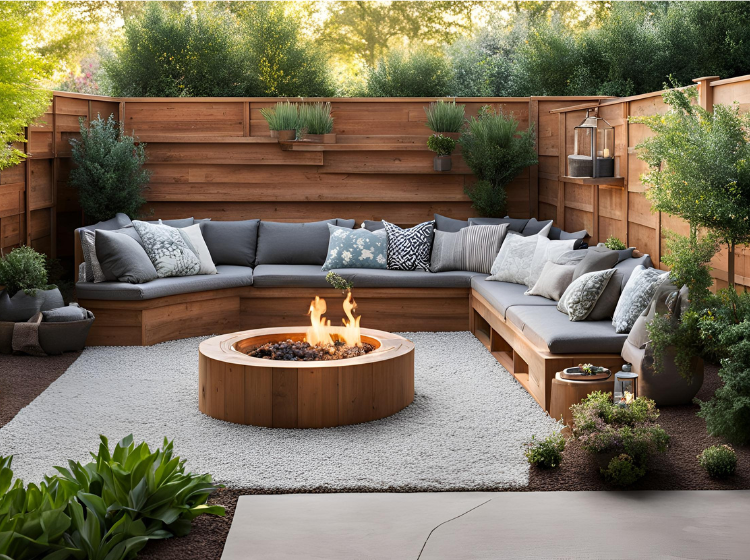
Create a relaxed and inviting space for conversation and gatherings with a DIY conversation pit. This project is perfect for fostering a sense of community and togetherness in your backyard.
Materials List:
- Landscape fabric
- Pea gravel (base layer)
- Stones, bricks, or pavers (for edging)
- Cushions and pillows
- Optional additions: small fire pit, string lights, small table
Step-by-Step Instructions:
- Choosing the Spot: Select a level area in your backyard that can comfortably accommodate the desired size of your conversation pit. Consider the proximity to seating areas, shade options, and fire safety if incorporating a fire pit.
- Laying the Foundation: Mark the desired size and shape of your conversation pit. Excavate the area to a depth of approximately 3-4 inches. Line the bottom with landscape fabric to suppress weeds and prevent the base layer from settling.
- Gravel Base: Add a layer of pea gravel on top of the landscape fabric. Use a tamper to compact the gravel evenly, creating a stable base.
- Edging it In: Line the perimeter of the conversation pit with stones, bricks, or pavers to create a defined edge and prevent the gravel from spreading.
- Comfort is Key: Furnish your conversation pit with comfortable outdoor cushions and pillows. Arrange them in a circle or facing each other to encourage conversation and social interaction.
- Setting the Mood (Optional): For a more inviting atmosphere, consider adding a small fire pit in the center of the conversation pit (ensure proper safety measures are in place). String lights hung overhead or placed around the edges can add a touch of magic and ambiance during evening gatherings. A small table in the center can be useful for placing drinks or snacks.
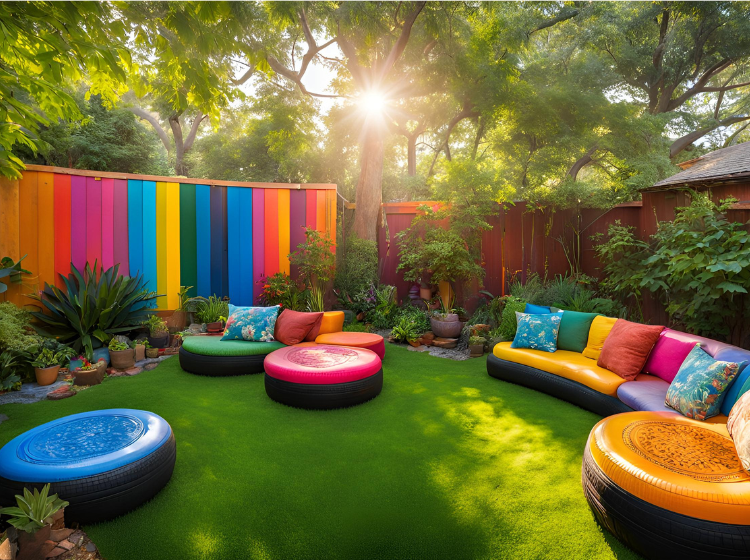
15. Recycled Tire Swing for the Young (or Young at Heart!)

Bring back a touch of childhood nostalgia and create endless entertainment for children (or even playful adults) with a recycled tire swing. This project is a simple and affordable way to add a fun and functional element to your backyard.
Materials List:
- Used tire (ensure it’s free of cracks or damage)
- Sturdy tree branch with a large diameter (that can safely support weight)
- Thick rope (rated for swing weight capacity)
- Shackles or carabineers
- Drill (with drill bit suitable for the tree branch)
Step-by-Step Instructions:
- Tire Selection: Choose a used tire in good condition, free of any tears, rips, or exposed metal wires. Ensure it’s the right size for the intended user and can comfortably accommodate them while swinging.
- Branch Out: Select a healthy and sturdy tree branch with a large enough diameter to support the weight of the swing and the intended user. The branch should be free of any major cracks or signs of rot.
- Drilling Time: Drill a hole through the center of the chosen tree branch, ensuring it’s large enough to accommodate the chosen rope.
- Securing the Swing: Cut a length of thick rope, ensuring it’s rated for the weight capacity of the swing. Thread the rope through the drilled hole in the tree branch. Secure the rope ends using shackles or carabineers, ensuring a strong and reliable connection.
- Tire Time: Attach the other ends of the rope securely to the sides of the tire. There are different methods for attaching rope to a tire swing. You can find tutorials online that detail specific techniques using knots or eyebolts, ensuring a safe and secure connection.
Safety First:
- Always supervise children when using the swing.
- Ensure the tree branch and rope can support the weight of the intended user.
- Regularly inspect the swing for any signs of wear or tear and replace damaged components immediately.
- Maintain a safe clearance zone around the swing to avoid collisions with other objects or people.
16. Butterfly Haven with Blooming Beauty
Attract a flutter of colorful wings to your backyard by creating a butterfly haven. This project is a beautiful way to support local pollinators and add a touch of magic to your outdoor space.
Materials List:
- Selection of butterfly-attracting plants (milkweed, lantana, butterfly bush, etc.)
- Rocks or stones (for creating a butterfly puddling area)
- Shallow dish (for water source)
- Sand or pea gravel (optional, for the puddling area)
Step-by-Step Instructions:
- Planting Power: Research and choose a variety of butterfly-attracting plants that bloom throughout the season, providing a continuous source of nectar for butterflies. Group these plants together to create a designated butterfly garden or scatter them throughout your backyard.
- Puddling Paradise: Butterflies need moisture and minerals, which they obtain by puddling on damp surfaces. Create a puddling area for them using a shallow dish filled with sand or pea gravel. Keep the dish filled with water and add a few flat rocks or stones for the butterflies to perch on.
- Shelter From the Sun: Butterflies need some protection from the hot afternoon sun. Plant a small tree or shrub near your butterfly garden to provide shade and shelter.
17. Glowing Pathway with Upcycled Glass Bottles
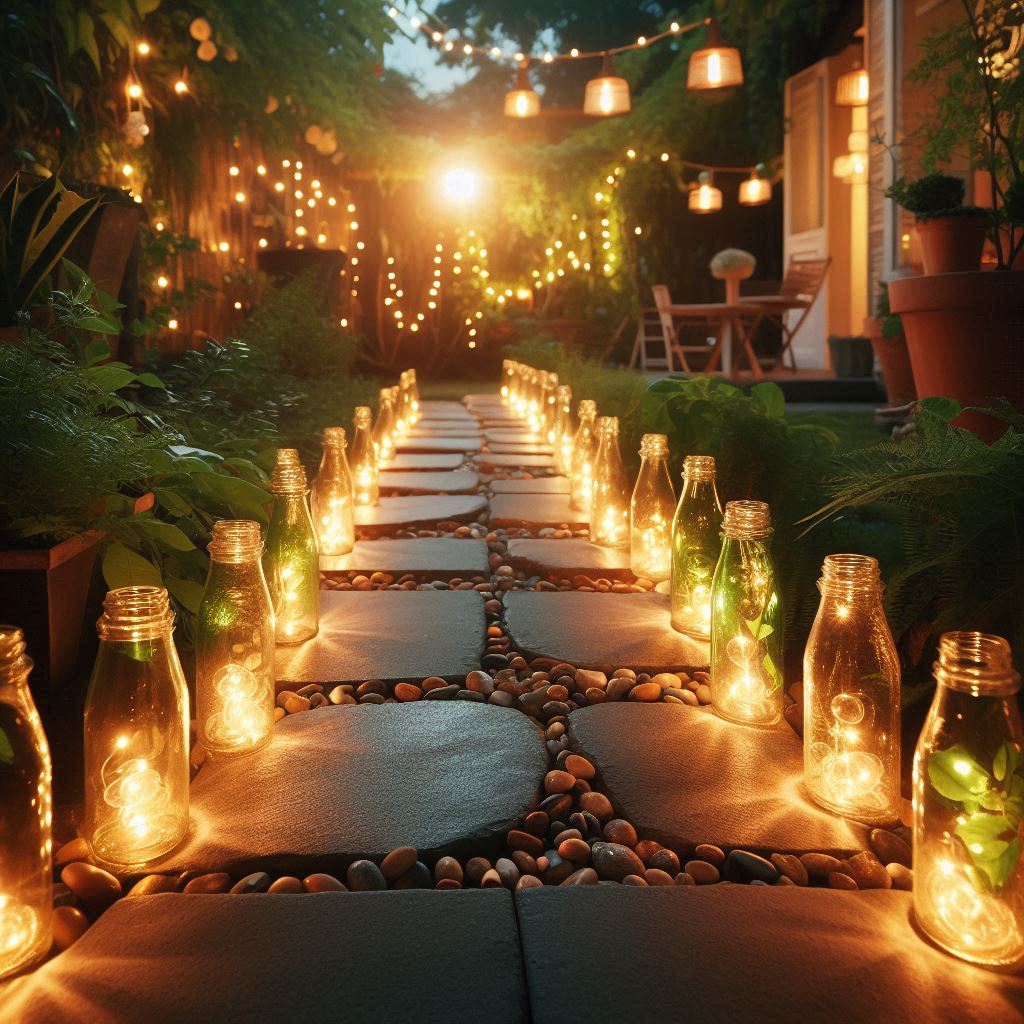
Light up your backyard pathway in a charming and eco-friendly way with upcycled glass bottles. This project is a beautiful and sustainable way to add illumination and enhance the ambiance of your outdoor space during evenings.
Materials List:
- Empty glass bottles (wine bottles or similar size)
- Solar fairy lights (one per bottle)
- Glass cleaner
- Sand or pebbles (optional)
- Optional decorations: acrylic paint, markers
Step-by-Step Instructions:
- Bottle Prep: Wash the empty glass bottles thoroughly with soap and water. Remove any labels or stickers and ensure they are completely dry.
- Light It Up: Carefully insert a solar fairy light into each bottle. The solar panel should be positioned at the top of the bottle to receive sunlight during the day.
- Standing Tall (Optional): For added stability, especially for larger bottles, you can fill the bottom of the bottle with sand or pebbles. This will weigh down the bottle and prevent it from tipping over easily.
- Decorative Touches (Optional): Get creative and decorate your glass bottle lights! Paint them with acrylic paint, add designs with markers, or wrap them with twine for a rustic touch.
- Illuminating Your Path: Place the decorated glass bottle lights along your backyard pathway, ensuring there’s enough space between each one. The solar lights will automatically turn on at dusk, casting a soft and inviting glow along your path.
Remember: When using glass bottles outdoors, ensure they are placed in areas with minimal foot traffic to avoid any accidents.
18. DIY Pallet Furniture
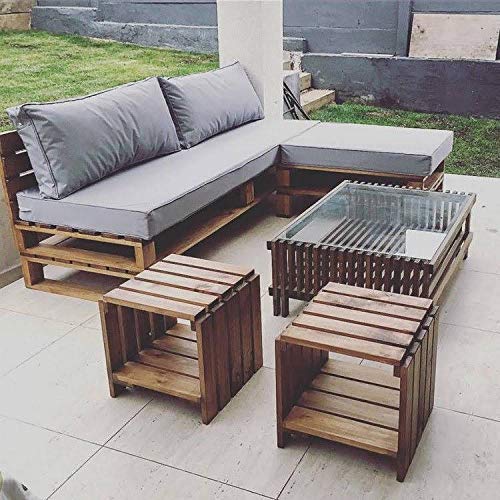
Pallet furniture is one of the most cost-effective ways to upgrade your backyard. Wooden pallets, which are often available for free from local businesses, can easily be repurposed into stylish outdoor furniture. To start, you’ll need to sand down the pallets to remove any rough edges, ensuring the wood is smooth and splinter-free. Once that’s done, you can stack the pallets to create bases for sofas, coffee tables, or benches. Secure the pallets with screws or brackets for stability.
Next, add a coat of paint or wood stain to protect the pallets from the elements. Choose outdoor-friendly paint in a color that complements your backyard’s theme or leave the wood in its natural state for a rustic look. For added comfort, invest in some outdoor cushions or pillows. These are available in a wide variety of colors and patterns, allowing you to customize your DIY furniture to match your style.
The best part about pallet furniture is its versatility. You can create individual pieces or a complete outdoor lounge area. Whether you’re hosting guests or enjoying a quiet evening outside, your DIY pallet furniture will offer a cozy and stylish space without the high cost of store-bought sets.
19. Vertical Garden with Recycled Materials
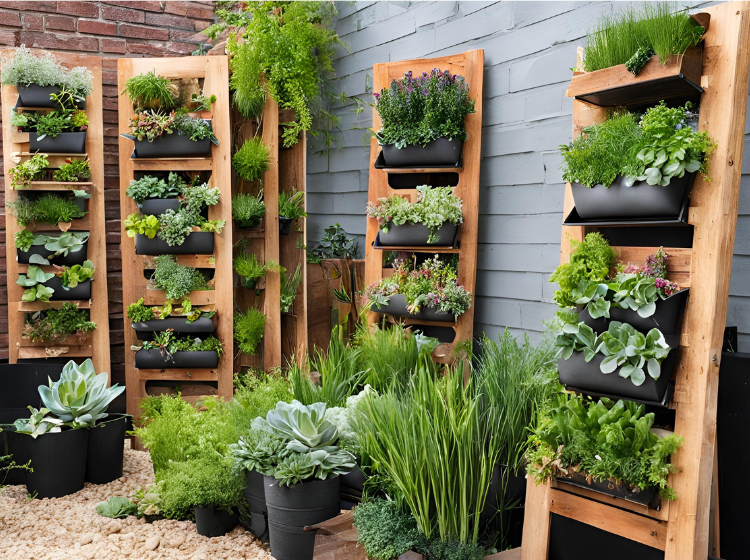
If you’re short on space or want to add greenery without taking up too much room, a vertical garden is a perfect solution. Not only is it space-efficient, but it’s also a great way to recycle materials like wooden pallets, old gutters, or even hanging planters. Begin by mounting a wooden pallet vertically on a fence or wall, or secure old gutters horizontally to create planting boxes.
Once your structure is in place, fill it with soil and plant herbs, flowers, or small vegetables. Vertical gardens are ideal for smaller backyards because they maximize space, allowing you to grow a variety of plants in a compact area. They also add a unique design element, drawing the eye upward and creating visual interest.
For those looking to add a splash of color, consider painting the pallet or planters in bright hues. If you prefer a more natural look, leave the materials unpainted and let the plants be the star of the show. This DIY project is not only budget-friendly, but it also adds life and beauty to your backyard with minimal effort.
20. Outdoor String Lights Using Mason Jars
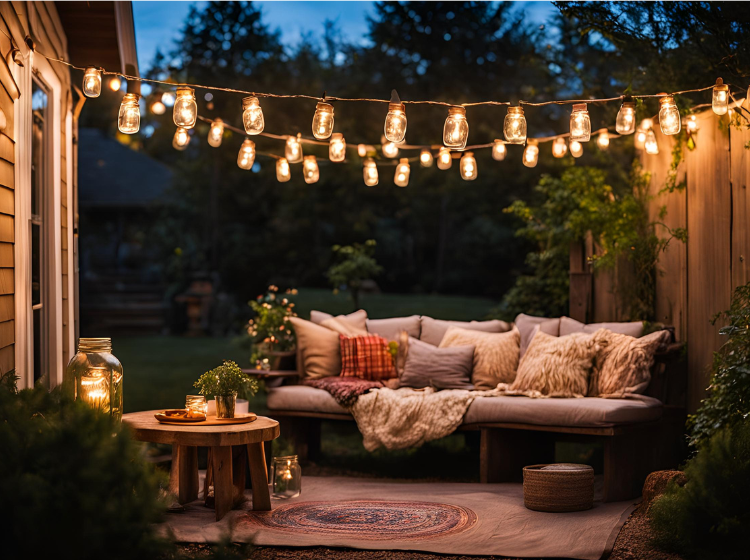
String lights can instantly transform a backyard into a magical retreat, especially when combined with DIY mason jar lanterns. This simple and inexpensive project only requires a few materials: mason jars, string lights, and hooks. Begin by hanging string lights along the fence, from trees, or across your patio to create an ambient glow. To enhance the look, place string lights inside mason jars and hang them along the fence or set them on tables for an enchanting vibe.
Mason jar lanterns are easy to make and can be customized to suit your style. You can add fairy lights inside the jars or even use them to hold candles or battery-powered LED lights. For a more rustic or vintage look, consider distressing the jars with paint or wrapping them with twine. These small additions create a warm, inviting atmosphere, perfect for evening gatherings or quiet nights outdoors.
To save money, use solar-powered lights to avoid additional electricity costs. Not only will this help reduce your energy bills, but it’s also an eco-friendly option for lighting your backyard.
21. DIY Stone Mosaic Stepping Stones
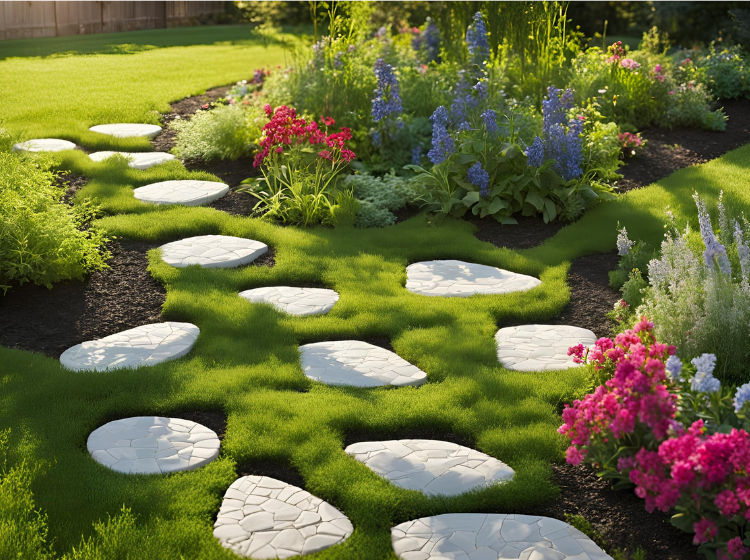
Stepping stones are a functional and decorative addition to any backyard, and making them yourself allows for endless creativity. Start by purchasing a simple concrete mix and plastic molds for your stones. You can find inexpensive molds in a variety of shapes at most craft stores. Mix the concrete according to the package instructions and pour it into the molds, filling them about halfway.
Now comes the fun part—decorating! Press decorative stones, broken tiles, or even glass pieces into the wet concrete to create a mosaic pattern. You can personalize your stepping stones with intricate designs, abstract patterns, or even your initials. Let the stones cure completely before placing them in your backyard.
Not only do DIY stepping stones add a personal touch to your outdoor space, but they also provide a practical path through your garden or yard. This project is perfect for those looking to add a unique flair to their backyard on a budget.
22. Repurposed Tire Planters
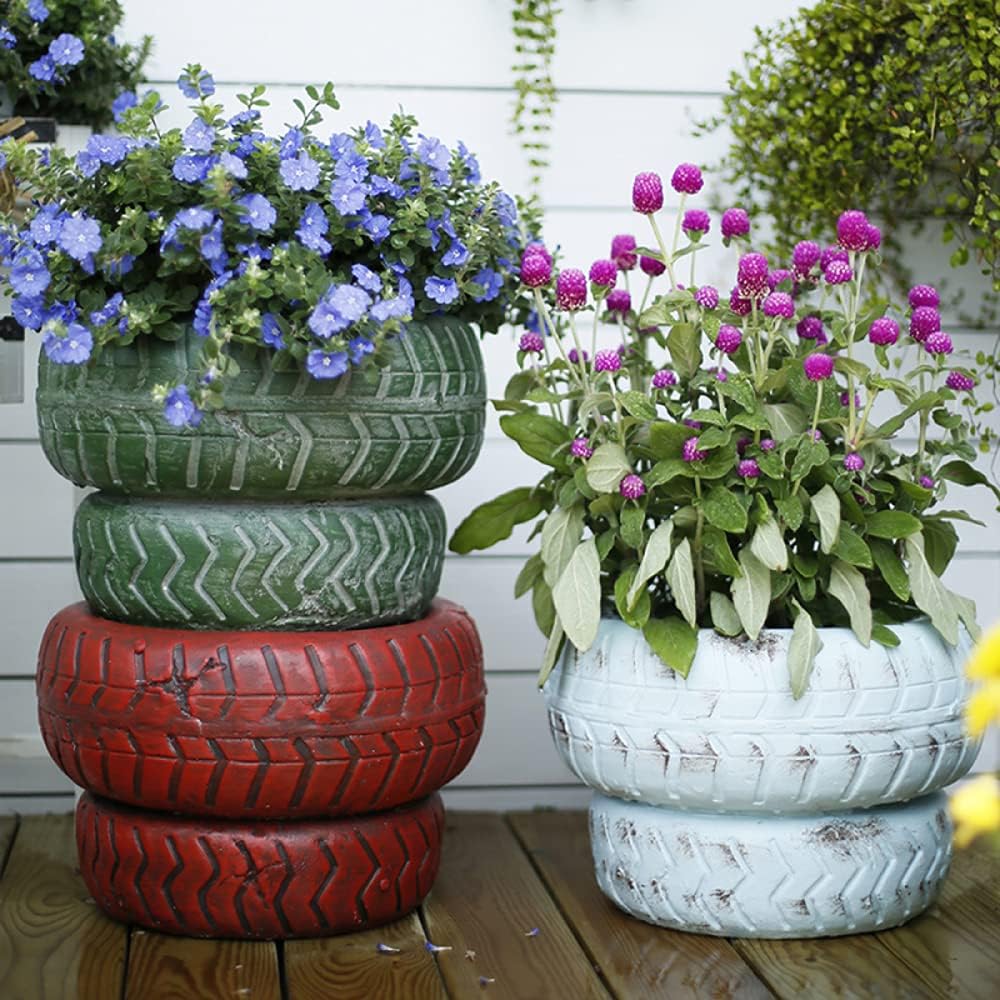
Upcycling old tires into colorful planters is a budget-friendly way to bring life to your backyard. Start by sourcing old tires, which you can often get for free from auto shops. After cleaning the tires, give them a fresh coat of spray paint in vibrant colors that match your outdoor decor. Bright reds, blues, and yellows can create a fun, playful vibe, while more muted tones like white or gray offer a chic, modern look.
Once the tires are painted and dry, fill them with potting soil and plant flowers, herbs, or small shrubs. Tires can be stacked for a tiered planter effect or placed individually around the yard. This project is a great way to add greenery to your backyard without the cost of expensive planters, and it also helps keep old tires out of landfills.
To further customize your tire planters, consider using different sizes of tires or adding stencils or patterns to the painted surface. These DIY planters are a fun and eco-friendly way to brighten up your outdoor space.
23. DIY Garden Trellis from Bamboo Poles
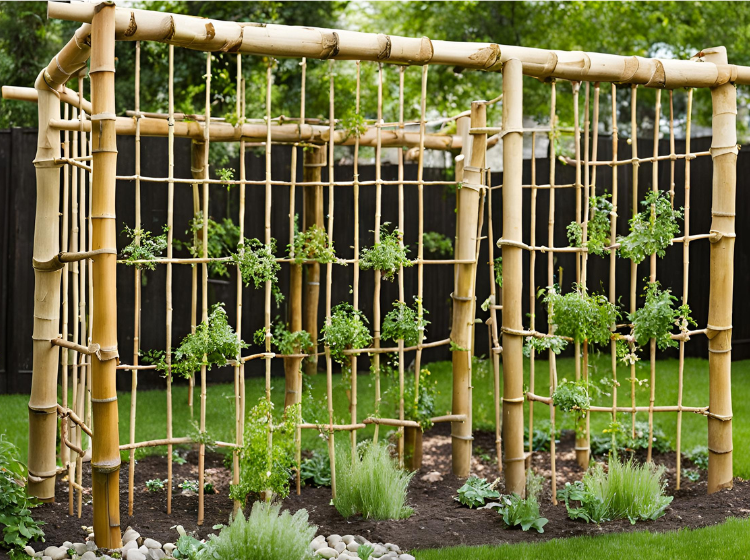
A garden trellis made from bamboo poles is an affordable and stylish way to support climbing plants like vines, tomatoes, or cucumbers. Bamboo is lightweight, durable, and easy to work with, making it the perfect material for DIY garden structures. To create a trellis, arrange bamboo poles in a teepee shape and secure them at the top with garden twine.
Plant climbing vines at the base of the trellis, and over time, they’ll grow around the bamboo poles, creating a lush, green structure. This DIY trellis adds height and visual interest to your backyard while providing essential support for your plants. Bamboo is also an inexpensive material that can often be sourced locally or from garden centers.
If you want to customize your trellis, consider painting the poles in vibrant colors or using decorative twine to secure the structure. The natural look of bamboo fits perfectly into any garden, from rustic to modern.
24. Create a Simple Outdoor Fountain
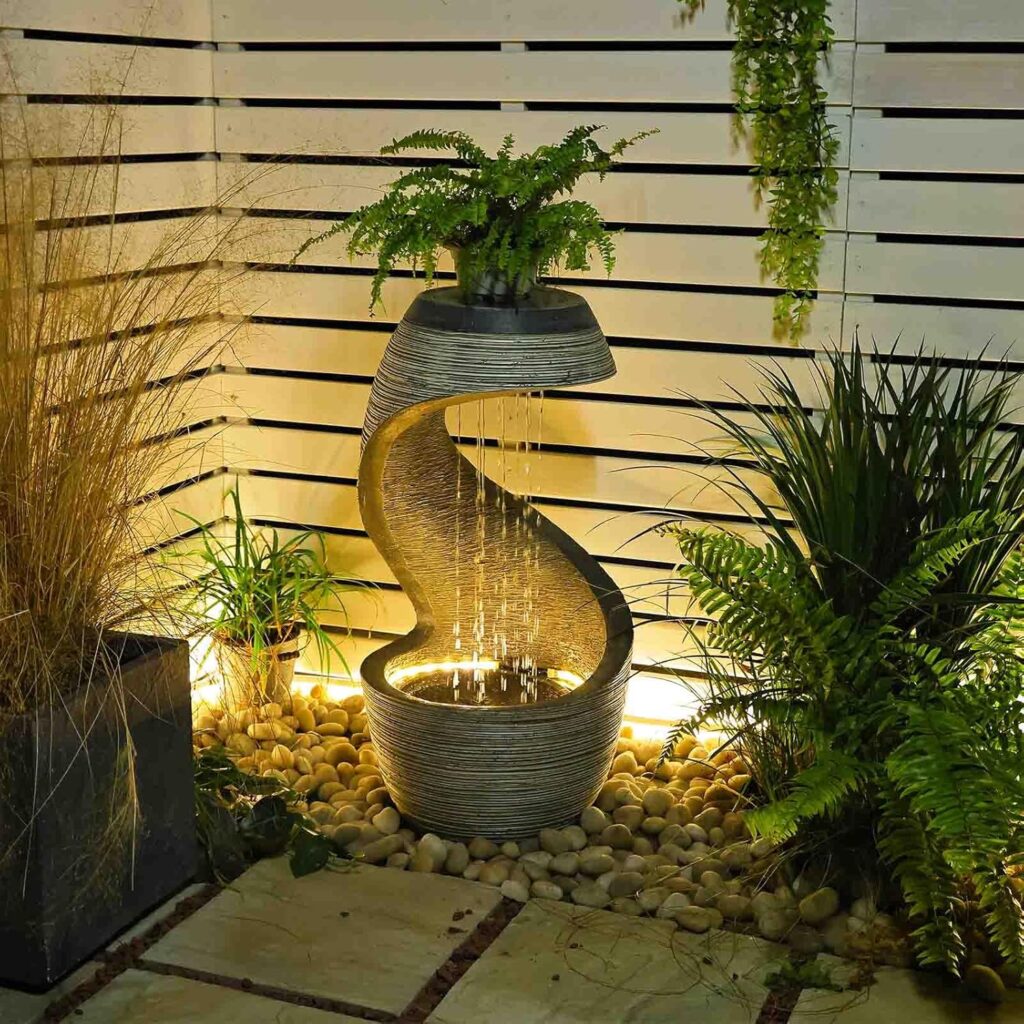
An outdoor fountain can add a soothing element to your backyard, and you don’t need to spend hundreds of dollars to get one. You can create a simple DIY fountain using a large ceramic pot, a submersible pump, and river stones. Begin by choosing a large, waterproof pot or container. Drill a hole in the bottom of the pot to feed the pump’s power cord through, then place the pump at the bottom of the pot.
Next, arrange river stones around the pump to hide it while allowing water to flow freely. Fill the pot with water, plug in the pump, and enjoy the calming sound of flowing water. This simple project is both budget-friendly and low maintenance, making it a perfect addition to any backyard retreat.
For added flair, consider adding aquatic plants or floating candles to the water. The sound of the fountain combined with the visual appeal of a well-designed pot can create a peaceful oasis in your backyard without the hefty price tag.
Bonus Tips for Finding Affordable DIY Materials:
- Thrift Stores and Salvage Yards: These hidden gems are treasure troves for finding unique and affordable items that can be upcycled into beautiful DIY projects. From old tires to discarded furniture, you never know what you might discover!
- Online Marketplaces: Websites and apps like Craigslist or Facebook Marketplace offer a platform to find pre-loved furniture, building materials, and other items that can be given a new life in your backyard DIY projects.
Common DIY Mistakes to Avoid and How to Fix Them:
- Uneven Paint Application: Take your time and apply thin, even coats of paint to avoid drips and streaks. If you do encounter unevenness, you can lightly sand the surface and reapply a thin coat of paint once it’s dry.
- Improper Measurements: Double-check your measurements before cutting or drilling to ensure everything fits together correctly. If you make a slight mistake, you may be able to fix it with creative solutions like adding trim or decorative elements.
- Ignoring Weight Limits: When hanging furniture or using structures, ensure they can support the intended weight. Don’t overload hammocks or hanging planters to avoid accidents.
Conclusion
Transforming your backyard into a beautiful and inviting space doesn’t require a hefty budget or extensive experience. With these 20+ Cheap & Easy DIY ideas, you can create a backyard haven that reflects your style and allows you to enjoy the outdoors to the fullest. Remember, the key is to be creative, have fun, and personalize these projects to suit your taste and needs.