

I’ve spent too many summers watching my water bill skyrocket while my prize-winning tomatoes shrivel up under the August sun. There is nothing more soul-crushing than standing over a wilted garden bed with a garden hose, knowing you’re essentially pouring money into the dirt. I used to think a “real” irrigation setup required a professional plumber and a thousand-dollar tank, but I was dead wrong.
Actually, the summer my zucchini took over the entire ZIP code, I realized I didn’t need a fancy system; I just needed to stop letting the free stuff fall off my roof and into the storm drain. You can set up a DIY rain collection system for less than the cost of a fancy dinner, and your plants will actually like it better because it isn’t loaded with chlorine.
Here are my tried-and-true methods for catching the sky-juice without breaking the bank.
1. The Classic Blue Food-Grade Barrel Setup
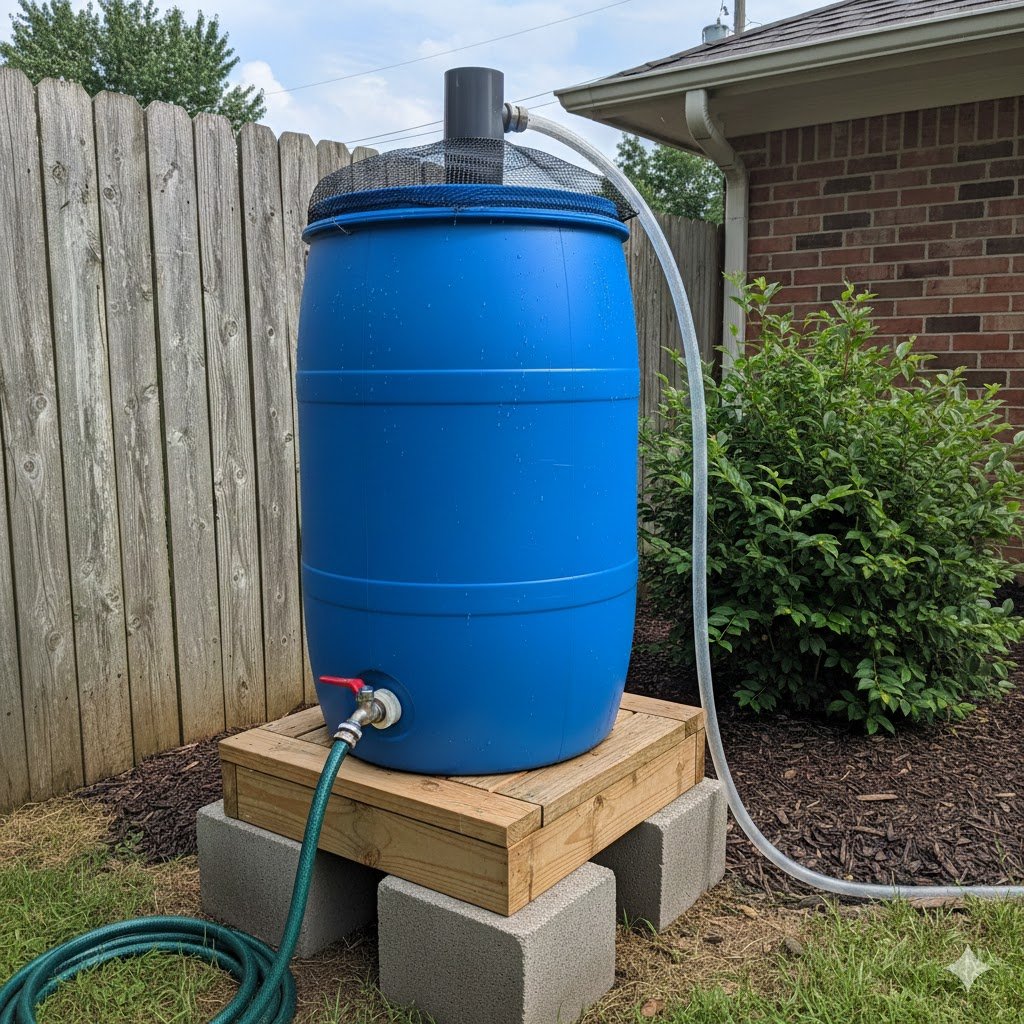
If you want the absolute best bang for your buck, you need to find those giant blue plastic barrels. I see people buying “decorative” rain barrels at big-box stores for $150, and I just shake my head. Those things are thin, they crack in the sun, and they hold about twenty gallons. I’ve found that the 55-gallon food-grade barrels used for shipping olives or pickles are the gold standard.
You can usually find these on local marketplace apps or at car washes for about $20. Just make sure you aren’t buying something that previously held toxic chemicals—I once made the mistake of grabbing a “mystery barrel” that smelled like industrial solvent, and I’m pretty sure my marigolds are still glowing from it. Stick to food-grade; your soil will thank you.
To get this running, you’ll need a drill, a 15/16-inch spade bit, and a standard brass spigot. I don’t mess around with plastic spigots because they snap off the second you accidentally bump them with a wheelbarrow. Drill your hole about two or three inches from the bottom. Why not the very bottom? Because sediment and gunk will settle there, and you don’t want that clogging up your soaker hoses.
The real secret to making this work is elevation. Water doesn’t move without gravity unless you’re using a pump, which we aren’t because we’re being cheap. I stack my barrels on top of three layers of cinder blocks. It gives the water enough “head pressure” to actually flow through a hose. If your barrel is sitting on the grass, you’ll get a pathetic little trickle that wouldn’t quench the thirst of a cactus.
2. Using IBC Totes for Massive Rainwater Storage
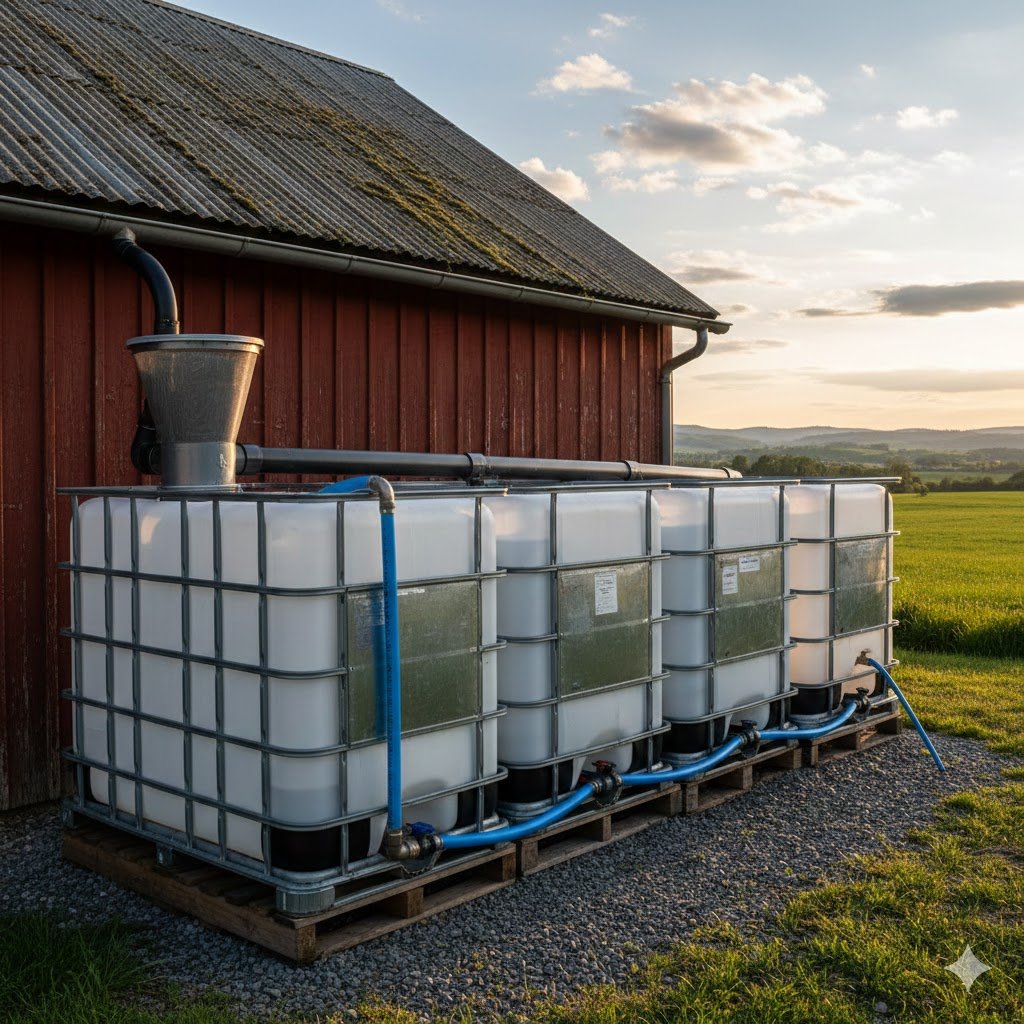
When 55 gallons isn’t enough—and trust me, it goes fast when you’re watering a full vegetable patch—you need to move up to IBC totes. These are the giant 275-gallon cubes wrapped in a metal cage. I switched to these after a particularly dry July where I was refilling my small barrels with a hose anyway, which totally defeated the purpose of being a “sustainable” gardener.
The beauty of the IBC tote is the sheer volume. One good afternoon thunderstorm can fill one of these babies to the brim. The downside? They are ugly as sin. My wife told me the garden started looking like a chemical warehouse until I got creative. I ended up wrapping mine in cedar pickets I found in a scrap pile, but honestly, a quick coat of dark green spray paint does wonders for hiding them and preventing algae growth.
Algae is the enemy here. Since these totes are often translucent white, sunlight gets in and turns the water into a swampy mess. If you don’t paint the tank or cover it with a heavy-duty tarp, you’ll end up with a green sludge that smells like a damp basement. I learned that the hard way when my drip emitters got plugged with “pond scum” right in the middle of a heatwave.
For the connection, you’ll need an adapter. The valves on these totes usually have a weird, oversized thread that won’t fit a standard garden hose. You can find “IBC to garden hose” adapters online for ten bucks. Don’t try to DIY this part with PVC glue and prayers; it’ll leak, and you’ll wake up to 275 gallons of water flooding your foundation. Trust me, that’s a phone call to the insurance company you don’t want to make.
3. The Trash Can Gravity Feed for Tight Spaces
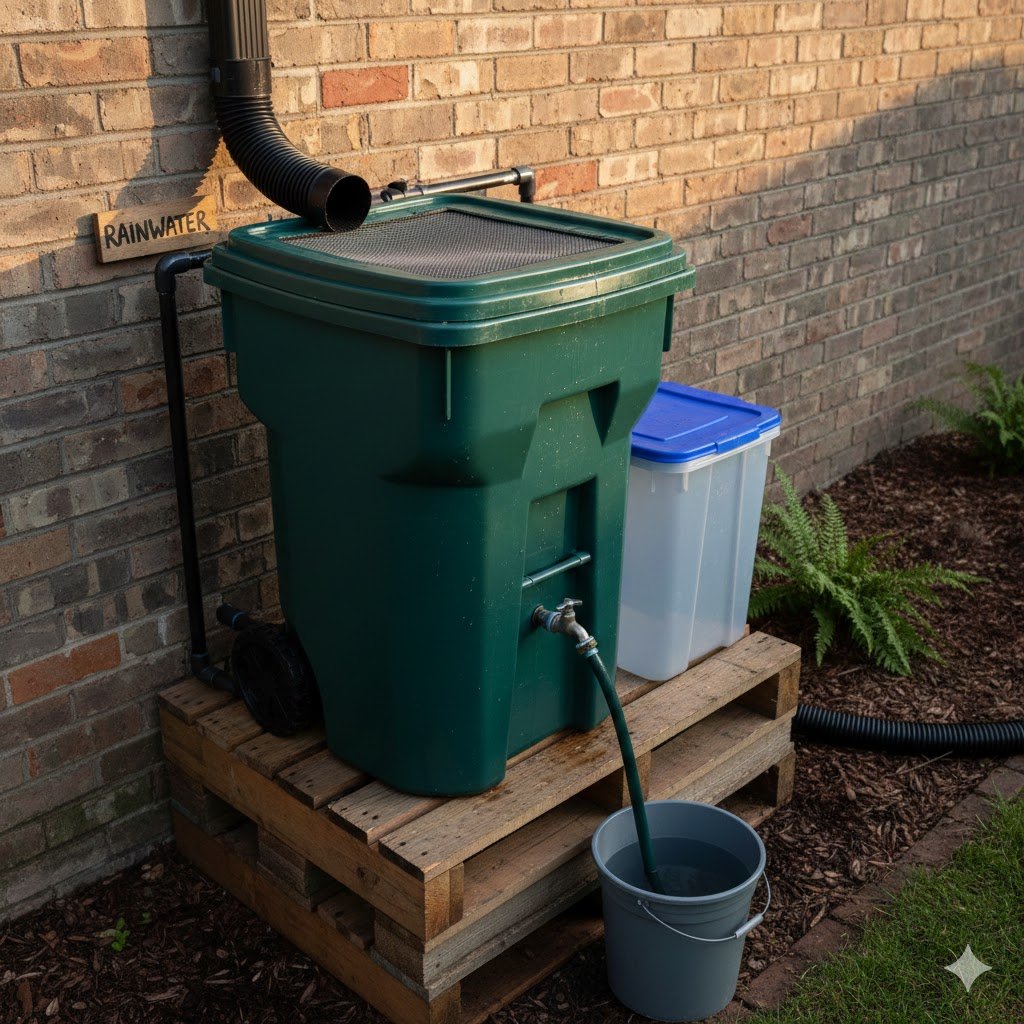
Sometimes you don’t have room for a massive cube, or maybe you’re just starting out and want to test the waters. This is where the heavy-duty plastic trash can comes in. I’m talking about the thick, 32-gallon ones with the locking lids. I used one of these behind my potting shed for years, and it worked like a charm for filling up watering cans.
The setup is basically the same as the blue barrel, but you have to be extra careful about the structural integrity. Water is heavy—about 8.3 pounds per gallon. A full trash can weighs over 250 pounds, and cheap plastic will bow and warp under that weight. I always wrap a couple of bungee cords or a ratchet strap around the middle of the can to keep it from “bellying out” and popping the spigot.
One thing I see people mess up constantly is the lid. You can’t just leave the top open. Aside from the mosquito problem (which we’ll talk about in a minute), you’ll get leaves, twigs, and the occasional confused squirrel in your water. I cut a hole in the lid, stretch some fine window screening over it, and secure it with the lid’s locking ring. It keeps the water clean and the critters out.
If you find that the pressure is too low, I’ve discovered a neat trick: use a shorter hose. The longer the hose, the more friction the water has to fight. For my trash can setup, I use a six-foot “leader” hose. It’s perfect for filling a bucket or a watering can without having to wait ten minutes for the physics to catch up with your gardening goals.
4. Linking Multiple Barrels for a “Daisy Chain” System

Once you get one barrel working, you’re going to want five. It’s addictive. Instead of having five separate barrels with five separate hoses, I like to link them together at the bottom. This is called a “daisy chain,” and it’s the smartest way to manage your inventory. I’ve found that using 1-inch PVC pipe to connect the barrels works much better than using garden hoses, which tend to kink and restrict flow.
By connecting them at the bottom, the water level stays equal in all barrels. You only need one spigot at the end of the line to drain the whole system. This saved my bacon the year I accidentally knocked out a load-bearing stud in my old garden shed—I had to move my entire water storage setup in a hurry, and having it all linked meant I only had to disconnect one main line.
The key to a successful daisy chain is a solid foundation. If one barrel is slightly lower than the others, it will take the brunt of the weight and might overflow or tip. I use a level and some packed sand under my cinder blocks to make sure everything is perfectly horizontal. If you skip this step, you’ll spend your Saturday morning watching your barrels slowly lean like the Tower of Pisa.
Also, don’t forget the overflow. When all four or five barrels are full, that extra water has to go somewhere. I run a 2-inch pipe from the top of the last barrel and directed it twenty feet away from my house. I’ve seen people forget this, and the resulting erosion literally washed away their prize-winning hostas. Water is a powerful force; give it a clear path to go where you want it.
5. Cheap Gutters and “The Tarp Method”
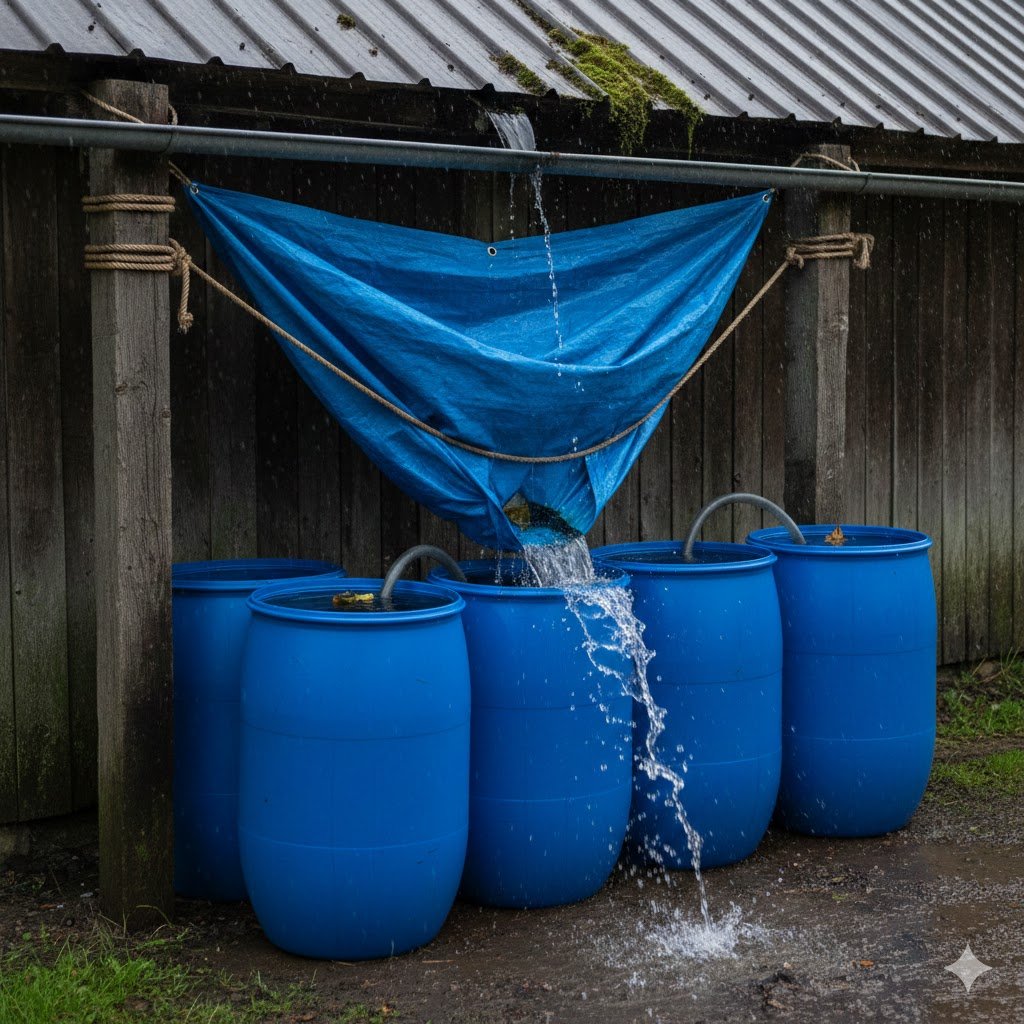
You don’t actually need gutters on your house to collect rain, though it certainly helps. If you’re watering a remote part of the yard, like a back-forty compost pile, you can use a “tarp funnel.” I’ve used this in my community garden plot where I didn’t have a roof to work with. You basically string up a heavy-duty tarp between four poles, with one corner slightly lower than the others.
By putting a weighted rock in the center of the low side, you create a natural funnel. Place your barrel underneath that low point, and you’ll be shocked at how much water you can catch from a single drizzle. It’s not the prettiest thing in the world, but it’s essentially free if you have an old tarp and some scrap wood lying around.
If you do have gutters, but they’re old and leaky, don’t replace them just for the garden. I use “flex-seal” or even just heavy-duty waterproof tape to patch the holes. As long as the water gets to the downspout, the garden doesn’t care if the gutter is a bit ugly. I’ve even seen people use halved PVC pipes as “budget gutters” on small sheds. It’s cheap, it doesn’t rust, and it works.
One quick side note: if you’re using the tarp method, make sure you tilt it enough so water doesn’t “pool” in the middle. A tarp with fifty gallons of water sitting in the center will eventually tear or collapse your support poles. It needs to be a slide, not a bowl.
Real Talk: The Mistakes Not Worth Making
Let’s be honest: not everything you see on Pinterest works in a real backyard. I’ve tried the “first flush” systems where you build a complex series of pipes to divert the first ten gallons of “dirty” roof water away from the barrel. In my opinion? It’s a total waste of time and money for a vegetable garden. Unless you’re planning on drinking the water (which you absolutely shouldn’t), your plants don’t mind a little bird poop and roof dust. Just use a screen to catch the big chunks and call it a day.
Also, don’t bother with those tiny little decorative rain chains unless you live somewhere with a constant, gentle mist. In a real downpour, the water just splashes everywhere and misses the barrel entirely. They look cute, but they are functionally useless compared to a 4-inch plastic downspout.
Finally, mosquitoes. If you don’t use “mosquito dunks” (those little BT donuts), you are essentially building a nursery for the most annoying insects on earth. I forgot them one year and couldn’t even walk into my garden without being swarmed. They’re cheap, they’re organic, and they’re non-negotiable.
Parting Wisdom
Collecting rainwater is the single best thing I’ve done for my garden’s health and my own sanity. It turns a chore into a self-sustaining cycle. Just remember to start small, get those barrels off the ground, and for heaven’s sake, keep them covered.
What’s the biggest “fail” you’ve ever had trying to DIY something in your garden? Tell me about it in the comments below—I guarantee I’ve done something even more embarrassing! Would you like me to give you a specific shopping list for the spigot and seals you’ll need?