

Look, I’ve spent fifteen years trying to convince people that they don’t need a 4,000-square-foot library to feel like a sophisticated bookworm. I once tried to build a “reading retreat” in a literal closet, forgot to check the ventilation, and fell asleep only to wake up three hours later smelling like mothballs and old winter coats. Learn from my oxygen-deprived mistakes: you only need about four square feet and a little bit of strategic planning to create a nook that’ll make you actually want to put your phone down.
Forget those Pinterest photos of sprawling window seats that cost more than a used Honda. We’re talking about that awkward corner behind your sofa or that weird gap under the stairs that currently just collects dust bunnies and lost socks.
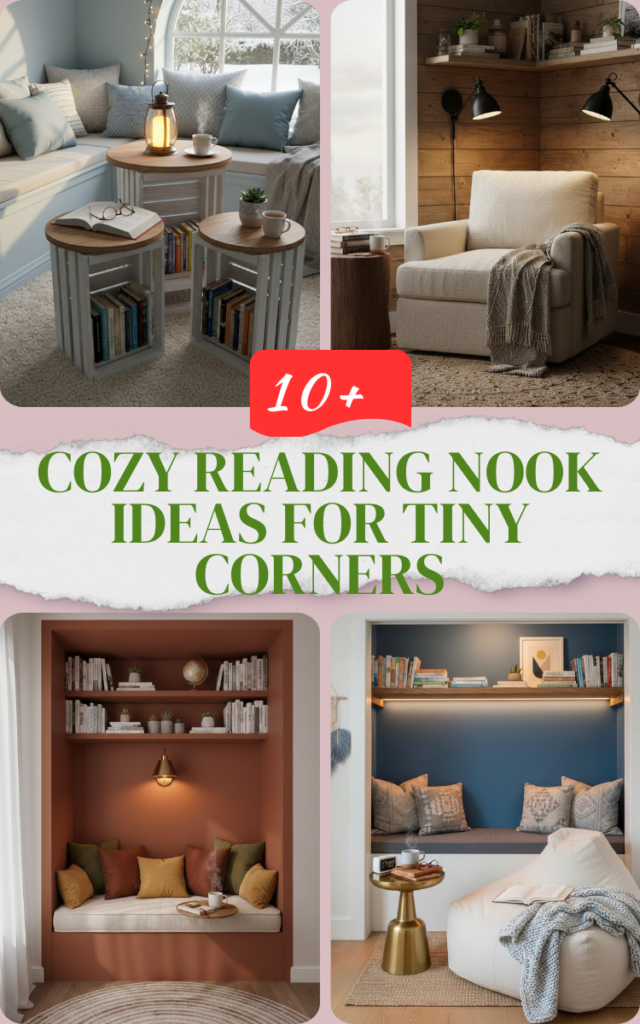
11 Cozy Reading Nook Ideas for Tiny Corners
1. The Power of Oversized Velvet Armchairs
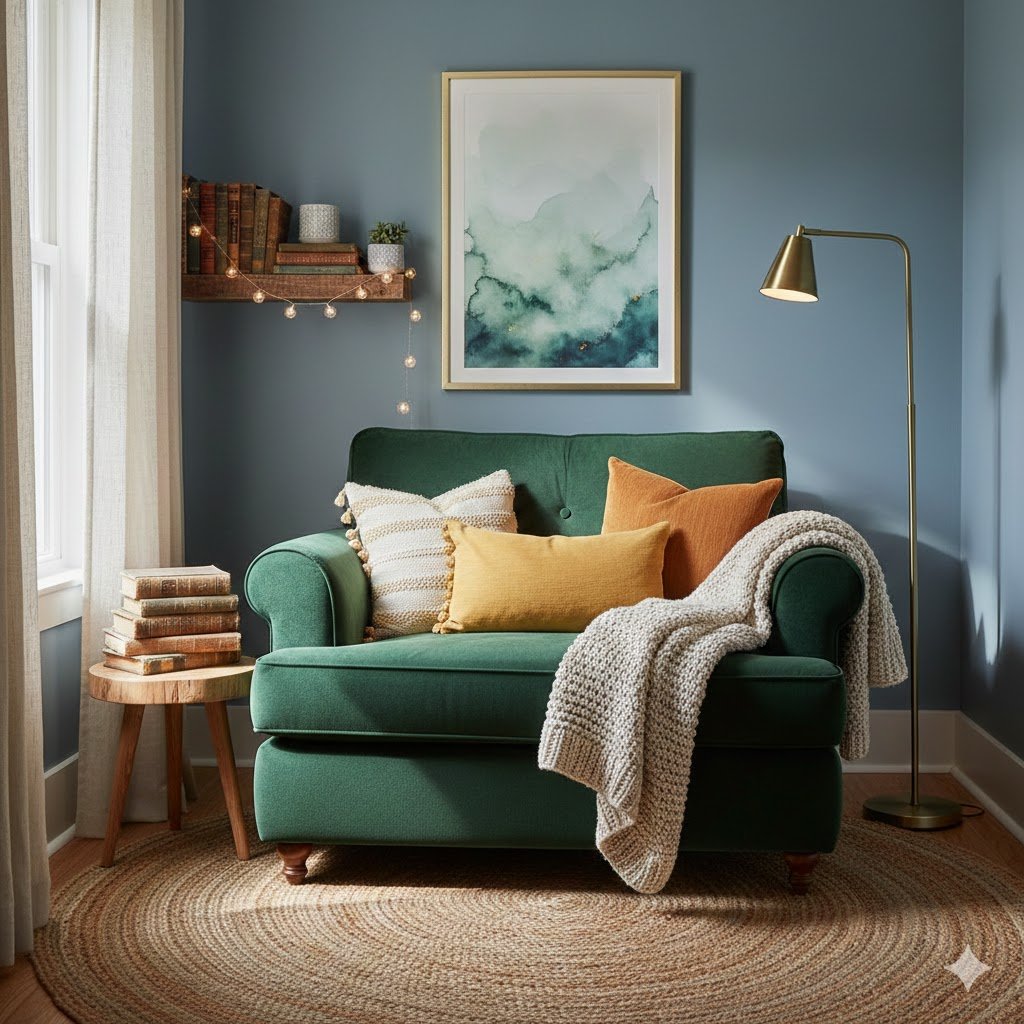
If you’re going to spend money on one thing, make it the chair. I used to think a cute wooden rocking chair was the peak of “aesthetic” reading until I spent twenty minutes in one and my lower back started sending me SOS signals. Now, I’m a total convert to the oversized velvet armchair. Velvet is durable, it hides the occasional coffee splash surprisingly well, and it feels like a hug for your soul.
When picking a chair for a tiny corner, ignore the “small furniture for small spaces” rule. That’s a trap. A tiny, spindly chair in a tiny corner just looks like you’re waiting for a bus. You want a chair that feels slightly too big for the space. It anchors the room. If the arms are wide enough to rest a book or a snack on, you’ve hit the jackpot.
Color choice is where you can be bold. Since it’s a small corner, you aren’t committing an entire room to a “look.” I once went with a deep emerald green in a gray room, and it turned a depressing corner into the centerpiece of the house. Don’t play it safe with beige. Beige is for waiting rooms and people who don’t have opinions. Pick a jewel tone that makes you feel like the protagonist of a Victorian novel.
Make sure you check the “sit-ability.” Some chairs look gorgeous but have the structural integrity of a brick. You want something with “sink.” If you can’t curl your legs up into the seat, it’s not a reading chair; it’s just a chair where you sit and think about how much your legs hurt. Look for high backs if you like to lean, or a “cuddle chair” width if you share your space with a persistent cat.
Finally, consider the fabric nap. High-quality performance velvet is your best friend here. It’s tough enough to handle “The Summer of the Zucchini” when you’re coming in from the garden covered in dirt, but it still looks like a million bucks. Avoid silk blends unless you enjoy crying over water stains. A good armchair is an investment in your mental health, so don’t cheap out on the foam density.
2. Integrated Floating Bookshelves and Vertical Storage
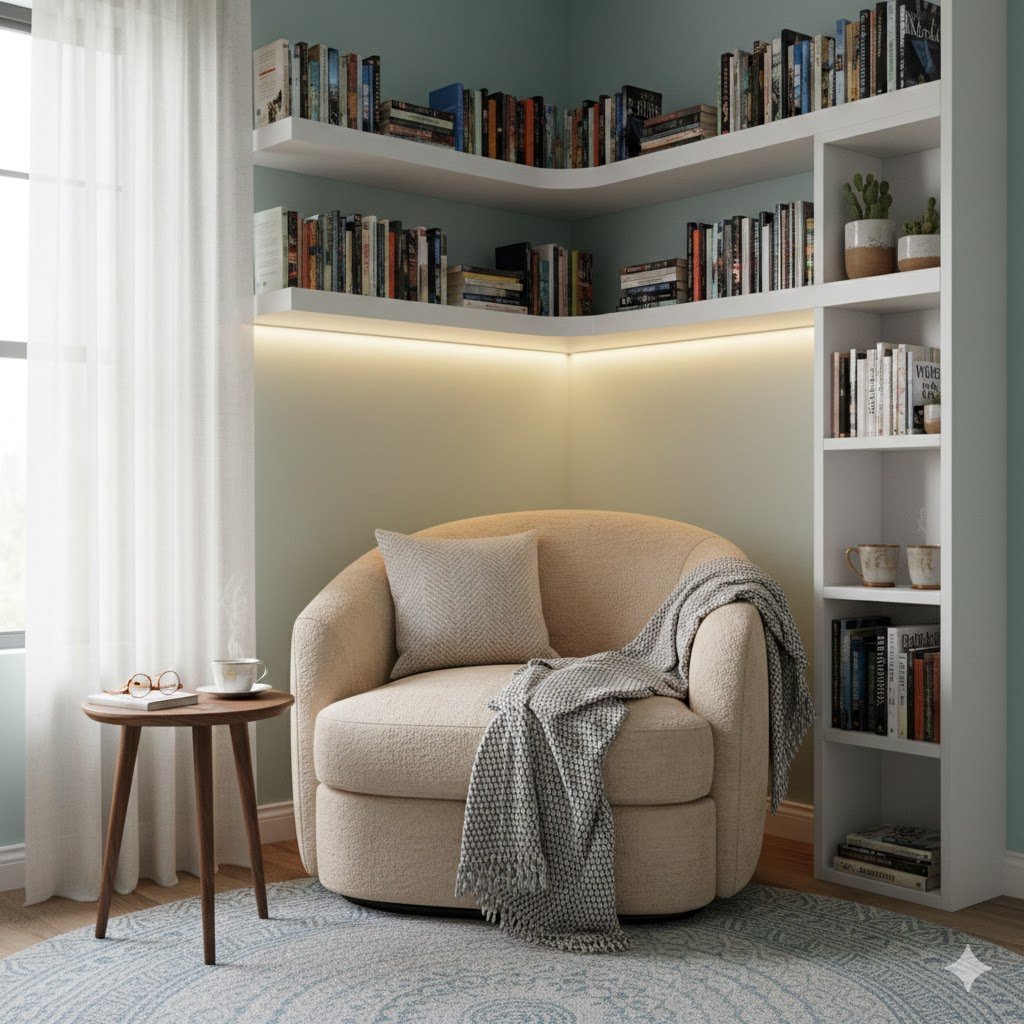
We need to talk about floor space—specifically, how you don’t have any. The biggest mistake I see in DIY remodels is trying to cram a floor-standing bookcase into a tiny nook. It eats up precious inches where your feet should be. Instead, go vertical. Floating shelves are the only way to go when you’re working with a “postage stamp” sized floor plan.
I’m a huge fan of “invisible” bookshelves. These are the little metal L-brackets where the bottom book actually slides onto the ledge, making it look like a stack of novels is just hovering on your wall. It’s a great conversation starter, and it keeps the visual weight of the room light. I once installed twelve of these in a hallway and felt like a wizard every time I walked past them.
If you want something more traditional, go for thick, chunky wood floating shelves. Use the space all the way up to the ceiling. Most people stop at eye level, which is a waste. Put the books you’ve already read (or the ones you want people to think you’ve read, like Ulysses) on the top shelves and keep your current favorites within arm’s reach.
Lighting should be integrated into your shelving if possible. Small LED puck lights or “tap” lights under a shelf can create a gorgeous glow that doesn’t require a bulky lamp base taking up your side table space. It’s all about layers. You want the light to wash down over your books like a spotlight in a museum, mostly because it makes your collection look more expensive than it actually is.
Pro tip: don’t just pack the shelves with books. Leave “breathing room.” Add a small trailing plant like a Pothos—they are basically impossible to kill, which is great because I once managed to kill a plastic cactus. A little greenery breaking up the spines of the books makes the corner feel alive rather than like a dusty archive.
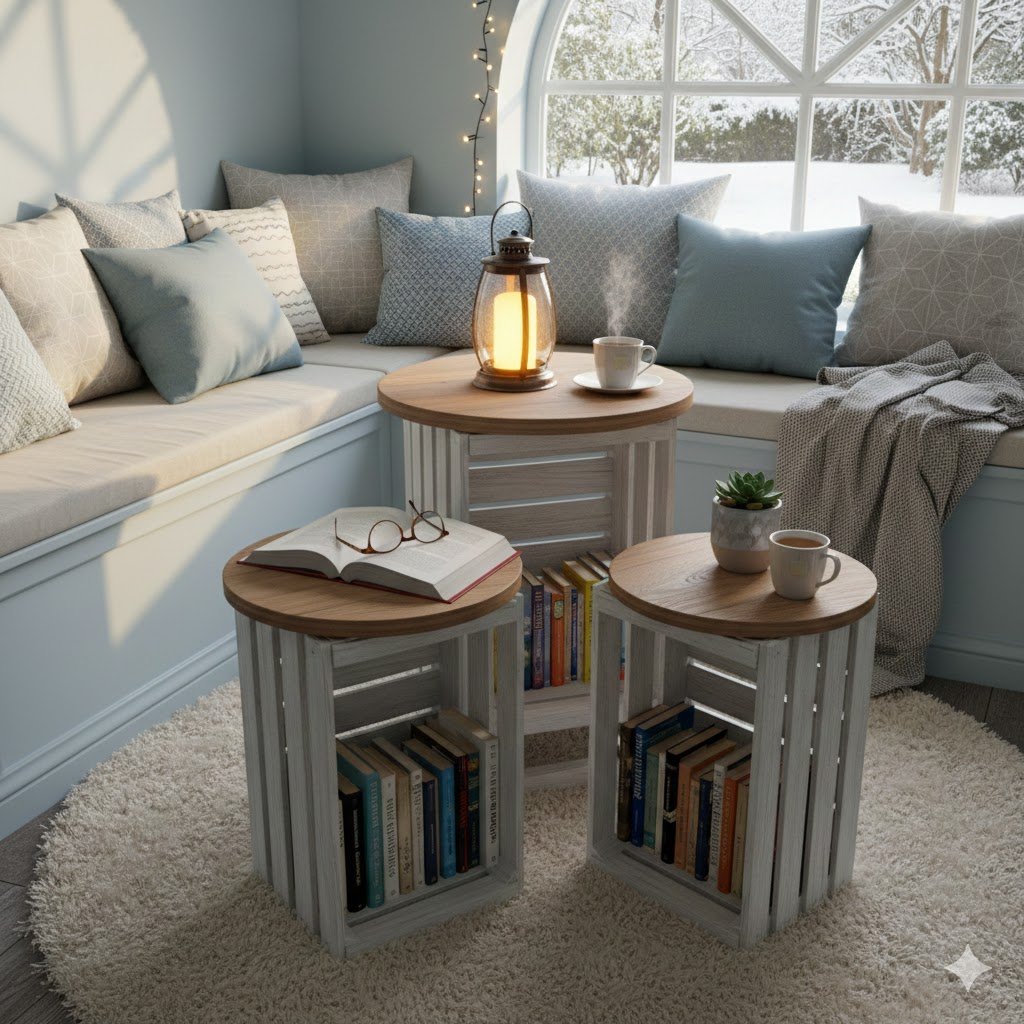
3. Layered Textiles and the “Rule of Three” Rugs
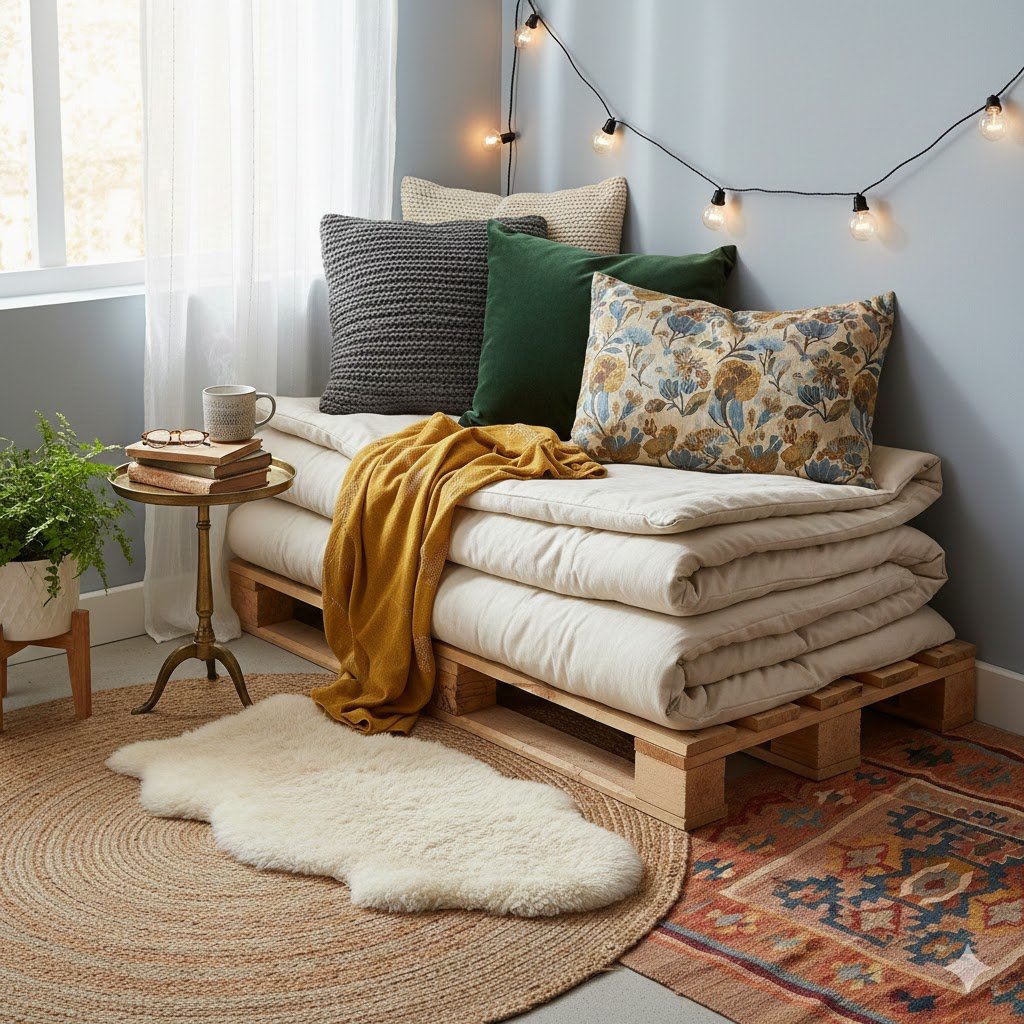
A reading nook without a rug is just a sad chair in a corner. You need to define the “zone.” In a tiny space, a rug acts as a border. I’ve found that the “Rule of Three” works best for textiles: one plush rug, one weighted blanket, and at least two pillows of different textures. If you have fewer than that, it’s a chair. If you have more, it’s a laundry pile.
Let’s talk about the rug. Do not buy a tiny 2×3 mat; it’ll look like a bath mat. You want a round rug that tucked slightly under the front legs of the chair. Round shapes break up the harsh lines of a corner and make the space feel more fluid. I prefer a high-pile shag or a faux sheepskin. Yes, they are a pain to vacuum, but your bare feet will thank you in February.
Blankets are non-negotiable. I have a chunky knit throw that weighs about fifteen pounds, and it’s basically a portable hug. When you’re picking a throw, look for something with weight. It grounds you. I once tried a “decorative” polyester throw that was so slippery it fell off the chair every time I sneezed. Never again. Stick to cotton, wool, or high-end acrylic blends.
Pillows should be functional, not just “karate-chopped” decor. You need a lumbar pillow for your back and a soft, squishy one for your head when you inevitably nod off. Mix your textures—think a leather lumbar pillow paired with a linen square pillow. It adds “visual grit,” which is a fancy designer way of saying it doesn’t look like you bought a “Nook in a Box” from a big-box store.
The color palette here should be tonal. If your chair is navy, go for blues, grays, and maybe a pop of mustard. Don’t go rainbow-crazy in a small corner or it’ll feel cluttered and chaotic. You want your brain to downshift the second you sit down, not feel like it’s at a rave.
4. Swing-Arm Sconces for Precision Lighting
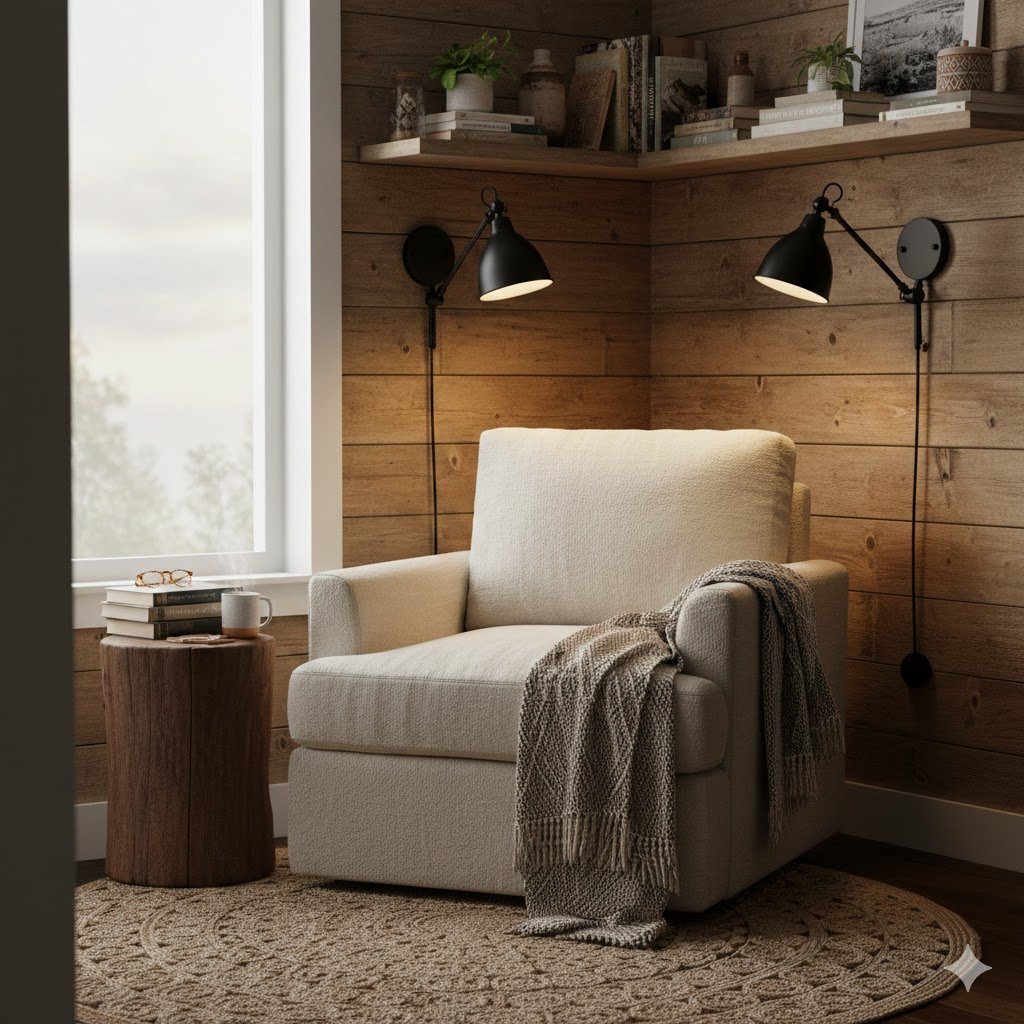
Table lamps are the enemy of the tiny nook. They require a side table, and side tables are space-hogs. If you want to maximize your square footage, you have to get the lighting off the ground and onto the wall. Swing-arm sconces are the MVP of small-space design. They look sophisticated, they’re incredibly functional, and they save you from the dreaded “cord sprawl.”
I love a matte black or brass finish for sconces. It adds a bit of “industrial chic” without being too cold. The beauty of a swing arm is that you can pull the light directly over your page when you’re reading fine print and push it back against the wall when you’re just lounging. I once installed one at the wrong height and hit my head every time I stood up—so, measure twice, drill once.
The “color temperature” of your bulb is actually more important than the lamp itself. Please, for the love of all that is holy, stay away from “Daylight” or “Cool White” bulbs. They make your home look like a high-security lab. You want “Warm White” (around 2700K). It gives off that cozy, amber glow that makes everything look softer and more inviting.
If you’re renting and can’t hardwire a light, don’t panic. There are plenty of “plug-in” sconces that look just as good. You can even buy cord covers that you paint the same color as your wall to make them disappear. I’ve used the “puck light trick” too—where you just velcro a battery-operated light inside a hardwired fixture—and it works like a charm for low-use areas.
Positioning is key. Aim for the light to come from behind your shoulder or slightly to the side. You don’t want the light hitting your eyes directly, and you don’t want to be fighting your own shadow on the page. It’s a delicate balance, but once you get it right, you’ll wonder why you ever used a floor lamp.
5. Multi-Functional Pedestal Tables
While I just ranted about side tables being space-hogs, you still need a place to put your tea (or wine, no judgment here). The solution is the pedestal table. Specifically, one with a very thin base. A heavy, four-legged end table creates a “visual wall” that makes a corner feel cramped. A pedestal table has a tiny footprint and lets the rug be seen around it.
I prefer a marble-topped pedestal table. It’s heavy enough that your cat won’t knock it over during a 3 AM zoomie session, and it adds a touch of “old-world library” vibes. If marble isn’t your thing, a sleek metal “C-table” that slides its base under the chair is a genius move for ultra-tight spaces.
Think about the height. The table should be about two inches lower than the arm of your chair. If it’s too high, you’ll be reaching up like you’re at a bar; too low, and you’re risking a spill every time you set your cup down. I learned this the hard way when I tried to use an old milk crate—it was the perfect height until I realized it had zero stability on a plush rug.
If you really have zero floor space, consider a “floating” side table that attaches directly to the wall or even a “clip-on” tray for the arm of the chair. It sounds a bit “as seen on TV,” but some of the wooden ones are actually quite stylish and incredibly practical.
Bonus tip: Use the space under the table. A small basket tucked under a pedestal table is the perfect spot to hide your reading glasses, a remote, or your “secret” chocolate stash. It’s all about utilizing every cubic inch without making it look like a storage unit.
6. The “Invisible” Window Seat Nook
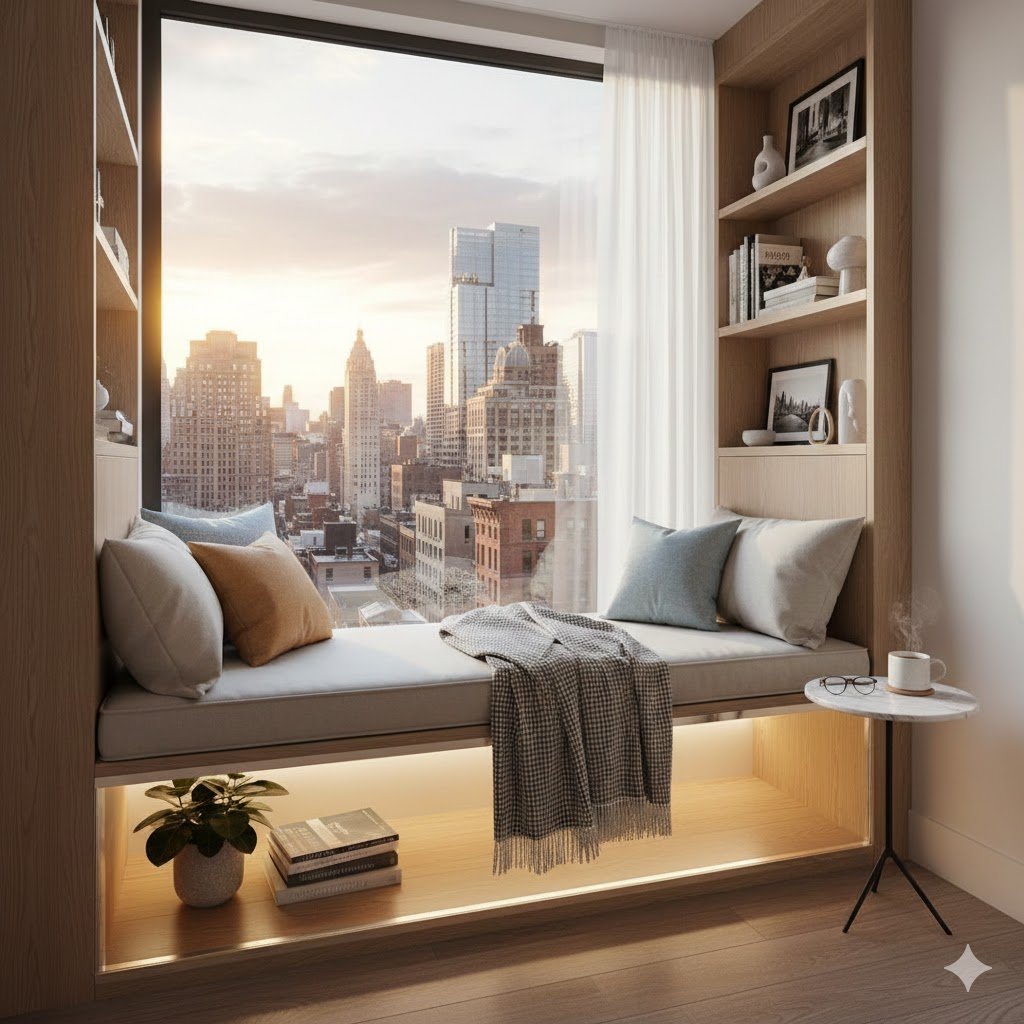
If you’re lucky enough to have a tiny corner that includes a window, you’ve hit the jackpot. Most people think they need a custom-built, $2,000 carpenter-grade bench to have a window seat. I’m here to tell you that’s a total lie. I once “built” one using two sturdy kitchen cabinets from a thrift store, a piece of plywood, and enough foam padding to cushion a stuntman’s fall.
The trick is to use a low-profile storage bench that fits the width of the window perfectly. It gives you a place to sit and a place to hide the blankets you aren’t using. When you’re in a tiny space, every piece of furniture needs to have a secret life as a storage container. If it’s just sitting there being a bench, it’s being lazy.
Don’t forget the “window treatments.” In a reading nook, you want layers. I’m talking sheer curtains for that soft, dreamy afternoon light, and heavy blackout curtains for when you want to ignore the sun and finish your thriller in peace. I once skipped the curtains and realized—too late—that the neighbors could see me eating Cheetos in my pajamas while crying over a particularly sad chapter. Privacy matters, folks.
For the cushion, don’t just throw a pillow on a hard board. Go to a craft store, buy high-density upholstery foam, and wrap it in a durable outdoor fabric. Why outdoor fabric? Because sunlight fades regular cotton faster than my New Year’s resolutions. Outdoor fabric stays vibrant even if your nook is south-facing.
Lastly, make sure the “ledge” is wide enough. If you’re teetering on the edge of the seat, you won’t relax. If the window sill is deep enough, use it as a built-in bookshelf. Just be careful with moisture; I once lost a first-edition Hemingway to a leaky window seal. Check your caulking before you sacrifice your library to the elements.
7. Acoustic Wall Panels and Soundproofing
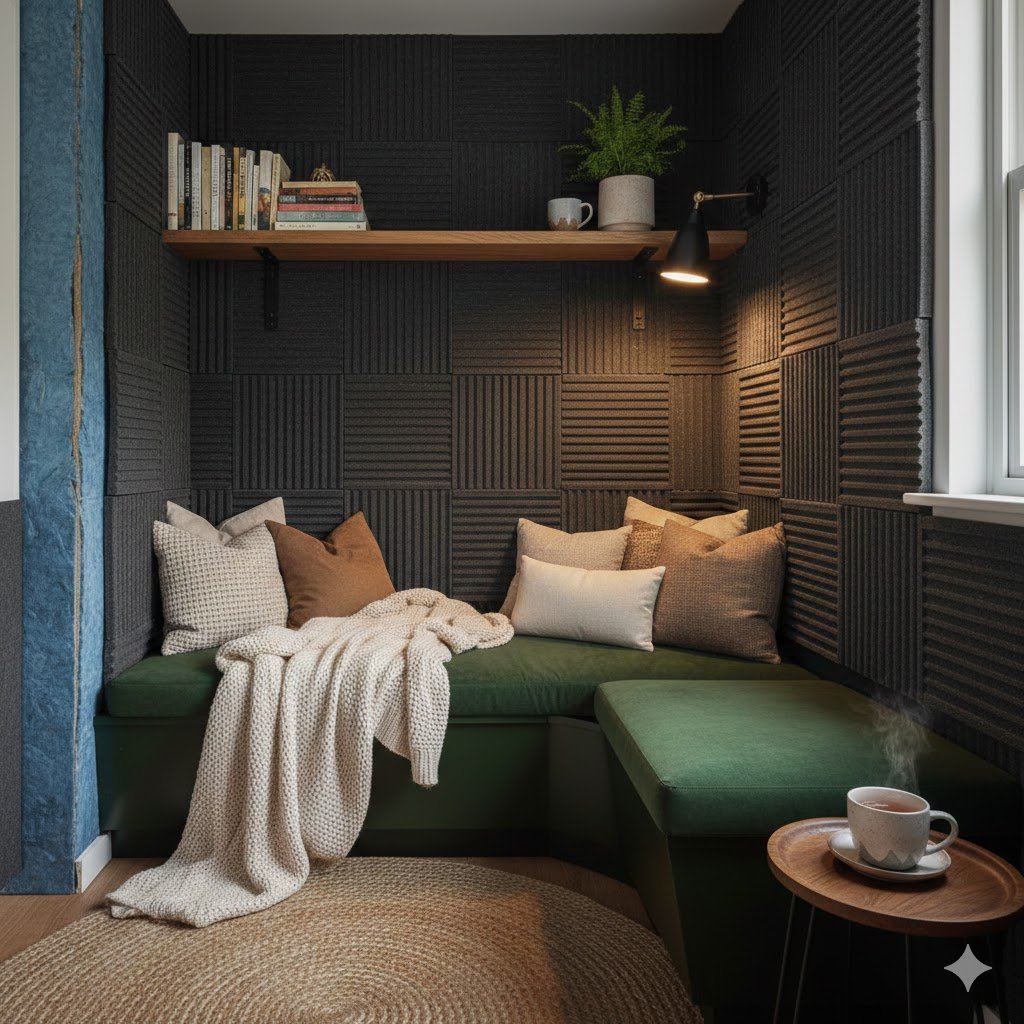
Here’s something the “pretty” magazines never tell you: a reading nook is useless if you can hear your teenager playing video games in the next room. In a tiny corner, sound bounces off the walls and makes everything feel loud. I’ve found that adding acoustic wall panels—the stylish kind, not the egg-carton look—changes the entire “vibe” of the space.
You can buy hex-shaped felt panels that look like modern art. They come in gorgeous colors and you just peel and stick them. I once did an entire accent wall in charcoal gray felt, and it made the corner feel like a recording studio. Suddenly, the house noise disappeared, and it felt like I was in a private bubble.
If you don’t want to buy panels, go for “soft” wall decor. A large tapestry or a heavy macramé wall hanging isn’t just for 70s enthusiasts; it’s a functional sound dampener. The more soft surfaces you have, the quieter the nook becomes. It’s the difference between reading in a library and reading in a gymnasium.
Don’t forget the floor. If you have hardwood, you need that rug I mentioned earlier, but consider a rug pad too. A thick felt rug pad adds an extra layer of sound insulation. It also makes the rug feel twice as expensive. I’m a total cheapskate when it comes to the rug itself, but I never skimp on the pad.
Lastly, think about “white noise.” If the wall panels aren’t enough, hide a small Bluetooth speaker behind a plant. I like to play “rain on a tin roof” loops. It masks the sound of the dishwasher and helps your brain realize it’s “me time.” Just don’t make it so cozy that you fall asleep on page three every single time.
8. The “Closet-Office” (Cloffice) Transformation
I am the self-proclaimed king of the “Cloffice” (closet-office), but for our purposes, we’re calling it the “Clook”—the Closet Nook. If you have a reach-in closet that’s currently just a graveyard for old coats, pull the doors off. I did this in my last apartment, and it gave me back about 12 square feet of living space that I didn’t know I had.
The beauty of a closet nook is the “built-in” feel. You can paint the interior of the closet a different color than the rest of the room to create a distinct zone. I went with a dark navy inside a white room, and it looked like a little portal to another dimension. It’s a great way to use “big” colors without overwhelming the whole house.
Instead of a chair, you can actually install a built-in platform with a mattress topper. It’s basically a giant bed for one person. It’s the ultimate “tiny corner” move because it utilizes the entire width of the closet. Add some fairy lights or a strip of LED tape around the frame, and you’ve got a space that looks like a high-end custom build.
Storage is built-in. Use the upper shelf (the one you usually can’t reach anyway) for “long-term” book storage. Use the sides for hooks—one for your headphones, one for your cardigan, and maybe one for a “Do Not Disturb” sign. I once put a small curtain rod back up and used it to hang a light fabric screen for when I wanted to hide from my family.
The “Real Talk” here: check for outlets. Closets rarely have them. I had to run an extension cord and hide it under the baseboard to get power into mine. If you’re not comfortable playing with electricity, stick to battery-powered lights, but there’s nothing worse than your reading light dying right as the killer is revealed.
9. Biophilic Design and Indoor Jungles
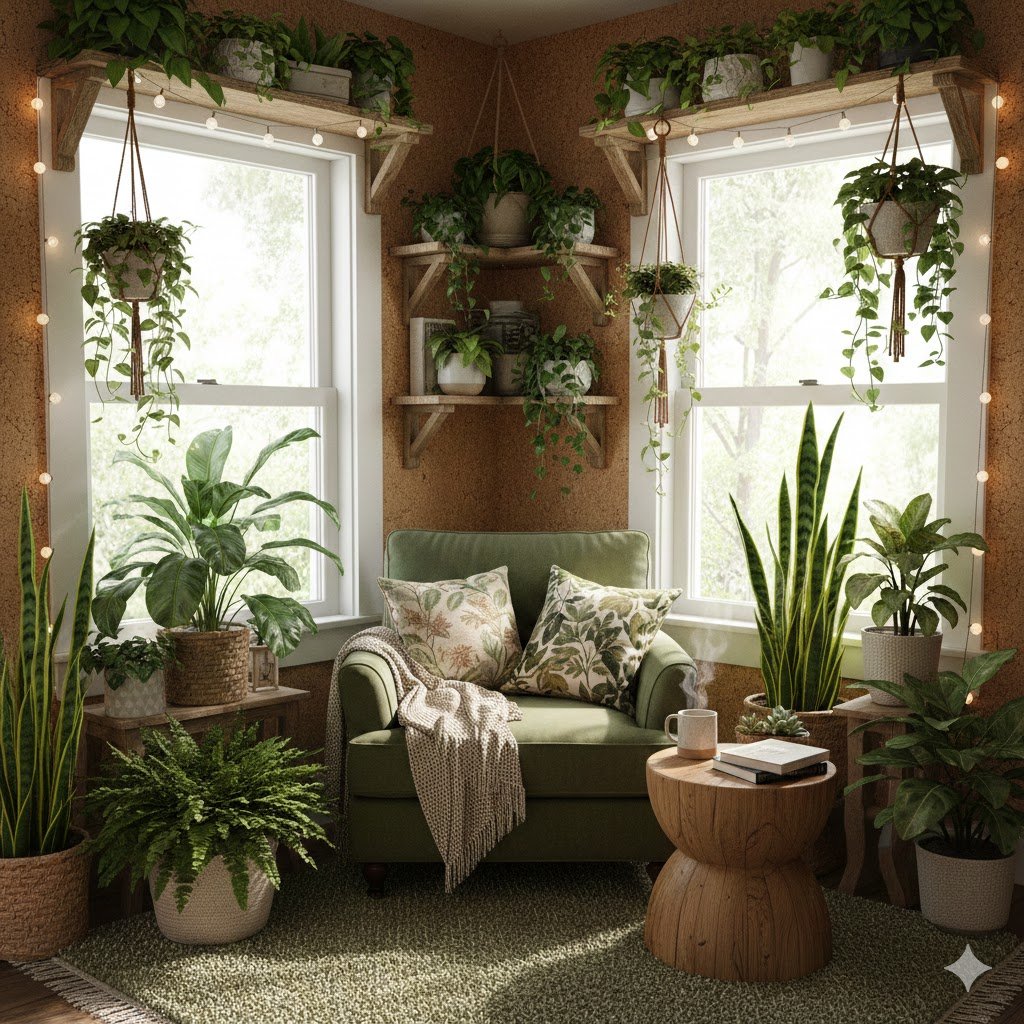
Biophilic design is a fancy word for “shoving as many plants as possible into a corner because humans like nature.” I’m a huge fan of this for reading nooks. Plants naturally clean the air, and there’s something about the color green that lowers your heart rate. My “zucchini incident” aside, I’ve actually become quite good at keeping indoor plants alive.
In a tiny corner, you don’t have room for a giant fiddle-leaf fig on the floor. Go for “hangers.” Macramé plant hangers allow you to have greenery at eye level without using an inch of floor space. I like to use “Spider Plants” because they are dramatic and have lots of “babies” that hang down, creating a natural curtain.
Vertical garden walls are another trending idea that works perfectly here. You can buy modular wall pockets that hold small succulents or herbs. Imagine reading your favorite book while the smell of fresh mint or lavender wafts over from the wall. It’s a sensory experience, people!
If you’re a “black thumb” (someone who kills silk plants), go for high-quality faux greenery. The technology has come a long way. I once spent ten minutes trying to water a fake fern at a friend’s house before I realized it was plastic. Just make sure to dust them; nothing ruins a cozy vibe like a layer of gray grime on your “leaves.”
The key to the “jungle” look is varying the heights. Put one plant on a shelf, hang one from the ceiling, and maybe put a small one on your pedestal table. It creates a “canopy” effect that makes the corner feel secluded and private, even if it’s right next to the front door.
10. The Mirrored Expansion Trick
This is an old designer trick that I still use today because it works every single time. If your corner feels too “claustrophobic” (a common problem in tiny homes), add a mirror. Not a small one, but a large, floor-leaning mirror behind your chair or a series of mirrored panels on one wall.
A mirror doubles the visual depth of the space. It makes it look like the room continues on forever. I once placed a large arched mirror behind an armchair and for a split second, I actually tried to walk into it. It’s a literal “smoke and mirrors” move that makes a 3×3 corner feel like a 6×6 room.
Mirrors also bounce light around. If your nook is in a dark part of the house, a mirror will catch whatever light is available—from a window or a lamp—and spread it. It keeps the corner from feeling like a “dungeon.” I recommend a “distressed” or “antique” mirror finish if you want a more cozy, vintage feel. Plain glass can feel a bit cold.
Placement is everything. You don’t want the mirror reflecting something ugly, like the trash can or your messy desk. Angle it so it reflects a window, a piece of art, or your newly organized bookshelves. It’s like a “live” painting that changes throughout the day as the light moves.
Be careful with reflections while you’re reading, though. If the mirror is directly in front of you, you might find yourself checking your hair instead of focusing on your book. I prefer putting the mirror on the “side” wall of the corner, so it opens up the space without being a distraction.
11. Custom Color Drenching for “Zone” Definition
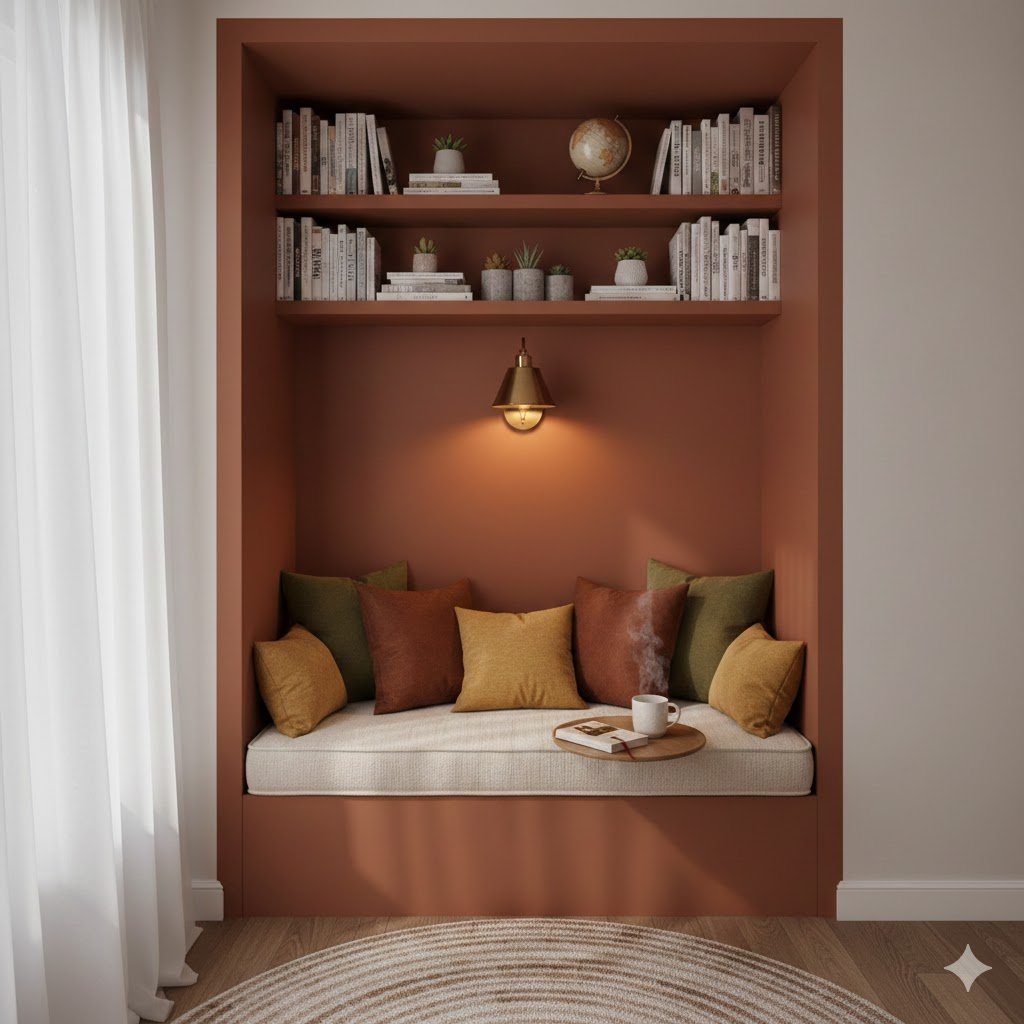
“Color drenching” is a major trend right now, and it’s perfect for a DIYer on a budget. It means painting everything in the nook—the walls, the trim, the shelves, and even the ceiling—the exact same color. It creates a seamless, “wrapped” look that is incredibly sophisticated.
I once color-drenched a corner in a deep “Terracotta” orange. Most people thought I was crazy, but once the chair and the books were in place, it looked like a high-end boutique hotel. By painting the trim and the ceiling the same color, you erase the “boundaries” of the small space, which actually makes it feel larger.
When you’re color-drenching, use different finishes to add interest. Use a “Matte” finish on the walls and a “Satin” or “Semi-Gloss” on the shelves and trim. The color is the same, but the way it reflects light is different, which keeps it from looking flat and boring.
This is also the best way to hide “ugly” features. Have an exposed pipe or a weirdly shaped bulkhead in your corner? Paint it the same color as the wall. It’ll disappear. I used this trick to hide a radiator that looked like it was from the 1920s, and it worked like a charm.
The “Bonus” side note: Don’t be afraid of dark colors. People will tell you “dark colors make a room look smaller.” That’s only true if the room is empty. In a reading nook, a dark color like charcoal, navy, or forest green makes the space feel intimate and “expensive.” It’s like a warm hug for your eyeballs.
The Real Talk: What Not To Do
Listen, I’ve seen some “nook” trends that are absolute garbage in practice. First off: The Hanging Egg Chair. They look cool, sure. But in a tiny corner? They are a nightmare. They swing into the walls, they require a heavy-duty ceiling joist (that I once missed, resulting in a very expensive ceiling repair), and they are surprisingly hard to get out of gracefully. If you want to feel like a bird, go to a park.
Second: The “Floor Pillow” Nook. Unless you are five years old or a yoga instructor, sitting on the floor to read is a fantasy. Within ten minutes, your legs go numb, and your neck starts to cramp. Real comfort requires elevation.
Third: Too Many Knick-Knacks. I know you want to display your vintage typewriter and your collection of tiny ceramic owls, but in a small corner, “clutter” happens fast. If you have to move three things just to set down a coffee mug, you’ve failed. Keep the surface areas clear for, you know, actual reading.
Parting Wisdom
The best reading nook isn’t the one that looks the most “Instagrammable”—it’s the one that actually gets used. If you find yourself gravitating toward the kitchen table instead of your nook, something is wrong. Usually, it’s the lighting or the “itch factor” of the fabric. Don’t be afraid to keep tweaking it until it feels like your favorite spot in the house.
What’s the one thing that ruins a cozy vibe for you? Is it bad lighting, a drafty window, or just a lack of snacks? Let me know in the comments!