

Look, I get it. You’re probably tired of your front porch looking like a generic suburban wasteland once December hits. We’ve all been there—usually standing in the middle of a craft store at 9:00 PM, holding a glue gun like a weapon and wondering why we didn’t just buy the pre-made plastic reindeer and call it a day.
I once tried to create a “winter wonderland” using nothing but cotton balls and a prayer. Let’s just say that after one light drizzle, my porch looked like a sheep had exploded in front of my door. I’ve spent fifteen years making these mistakes so you don’t have to. We’re going to upgrade those porch lights without burning the house down or spending your entire gift budget on overpriced garland.
Top 10 DIY Holiday Porch Light Ideas I Swear With
1. Outdoor Christmas Lantern Decor with Battery LEDs
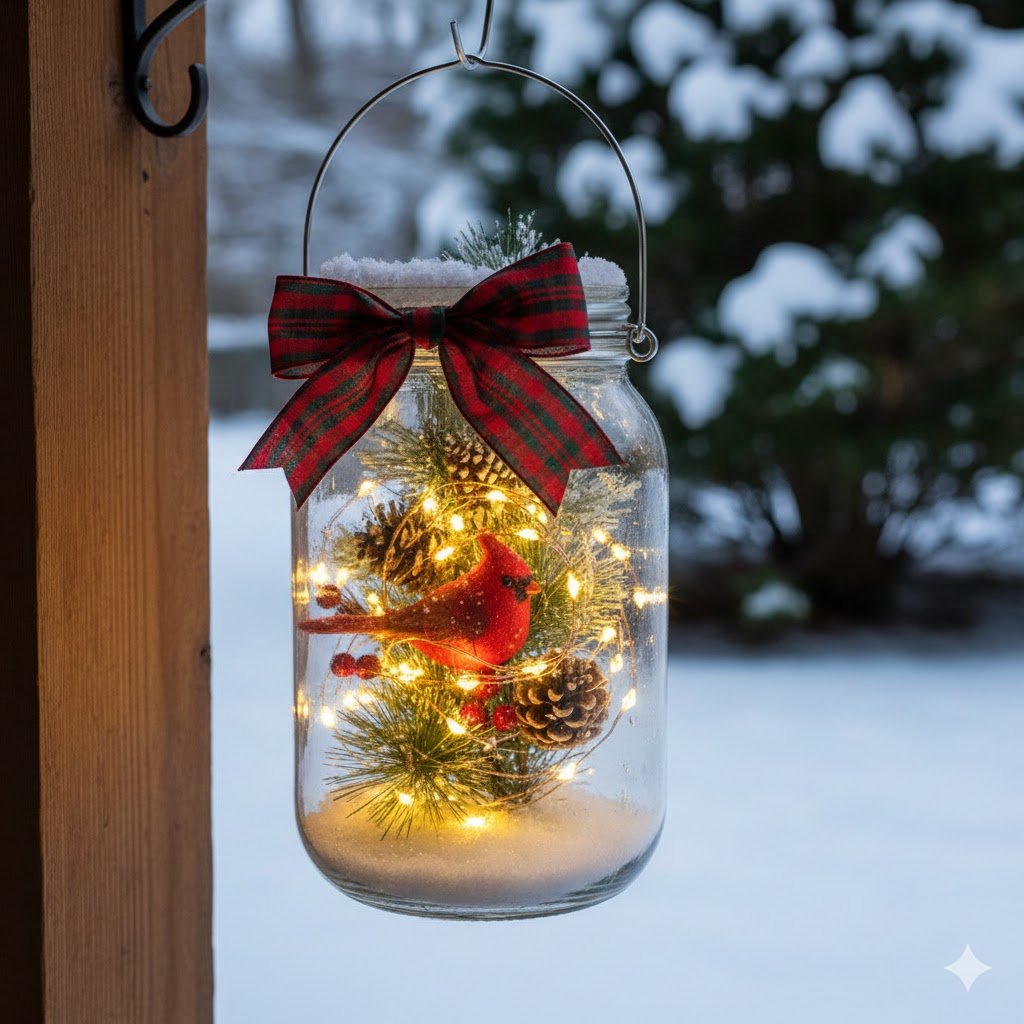
If you’re still trying to run orange extension cords across your walkway like a high-stakes game of Tetris, stop. I’ve tripped over enough cords in my life to know that “cordless” is the only way to live. This is the ultimate “low effort, high reward” move.
First, you’re going to find some oversized lanterns. I’m talking the big, chunky ones that look like they belong in a Dickens novel. Don’t go buying the flimsy plastic ones from the dollar bin; they’ll blow into your neighbor’s yard the second the wind picks up. Trust me, chasing a fake lantern down the street in your pajamas is a core memory you don’t want.
Fill the bottom with some fake snow or even those flat glass marbles. Then, instead of a real candle—which will blow out or, worse, melt into a wax puddle you’ll be scraping off until July—use a high-quality LED pillar candle with a timer. Setting a timer is the closest thing to magic we have in the adult world.
I like to toss in a few shatterproof ornaments around the base of the candle. Go for gold or silver to catch the light. It adds depth and hides the plastic base of the candle. It’s a simple trick that makes a $20 lantern look like it came out of a high-end boutique catalog.
Wrap a sprig of real cedar or pine around the handle. The smell is fantastic, and since it’s outside, it stays fresh way longer than it would in your dry, heated living room. Just make sure the greenery isn’t touching any heat source, though most LEDs stay cool enough that it’s not a disaster waiting to happen.
2. Tomato Cage Christmas Trees for Front Porch
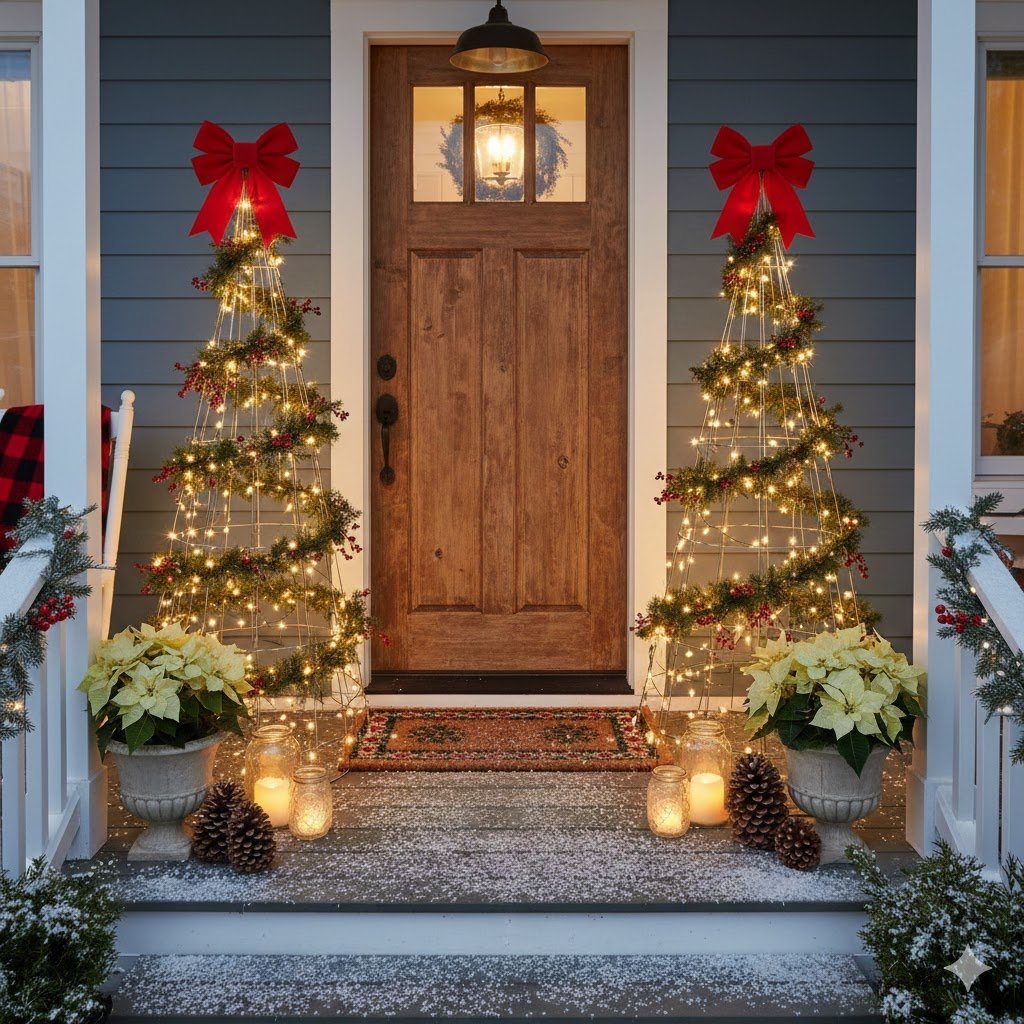
I’ve found that those wire tomato cages you have rusting in the shed are actually the secret weapon of holiday decorating. Why spend $80 on a pre-lit topiary when you can make one for five bucks? I once tried to build a tree out of actual sticks I found in the woods, and I ended up bringing a family of very confused spiders into my foyer. Use the cages instead.
Turn the cage upside down and zip-tie the pointy ends together to create a cone shape. This is your skeleton. If you don’t zip-tie them tightly, the “tree” will start to lean like it’s had one too many eggnogs by the time Christmas Eve rolls around.
Now, take your outdoor-rated string lights. Start at the top and wrap them around the cage, working your way down. Don’t be stingy here. A sparsely lit tomato cage just looks like a sad piece of garden equipment. You want it to glow.
Once the lights are on, wrap the whole thing in thick, faux-evergreen garland. This hides the wire frame. I’ve seen people use tinsel, but unless you want your porch to look like a disco from 1974, stick to the greenery. It looks more “classy estate” and less “last-minute clearance sale.”
Stake these into your large porch planters. If the planters are empty, fill them with dirt or heavy rocks first. There is nothing more embarrassing than seeing your “trees” rolling down the driveway during a windstorm. Secure them well, and you’ve got instant curb appeal that looks professional.
3. DIY Hanging Lighted Baskets for Winter
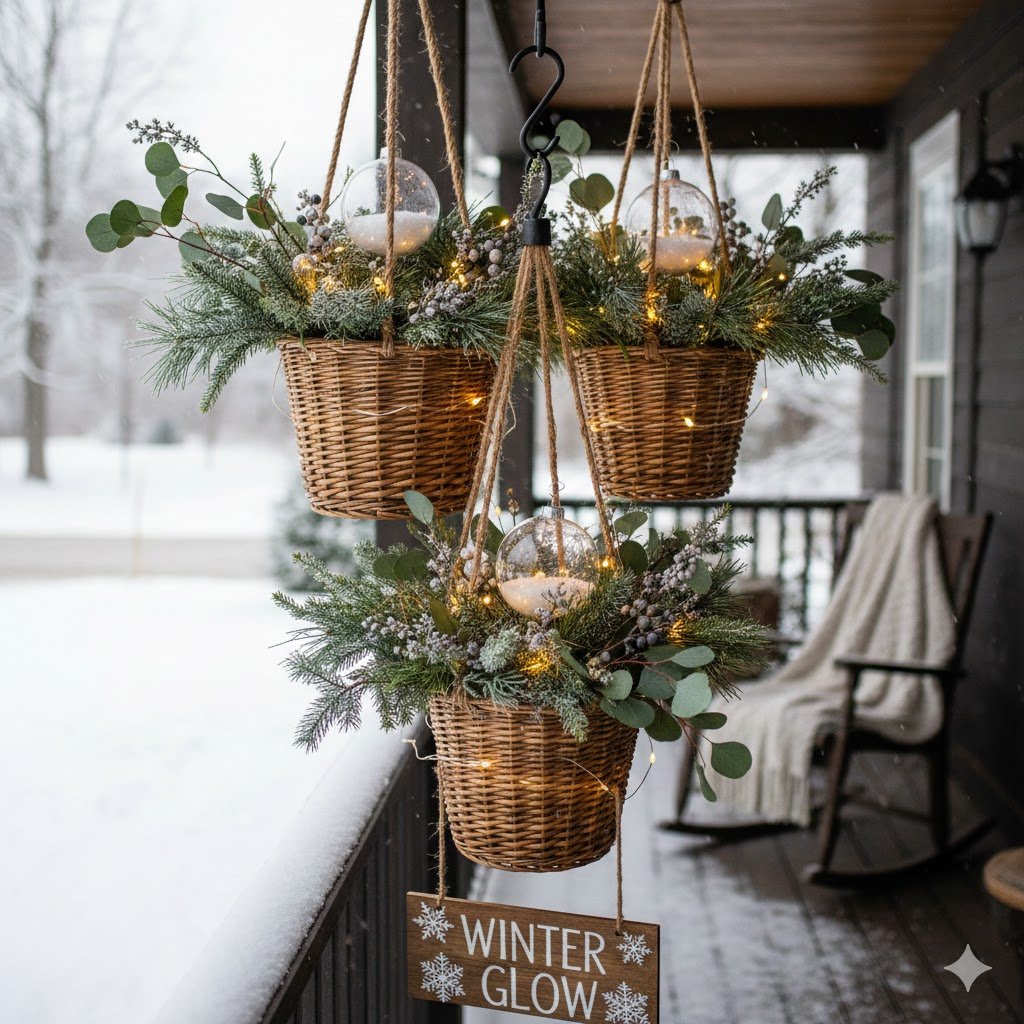
Hanging baskets aren’t just for petunias. In fact, I think they look better in the winter when they’re filled with light instead of wilted flowers. My first attempt at this involved real berries, which the local birds treated like an all-you-can-eat buffet. I woke up to a porch covered in “nature’s glitter.” Use faux berries.
Start with a standard wire hanging basket and a coco liner. You want that rustic, earthy look. Instead of soil, you’re going to fill the center with a bundle of battery-operated fairy lights. The kind with the copper wire are great because they disappear into the greenery.
Layer in some oversized pinecones and sprigs of eucalyptus. Eucalyptus stays green forever and adds a nice silvery-blue tint that screams “winter” without being too “Christmas-y.” It’s a sophisticated look that says, “I have my life together,” even if you’re currently eating cereal for dinner.
The key to making these look expensive is the “spill” factor. You want some of the greenery to hang over the edges of the basket. Use floral wire to secure everything. If you just toss things in there, the first gust of wind will turn your porch into a debris field.
Hang these at varying heights if you have a large porch. It creates visual interest and draws the eye up. Just make sure they aren’t so low that your tallest uncle takes a pinecone to the forehead when he comes over for dinner.
4. Giant Light-Up PVC Candy Canes
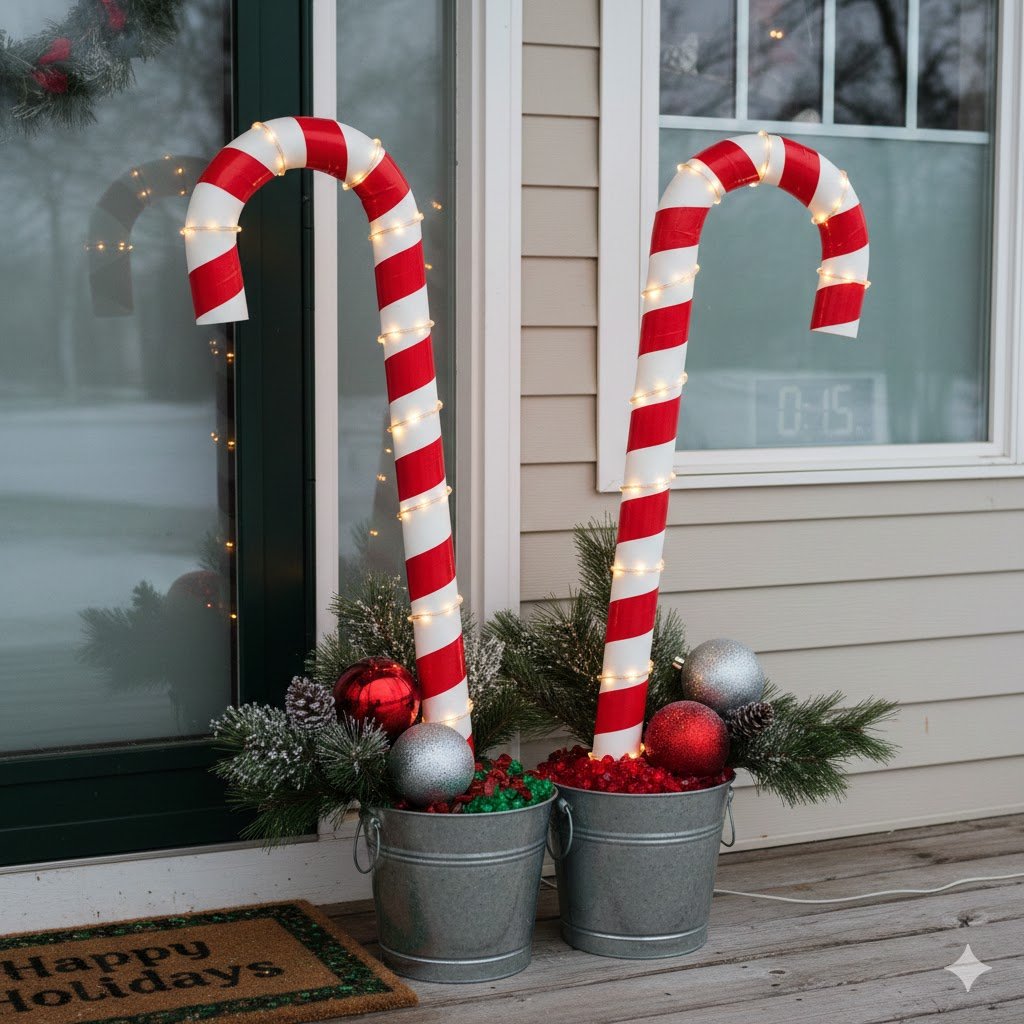
If you want to be the house the kids talk about, you need scale. Small decor gets lost from the street. I learned this the hard way when I spent three hours making tiny light-up gnomes that just looked like colorful trash from the sidewalk. You need big, bold shapes.
Get some white PVC pipe from the hardware store. You can use a heat gun to bend the top into a hook, but honestly, that’s a lot of work and you might melt your eyebrows off. Just buy the “U” joints or “elbow” pieces to create the curve. It’s much safer and looks cleaner.
Wrap the pipe in red electrical tape to create the classic stripes. This is a great task for kids or a bored spouse. Then, drill small holes along the pipe and poke LED Christmas lights through from the inside. It’s a bit tedious, but the glow is incredibly even and professional-looking.
I like to mount these against the porch pillars. They provide a sturdy vertical element that frames the front door. It’s a classic look that works with almost any house style, from modern farmhouse to “I haven’t painted this place since 1998.”
Bonus tip: Use a matte finish tape. Shiny tape reflects the LEDs in a weird way that makes them look cheap. A matte red tape gives it a painted, high-end look that stands up to the harsh winter sun without peeling.
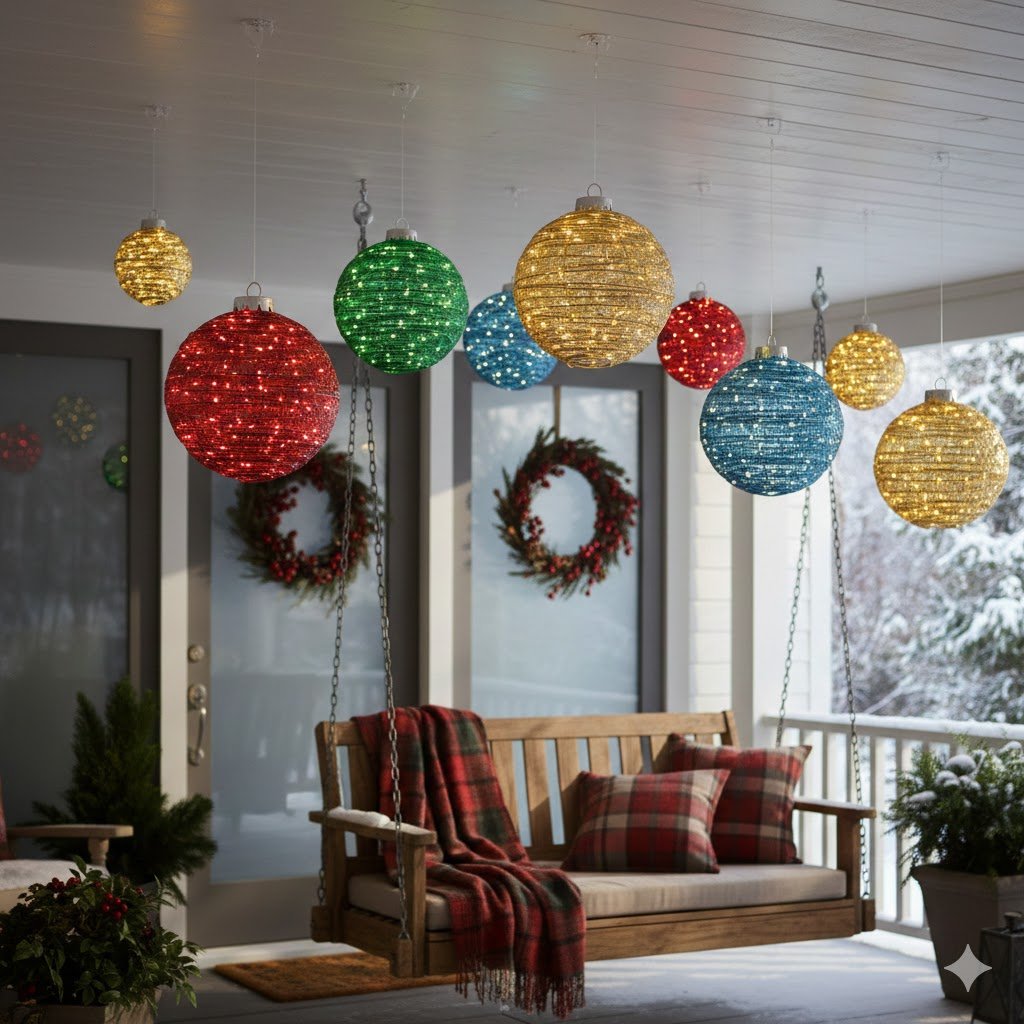
5. Floating Lighted Ornaments for Porch Ceilings

This is one of my favorite tricks because it uses the “dead space” of the porch ceiling. Most people forget about the ceiling, but it’s the best place to add some magic. I once tried hanging actual glass ornaments, which was a disaster the first time a door slammed and they all shattered like a scene from an action movie.
Go get those giant plastic ornaments—the ones the size of basketballs. They’re lightweight and won’t kill anyone if they fall. Drill a tiny hole in the top and bottom. String a line of clear fishing wire through them, spacing them out so they look like they’re floating at different heights.
Wrap each ornament in a strand of battery-powered fairy lights before you hang them. When the sun goes down, it looks like glowing bubbles are hovering over your entryway. It’s incredibly whimsical and much more interesting than a standard string of lights.
You’ll want to use heavy-duty command hooks on the ceiling. Don’t try to use tape; the cold weather will make the adhesive fail, and you’ll find your “bubbles” on the floor the next morning. Make sure the fishing line is high-test so it can handle the weight if it gets icy.
I find that using a single color—like all warm white or all cool blue—looks better than a rainbow. It keeps the look cohesive and expensive. It’s a “Pinterest-worthy” moment that actually works in real life, which is a rare find in the DIY world.
6. Rustic Lighted Log Pile Decor
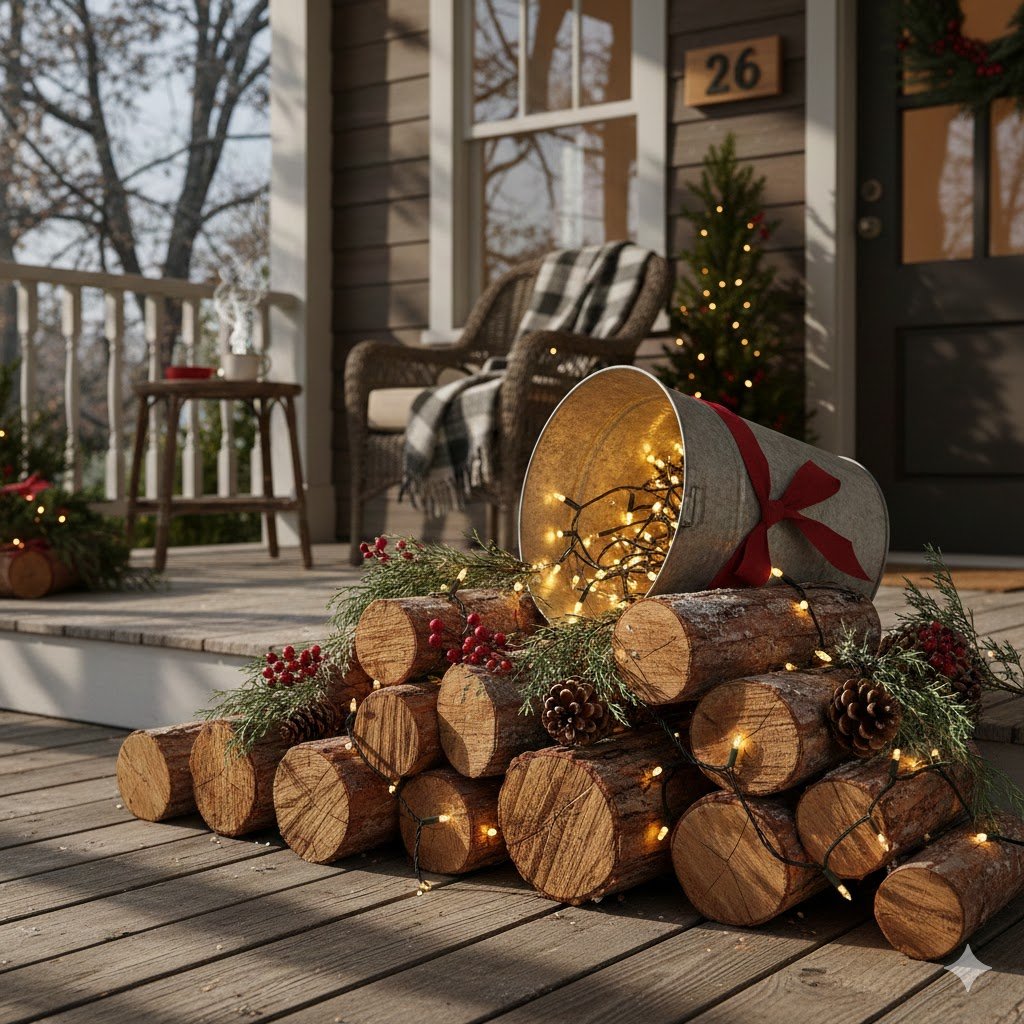
Nothing says “cozy winter” like a pile of wood, even if you don’t actually have a fireplace. I once tried to use wood I found in the alley, only to realize I’d brought home a colony of termites. Buy the “kiln-dried” birch logs from the craft or hardware store. They’re clean, white, and look amazing.
Stack the logs in a crate or a galvanized metal tub. You want it to look intentional, not like you just dumped a load of wood on your porch. Mix in some evergreen branches between the logs to fill the gaps and add a pop of color.
Now, weave a string of warm white lights throughout the pile. The light should peek out from behind the logs, creating a “glowing embers” effect. It’s incredibly inviting and makes your porch look like a cozy cabin in the woods.
This is a great option for people who hate “flashy” decor. It’s subtle, elegant, and stays relevant through the entire winter, not just December. You can leave it up until March and no one will judge you for having your “Christmas lights” still out.
I like to add a big, plaid flannel bow to the side of the crate. It adds a touch of “lumberjack chic” that balances out the sparkle of the lights. It’s the kind of decor that makes people want to stop and stay for a cup of cocoa.
7. Lighted Gift Box Walkway Markers
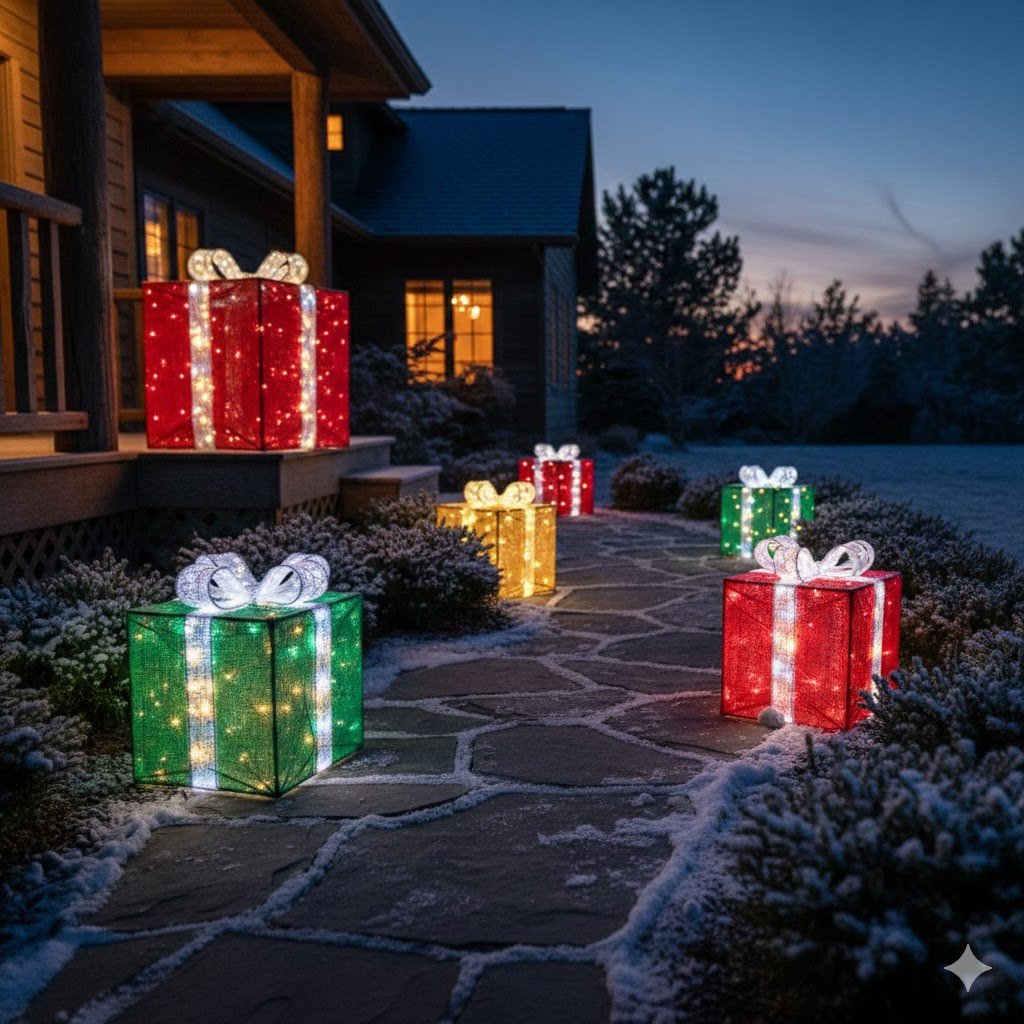
This is a classic for a reason. It’s easy, and you probably already have half the supplies in your recycling bin. I used to use real cardboard boxes, but one snowstorm later, I had a pile of soggy mush. Use plastic “storage” boxes or pre-made acrylic gift boxes.
If you’re using clear plastic bins, line the inside with frosted window film or even just white tissue paper. This diffuses the light so you don’t just see a bare bulb sitting in a box. It gives it that soft, magical glow that looks great in photos.
Place a set of battery-operated lights inside each “gift.” Then, wrap the outside with a thick, weatherproof ribbon. Tie a massive bow on top. These look great lined up along the steps or tucked into the corners of the porch.
I’ve found that weighting them down is non-negotiable. Put a brick or a few heavy rocks inside the box before you close it. Otherwise, your “gifts” will be three blocks away by morning. I once spent a Tuesday morning chasing a “giant present” across a four-lane road. Not my finest hour.
Choose a color scheme and stick to it. If your house has a lot of red, go with gold ribbons. If you’re into the “frozen” look, go with silver and blue. Consistency is what separates the “pro” DIYers from the “I tried” crowd.
8. Solar Powered Starburst Porch Lights
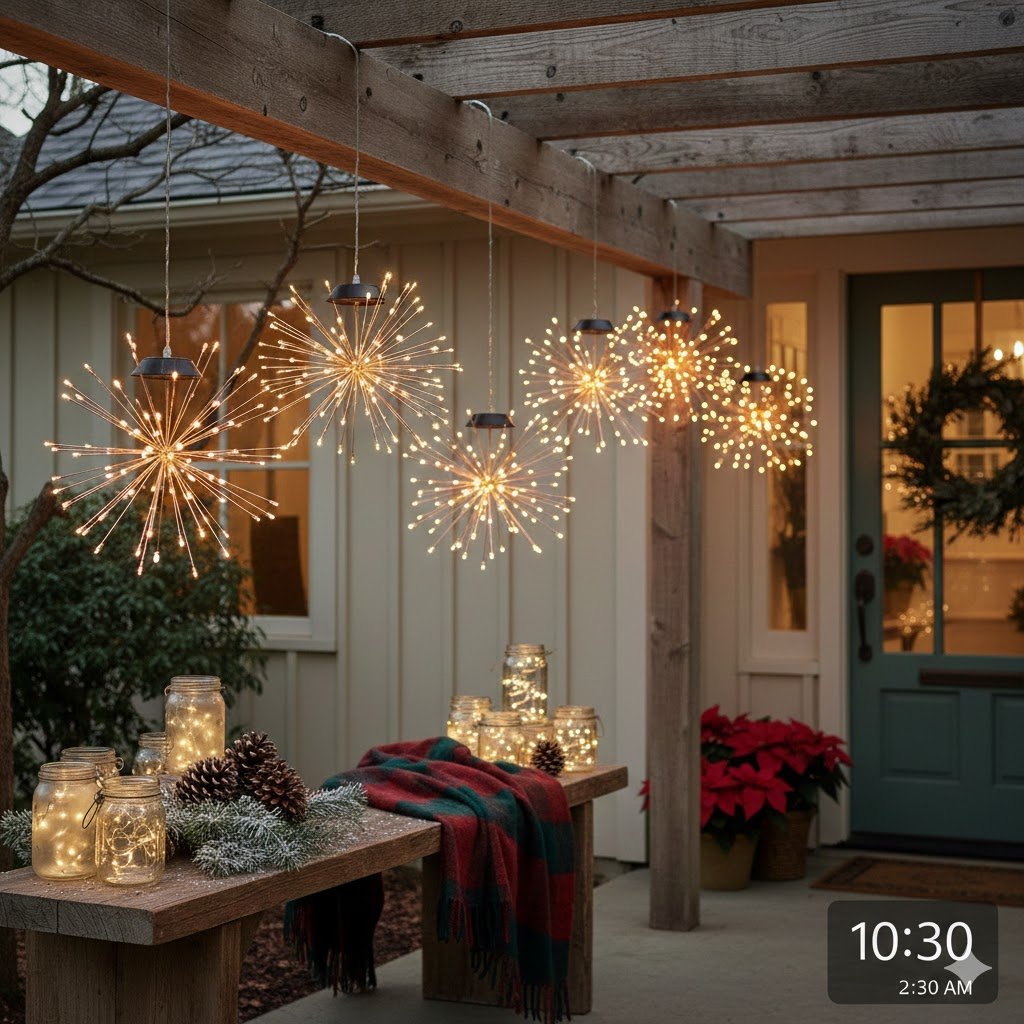
If you have a sunny porch but no outdoor outlets, solar is your best friend. I used to think solar lights were weak and pathetic, but the new starburst style (sometimes called “dandelion” lights) are actually quite bright. They look like little fireworks frozen in time.
These usually come on stakes. You can “plant” them in your winter window boxes or large urns. Because the wires are flexible, you can shape them into a perfect sphere or a more chaotic “explosion” look.
The trick to making solar lights work is placement. If your porch is covered, you need to run the solar panel out to the edge where it can actually see the sun. Most of these come with a decent length of wire between the light and the panel, so you can hide the panel in the bushes.
I love these because they are truly “set it and forget it.” They turn on at dusk and off at dawn. No timers to program, no batteries to swap out in the freezing cold. It’s the lazy decorator’s dream, and honestly, at this stage in my life, I’m all about the path of least resistance.
Group them in threes. Odd numbers always look more natural and designer-led than even numbers. It creates a cluster of light that feels substantial rather than a few lonely sparks in the dark.
9. Monogrammed Lighted Wreath for Front Door
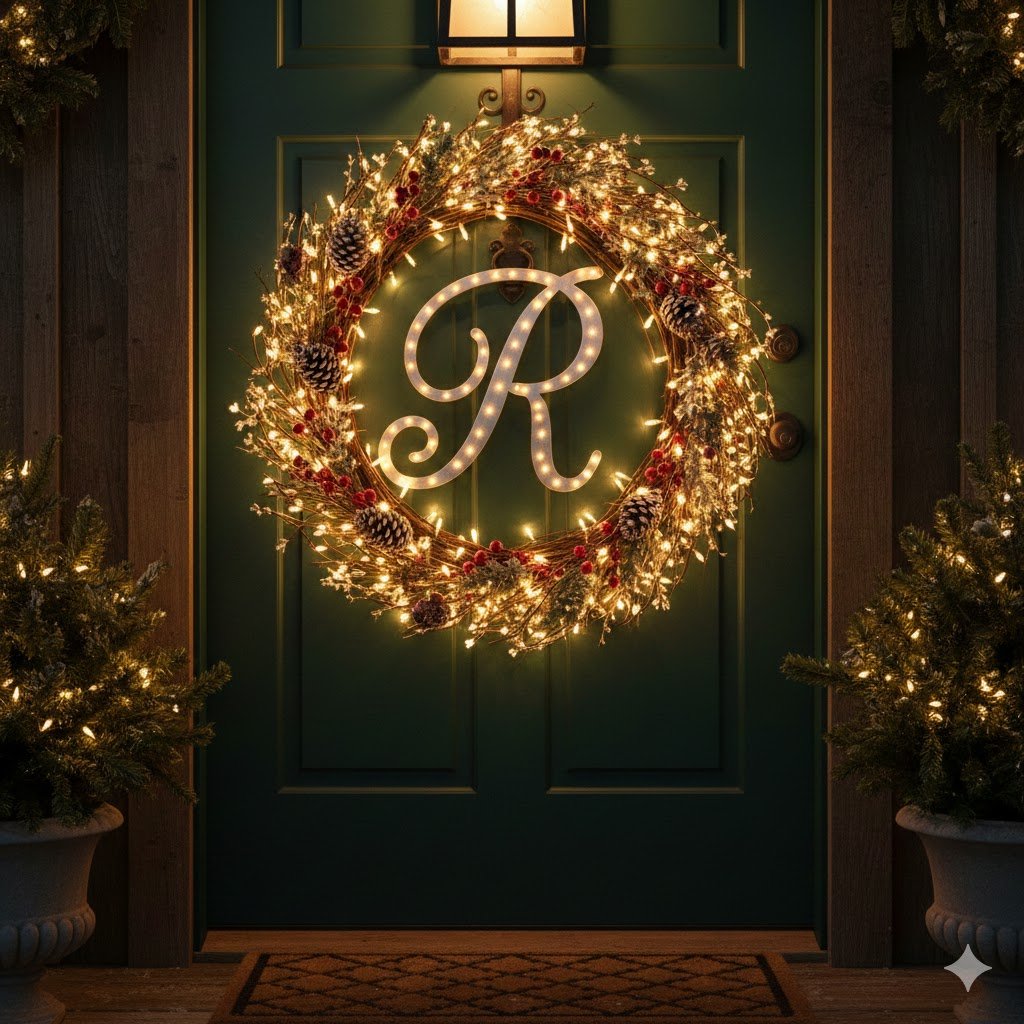
Your door is the focal point, so don’t neglect it. A plain wreath is fine, but a monogrammed, lighted wreath says you put in the effort. I once tried to make a wreath out of actual candy canes. It was great until the sun came out, they got sticky, and I ended up with a door covered in ants. Stick to the fake stuff.
Start with a high-quality faux-fir wreath. Fluff it out—seriously, spend ten minutes “zhuzhing” the branches. A flat wreath looks sad. Then, wrap it in “warm white” micro-lights. Avoid the “cool white” ones unless you want your porch to look like a surgical suite.
Get a large wooden letter (your last name initial) and spray paint it a contrasting color—gold, red, or even a deep navy. Secure it to the center of the wreath with floral wire. Make sure it’s tight; you don’t want your initial swinging like a pendulum every time someone opens the door.
Tuck in some oversized pinecones and maybe a few sprigs of holly. The contrast between the natural textures and the clean lines of the monogram letter looks very sophisticated. It’s a custom look for a fraction of the price of those fancy wreath shops.
A quick side note: if you have a glass door, make sure the back of the wreath is “clean.” Use some felt pads to prevent the wire from scratching the glass. I learned that lesson after a particularly windy season left my front door looking like a cat had used it as a scratching post.
10. Upcycled Wine Bottle “Firefly” Lights

Don’t throw away those empty wine bottles from your holiday parties. Wash them out, peel off the labels (soak them in hot water and baking soda—it works like a charm), and you have the perfect light vessels. I’ve found that blue or green bottles look especially “wintry.”
You can buy “cork lights” which are tiny strands of fairy lights attached to a plastic cork. You just drop the lights into the bottle and pop the cork in. It’s the easiest DIY on this list. Line them up along the porch railing or a side table.
To make them look more festive, tie a piece of twine around the neck and add a small sprig of evergreen or a tiny silver bell. It’s a very “farmhouse chic” look that feels intentional rather than just “I left my recycling out.”
If you want to get fancy, you can use glass etching cream to put snowflakes or stars on the bottles. It’s easier than it sounds, though I did once etch a snowflake that looked more like a lopsided spider. Practice on a jar first.
These are great because they’re heavy enough not to blow away, and if one breaks, it’s not the end of the world. They add a soft, ambient glow that’s perfect for those long winter evenings when you just want to look out the window and feel “cozy.”
Real Talk: What’s Not Worth Your Time
I’m going to be honest with you—some DIY projects are a total trap. Anything involving real fruit (cranberries, oranges) outside is a disaster. It will rot, or the squirrels will treat your porch like a 5-star bistro. I once did a beautiful orange-slice garland that turned into a moldy string of sadness within a week.
Also, avoid cheap suction cups. They do not work in the cold. You’ll spend your whole December sticking things back onto the windows. Use Command hooks or actual hardware. And for the love of all things holy, check your wattage. If you’re plugging fourteen strands into one outlet, you aren’t decorating; you’re starting a fire.
Finally, don’t obsess over “perfection.” Your neighbors aren’t walking by with a magnifying glass. If a ribbon is slightly crooked or a light bulb is out, the world will keep spinning. The goal is to make the place look cheery, not to win a structural engineering award.
Parting Wisdom
Decorating should be fun, not a chore that makes you want to move into a windowless apartment. Start small, pick one or two of these ideas, and see how they look. You can always add more next year. The best porches are the ones that reflect the person living inside—even if that person is currently wearing three layers of wool and a Santa hat.
Which of these ideas are you brave enough to try this weekend? Let me know in the comments, and if you’ve got a DIY disaster story of your own, please share it—I need to know I’m not the only one who’s fought a losing battle with a garland.