

I’ve spent more than a few winter nights staring out the window, watching the frost creep across the glass and wondering if my rosemary bush was currently turning into a popsicle. For years, I followed the “rules”—I bought the expensive frost blankets and the heavy bags of mulch—only to find that my garden still struggled. The truth is, plants don’t care about brand names or fancy gardening tech; they care about thermodynamics and wind protection.
Over time, I’ve stopped rushing to the garden center every time the forecast dips. Instead, I head to the garage, the recycling bin, or the kitchen pantry. These eleven methods might look a little eccentric to your neighbors, but they’ve saved my garden through some of the nastiest cold snaps I’ve ever seen. Here is how you can keep your plants thriving using a bit of grit and some very unusual household items.
1. The Thermal “Hot Water Bottle” Method
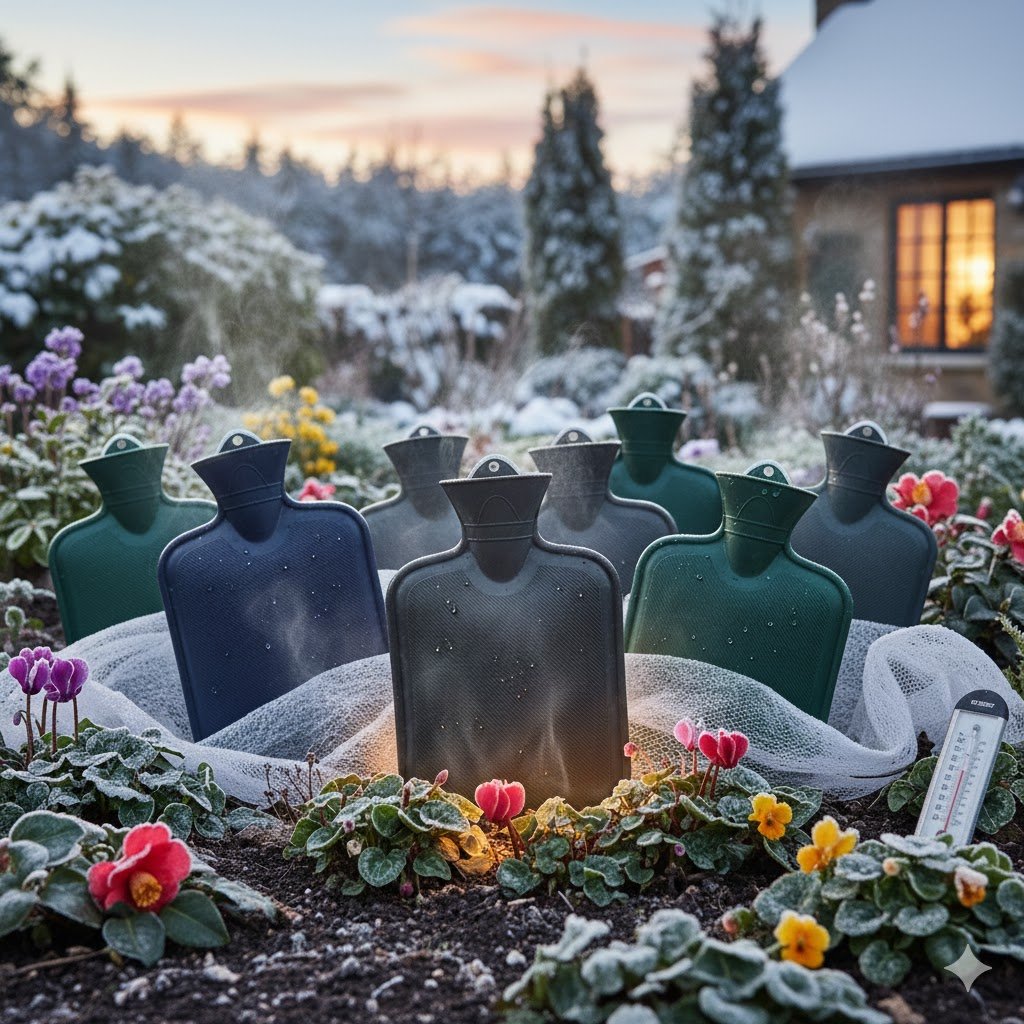
The first time I lined my garden beds with dark plastic jugs, I’ll admit it looked like I was running a miniature recycling center. But there is a very sound scientific reason for this: water is a phenomenal heat sink. By filling dark-colored gallon jugs with water and tuckingly them tightly against the base of your most sensitive plants, you are essentially creating a battery that stores sunlight.
During the day, those dark surfaces soak up every bit of solar radiation available, even when the air feels crisp. As the sun goes down and the temperature drops, the water inside the jugs begins to release that stored energy. It radiates a gentle, consistent warmth directly into the soil and the immediate air around the plant’s “feet.” It’s often just enough of a temperature buffer to keep the root zone from reaching a fatal freeze.
I usually keep my jugs from the summer—vinegar or juice containers work perfectly—and spray-paint them matte black if they aren’t already dark. Just make sure you don’t fill them to the very top; leave a little room for the water to expand if it does happen to freeze solid. Once the spring thaw arrives, you can just pour the water into your rain barrel and store the jugs for next year.
2. The “Cuddly” Cardboard Box Forts

Cardboard is one of the most underrated insulators in the world. We often forget that it’s essentially two layers of paper with a “waffle” of trapped air in between, which acts just like the insulation in your attic. When a sudden frost is predicted, I stop breaking down my shipping boxes and start hauling them into the backyard to build what I call “plant forts.”
The trick to making this work isn’t just plopping a box over a shrub. If you leave a big empty space inside, the air can still get quite cold. I like to fill the gaps between the plant and the box walls with dry leaves or straw. This creates a “nesting” effect that keeps the plant’s internal temperature significantly higher than the ambient air outside. It’s the plant equivalent of wearing a heavy parka.
To keep your forts from blowing into the next county, I always keep a few bricks or heavy stones nearby to weigh down the flaps. If you’re expecting a mix of snow or freezing rain, toss a cheap trash bag over the top of the box to keep the cardboard from getting soggy. Once the sun comes out and the temp rises above freezing, lift the boxes to let the plants breathe and prevent mold growth.
3. Incandescent Christmas Lights

There was a brief moment of panic a few years ago when I realized I’d replaced all my old Christmas lights with cool-to-the-touch LEDs. While LEDs are great for the electric bill, they are useless for a freezing lemon tree. I keep a few strands of the “old school” C7 or C9 incandescent bulbs specifically for the garden. These bulbs are inefficient, which is exactly why they work—they release about 90% of their energy as heat.
I string these lights through the interior branches of my more delicate perennials, making sure the bulbs aren’t resting directly against any dry, flammable mulch. When you wrap a light-strung tree in a layer of burlap or a light sheet, you’re creating a heated tent. The warmth from those tiny glass bulbs can raise the temperature inside that canopy by a crucial three or four degrees.
I’ve found this works best for those “fringe” plants that are just barely hardy for your zone. It’s a bit of a nostalgic sight, seeing the garden glowing under a layer of snow, and it’s a lot cheaper than buying a specialized plant heater. Just ensure you’re using outdoor-rated cords and a GFCI outlet to keep everything safe while you’re fighting off the frost.
4. The “Bubble Wrap” Greenhouse

Bubble wrap isn’t just for keeping your fragile deliveries safe; it’s a master-class insulator for container gardening. Most people don’t realize that a plant in a pot is far more vulnerable than a plant in the ground because the roots are exposed to the air on all sides. I’ve lost many a terra-cotta pot to the “freeze-thaw” cycle, where the soil expands and cracks the ceramic.
My solution is to wrap the pots—not the foliage—in several layers of large-bubble wrap. I secure it with some twine or packing tape, making sure the plastic extends from the rim down to the base. This traps a layer of still air around the pot, preventing the root ball from experiencing the wild temperature swings that lead to root death. It’s like giving your pots a quilted winter coat.
I usually leave the top of the soil open so I can still check for moisture, as winter wind can dry out a pot faster than you’d think. If the weather gets truly polar, I’ll wrap the entire thing, but I’m careful to remove the top layer as soon as the sun hits it. This method has allowed me to keep “borderline” plants on my patio all winter long without having to lug heavy containers into the garage.
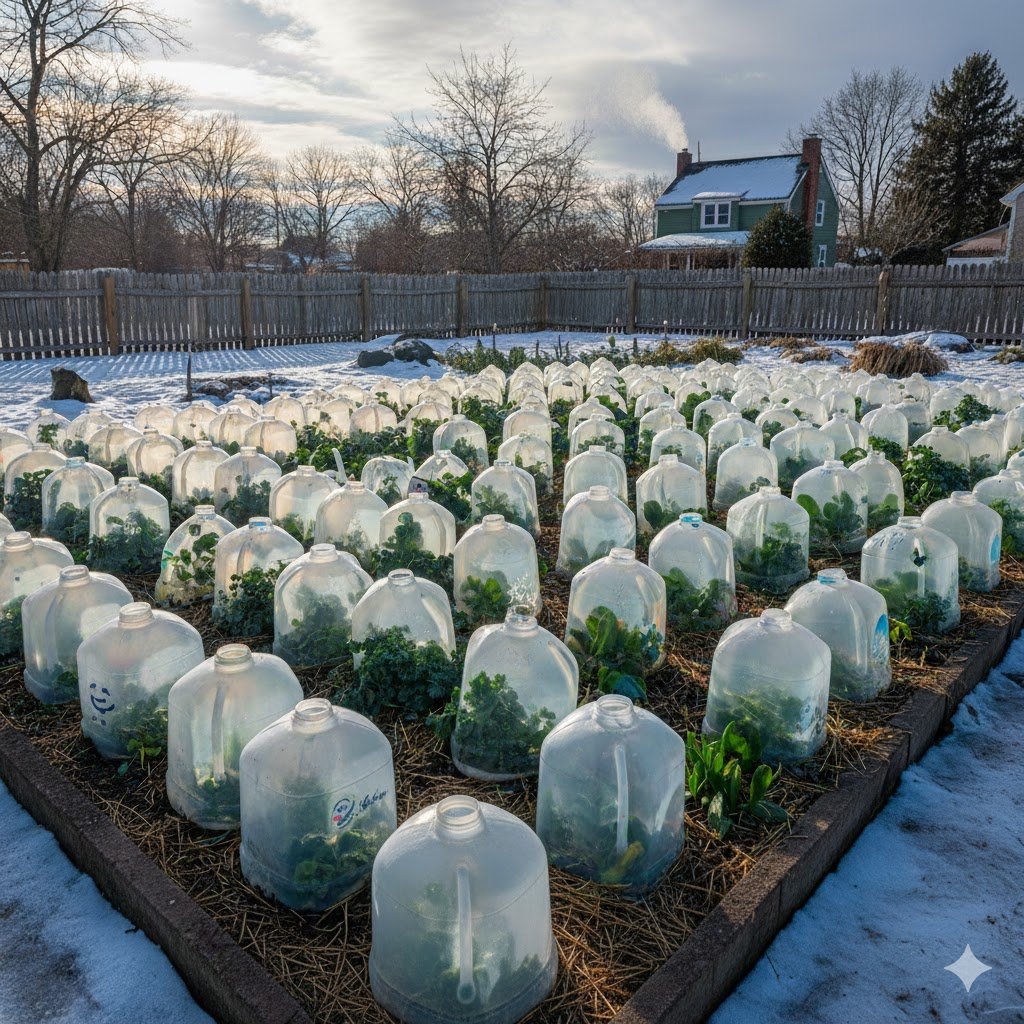
5. The “Cloche” of the Poor: Plastic Milk Jugs
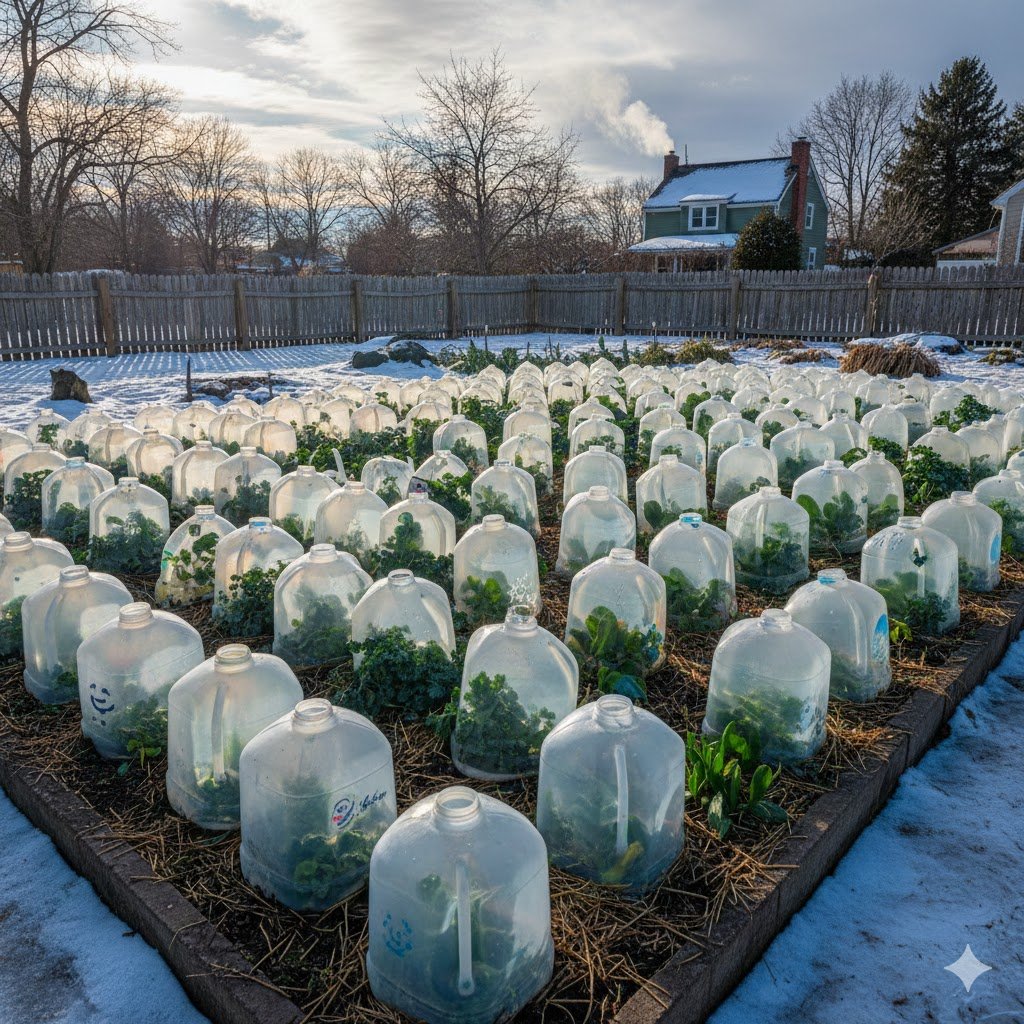
If you have a row of young seedlings or small herbs, you don’t need to go out and buy expensive glass cloches. I’ve been using clear plastic milk and water jugs for years, and they work every bit as well as the fancy versions. By cutting the bottom off a one-gallon jug, you create a perfect, individualized greenhouse that protects against both frost and the drying effects of winter wind.
The real “pro tip” here is in the cap management. During the day, even a cold winter sun can turn a sealed plastic jug into a miniature oven, which will wilt your plants in hours. I leave the caps off during the day to allow for ventilation. About an hour before sunset, I go around and screw the caps back on to trap the residual warmth of the soil for the night.
I like to use a small bamboo skewer poked through the handle and into the ground to keep the jugs from migrating across the yard when the wind picks up. It’s a simple, zero-cost way to extend your growing season. Plus, there is something very satisfying about seeing a tidy row of jugs protecting your future spring harvest while the rest of the world is dormant.
6. Upside-Down Terracotta Pots
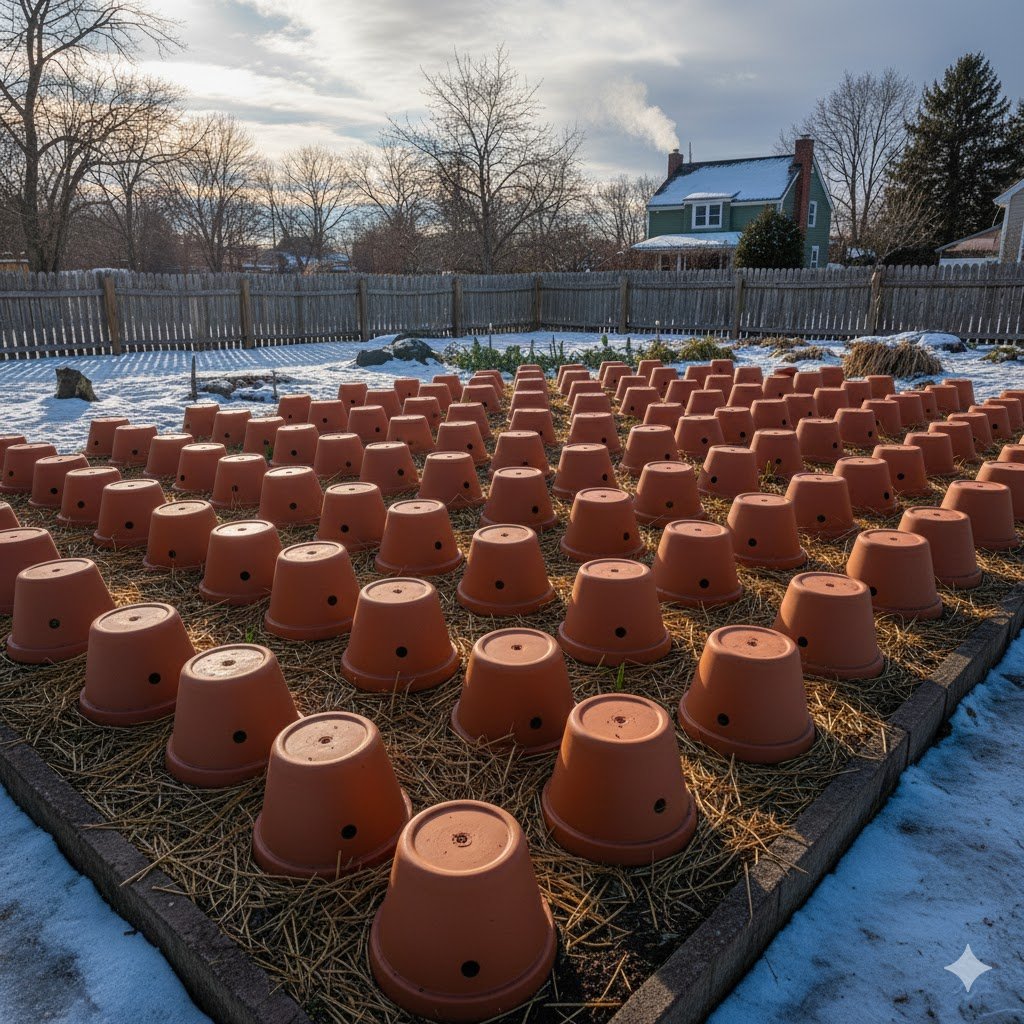
Terracotta is a natural material that breathes, but it also has a surprising amount of thermal mass. When I have small succulents or low-growing herbs that need a bit of extra shelter, I reach for my stack of empty clay pots. Flipping a pot over a plant provides a sturdy, heavy-duty shield against frost and freezing rain that won’t blow away like plastic might.
On particularly brutal nights, I’ve used a trick I learned from an old neighbor: the “candle heater.” If you place a small, stable tea light on a brick and then hover a large terracotta pot over it (propped up slightly to allow oxygen in), the clay will absorb the heat and stay warm for hours. It’s a controlled, low-intensity heat source that can keep a small area from dipping into the danger zone.
Even without the candle, the pot acts as a windbreak and prevents frost from settling directly on the leaves. I find this especially useful for things like sage or thyme that can handle the cold but hate being smothered by heavy, wet snow. Just remember to flip the pots back over in the morning so the plants can get their daily dose of light.
7. The Pine Needle “Mulch Volcano”

Standard wood mulch is great, but in the winter, it can sometimes become a soggy, matted mess that encourages rot around the base of your plants. I prefer using pine needles, or “pine straw,” for my winter protection. They have a unique shape that allows them to interlock, creating a fluffy, airy mound that provides incredible insulation without sacrificing drainage or airflow.
When a deep freeze is coming, I mound the pine needles right up and over the “crown” or the center of the plant. This is the most vulnerable part of many perennials. Because pine needles are naturally acidic and don’t break down quickly, they don’t get heavy when wet. They stay “springy,” which keeps a layer of air trapped right against the plant’s stems.
I’ve found that even after a heavy snow, the pine needle mound stays relatively dry underneath. It’s a fantastic way to protect roses or strawberries. In the spring, you don’t even have to remove it; just spread the needles out to serve as a weed-suppressing mulch for the rest of the season. It’s one of those “set it and forget it” hacks that actually works.
8. Buried “Lampshades”

If you’ve ever walked into a thrift store and seen those old, naked wire lampshades, you’re looking at a world-class plant protector. One of the biggest killers of garden shrubs in the winter isn’t actually the cold—it’s the weight of heavy, wet snow snapping the branches. I use the metal skeletons of old lampshades as “cages” to provide structural integrity to my smaller bushes.
I place the wide end of the frame over the plant and push the wire legs into the soil to anchor it. Then, I drape burlap or a light sheet over the wire. This creates a tent where the fabric never actually touches the foliage. This is key because if wet fabric freezes and touches your plant’s leaves, it can cause more damage than the frost itself.
The lampshade frame takes all the weight of the snow, allowing it to slide off the sides rather than crushing the plant underneath. It’s a bit of a quirky look, but it’s incredibly effective for protecting the “bones” of your garden. When spring arrives, these frames stack together perfectly in the corner of the shed, taking up almost no space.
9. The “Laundry Basket” Shield
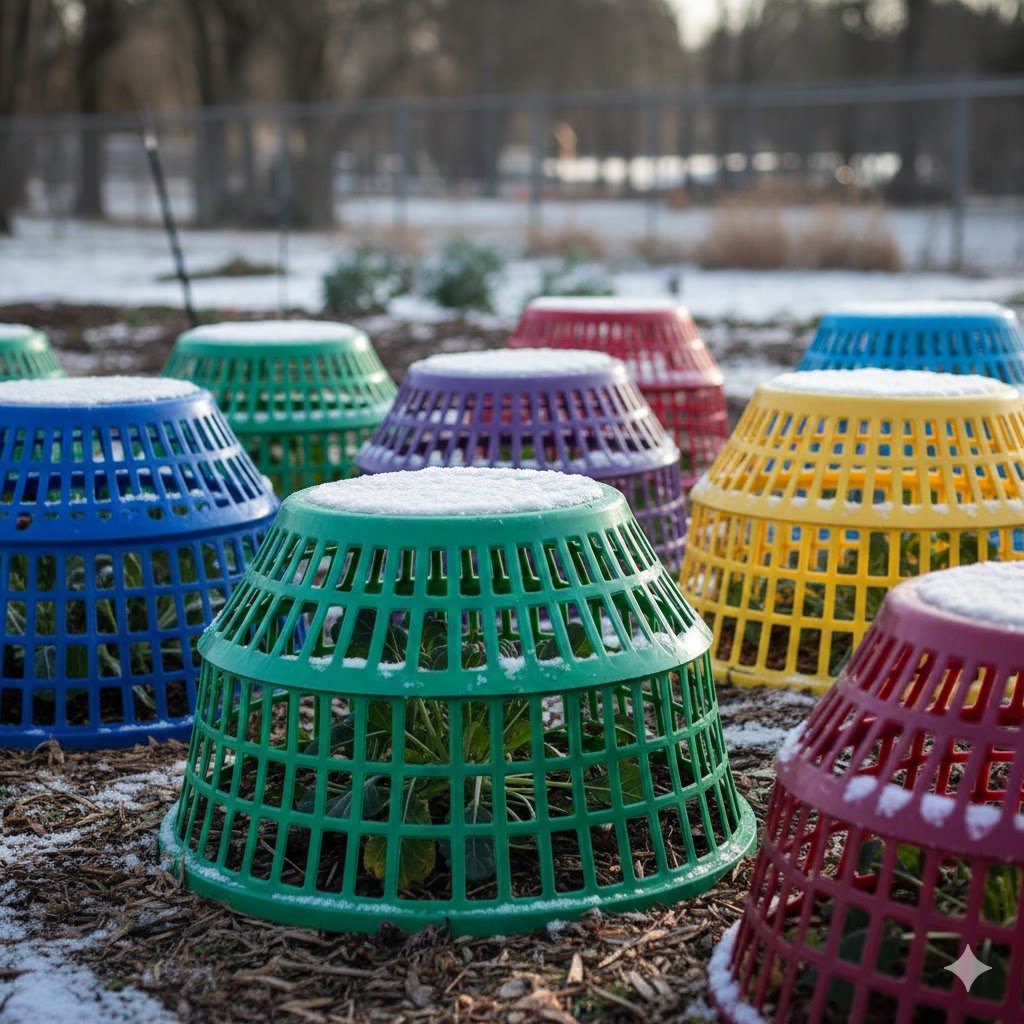
There is nothing quite like the panic of a sudden, unpredicted hail storm or a heavy, “heart attack” snow in late autumn. When I don’t have time to set up elaborate structures, I run to the laundry room. Plastic laundry baskets—the kind with the holes in the sides—are the ultimate “emergency” garden gear. They are lightweight, stackable, and surprisingly tough.
I flip the baskets upside down over my garden beds. The holes are the secret weapon here; they allow just enough airflow so the plant doesn’t overheat if the sun comes out unexpectedly, but the plastic grid is strong enough to break the force of falling hail or heavy snow. It’s like a suit of armor for your greens.
If the wind is howling, I’ll just toss a rock on top of each basket. It’s a five-minute solution that has saved my kale and spinach more times than I can count. When the storm passes, I can have the whole garden “uncovered” and the baskets back in the house in under ten minutes. It’s the fastest protection method I know.
10. Humidity Tents using Umbrella Frames

We’ve all had an umbrella succumb to a gust of wind, leaving us with a mangled mess of metal ribs. Before you toss it, strip away the fabric. Those metal skeletons are perfectly engineered domes. I use them to create “humidity tents” for plants that are sensitive to the dry, dessicating winds of mid-winter.
I stake the handle of the umbrella frame into the center of a garden patch and then drape clear plastic sheeting over the ribs. Because the ribs are curved, the plastic forms a natural dome that sheds water and snow beautifully. It creates a high-humidity microclimate inside that prevents the “winter burn” you often see on broadleaf evergreens.
It’s essentially a portable, collapsible greenhouse. I like this method because the “spider” shape of the umbrella ribs provides a lot of surface area protection without needing a dozen different stakes. It’s a great way to recycle something broken into something that gives life to your garden.
11. The “Anti-Transpirant” Spray
This is a method that feels like a magic trick. Instead of covering the plant, you “paint” it. Anti-transpirants, often sold as “Wilt-Pruf,” are made from natural pine resins. When you spray them on the leaves of evergreens like hollies or boxwoods, they create an invisible, flexible film that slows down the rate at which the plant loses moisture.
Most people think plants die in winter because they “freeze,” but often they actually die of thirst. When the ground is frozen, the roots can’t suck up water, but the winter wind continues to pull moisture out of the leaves. By applying this spray in late autumn, you’re essentially “sealing” the moisture inside the plant for the duration of the winter.
I’ve used this on my window-box greens and my foundation shrubs with great success. It doesn’t look like anything is there, but you’ll notice the difference in the spring when your plants aren’t covered in brown, crispy edges. It’s a “set it and forget it” strategy that works behind the scenes while you’re inside drinking cocoa.
Final Thoughts
The beauty of a winter garden isn’t found in a perfectly manicured row of expensive store-bought covers. It’s found in the clever ways we adapt to the seasons. When you start seeing your “trash” as potential garden tools—the milk jugs, the old lights, even a broken umbrella—you realize that gardening is as much about problem-solving as it is about planting. These oddball methods might look a little strange at first glance, but when your garden wakes up green and vibrant in the spring while others are staring at brown twigs, you’ll know it was worth the effort.